To avoid these ads, REGISTER NOW!

Leaking Taco pump

mx842

Well-known member
Joined
Feb 24, 2011
Messages
227
Location
Richmond Va
I'm still trying to get my heating system completed but it looks like every time I take one step forward something happens to drive me backwards. I didn't want to go through another season like last year when I had a leak in a couple of the boiler tubes in the wood heater that I thought I had gotten such a good deal on. The old saying, if it looks too good to be true it probably isn't was never truer than with this old heap of rusted iron.

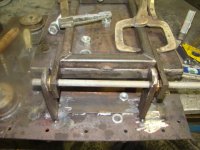
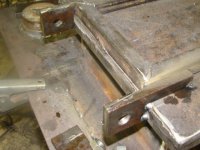
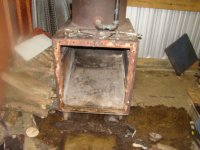
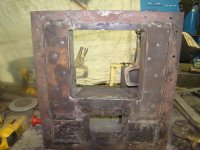
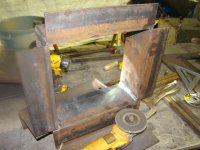
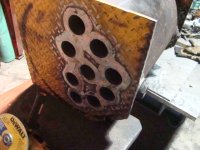
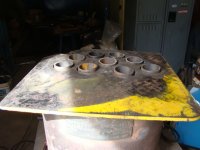
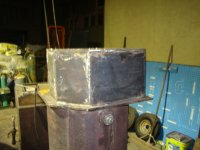
Money held me up from starting my new SS gasifier I want to build so I rebuilt my old wood boiler. I put on a new top and bottom plate and put in new tubes and filled in about a hundred or so pitted places in the old shell and when I was done it was good or better than when it was new.

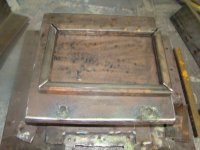
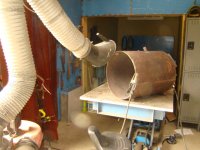
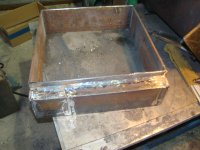
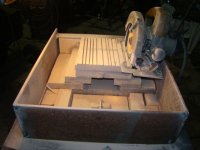
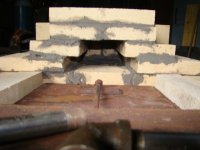
While I was at it I I wanted to play around with the notion I had for an updraft type gasifier type system. I built a box on top of the fire box and made a fire brick chamber for the smoke to pass through on it's way out of the firebox in hopes I could get a secondary burn. I placed a couple of air holes in the back of the stove right where the smoke would enter this super heated chamber with hopes it would aid with the secondary burn.

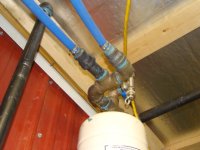
I didn't get a chance to really finish the whole thing like I wanted because we got our first really cold air a month early this year and I had to rush to get it hooked up. I still had a lot of work to do because I moved the stove from one part of the building to another which meant I had to run new plumbing, wiring, plus the room I wanted to put it in wasn't finished yet so I didn't know what I would end up with once I fired it up.

When you have your back to the wall it looks like all heck always breaks out to pile more on to what you have to get done and this time was no different. My wife's car broke down and I had to fix that so she could get to work. My truck needed to be inspected and there was a lot of work I needed to do to it before I could get it inspected. My wood spliter was broken and we were almost out of dry wood along with all the normal stuff that goes on around here.

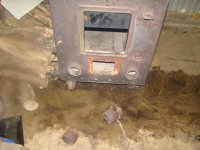
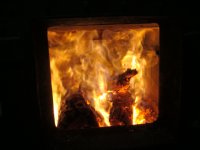
One day while I was trying to finish her car it was cold when I went into the shop and I didn't want to be laying on that cold concrete floor so the first thing I did was go to the boiler room and filled the old girl up with good dry wood and fired her up. At this point I really don't have any controls on it because I didn't want to have to spend a lot of money until I knew what I had and basically I was just looping the water through the system continually while there was a burn going on.

This morning it was cold, I was in a hurry so I figured I would shut the pump off and fire it up that way the water would heat up quicker than if it had water circulating through it all I had to do is not to forget about it. Well you know how that goes........:shocking: I went in the shop and started working because I knew I had 20 minutes of so before I would have 100 degree water and the first thing that happened was the power steering line I was trying to replace popped off and blew power steering fluid everywhere and I got busy trying to clean that mess up along with my wife yelling I need the car when is it going to be done and I forgot all about the boiler :scared:

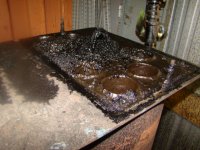
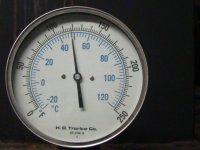
When I did remember I thought Holy Scheet! The boiler and as I ran in to the dark room the whole thing was glowing and I didn't know weather to run or try an get by it without setting myself on fire from passing by. I had to go passed it to get to the corner where I could plug in the wall switch to start the pump. First I had to push this melting plastic tub out of the way that was going to be a portable hot water storage tank so I could get back there. The stove was so hot I thought my pants were going to flame up before I got the tub out of the way so I could get in the corner.

I plugged the cord in and when I did water went everywhere. It was leaking out of the weep hole and now I was afraid I would be electracuted before being blown to bits by this ticking time bomb I was standing next to. At this point I was really considering running but then I thought...I still have the water line hooked up to the fill valve and I could dump cold water into the system to maybe cool the old girl down a little.....that is if the hose hadn't melted already. I eased around to the other side to where the hose bib is and luckily it was still hooked up and I opened the valve to the hose then opened the valve to the fill valve and ran like a bat out of hel cause I had no idea what was going to happen next. About 20 minutes later as I was standing in the cold from a vantage point of around a hundred feet from the building and decided it may now be safe to re-enter the building and when I went into the boiler room it was still hot as a desert in there but the boiler was no longer glowing. It had sprung a leak though and some water was leaking inside the firebox so I guess the cold and hot water didn't mix too well but at least it didn't blow up and I still had a building to work in.:3gears:

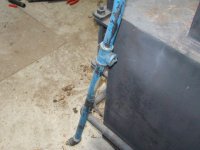
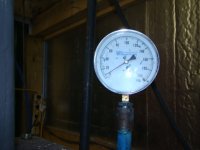
I don't know why the pump started leaking but now every time I start it, it leaks for a few minutes then quits. Some times it takes 10 minutes to stop some times it stops after a minute or so. It's a Taco 113 B4 inline pump that's supposed to be bullet proof. The problem is I bought it over a year and a half ago when I bought all my manifolds and pipping and it's been sitting on a shelf until now but the people I got it from says too bad, it's been too long ago since I bought it to do anything about it, which I can somehow understand a little.

I don't see how this could have damaged the pump because it was isolated from the boiler by valves and had plenty of feed water going to it when I opened the valves and turned it on. It seems to be working ok accept when I stop it and turn it back on but I'll have to fix it before I hook it up to controls. The leaking doesn't really bother me where it is but I wonder how long it will last like this before it breaks all the way.
 
To avoid these ads, REGISTER NOW!

Hpozzuoli

Well-known member
Joined
Dec 11, 2013
Messages
3,428
Location
Rhode Island
You can pull them apart easily. Like said above replace the seals or maybe reseat with some lube. Make sure the body is tight. I use taco as well and my hard water seizes them so I pull them apart and replace the impellers and clean the walls. I am guilty of reusing the seals.
 

anthony666

Well-known member
Joined
Dec 29, 2007
Messages
987
Location
kirkfield ontario
that is a lot of pump you have there, how did you come to spec it out ?? like these fellas you can swap seals in that bad boy

do you have a t&p valve on the old girl ?? you dodged a bullet for sure
 
OP
M

mx842

Well-known member
Joined
Feb 24, 2011
Messages
227
Location
Richmond Va
that is a lot of pump you have there, how did you come to spec it out ?? like these fellas you can swap seals in that bad boy

do you have a t&p valve on the old girl ?? you dodged a bullet for sure

that is a lot of pump you have there, how did you come to spec it out ?? like these fellas you can swap seals in that bad boy

do you have a t&p valve on the old girl ?? you dodged a bullet for sure

What da heck am I doing wrong here? Every time I switch a page on this board I have to log in again.

Yes it is a lot of pump but I bought it for something else I was working on that didn't pan out so I decided to use it to circulate the water through the boiler to my manifolds that are roughly 75 feet away. In the floor there are 7 loops that are between 250 and 300 feet each.

This was just going to be a temp setup until I could get the rest of the stuff needed to build my real boiler that hopefully will heat my house and my building. I had thought that by now I would have been able to get this done but the last couple years have been so slow that money is hard to come by so I'm in the do what I can mode.

My main objective with this old boiler was to just keep my slab from freezing and maybe provide a little comfort in the meantime until I could do better. So far it's doing that and the leak that popped up after the almost melt down has stopped after a couple days and hasn't leaked a drop since. That don't mean it fixed itself and will never cause problems again but at least it is still holding water for now. Hopefully it will stay like that for the rest of the winter until I can either build the new one of repair what is wrong with this one.

I know that an updraft type burn system doesn't work as well as a down draft system but the burn chamber I fabricated into this stove seems to be working fairly well. I have a Pyro meter that records temps to 2500 degrees and when I stick the probe into one of the air vents going into the burn chamber I'm seeing between 1900 and 2200 degrees depending on how it's burning at the time. I have between 300 and 400 degrees going out the stack. I don't know if that is good or bad but it seems to tell me that there is heat transfer going on somewhere.

Oh you mentioned a t&p valve? I'm thinking by that you mean a pressure relief valve? It never popped off until I dumped the water line pressure into the system. The valve is a 40 psi rated valve and the pressure gauge was showing 40 psi while all this was going on. My water pressure is around 50 psi down at the barn so I guess the water line pressure popped off the pressure valve.

I don't really know how hot the water was inside the boiler because my temp gauge stops at 160. When I first came into the room it was the first thing I saw. The 160 mark is at around the 8:00 o' clock position on the gauge and the needle had passed that and went over, and around to about the 4:00
o' clock position.

It was hot enough to burn off the end of the medal control rod I had attached to a sliding steel plate that was the damper to close off exhaust gas from going up the tubes and to force them to exit through the burn chamber.

And yes I'm thinking I used up at least one of my 9 cat lives on that one.:lol:
 
OP
M

mx842

Well-known member
Joined
Feb 24, 2011
Messages
227
Location
Richmond Va
You can pull them apart easily. Like said above replace the seals or maybe reseat with some lube. Make sure the body is tight. I use taco as well and my hard water seizes them so I pull them apart and replace the impellers and clean the walls. I am guilty of reusing the seals.

I pulled it apart yesterday and cleaned everything up then put it back together and it still leaked on start up. It stopped after a short while but I did notice that it would leak again if the pressure went over 7 or 8 lbs. That thing is supposed to be good for up to 125 lbs so something has gone wrong in the seal. Everything in there looked good though.
 

anthony666

Well-known member
Joined
Dec 29, 2007
Messages
987
Location
kirkfield ontario
glad to hear you have a t&p on there .. that's your first line of defense .. from what you're saying the boiler was glowing red & there was no circulation i would think any water that was in boiler would have been steam, it might have gone off and then closed again .. just to be safe i'd replace it, it's probably a 30 psi unit, that's a more common rating

take some pics sometime .. i'd love to see it
 
OP
M

mx842

Well-known member
Joined
Feb 24, 2011
Messages
227
Location
Richmond Va
that is a lot of pump you have there, how did you come to spec it out ?? like these fellas you can swap seals in that bad boy

do you have a t&p valve on the old girl ?? you dodged a bullet for sure

I have some pictures of when I was putting this thing together somewhere. I'll see if I can get them together and post them up if you really want to see them. BUT!! only if you promise not to laugh.:)
 
OP
M

mx842

Well-known member
Joined
Feb 24, 2011
Messages
227
Location
Richmond Va
glad to hear you have a t&p on there .. that's your first line of defense .. from what you're saying the boiler was glowing red & there was no circulation i would think any water that was in boiler would have been steam, it might have gone off and then closed again .. just to be safe i'd replace it, it's probably a 30 psi unit, that's a more common rating

take some pics sometime .. i'd love to see it

The actual heat exchanger wasn't glowing but the rest of the stove sure was. When I came down the hall way going into the boiler room there was a piece of that R Max insulation board sitting in the corner with the shiny side out and all I could see was this red glowing object and I thought the container was on fire. Then I realized it was the reflected light from the stove shining on the board glaring back at me.

I might take your advice and change out that valve. Something else I was wondering? Why would the water line pressure pop off the valve. This valve is not one like you get at Lowes or home depo. I got it from a boiler supply place and it was suppose to be what I needed. I'll have to look but I don't think it is a 30 psi.....it seems to me that it was either a 40 or 60 psi valve. I was thinking it was 40 because that is where it pops off when I apply water line pressure.

I know the one on my hot water heater is a 30 psi but why don't they pop off when connected to a unit that is hooked up to a water system with 50 psi?
 

anthony666

Well-known member
Joined
Dec 29, 2007
Messages
987
Location
kirkfield ontario
t&p stands for temperature and pressure .. a spike in either will make them open

hydronic heating system t&p's are usually 30 psi .. water heater versions are way higher, like 150 psi if memory serves .. because they have to deal with city/well pressure in the lines which is way higher .. around here city pressure is usually about 70 psi and well pressure i have seen anywhere from 40 to 120 psi

so when you hit the boiler with line pressure you exceeded the rating and it opened

if there's a 40 on there now you'd be fine to put the same one back on
 

LS6 Tommy

Well-known member
Joined
Dec 27, 2013
Messages
26,162
Location
Northern NJ
A water boiler T&P is NOT supposed to be rated that high unless the boiler itself is rated for 50 Psig. It should normally be 30 Psig. Either way, it has to be rated for the Btu output of the boiler. T&P valves are not all the same. If you're popping your boiler T&P, and the guage is at a normal pressure (around 12-15#), it's bad. if you're boiler pressure is above 12-15#, your PRV is bad. Using a city water "fast fill" can pop the T&P.

NEVER fast fill city water/cold water into an overheated boiler. It's a good way to get seriously killed.

Your water heater should have a 150 Psig T&P valve, NOT 30 Psig.

Tommy
 
Last edited:

anthony666

Well-known member
Joined
Dec 29, 2007
Messages
987
Location
kirkfield ontario
seriously killed

i'm planning on a humorous death, or maybe one involving lots of *****

but yea, i shoulda said that too, it's real dangerous to add a bunch of cold water, it turns to steam and there's pressure and all kinds of bad stuff can happen involving shrapnel .. not really a subject i should be making light of

glad things didn't go south
 
OP
M

mx842

Well-known member
Joined
Feb 24, 2011
Messages
227
Location
Richmond Va
Thanks guys, I learn something new everyday. For some reason I thought water heaters had 30 PSI ratings and never really thought about why they didn't pop off on well pump pressure. I guess that explains that, huh.:eek:

I wish I had, had my temp probe inside the burn chamber that day just to see how hot it was inside that bad girl. I didn't know what to do when I turned the pump on and water went everywhere. I didn't know if it was pushing water through it or not. I thought about throwing a 5 gal bucket of water in the firebox but it was so hot where the hose bib was I couldn't undo the hose so I just cracked the valve on the fill valve and turned the hose on a half turn or so and hauled azz. I did hear a pretty loud clunk as I went out the door but didn't stick around to see what it came from.:)
 

brewchief

Well-known member
Joined
Sep 20, 2008
Messages
2,370
Location
Michigan
Boilers use a 30# relief valve that doesn't sense temp like the t&p on a water heater, btu rating needs to be high enough to handle the max possible btu input, on a wood boiler i would think you would have to calculate the max amount of wood and see how many btus it could be to find the proper valve size.
Most wood boilers that I've seen were open systems so no relief valve needed.
Normal boiler fill valve is about 12-13#s, when hot should end up near 20# .
 

rburke65

Well-known member
Joined
Nov 10, 2007
Messages
12,349
Location
Canfield, Ohio
Anthony666..."i'm planning on a humorous death, or maybe one involving lots of *****"....sign me up for THAT plan.
 
OP
M

mx842

Well-known member
Joined
Feb 24, 2011
Messages
227
Location
Richmond Va
Boilers use a 30# relief valve that doesn't sense temp like the t&p on a water heater, btu rating needs to be high enough to handle the max possible btu input, on a wood boiler i would think you would have to calculate the max amount of wood and see how many btus it could be to find the proper valve size.
Most wood boilers that I've seen were open systems so no relief valve needed.
Normal boiler fill valve is about 12-13#s, when hot should end up near 20# .

Thanks, I was wondering about that because I didn't see anything on the tag about temp....just pressure.

Maybe you can help me out here. As I said this setup is just temp. but I want to start adding to my system as I can afford it to someday hopefully have it so I don't have to baby sit it the way I have to do now.

I have the boiler in one room in the back of the building and my manifolds are in the front part of the building. The pipe run between the two is around 75 feet. Right now they are connected by 3/4" pex for the feed and the return....that's all I had at the time.

I am now working on running a 1" black iron pipe along the same route as the pex is now and plan on combining the two 3/4 pex lines to make up the feed to the manifold and use the 1" pipe for the return. I want to add a expansion tank to the system and I also believe I need to add some type of air bleed valve to the system. I have an air bleed valve on my return manifold but the problem is that the feed and return lines are run high in the building. By that I mean the manifolds and the boiler are at about the same level but I had to elbow up about 8' vertical from the pump stationed at the boiler and then run along the wall then back down about 8' to the manifold.

I'm thinking I would need to put a air bleed valve somewhere up high on that long run being that this is the highest point in the system.??? I don't know if I need the expansion tank in the system as I never have gotten a straight answer on that as yet. Right now I think what I have would be considered a closed system and I have the tank and if I need it where would be the best place to install it? I would like to do it now since I am re doing my lines. I was thinking about putting them both where the line turns down into the manifold room on the cold water side.

Also, right now I don't have a mixing valved installed anywhere. The way it has worked out I have been able to keep the water temp.....well accept that one incident to around 120 degrees leaving the boiler and by the time it gets to the manifold it has dropped to between 85 and 90 degrees. The return water after the slab warmed up is running about 60 degrees. Some places in the floor are warmer than others but I think that will change when I get more water supply to the manifolds and get a chance to play with the flow rates from one loop to another.

I had to do this in a hurry to keep the floor from freezing early on in the season. I just ran out of time then got hit with a early cold spell. Now I am taking advantage of warm spells to improve my setup.

I'm thinking later on I will build an add on water storage tank to the system with hopes that I won't have to fire the boiler but once a day and have enough hot water to keep the floor at a constant temp rather than the way it has been so far.
 
To avoid these ads, REGISTER NOW!

oltruckag

Well-known member
Joined
Aug 10, 2007
Messages
171
Location
*******, GA
...

I am now working on running a 1" black iron pipe along the same route as the pex is now and plan on combining the two 3/4 pex lines to make up the feed to the manifold and use the 1" pipe for the return. I want to add a expansion tank to the system and I also believe I need to add some type of air bleed valve to the system. I have an air bleed valve on my return manifold but the problem is that the feed and return lines are run high in the building. By that I mean the manifolds and the boiler are at about the same level but I had to elbow up about 8' vertical from the pump stationed at the boiler and then run along the wall then back down about 8' to the manifold.

I'm thinking I would need to put a air bleed valve somewhere up high on that long run being that this is the highest point in the system.??? I don't know if I need the expansion tank in the system as I never have gotten a straight answer on that as yet. Right now I think what I have would be considered a closed system and I have the tank and if I need it where would be the best place to install it? I would like to do it now since I am re doing my lines. I was thinking about putting them both where the line turns down into the manifold room on the cold water side.
...

Yes on both the air bleeder and expansion tank. You really should have air bleeders anywhere air could get trapped in the system, but the expansion tank is CRITICAL in a closed system. Water, for purposes of discussion, is incompressible. When it's heated it expands, and this increase in volume without an expansion tank will result in a very rapid rise in pressure as the system is heated. At best you will pop the T&P or maybe split a line, worst case is a boiler explosion. It's very possible the seals in the TACO pump were the point of pressure relief when you overheated your system.

You should also ALWAYS have flow through the boiler when it's burning, and some sort of low water cut-out. As noted above, a dry hot boiler exposed to cold water is a bomb. Never open a fill valve on a hot & empty boiler.

I would highly suggest reading some books on hot water systems and installation manuals of boilers to get a better idea of what safeties are required in a system like this. Boilers, when designed with the proper safety systems, are completely safe if maintained. I wouldn't run the system again until you understand what is required to make it safe, and the hazards it poses if its not.

Please don't take what I've said as negative - this is all for your safety and the safety of others. Check google for osha reports of boiler explosions and youtube for some videos. There have been lots of deadly accidents with boilers, and I don't want you to have one.

Tyson
 
OP
M

mx842

Well-known member
Joined
Feb 24, 2011
Messages
227
Location
Richmond Va
Yes on both the air bleeder and expansion tank. You really should have air bleeders anywhere air could get trapped in the system, but the expansion tank is CRITICAL in a closed system. Water, for purposes of discussion, is incompressible. When it's heated it expands, and this increase in volume without an expansion tank will result in a very rapid rise in pressure as the system is heated. At best you will pop the T&P or maybe split a line, worst case is a boiler explosion. It's very possible the seals in the TACO pump were the point of pressure relief when you overheated your system.

You should also ALWAYS have flow through the boiler when it's burning, and some sort of low water cut-out. As noted above, a dry hot boiler exposed to cold water is a bomb. Never open a fill valve on a hot & empty boiler.

I would highly suggest reading some books on hot water systems and installation manuals of boilers to get a better idea of what safeties are required in a system like this. Boilers, when designed with the proper safety systems, are completely safe if maintained. I wouldn't run the system again until you understand what is required to make it safe, and the hazards it poses if its not.

Please don't take what I've said as negative - this is all for your safety and the safety of others. Check google for osha reports of boiler explosions and youtube for some videos. There have been lots of deadly accidents with boilers, and I don't want you to have one.

Tyson

No harm, no foul, I appreciate any input on this subject. I know the dangers involved with hot water systems and I searched the web for a year or so before I started my building project. The problem most do it your selfers have is that it is hard to get just plain facts without wading through all sorts of gimmicks, rip off's and people trying to sell you useless information and then the people that are trying to protect their trade.....which that part I can understand of-course.

I watched the Myth Busters show where they heated a water heater that they had disabled the pressure valve on and it in deed blow up, sending what was left of the heater through two floors and roof then a hundred feet or so into the air. Pretty cool stuff those guys do.:D

The problem is I have to at this point run the boiler at least once a day to keep some heat in the floor. It was never my intention to have a boiler in the building to begin with but with this great economy we have had over the past 4 or 5 years has caused me to do a lot of things I had not planned on. What I'm trying to do now is finish what parts of my building I can with what parts and pieces I have been able to get together and no matter what I try to do the heating system always seems to take the demanding role in everything that gets done these days especially when it's cold outside.

I had not worried about an expansion tank before because I was running the system open. As in running the system with an open storage tank in-between the stove and the manifolds. I was not able to get as much heat into the floor the way I had it set up so I decided to try it this way to see what would happen.

Once I found out that it worked better this way and burned less wood I decided to leave it this way and start adding the needed parts as time and money permits. My question about the tank was where to put it? Does it make a difference where it is in the system......on the hot water side.....cold side??? somewhere in-between maybe???
 

anthony666

Well-known member
Joined
Dec 29, 2007
Messages
987
Location
kirkfield ontario
split your manifolds and run another 3/4" pex line set if you are not getting enough flow .. it's almost impossible to balance to feed lines going to the same spot and one will end up doing the lions share of the work .. total waste

also, black iron is old school, just a huge source of system cloggin rust, keep it to a minimum

you're gonna need an expansion tank for sure, sized to the system .. it needs to be on the hot side, it handles THERMAL expansion .. ideally it should be mounted to the bottom of an air eliminator, it helps keep the air release mechanism from opening at the wrong time and letting air back in .. and just down stream of the main system pump, that's because that spot is the point of constant system pressure in a closed system

like has been said a way to vent air is a good call .. you could use a maid of the mist style air vent at the highest spot http://www.maid-o-mist.com/index.html .. just make sure you add checking it for operation to your yearly maintenance schedule, they clog up really fast in a hard water scenario

thermal storage tanks are a great add on to wood boiler setup .. there's tons of write ups on building tanks on the net so i won't go into it here
 
OP
M

mx842

Well-known member
Joined
Feb 24, 2011
Messages
227
Location
Richmond Va
split your manifolds and run another 3/4" pex line set if you are not getting enough flow .. it's almost impossible to balance to feed lines going to the same spot and one will end up doing the lions share of the work .. total waste

also, black iron is old school, just a huge source of system cloggin rust, keep it to a minimum

you're gonna need an expansion tank for sure, sized to the system .. it needs to be on the hot side, it handles THERMAL expansion .. ideally it should be mounted to the bottom of an air eliminator, it helps keep the air release mechanism from opening at the wrong time and letting air back in .. and just down stream of the main system pump, that's because that spot is the point of constant system pressure in a closed system

like has been said a way to vent air is a good call .. you could use a maid of the mist style air vent at the highest spot http://www.maid-o-mist.com/index.html .. just make sure you add checking it for operation to your yearly maintenance schedule, they clog up really fast in a hard water scenario

thermal storage tanks are a great add on to wood boiler setup .. there's tons of write ups on building tanks on the net so i won't go into it here

I ran the 1" black iron line and got everything hooked up at both ends. I broke my water line where it comes into the building. Before I poured my floor I made up 2, 1" pex lines that were wrapped in 3 layers of insulation wrap then placed in plastic 4" drain tile and ran it out into the yard where I hope my future outside boiler will live. I laid my water line in the same ditch and where it came through the floor with all the other stuff that was stubbed in at the same place made it a real bear to work around.

I ran the iron pipe to the point right above where the manifolds are and then came down inside the wall with a short piece of 1" pex I had left over. That worked out nicely and now if I ever decide to replace that iron pipe run I wont have to worry about pulling it down into the wall and disturbing all that mess that's in there now.

I say it went nicely but that's how I broke my water line. That stiff azz 1" pex was almost as hard to feed down the wall as the iron pipe would have been. The way I had the water line plumbed was temp anyway so it gave me the chance to fix it like it should be so that is one thing I can mark off my to do list. I didn't however like that cold water shower I got for my trouble.:shocking:

I know.....black iron would not have been my first choice but that was all I had. It wasn't all that fun working with those 20' pieces of pipe in a room that is already so full of stuff that you can hardly get around in. I wanted to keep them at full lengths if possible to keep from having to thread so many ends and to hold down the amount of connecting points. I was short on fittings too. When I filled the boiler again last night I only ended up with one small leak and that will be easy enough to fix because it's right in a corner and there is a union right there too. When I put the union in I probably just didn't tighten that short stub to the elbow in the corner. I would have fixed it last night but I was so tired when I finally got the boiler fired I just sat there in the warm boiler room and drank a couple cool ones listening to some classic rock on the radio while watching my temps and pressures as the water heater was coming up to speed.

I didn't have one of those fancy thermal eliminator fittings to attach my expansion tank to. I did have a 1" brass 4 way 'T' and put the tank on the bottom hole, an inlet, the top hole I put one of my spare air bleeders that was on one of my manifolds, and the last hole for the outlet to a makeshift manifold I made up to connect the 2 pieces of 3/4 pex going to the hot side of the manifold. It may not be the prettiest thing in the world but hopefully it works well enough to get me through this season or until I can do better.

While I was running pipe I stubbed in a 3/4" line off the main hot feed with a shutoff valve and another 3'4 line was stubbed into the return where it goes into the boiler. I have a 25 gal SS fuel tank I made years ago that I never used and I thought about pulling off some of the hot water from the hot side running it into this tank then using it to temper the cold water going into the boiler. I'll mount this tank to one side of the boiler where it's really always hot and hopefully capture some of that heat also. I can insulate the outside of this tank in hopes that water will stay hot longer in-between burns thus increasing my overall water capacity. I don't know if it will work but it's worth a try I guess.

While at it I also plumbed in a boiler drain and I had another 1" brass 4 way 'T' that I placed on the hot water outlet. One opening I put my temp gauge, the center one I placed the pressure valve and the other was water out. The temp gauge works much better here that where I had it before. I plumbed the outlet from the pressure pop off valve off to the side and down to the floor drain. I also put a 'T' in that line where I may put a line into the firebox to kill the fire in case of some kind of pressure overload. I'll put a valve on this line where I can shut off this stub into the fire box for when I'm working on the boiler so I don't kill my fire when I'm working on it.

I'm going to take some pics of what I have now as I can't seem to find the ones I took earlier. Sorry for such long post.
 

mygarageone

Well-known member
Joined
Oct 16, 2013
Messages
2,691
Location
Munising , Mich
Anthony and I have discussed the term T&P valve for boilers . They are pressure only and in my neck of the woods are nor ever have been call t&p valves only pressure relief valves.
Though , believe it or not I found the term for a boiler press relief vale listed as a T&P on the Internet by a so called control/ boiler expert.
Go into any supply house and ask for a boiler t&p valve , they will look at you funny.
 

dogdog

Well-known member
Joined
Nov 15, 2011
Messages
12,711
doesn't wood burning boilers have some sort of lwco ? at least use it with an automatic feeder to refill your water if it is low?
 
OP
M

mx842

Well-known member
Joined
Feb 24, 2011
Messages
227
Location
Richmond Va
MX- have you spent any time here?
http://www.hearth.com/talk/forums/the-boiler-room-wood-boilers-and-furnaces.13/
they seem to be a good bunch of folks who could help you with your system design.

Come to think about it I have been over there but it's been awhile. They seemed to be a pretty close nit group and hard to get into the click over there. I asked a couple question but never got much in the answers department. Maybe I just hit them at the wrong time. Thanks for the reminder.:thumbup:
 
OP
M

mx842

Well-known member
Joined
Feb 24, 2011
Messages
227
Location
Richmond Va
I went looking for some of my old pics of when I first got this old heater but now I remember the computer I had them on crashed and I lost all of them. I reworked this thing several times trying to get something out of it. Once I realized the tubes had burned through I tried running a loop of tubes through the firebox to try an get some heat in the water just to save the slab. I got it going and was hopeful it would get me through the winter but it pooped out right when the coldest weather of the season hit so I had to do something.

Just the 2 loops through the firebox brought the floor temps back up from 28 degrees in places to 45 and even 55 in one or two spots. I made it through that winter like that but the loop inside the firebox took up so much room it was hard to load it and get enough wood in it to last the whole night so I knew I had to do better than that.

I wish now that I had went on and cut a hole in the bottom of the thing and made it a down draft system but decided it would be easier to just modify what I had. As it turns out it would have been easier to go with the down draft.

This is what I started out with http://www.garagejournal.com/forum/attachment.php?attachmentid=406867&stc=1&d=1421677866

I know it doesn't look like much but I had high hopes it would get me through a couple winters until I could get my new stainless steel one built. But, as I said it didn't make it through the winter before I had to work on it.

When I found out the tubes were bad it wasn't that cold so I decided to shut it down and had in mind to rebuild the heat exchanger right then but decided I didn't have that much time so just made a couple mods that I wanted to do. When I took the heat exchanger off the firebox I thought I had found the leak and I fixed that one and while I was at it I decided to go ahead and start what my original plan was and that was to try to modify it in hopes to get a secondary burn. I added a piece of thick plate to the top to act as a baffle and built a small drop down chamber in the back and placed several short pieces of 2"X 2" sq tube in a somewhat circular pattern for the gas to exit through. I was hoping this would force the gases to exit in a circular motion and the plate in that area would get hot enough and with a small amount of air injected in that area it would ignite the gas for a hotter burn. I never did find out weather this would work because, well I fixed one hole but there was several others that were still leaking and I never could get it to burn right without stopping up the stack. That is when I just drained the exchanger and routed a couple loops through the firebox to get by because it had gotten really cold by then.

I also went ahead and added an extension to the loading door which really helped.
 

Attachments

  • down view.JPG
    down view.JPG
    122 KB · Views: 13
  • block off plate sitting in place.JPG
    block off plate sitting in place.JPG
    114.6 KB · Views: 13
  • rear gas burner outlet.JPG
    rear gas burner outlet.JPG
    123.2 KB · Views: 12
  • side view of down force plate.JPG
    side view of down force plate.JPG
    106.5 KB · Views: 12
  • view 2 of block off plates.JPG
    view 2 of block off plates.JPG
    112.7 KB · Views: 12
  • Huston we have a problem.JPG
    Huston we have a problem.JPG
    114.4 KB · Views: 12
OP
M

mx842

Well-known member
Joined
Feb 24, 2011
Messages
227
Location
Richmond Va
The front of the stove had a door with a stupid flapper that was supposed to keep the smoke from getting out when you put wood in it but it was a real pain because it still let smoke out and made it really a pain to get wood into the firebox. While I had it down I went ahead and added an extension to the door and also made the opening larger and removed the silly flapper.

Making the opening larger meant I had to make a new door also. I eventually plane on making this a water cooled door I just didn't have time to work out all the details with the time frame I was working with.
 

Attachments

  • hinge post tacked in place with pin and bushings in place.JPG
    hinge post tacked in place with pin and bushings in place.JPG
    115.6 KB · Views: 8
  • hinge pin holes drilled.JPG
    hinge pin holes drilled.JPG
    111.8 KB · Views: 8
  • door layup.JPG
    door layup.JPG
    115.6 KB · Views: 8
  • removed front warped front cover plate.JPG
    removed front warped front cover plate.JPG
    116.8 KB · Views: 8
  • extention installed and opening cut out.JPG
    extention installed and opening cut out.JPG
    124.9 KB · Views: 8
  • new door extention.JPG
    new door extention.JPG
    125.2 KB · Views: 9
  • old front view flapper was a pain in da azz.JPG
    old front view flapper was a pain in da azz.JPG
    115.3 KB · Views: 8
OP
M

mx842

Well-known member
Joined
Feb 24, 2011
Messages
227
Location
Richmond Va
Well that was then so now its time to fast forward to this year. I didn't want to have to replace the round portion of the heat exchanger because I couldn't find any material that size so I had to repair what I had. There were a bunch of pitting inside that I had to clean out and fill in with weld to make it solid again. On projects like this I always try to use what material I have on hand to do what I need to do. For the top and bottom plates I had a piece of 1/2" diamond plate laying around that I could get enough material out of to make up these two pieces. If I knew then what I know now I would have used something else because the diamond pattern caused me many problems with fitment and welding but live and learn I always say.
 

Attachments

  • DSC03451.JPG
    DSC03451.JPG
    123.3 KB · Views: 10
  • DSC03448.JPG
    DSC03448.JPG
    121.9 KB · Views: 10
  • DSC03447.JPG
    DSC03447.JPG
    104.4 KB · Views: 9
  • DSC03421.JPG
    DSC03421.JPG
    141.8 KB · Views: 9
  • DSC03415.JPG
    DSC03415.JPG
    113.4 KB · Views: 9
  • DSC03417.JPG
    DSC03417.JPG
    126.2 KB · Views: 9
  • DSC03416.JPG
    DSC03416.JPG
    117.2 KB · Views: 10
OP
M

mx842

Well-known member
Joined
Feb 24, 2011
Messages
227
Location
Richmond Va
I wanted to add a burn chamber to the boiler so I had to build a extension box between the stove and boiler then build the smoke oven inside this box. But first I had to cut out that set of sq tubes I had spent so much time putting in last year. I think it took longer to cut it out than it did for me to weld it in.

once it was cut out I then built my brick oven. I wanted it to be at least 3 layers high to give it enough strength to stay together but it ended up being a little high for the medal I used for the box so I had to trim it down a little. When it was all bricked in and the box fitted in around it I thought it turned out pretty good......but will it work?
 

Attachments

  • DSC03475.JPG
    DSC03475.JPG
    129.9 KB · Views: 9
  • DSC03470.JPG
    DSC03470.JPG
    128.3 KB · Views: 8
  • DSC03469.JPG
    DSC03469.JPG
    115 KB · Views: 8
  • DSC03461.JPG
    DSC03461.JPG
    109.7 KB · Views: 9
  • DSC03457.JPG
    DSC03457.JPG
    107.1 KB · Views: 7
  • DSC03454.JPG
    DSC03454.JPG
    108.6 KB · Views: 7
  • DSC03452.JPG
    DSC03452.JPG
    102.6 KB · Views: 7
OP
M

mx842

Well-known member
Joined
Feb 24, 2011
Messages
227
Location
Richmond Va
The hole in the front is a port hole to observe the burn chamber. I also had to fab in a box on top so that I could get access to the fire tubes so I could clean them. For this I used a 3" flange I had laying around and for the gas exit for the smoke pipe I used a 6" flange. When I cut out the hole for the flu exit I left about 3/8's of an inch all around for the 6" piece of black iron pipe I used for the stove pipe to sit on. I didn't want it welded in because it is so heavy and if I need to take the heat exchanger off the stove I want to be able to disconnect the pipe to do service work on it.

I had already installed a piece of 1" box tube inside the firebox to feed air into it. I used 1" black iron to feed the air outlets and routed a line to the back of the stove to feed the air injection ports going into the burn chamber. I have some more work to do to the air system. I want to run the main air line to the outside of the building to draw in outside air and to get that noisy blower motor out of the room. I'll have to build a lean to on that side of the building to hold fire wood and have a place to keep this blower motor dry but that later on down the road.
 

Attachments

  • DSC03553.JPG
    DSC03553.JPG
    107.5 KB · Views: 8
  • DSC03557.JPG
    DSC03557.JPG
    112.4 KB · Views: 8
  • DSC03558.JPG
    DSC03558.JPG
    110.4 KB · Views: 8
  • DSC03552.JPG
    DSC03552.JPG
    118.7 KB · Views: 10
  • DSC03505.JPG
    DSC03505.JPG
    112.7 KB · Views: 8
  • DSC03503.JPG
    DSC03503.JPG
    111.8 KB · Views: 8
  • DSC03485.JPG
    DSC03485.JPG
    120.6 KB · Views: 8

Punchwood

Well-known member
Joined
Sep 7, 2013
Messages
332
Location
Western NY
AYE NYE !!!!!!!! Subscribed. This just has fail written all over it. Remember, while your system may be temporary, dismemberment and death aren't.
 
OP
M

mx842

Well-known member
Joined
Feb 24, 2011
Messages
227
Location
Richmond Va
AYE NYE !!!!!!!! Subscribed. This just has fail written all over it. Remember, while your system may be temporary, dismemberment and death aren't.

Trust me.....I don't want to die. At 68 I still have a few more years left to enjoy life but if I had listened to all the nay sayers a couple years ago I wouldn't be this far along with my building/shop project. I've learned a lot fooling with this old hunk of junk and it may not be pretty it is doing all it needs to do for now.

Hopefully I'll learn enough about these things so when I build my SS one I won't have as many problems as I have had with this one.

Thanks for your vote of confidence. :beer:
 
OP
M

mx842

Well-known member
Joined
Feb 24, 2011
Messages
227
Location
Richmond Va
I ran out of time yesterday so i'll add a few more pics today while I have a break.

As I said I had planned to add a new 1" line and combine the 2 3/4 lines for the feed to the manifolds. While I was at it I completely re-plumbed the whole boiler and moved a few things around so that hopefully things would work better. The only thing I'm not sure of is where I have my pressure valve. I put it in the outlet 4 way 'T' straight out from where the water exits the top of the boiler...see pic below...........
 

Attachments

  • DSC03568.JPG
    DSC03568.JPG
    118.1 KB · Views: 7
  • DSC03573.JPG
    DSC03573.JPG
    103.1 KB · Views: 8
  • DSC03572.JPG
    DSC03572.JPG
    116.2 KB · Views: 9
  • DSC03571.JPG
    DSC03571.JPG
    106.7 KB · Views: 8
  • DSC03555.JPG
    DSC03555.JPG
    114.7 KB · Views: 8
  • DSC03552.JPG
    DSC03552.JPG
    118.7 KB · Views: 11
  • DSC03556.JPG
    DSC03556.JPG
    114.1 KB · Views: 9
OP
M

mx842

Well-known member
Joined
Feb 24, 2011
Messages
227
Location
Richmond Va
That tank in the last pick is the old fuel tank I built that I plan to bleed off a little of the hot feed water and reroute back into the return water to temper it a little with hopes of getting a little better response time.

These last few pics are of the last time I fired the boiler to see if everything was working and to check for leaks. I did pretty well considering the wood I put in there. The wood has been on the ground for several years but it was wet from the last ice storm we just got.

The last pic is the mixing valve I may put at the manifold if I find I need to. I don't plan on firing it to the point it's making much hotter water than 115 to 125 degrees right now and I can do that easy enough by how much wood I put in it and how long I run the blower pushing air into the fire box.
 

Attachments

  • DSC03584.JPG
    DSC03584.JPG
    114.3 KB · Views: 8
  • DSC03592.JPG
    DSC03592.JPG
    73.4 KB · Views: 8
  • DSC03570.JPG
    DSC03570.JPG
    97.2 KB · Views: 8
  • DSC03596.JPG
    DSC03596.JPG
    95.7 KB · Views: 7
  • DSC03595.JPG
    DSC03595.JPG
    90.4 KB · Views: 9
  • DSC03594.JPG
    DSC03594.JPG
    85.5 KB · Views: 8
  • DSC03579.JPG
    DSC03579.JPG
    113.7 KB · Views: 7
OP
M

mx842

Well-known member
Joined
Feb 24, 2011
Messages
227
Location
Richmond Va
Anthony 666.....I was wondering what you thought about the way I had the pressure valve installed in the system. You asked for some pics of my setup:scared:........is it that bad that you can't stop laughing long enough to post back your thoughts?:) I really would like to see what you think and would appreciate any thoughts you might have on how to improve my setup.

I went back over the new pipe I installed and fixed the leak I had. It works a lot better now that I have more flow. I did have trouble with one of the 3/4 lines with and air block but once I got the air out of that line it worked just fine. Now the 2 loops in the back manifold have a good flow of hot water where before there was almost none.

I thought about splitting them like you suggested but that second manifold only has 2 loops it's feeding. There are a couple left that I have blocked off that I could use later if needed for radiators or to heat parts washing solution in a parts cleaning tank in a back room. If I need to later I can do that easy enough. If I decide to leave this thing where it is I will have to replace all those lines anyway and replace that iron pipe and those 2, 3/4 lines with 1" pex but for now that part of the system seems to be working fairly well.
 
To avoid these ads, REGISTER NOW!
Top Bottom