

This summary is to try to close some of the gaps I found when trying to find out info for my epoxy floor project. The search tool is great, but I spent hours getting nuggets of info here and there. In addition, Legacy Industrial’s instructions are short of details, and while Scotty is great with individual customer service, the information he shares doesn’t appear to make it back into the instructions.
First note- it isn’t clear on their site, but some of Legacy’s products are not allowed in Los Angeles due to the AQMD rules. This can be a surprise, and a challenge.
Prep:
Grind vs etch: Goal for this 600 sq ft project (200 sq ft workshop connected to a 400 sq ft garage) was to have a smooth surface for a creeper to roll on. Flatness was a ‘nice to have’, but unlikely due to the waviness of the existing 1950’s concrete. Acid etching was eliminated due to nearby drywall, plants, and the clean up mess. Los Angeles area vendors that would grind or level wanted >$2k, so grinding was ‘insourced’ for cost savings. 2 grinding options were considered- diamond cup or Diamabrush, and, in the end both were used. The diamond cup efficiently cut down high spots, and the Bosch 1773AK 5in shrouded grinder and Makita filter cleaning vacuum were found on E Bay and Craigslist. These were great tools and worth the money, but E bay and craigslist will likely be used again when finished to offset the cost. A Makita 4.125in crack chaser blade in an angle grinder was used to open up the cracks for gel epoxy filler HD-821.
Lessons learned:
For vacuums with self cleaning filters, the dust bags were not good for concrete grinding. The dust bag would reduce suction within a few minutes, and negated the function of the self cleaning filter. The standard non-HEPA filter was excellent for dust control, even with eventual ~100+lb of concrete dust generated.
The Bosch diamond cup wheel lasted about 300 ft sq. A DeWalt 4.5in DW4774 cup wheel worked just as well, was much cheaper, and was locally available at Lowes. Amazon Prime also has these for a very low price. The downside is that the wheel ends up 0.25in further away from the drywall than the Bosch 5in wheel.
The diamond cup was effective to shave the peaks and minimized the low spots, so much less epoxy patch was needed than first thought.
Diamond cup wheel grinding kiss marks could be minimized by moving in 1ft circular orbits, but adjusting the vacuum suction down was also helpful. Kiss marks were still visible, so a rental 16in Diamabrush from Home Depot was used to finish the surface. Their floor buffers have recently become available with dust collection in my area, and the dust shrouds worked well. One tip- I had to use 2 velcro dust shroud rings to cover the exposed height of the Diamabrush.
Patching:
HD-105 2 part epoxy with sand filler was used. A small mixing paddle from Home Depot helped get a quick mix since the pot life is <40min. Pint sized batches were made by weighing the different parts on a digital postal scale. 1in deep patches used more sand in the mix. For 0.25in valleys, less sand was used to get better feather. For 0.125in valleys, HD-105 didn’t work well since the sand is so coarse. Clean up, however, worked surprisingly well with Windex.
HD-821 was used for crack filling and to fill in the shallow voids that HD-105 couldn’t fill. Re-grinding could be done the next day, full cure was not required. This gel had a tendency to sink in after application, and needed to be reapplied within 24hrs. All told, too much time was spent on filling small holes when the primer and the flakes covered so much.
Primer:
Since the concrete had many small holes (pencil lead size), a primer would help fill in the holes to maximize the yield of the epoxy. HD-829 pourable filler was mistakenly sent for use as a primer, and this didn’t work and had to be ground back off. A 2nd rental of the Diamabrush was required to remove the mess, and this time, it was a bear of a job to remove 100 sq ft of the HD-829. The material was still soft enough to grip the diamond abrasive and cause a strong torque reaction. The diamond cup worked better in this case, and the Diamabrush was used to smooth out the kiss marks.
HD-139 primer was sent as a replacement. For novices in epoxy, apparently any 100% solid product needs to be poured onto the cool concrete after mixing. This was clear in the epoxy coat directions, but wasn’t in the primer instructions, so the first batch was ruined within a few minutes of mixing. The chemical reaction was hot enough to melt the bucket. Lesson learned. After that, the primer application went really well. A straight edged driveway squeegee from Home Depot was used to spread it out before backrolling, and the yield was impressive- just over 2 gallons total was needed to cover all 600 sq ft. One batch was used for the 200 sq ft workshop, and once confident, the 400 sq ft garage was done in one batch as well. Spiked shoes from e bay (with locktite applied) were used. Almost no cut-in was needed since the roller was able to get up to the drywall and baseboards would be applied later in any case. Bubbles formed in the primer after drying, some were small, but some were as large as a pencil eraser. A razor blade was used to trim flush.
Epoxy:
After the learning curve with primer, the epoxy went smoothly. A Michigan Rake notched trowel from Zoro tools was used to spread the material to a reasonably consistent thickness, and then backrolled. Again, almost no cut in helped to save time with the short pot life. The 200 sq ft workshop was done in 100 sq ft batches and flakes were applied after both batches were down. The 400 sq ft garage was done in 200 sq ft batches after gaining confidence with the smaller batches in the workshop.
Flakes were applied with a 1 quart plastic tub with 1/4in holes drilled in the lid. 1lb per 100 sq ft was used in the workshop. This application method was slow and the lesson learned was that the flakes have a fair amount of very small chips in them that would come out of the shaker at random times. If hand broadcasting was done, this would likely have been avoided. Lesson learned. For the garage portion, 1.25lb per 100sq ft was used, and this was filtered with a kitchen sifter before going in the shaker. The holes were opened up to 5/16in. Of note, this medium flake was very effective for covering any defects in the floor.
Urethane Clear:
HD-030 low VOC clear was used over the flakes. No anti slip was added for several reasons. Los Angeles rainfall is unfortunately very low, so water was not persistent concern for slippage. The medium flake chips also provided a fair amount of texture. Finally, comments about floor cleaning issues with sandpaper-like finish when anti slip is used was considered a negative. The HD-030 has since been replaced by Legacy with something different. Application with a roller was like normal paint, no short pot life concerns. Noteworthy, however, is that tires are leaving yellow marks that don’t clean off, even with automotive polish. This was frustrating, as no cause or solution has been identified by Scotty. Hopefully the newer urethane doesn’t yellow under tires.
For folks that are in the Los Angeles area, I have significant leftovers that can get someone else started on their project. Send me a note if you are ready to start, I am in Redondo Beach.
HD-105 Repair kit- small portion
HD-829 Pourable filler- just under 2 gal total
HD-139 Flex Primer- just under 2 gal
HD-030 Urethane- 1 gal – note concerns listed above
HD-HWS anti slip – 2 pints
Spiked shoes
Notched rake
Pete
Attachments
-
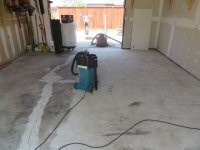 Garage floor 1 mid grind.jpg43 KB · Views: 151
 -
 Garage floor 2 crack filler mid grind.jpg51.8 KB · Views: 154
 -
 Garage floor 3 primer bubbles.jpg23.6 KB · Views: 155
 -
 Garage floor 4 workshop done.jpg50.1 KB · Views: 196
 -
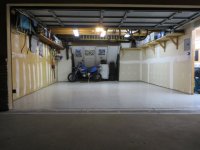 Garage floor 5 garage done.jpg47.5 KB · Views: 194
 -
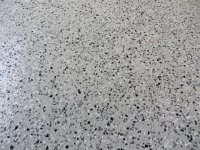 Garage floor 6 medium flake.jpg99.8 KB · Views: 178