To avoid these ads, REGISTER NOW!

Legacy Primer Wait Time

ae82gtm

Well-known member
Joined
Sep 8, 2013
Messages
48
Location
MI
Hello All,

My plan was to apply Legacy's primer this evening (around 6pm start), and then apply Epoxy-Coat tomorrow morning.

However, the weather has decided to act up, and it's going to be a low of 56 degrees tonight, and then high of 79 tomorrow.

From reading different things on here, it seems like afternoon application of Epoxy is best to avoid out-gassing.

Two questions:

1. If I apply primer tonight and then wait to apply Epoxy in the afternoon tomorrow, can the primer sit and wait for ~18 hours?
(Legacy's website says apply top coat between 7-10 hours, but nothing about what you may or may not need to do over that time)

2. If primer goes down tonight, is out-gassing a non-issue for the Epoxy and I can apply it in the morning without worrying about the temp being cool --> hot?

Thank you all!
 
To avoid these ads, REGISTER NOW!

Shea

Well-known member
Joined
Sep 19, 2012
Messages
2,867
Location
California
The primer helps to eliminate the problems associated with outgassing. Once applied, you will not need to worry about outgassing with the subsequent coats. Just time your applications accordingly.
 
OP
A

ae82gtm

Well-known member
Joined
Sep 8, 2013
Messages
48
Location
MI
Completed primer stage tonight.
Took less time than I thought, but struggled finding a good way have the garage door cracked open (primer past g-door) and not have a ton of bugs get in.
Garage is just over 600 sq ft and used about 1.75 cans of Legancy primer.
It was very easy to apply and the floor really seemed to soak it up.
There was one oil stain I struggled to remove and a small portion didn't quite pass the water droplet test. Hopefully it's turns out ok despite this fact!
Epoxy tomorrow morning.
 

Attachments

  • image.jpg
    image.jpg
    136.9 KB · Views: 62
OP
A

ae82gtm

Well-known member
Joined
Sep 8, 2013
Messages
48
Location
MI
Looks patchy this morning...
On to the epoxy next.
 

Attachments

  • image.jpg
    image.jpg
    139.7 KB · Views: 87
To avoid these ads, REGISTER NOW!

Shea

Well-known member
Joined
Sep 19, 2012
Messages
2,867
Location
California
Looks patchy this morning...

Primer is the "ugly coat".

This is EXACTLY why primer is recommended most of the time. The reason the floor looks patchy is because some parts of the concrete absorbed more than others since porosity and density is not uniform in concrete. The primer is the "buffer zone" that helps to equalize this out. Now the subsequent coats will go on much more uniformly to create a consistent color and thickness.

Now imagine if you had applied a 1 coat water based color kit with some floor chips instead like those you can buy from the home improvement centers? You would have a patchy looking floor that you would be unhappy with.

Good job! Like Scotty said, keep the updates going. It really helps people out.
 
OP
A

ae82gtm

Well-known member
Joined
Sep 8, 2013
Messages
48
Location
MI
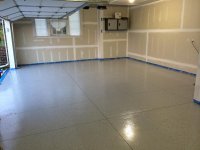
OK, everything was complete on July 4th!
The epoxy application was surprisingly easy. I used a 2:1 volume ratio and divided everything out into 8 'part A' and 8 'part B' buckets. I used the same buckets as:
http://garagejournal.com/forum/showthread.php?t=246234&showall=1

Thank you to that thread, it really helped me get organized.

<Key Points>
These epoxy applications have been documented many times, so I will just mention what I found unique:

-Have another person help, it was invaluable.
-Spiked shoes for both
-Have good ventilation, but be careful of winds blowing in stuff onto your sticky floor.
-I'm glad I used primer. My new floor really soaked it in. I'm glad it happened to the primer layer, instead of the final epoxy.
-Primer and spiked shoes don't go well together. I noticed many small need pricks in the primer that gave a rough surface while we were laying down the epoxy. However, without the spiked shoes, it would have made the job very difficult. I used Legacy's Standard Primer, and it was allowed to dry ~15 hours prior to epoxy. The spikes caused mini pockets with a peeled edge. Using my hand, the "peel" easy scraped off. After applying epoxy, I could not tell the difference, so perhaps it wasn't too big of a deal after all.

<My Results>
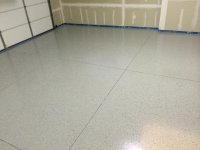
It's about 31 hours after final application, and so far so good.
No bubbles or fish eyes, did not have to do any additional back-rolls to combat any issues. After the second back-roll, I waited a few minutes for signs of trouble, and when I saw it was OK, I applied the sprinkles and non-slip.

There were 2 spots where I accidentally dropped too many sprinkles, and to remedy that, we re-back rolled just that spot. It doesn't look pretty, as you can tell there are sprinkles underneath the epoxy, and makes the epoxy look rough.
No big deal, unless you look very closely.

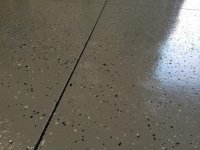
Around +24 hours from final apply, I noticed a dull spot on the floor. You can see it in one of the images I have attached. The epoxy looks rough and dull. Completely opposite from the rest which is smooth and shiny.
I am not sure why, perhaps a thin layer??
Has anyone seen this or know what caused it?

Epoxy-Coat instructions mention a cure time of 24 hours for heavy traffic. However, they also note not to have any water touch the epoxy for 7 days (not sure why, if full chemical resistance is 3 days). To play it safe, I have decided not to leave the garage empty until next week. Only trouble is that I decided to epoxy past the garage door to the concrete edge. I struggled with trying to tape plastic drop-cloth to the mostly closed garage door and the driveway, but such a large size of plastic sheet is very difficult to deal with.

Tip: I purchased the cheapest sheet of ply wood, and cut it to 2 pieces measuring 8' x 1.5'. Wrapped the plastic sheet around it, and stapled the sheet to the wood. Very easy to handle and rest against the mostly closed garage door. Hopefully will keep rain out as it is forecasted for Sunday night until Wednesday.

That's it. I hope this will last, and I hope I don't find any surprises tomorrow morning. I would say that the primer application and the epoxy application was very easy. The hardest and most stressful part was cleaning, scrubbing, and removing oil stains.... watching the weather for rain and high humidity, and crossing your fingers that the garage floor has dried so you can keep to your schedule.
 

Attachments

  • 1.jpg
    1.jpg
    142 KB · Views: 57
  • 2.jpg
    2.jpg
    139.9 KB · Views: 76
  • 4.jpg
    4.jpg
    144.8 KB · Views: 73
OP
A

ae82gtm

Well-known member
Joined
Sep 8, 2013
Messages
48
Location
MI
^^bump^^

Has anyone seen this phenomenon before? What caused the dull, rough spots?
Is it a concern?
 

Shea

Well-known member
Joined
Sep 19, 2012
Messages
2,867
Location
California
Many times spots like that can be caused from back rolling too late or going back to a spot later during the coating period to try and take out a roller mark or etc. Not keeping your roller saturated can do that as well. It's not a concern in most cases, just cosmetic.
 
OP
A

ae82gtm

Well-known member
Joined
Sep 8, 2013
Messages
48
Location
MI
Thanks, Shea.
I also called E-C and they said the samething.
As long as it's just cosmetic and the performance isn't degraded, then I'm ok with it.
 
To avoid these ads, REGISTER NOW!
Top Bottom