To avoid these ads, REGISTER NOW!

Lemons to Lemonade welding/work table build

BLUE72CAMARO

Well-known member
Joined
Jan 1, 2014
Messages
911
Location
IL
I have been on the lookout for quite some time for a heavier duty decent size welding table that will double as a work surface for machining projects as well. The little welding table I currently have just isnt big enough to do work of any size on and is not what you would call exactly flat either, granted I do not need an inspection table flat surface for the rude and crude welding I do anyhow. Although I am hoping to improve my welding skills in the future so a decently flat table is preferred.

So one morning early November my best friend calls me early. There's only two reasons he calls me this early, either there is some sort of an emergency or he has came across a deal that someone at his job his pedaling. For obvious reasons I always hope for the second option. His work is upgrading welding tables and is selling two 2" thick top 4' x 6' tables on the cheap. While this is really a little bigger than I was looking for the price was to good to pass up. So when the new tables come in I will get one of them, so I begin the process of figuring out how the hell I can unload a 2000+ lb table at my house as thats way more than my little Ford 1920 with a loader wants. I finally came to the conclusion I could get off a trailer in my back shop using my car lift and then tap one of several friends that have large skidsteers to bring it up to the shop for me.

Fast forward a couple weeks and my buddy sends me a pic of a different weld table with no explanation. So when I get a chance I call and he says hey the welders here at work talked to the welding supervisor that was getting rid of the tables and they got both of them. One of them has this table that he will sell for $50 if you want it. So disappointed with the whole situation I agree to take the other table since I dont work there or do business with them.

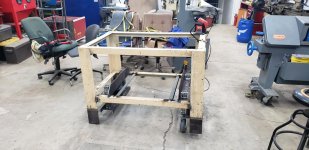
That weekend I went over and picked up the table. It is just under 3' deep and just over 4' wide and 3/4" thick top. The glaring issue with the table was the height at only 29" tall. This would be fine if I was looking for a welding table to sit at and weld except the cross braces prevent you from putting legs underneath and I really want something taller I can use to lay parts and tools on while machining and not have to stoop over to look at anything closely.

My welding table I have used for the last 5 years or so. Its served its purpose but limits what you can do on it in a lot of ways. So anything of any size usually ends up getting welded on my lyons steel top work bench.
20201122_181258.jpg

The new table fresh off the trailer, at 600lbs or so this was much more in my tractors wheel house. I believe this table to originally been made for a small piece of manufacturing equipment of some sort.
20201122_181228.jpg

Then life took a bite out of my spare time for a while. My dad came down with Covid and went in the hospital December 11th. So work in the shop ground to a halt as priorities shifted to make sure my mom and the parents place were taken care of in his absence. I did manage to sneak a couple days in during the week between xmas and new years but spent that time organizing a few areas that had become catch alls and were now overflowing. The table served its purpose as the I am not sure what to do with this area during this. This is when I decided it was time for a change in altitude.
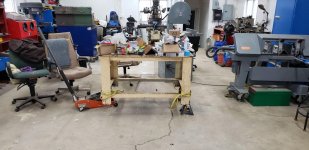
20201229_114710.jpg

After 25 days in the hospital my dad was finally able to come home on January 5th. While he was weak from no physical activity for this long it was quite the relief to have him back home. To date he is doing remarkably well and gaining his strenght and lung capacity back at a pretty amazing pace. So with him home and him able to take care of things around their house again I was able to start steering a little time back at my projects. So first thing to deal with the legs that are 5x5x3/8 angle. I was able to acquire a couple pieces of the same size material and decided the easiest solution was to but extensions to the bottom and **** weld them on. So I made these extensions up with new leveling feet blocks.
20201230_171037.jpg

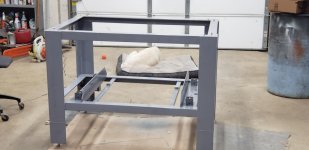
I then had a friend come by and help me pull the top off that to my surprise bolted on and the bolts came out easily. After that I was able to man handle the frame around by myself to roll it around and work on it. Two of the extensions welded on, decided to leave the old leveling blocks intact as they are way to well attached to be worthwhile to cut out.

20210110_182035.jpg

Extensions welded on and back on her feet.
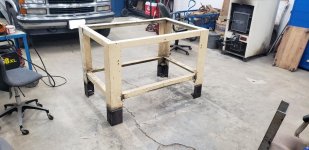
20210112_195719_LI.jpg
 
Last edited:
To avoid these ads, REGISTER NOW!
OP
B

BLUE72CAMARO

Well-known member
Joined
Jan 1, 2014
Messages
911
Location
IL
Agreed Pugot for 95% of what I will do this size will work out better for me. But man that drilled and tapped 2" thick table was sweet...

So the next issue for me is the table being movable. One thing I have tried to do and have done pretty decent at so far is keeping things around the perimeter of my shop so I have a larger work area with a vehicle parked in the other end. I know the pictures dont really show this with the chairs all huddled up in the middle along with the old walker turner bandsaw that is waiting on a shop reorganization to find its place. I also know I dont want the table on wheels all the time as I will be in the hunt for a large vintage vise to mount to it and a vice on a mobile table is a loser from my previous experiences. So this lead me down the road of retractable or removable casters. I quickly decided removable was out as it would be to much work to install and remove to move the table 10 feet and then set it back down, so retractable casters it is.

The first thing to figure out for this was what to use for the lifting device or devices.

I looked at other designs using bottle jacks first but I was concerned about having access to the jack when parking the table in the corner of the shop which is where I think it will live at right now. Small bottle jacks could certainly be had cheap enough but I really didnt want to get on my hands and knees to work them either.

Second thought was a scissor jack much like a spare tire jack on a car. My thought was on this I could run an extension for the jack drive out the front legs of the table and use an impact to run them up and down. Unfortunately I wasnt able to find anything that worked dimensionally between the material I had on hand to make the guides out of.

So one day at my second job I was discussing the table with a coworker at lunch he said it would be cool to use airbags on something like that. I blew it off as I was still stuck on scissor jacks and figuring out how to make them work. A few days later it finally sunk in that he had a good idea!


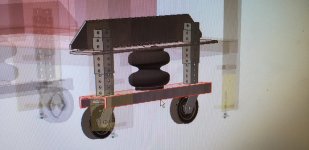
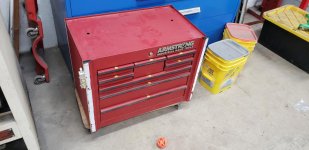
So it was time to finally set in and figure this thing out. Since I do design work for a living and my work lets me use my work pc for personal stuff on nights and weekends I modeled up the table in Inventor and started figuring things out. I will also be mounting an armstrong toolbox I got from a friend probably 10 years ago or so that has been occupying space under a pallet rack in the back shed to keep welding tools and ppe in.

20210114_073458.jpg

20210114_073533.jpg

20210114_073512.jpg

After a day and a half of working in the shop last weekend all the parts short of a small air manifold were machined and ready to go.

20210117_110836.jpg

I also looked and called around trying to find a source for some used functioning airbags to no avail so I ordered this set off of amazon. While I know they arent a quality brand like firestone bags they should do just fine for the little and light duty use they will see on the table.

20210113_160848.jpg
 
Last edited:

travisn1

Well-known member
Joined
Oct 22, 2012
Messages
152
Location
Waterloo NY
That's a neat idea. You can even plumb fittings to each side so you can raise and lower it from any corner.
 

quadrcr87

Well-known member
Joined
Jul 5, 2013
Messages
1,036
Location
Travelers Rest, SC
I like the airbags to lower the casters. I don't think I have seen that before. With the potential sparks from grinding and welding, you might want to consider some type of guard for the airbags.
 
OP
B

BLUE72CAMARO

Well-known member
Joined
Jan 1, 2014
Messages
911
Location
IL
This post will get me up to date as I got to spend the evening in the shop last night with the intention to get everything first tacked together to prove it would work and then burn it together.


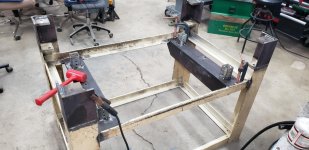
Tacked the outside stationary tubes into the new cross members with a lot of attention paid to keeping them as square as possible. Then welded the cross members to the table. The ends of the cross members are slotted to allow the bottom flange to go under the existing angle iron brace.

20210117_170002.jpg

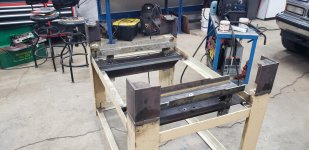
Next up was the sliding tubes getting welded to the caster channels. I had to machine the flanges down slightly on the 6" channel for clearance on the wheels. I tacked the first tube in place on both channels on the bench and then used the tubes on the cross members and some shim stock to position the second tube for both channel assemblies

20210120_195806.jpg

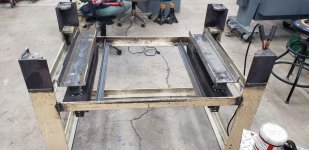
Next I added a couple angles to support the tool box, I will need to add some sort of clip to hold the box in position front to back once I set it in for a test fit.

20210120_195836.jpg

After that I decided it was time to temporarily install the bags and one set of casters and plumbed one of them up to see if it would move.

20210120_201451.jpg

And to end the night I flipped it over to see how it liked a little weight. It took 20 psi to hit the limit on the travel using a pin in the top hole of the inner tube. I have another thought in mind that I may try for a limit if I need more travel it would also incorporate return springs to raise the wheels off the ground. Still thinking if that is worthwile to pursue or not.

20210120_203005.jpg

Close up of the cross member angle to stationary tube fit and also shows the stop pin on moving tube. One other thing worth noting is where this tube material came from. Long story short a friend and I may or may not have borrowed a county road sign 15+ years ago in our young and dumb days. The post was long enough it wouldn't stay in a 6 1/2 bed pickup so we allegedly hauled it to my parents house thru the side windows of the truck of a single cab pickup for 5 miles or so.... We were lucky to survive this endeavor and this stage of life in general to be honest.

20210120_203817.jpg
 
OP
B

BLUE72CAMARO

Well-known member
Joined
Jan 1, 2014
Messages
911
Location
IL
I like the airbags to lower the casters. I don't think I have seen that before. With the potential sparks from grinding and welding, you might want to consider some type of guard for the airbags.

I have thought about this as well, the bags are pretty darn shielded once it all goes together but I have a thought or two on how to guard them if I think it needs it when its done.
 

Monza Harry

Well-known member
Joined
Dec 29, 2018
Messages
1,433
Location
Windsor ON
Blue72 had you considered front air brake chambers for the lifting? They are ~4" dia. that would give you approx. 1200#'s each @ 100#'s of air pressure, and they are usually way cheaper than those bags you bought? Arm chair design leader here I know, but I wondered if you did and then why you changed your mind if that was the case? A local metal shaping guru uses them for all kinds of his tools. Just wondering out load Harry.
 
OP
B

BLUE72CAMARO

Well-known member
Joined
Jan 1, 2014
Messages
911
Location
IL
Monza,

To be completely honest you have found one part of automotive/Ag/Industrial stuff that I have absolutely zero experience with. While I obviously have seen them a million times I have never spun a wrench on an air brake system not had a need to understand what components make up these systems. I think with a little modification I could have definitely made those work as well but from what I am seeing I didnt leave a lot of money on the table. The bags I bought were $80 for the pair and with just a little googling it looks like a lot of chambers are in the $30 price range so might have saved $20 had I went that route.
 

Monza Harry

Well-known member
Joined
Dec 29, 2018
Messages
1,433
Location
Windsor ON
Monza,

To be completely honest you have found one part of automotive/Ag/Industrial stuff that I have absolutely zero experience with. While I obviously have seen them a million times I have never spun a wrench on an air brake system not had a need to understand what components make up these systems. I think with a little modification I could have definitely made those work as well but from what I am seeing I didn't leave a lot of money on the table. The bags I bought were $80 for the pair and with just a little googling it looks like a lot of chambers are in the $30 price range so might have saved $20 had I went that route.
Well I'm cheap and Canadian so $20US is like $28 Canadian and that is a fast food meal bag, and a whack of chip brushes, or grinding wheels or 2 spray bombs. I mentioned I'm cheap right? The brake chambers are also almost totally enclosed a real good thing for a welding table, especially if you are using a Splatter Blaster (MIG or stick welder, Yep I have my own "Lingo" I pointed out in a couple of threads that I am not normal either, FYI) They also have a fairly stiff spring return inside, I don't work on them either but my baby bother does though, i just point and shoot the trucks sometimes and I am required to check them dailly before setting sail though. I'll try and remember to grab an installed pic if you want. I also remember them being closer to $20 Canadian but everything seems to be going up lately except my wages. :lol_hitti Harry :headscrat:shocking:;)
 
OP
B

BLUE72CAMARO

Well-known member
Joined
Jan 1, 2014
Messages
911
Location
IL
Yeah I could have made them work had I known anything about them when I was designing the modifications. maybe next time or if the bags give me problems. The only plus to the bags is they have a considerable amount more travel in them. I think the bags I have are around 7" or a little more of travel so i didnt have to be to careful with where i landed in its range for the most part.
 
To avoid these ads, REGISTER NOW!
OP
B

BLUE72CAMARO

Well-known member
Joined
Jan 1, 2014
Messages
911
Location
IL
Well progress was a little slow this weekend as paint only dries so fast and I had to work the second job one day this weekend.

My shop supervisor and I had a severe difference of opinions on what the priority in the shop was after I got home from work last night. He gave me the cold shoulder after I refused to stop painting to throw his ball. Last coat of paint will go on the frame tonight.

20210131_201238.jpg

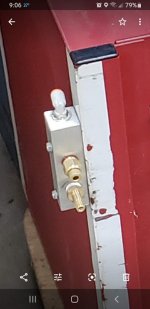
Got the tool box for it cleaned up and the manifold I made for the airbags mounted on it

20210131_201747.jpg

The caster channels painted up and extension cord with 4 outlets that I will mount off the other side of tool box.

20210131_201906.jpg
 
OP
B

BLUE72CAMARO

Well-known member
Joined
Jan 1, 2014
Messages
911
Location
IL
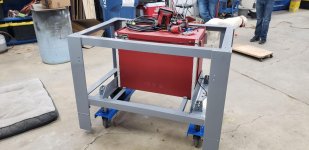
My buddy and his boy came out last night and helped me roll the table on its side for install of the wheel and bag assemblies without screwing up the fresh paint. I had been able to roll this around by myself during welding but not always in a controlled manner... Every thing went in place like it should then we rolled it back on its feet and put the tool box in its place. A few minutes with tubing and self tappers and we were ready to go. Goes up and down pretty darn smooth considering its an unbalanced load and steel on steel. For anyone thats curious I think its lifting somewhere in the ballpark of 5-600lbs now without the top and at 27 psi. the bags have it against the travel stop pins.

20210203_192043.jpg

20210203_192057.jpg

Now to get the top all finished ready to go back on. The current battle is getting old mill scale off of it.:sad:
 

Vahispd

Well-known member
Joined
Nov 21, 2012
Messages
141
Location
SE VA
The table is coming along nicely. Your coworker had a great idea to use the airbags and you implemented it well (even with the midnight requisition metal). Looking forward to seeing the top.
 

Bad Mojo

Well-known member
Joined
Sep 2, 2012
Messages
119
Is the plan to keep running that M12 compressor? If so I am curious if you feel like it is keeping up with the work. I don't see a reason why it wouldn't and it be nice to have to run airline over just to lift the table up.
 

king nero

Well-known member
Joined
Dec 27, 2010
Messages
1,469
Location
Belgium
WHat is the lifting capacity of those airbags? Out of curiosity.
I guess somewhere towards 10k lbs if you run it on a 100 psi compressor?
 
OP
B

BLUE72CAMARO

Well-known member
Joined
Jan 1, 2014
Messages
911
Location
IL
So Friday night and yesterday I managed to strip all the mill scale off of the top. What a fricking ordeal. My buddy was out and helped me finish it up and get it bolted back on. I plan to work on it a little more to smooth it up a little more and paint the edges of the table. Also plan to tap holes to mount an old pipe vise I have on it for an upcoming cylinder rebuild of one of my car lifts cylinders. All in all I am very pleased with how it has come out. I think i am into for well under $500 with supplies and all.
20210206_155504.jpg


Bad mojo,
I dont see a need to use anything more than it. I got the top installed back on the table and the toolbox filled yesterday and the little compressor still raises it to its stops at 50psi. Since i used a schrader valve (tire valve stem) i only need the compressor to air them up then I can disconnect it and it holds position. It takes the little compressor maybe 30 seconds to hit 50 psi and likely less time than that.

king nero,
manufacture says 2600 lbs at 100 psi each. I think the table is weighing in at a little over 1k right now.

https://www.amazon.com/dp/B082DPWHXV/?tag=atomicindus08-20
 
Last edited:

Bad Mojo

Well-known member
Joined
Sep 2, 2012
Messages
119
Blue72Camero,

Thanks for the information on the inflator! That has me thinking about how I build some shop infrastructure completely different.
 
OP
B

BLUE72CAMARO

Well-known member
Joined
Jan 1, 2014
Messages
911
Location
IL
Blue72Camero,

Thanks for the information on the inflator! That has me thinking about how I build some shop infrastructure completely different.

Here is a better picture of the little manifold I made up for the schrader valve and tank drain valve.
Screenshot_20210205-090657_Photos.jpg
 
OP
B

BLUE72CAMARO

Well-known member
Joined
Jan 1, 2014
Messages
911
Location
IL
So my shop was turned into an emergency storage spot for a buddies boat the last couple weeks why the extreme cold moved thru our area but we shifted things around on Saturday and got the boat back in my other shed now so I was able to drag the table out and tinker with it a little yesterday.

Made up guards for the bags out of 8" hvac duct and caps. This quickly reminded why I am not a sheet metal man. But they came out looking way better than they should considering the struggles I had getting them together and fitted.

20210221_135810.jpg

20210221_135820.jpg
 
To avoid these ads, REGISTER NOW!
Top Bottom