
You are using an out of date browser. It may not display this or other websites correctly.
You should upgrade or use an alternative browser.
You should upgrade or use an alternative browser.
Lenny's ManCave (40x60 + 40x30)
- Thread starter LennyTheLizard
- Start date
OP
LennyTheLizard
Well-known member
More progress on the shop the last two days.
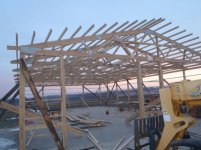
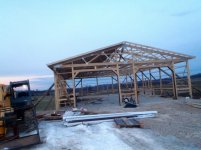
1 & 2. Monday - all trusses and purlins set, including ceiling joists.
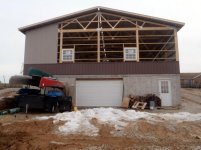
3 & 4. Tuesday - 1/2 roof tin installed, some wainscot siding installed, man door, windows and overhead doors framed out.
Seriously considering hiring contractor to install ceiling - will see about cost tomorrow.
1 & 2. Monday - all trusses and purlins set, including ceiling joists.
3 & 4. Tuesday - 1/2 roof tin installed, some wainscot siding installed, man door, windows and overhead doors framed out.
Seriously considering hiring contractor to install ceiling - will see about cost tomorrow.
Attachments


OP
LennyTheLizard
Well-known member
Excuse the mess around shop!
The contractors made good progress again today. Expecting some bad weather Thursday so they're trying to get it closed in quick. Got both long sides all covered, all windows / man door installed, some tin on back side.
1. Looking from my back deck. West side of building
2. South side of building - will have 2 12' W x 10' T insulated overhead doors.
3. East side wall.
4. North Side where basement walkout is located.
The contractors made good progress again today. Expecting some bad weather Thursday so they're trying to get it closed in quick. Got both long sides all covered, all windows / man door installed, some tin on back side.
1. Looking from my back deck. West side of building
2. South side of building - will have 2 12' W x 10' T insulated overhead doors.
3. East side wall.
4. North Side where basement walkout is located.
Attachments


OP
LennyTheLizard
Well-known member
My son was home sick from school today, so decided to try to get some 5S work done in between going to doctor and tending to his needs.
1. Pic of my storage room on Saturday - MESS
2. Added some more plywood so that I have "pigeon holes" for totes. Tried to use 2-3 different sizes of totes to make things look more clean. Picture from main shop looking through access door.
3. Inside storage room after doing some more sorting and re-organizing. Not done, but making some good progress. Wife brought home some more totes this evening so I should be able to sort some more tomorrow night.
1. Pic of my storage room on Saturday - MESS
2. Added some more plywood so that I have "pigeon holes" for totes. Tried to use 2-3 different sizes of totes to make things look more clean. Picture from main shop looking through access door.
3. Inside storage room after doing some more sorting and re-organizing. Not done, but making some good progress. Wife brought home some more totes this evening so I should be able to sort some more tomorrow night.
Attachments


goneflyin2002
Well-known member
Seriously considering hiring contractor to install ceiling - will see about cost tomorrow.
This would be money very well spent indeed.
Don
great shop by the way...
SiGmA_X
Well-known member
I agree Don, money well spent! OP, very nice looking shop, I love the added basement space. Smart!
gussteve
Well-known member
I love the space, it's shaping up nicely 
OP
LennyTheLizard
Well-known member
Shop is almost finished. Too dark to get pics tonight.
All the metal is on the building. Decided to pay contractor to put in metal ceiling. Hopefully, it will be finished tomorrow. Still waiting on sub-contractor to come install the overhead doors.
All the metal is on the building. Decided to pay contractor to put in metal ceiling. Hopefully, it will be finished tomorrow. Still waiting on sub-contractor to come install the overhead doors.
fixcasa58
Member
My first new car was a '78 Z28. 7200.00 out the door. That was a fun car, although at only 170 hp it was a bit slow, although the growl made up for it. Have you managed a way to eke more hp out iof the engine? I wish that I had kept it so that I could pass it down as well.I'm liking this idea, but the funds are gonna be a problem. I have '79 Z28 right now that is a pretty fun little toy. It needs to have a little work done, but I would rather start another toy from scratch. After it's done, then I'll start restoring the Camaro. My dad gave it to me and I plan to give to my son, but he has to get his hands dirty beforehand. He's only 6 now, but he already loves that car!
Enjoy - Paul
OP
LennyTheLizard
Well-known member
My first new car was a '78 Z28. 7200.00 out the door. That was a fun car, although at only 170 hp it was a bit slow, although the growl made up for it. Have you managed a way to eke more hp out iof the engine? I wish that I had kept it so that I could pass it down as well.
Enjoy - Paul
Mine isn't super fast, but it does have a 383 stroker in it. Never had it on the dyno, but I'd venture that it puts out pretty close to 400 hp (on motor).
OP
LennyTheLizard
Well-known member
DANG! I was meaning to post pics of finished building this weekend, but I worked until after dark. Cleaned up all the mess that was left (wood / metal scraps). Swept out inside floor. Loaded up all the trash and junk around the place on the trailer so I can dump it off tomorrow. Gave the fire pit a workout yesterday!
OP
LennyTheLizard
Well-known member
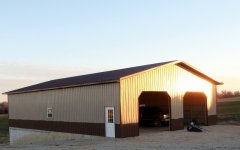
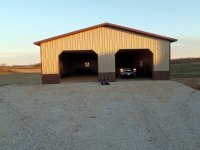
Snapped some pictures of finished building before work this morning. Well, I don't think this is ever going to be finished, but the contractor's work is done.
They installed overhead doors and openers today, but pics didn't turn out in the dark. Doors look good, but the guys got a little sloppy on the openers (wiring & positioning of the controls). I may have to make them come change it.
I sure was glad they put doors in today. 21 degrees in the garage when I hooked up an extension cord to openers (supposed to be low of 8 tonight).
They installed overhead doors and openers today, but pics didn't turn out in the dark. Doors look good, but the guys got a little sloppy on the openers (wiring & positioning of the controls). I may have to make them come change it.
I sure was glad they put doors in today. 21 degrees in the garage when I hooked up an extension cord to openers (supposed to be low of 8 tonight).
Attachments

OP
LennyTheLizard
Well-known member
NEXT STEPS:
I'm a little stuck - can't decide how I'm going to spend the limited amount of money I have left. I've been spending way too much time reading Garage Journal and not enough time taking action (get quotes, start installing, etc.). It takes a lot of searching here to find what your looking for and easy to get side tracked. Anyone have any good matrix / excel file comparing options vs. cost?
What's Next?
-Electrical Install
-Need Lights (I'm sure I'll use T8 flourescents, but how many, how far apart?, where to buy cheap?)
-How to mount Receps?
-inside wall (flush) how to set-up so not in middle of rib when later wall covering.
- outside wall with conduit.
-Insulation
-Trying to decide how to do it
-Probably R30 blown in cellulose in ceiling (need some in house at same time
-What's adv / dis of Fiberglass vs. cellulose
- R19 fiberglass batts in wall
-Anyone done $ / R value comparisons. I like the spray foam idea, but it just seems really expensive
Interior Walls (can't decide when / how)
- Steel siding all the way up wall
- Plywood top 8' / Steel bottom 4'
- Slat wall partial steel siding the rest
- Cost / Sq. ft. for each?
Radiant Set-Up
- Decide how to build manifolds / distribution system
- Pick a Heat Source
-Need a $/BTU matrix for fuel (prefer a dual source capability
- Elec
- Propane (nothing at house now)
- Wood (no fuel source on property, but I can probably find plenty of friends who will let me cut on their property. Have to factor in Labor / Tool Costs)
Don't know if these are really questions or talking out load, but let me know if you have any excellent bookmarks for solving these fun problems.
I'm a little stuck - can't decide how I'm going to spend the limited amount of money I have left. I've been spending way too much time reading Garage Journal and not enough time taking action (get quotes, start installing, etc.). It takes a lot of searching here to find what your looking for and easy to get side tracked. Anyone have any good matrix / excel file comparing options vs. cost?
What's Next?
-Electrical Install
-Need Lights (I'm sure I'll use T8 flourescents, but how many, how far apart?, where to buy cheap?)
-How to mount Receps?
-inside wall (flush) how to set-up so not in middle of rib when later wall covering.
- outside wall with conduit.
-Insulation
-Trying to decide how to do it
-Probably R30 blown in cellulose in ceiling (need some in house at same time
-What's adv / dis of Fiberglass vs. cellulose
- R19 fiberglass batts in wall
-Anyone done $ / R value comparisons. I like the spray foam idea, but it just seems really expensive
Interior Walls (can't decide when / how)
- Steel siding all the way up wall
- Plywood top 8' / Steel bottom 4'
- Slat wall partial steel siding the rest
- Cost / Sq. ft. for each?
Radiant Set-Up
- Decide how to build manifolds / distribution system
- Pick a Heat Source
-Need a $/BTU matrix for fuel (prefer a dual source capability
- Elec
- Propane (nothing at house now)
- Wood (no fuel source on property, but I can probably find plenty of friends who will let me cut on their property. Have to factor in Labor / Tool Costs)
Don't know if these are really questions or talking out load, but let me know if you have any excellent bookmarks for solving these fun problems.
OP
LennyTheLizard
Well-known member
After I get my shop done, I want to re-do my build thread. I would like to put all my posts / pictures in sequential order at the top of build. Until I get all the pictures / posts complete, I want to not make it live. Then everyone could ask questions and answers below, but not break up the build pictures / posts.
Anyone done this already? Any advice on how it's done?
Anyone done this already? Any advice on how it's done?
Kevin54
MEMBER EMERITUS
NEXT STEPS:
I'm a little stuck - can't decide how I'm going to spend the limited amount of money I have left. I've been spending way too much time reading Garage Journal and not enough time taking action (get quotes, start installing, etc.). It takes a lot of searching here to find what your looking for and easy to get side tracked. Anyone have any good matrix / excel file comparing options vs. cost?
What's Next?
-Electrical Install
-Need Lights (I'm sure I'll use T8 flourescents, but how many, how far apart?, where to buy cheap?)
-How to mount Receps?
-inside wall (flush) how to set-up so not in middle of rib when later wall covering.
- outside wall with conduit.
-Insulation
-Trying to decide how to do it
-Probably R30 blown in cellulose in ceiling (need some in house at same time
-What's adv / dis of Fiberglass vs. cellulose
- R19 fiberglass batts in wall
-Anyone done $ / R value comparisons. I like the spray foam idea, but it just seems really expensive
Interior Walls (can't decide when / how)
- Steel siding all the way up wall
- Plywood top 8' / Steel bottom 4'
- Slat wall partial steel siding the rest
- Cost / Sq. ft. for each?
Radiant Set-Up
- Decide how to build manifolds / distribution system
- Pick a Heat Source
-Need a $/BTU matrix for fuel (prefer a dual source capability
- Elec
- Propane (nothing at house now)
- Wood (no fuel source on property, but I can probably find plenty of friends who will let me cut on their property. Have to factor in Labor / Tool Costs)
Don't know if these are really questions or talking out load, but let me know if you have any excellent bookmarks for solving these fun problems.
Just from my experience, if you are not going to put drywall or OSB on the inside to cover the walls (flat walls) and are going to use corrugated metal, I would use conduit and surface mount boxes.
Insulation.....From my experience with blow in insulation, I don't like it, but that's a personal preference. I find it dirty and dusty. If you have to get in the attic for any reason, it's just a mess and it's all over you. I would much rather deal with fiberglass batts over blown in. If money is not an object, I would take foam over anything. For one, it insulates better and it also fills any voids that you may have with other types of insulation.
As far as heat, If you are out in the country, propane is about your only source on a continual basis. A couple of 75,000 BTU ceiling hanging units (one upstairs and and in the basement) would be your best bet, but as backup, install a woodburner or two (again, one up, one down) to offset the propane usage and cost. The bad thing is that a lot of insurance companies will tell you "no" with having a wood burning stove in a garage or barn. So that is something you may have to take a gamble on and see if you can get by and hope it never burns down.
BTW....the barn looks great and I am officially jealous!!!

OP
LennyTheLizard
Well-known member
Thanks for the advice Kevin.
I think my order of priority will be.
1. Electric install (especially lights)
2. Ceiling Insulation
3. Wall insulation
4. Liner Panel
5. Heat
I'm going to do as many as I can until I run out of money.
My big dilema now is that I probably will not install my liner panel for a while. I want to put in my electric and be able to use it, then add insulation, then liner panel as money allows. Any ideas on how to mount the boxes for future liner panel cover up?
I've been searching around, just haven't found good pics yet.
I have Pex installed in the concrete so I want to take adavantage of the radiant heat. My idea was that I wouldn't use the basement that often (mostly storage) after top was finished. I thought the radiant concrete would radiate up and down, and if I need a little extra heat, I can put in electric space heater or ventless propane where I'm working.
I think my order of priority will be.
1. Electric install (especially lights)
2. Ceiling Insulation
3. Wall insulation
4. Liner Panel
5. Heat
I'm going to do as many as I can until I run out of money.
My big dilema now is that I probably will not install my liner panel for a while. I want to put in my electric and be able to use it, then add insulation, then liner panel as money allows. Any ideas on how to mount the boxes for future liner panel cover up?
I've been searching around, just haven't found good pics yet.
I have Pex installed in the concrete so I want to take adavantage of the radiant heat. My idea was that I wouldn't use the basement that often (mostly storage) after top was finished. I thought the radiant concrete would radiate up and down, and if I need a little extra heat, I can put in electric space heater or ventless propane where I'm working.
Looks great, Insulate 1 section of wall and install your liner panel of choise, then install your circuit panel, this will allow your ceiling lighting to be done. Mount some outlets near your panel, you could also run some temporary circuits. If you have a Menards they have everything needed for your radiant heat setup. An outside wood burning boiler would be an option, with electric backup. Maybe you will get a big tax return, and due it all at once.
OP
LennyTheLizard
Well-known member
Wow, Haven't update this in quite a while!
Over the past year, I've been doing small jobs in the shop, but mostly just parking the toys in there and enjoying the warm weather outside.
Went to lumber yard today, and purchased insulation and liner panel. Tomorrow morning I'll start the insulation - R-19 Kraft faced batts for the walls.
Thursday - the steel will be delivered. Hopefully I can get it done before the end of weekend.
Over the past year, I've been doing small jobs in the shop, but mostly just parking the toys in there and enjoying the warm weather outside.
Went to lumber yard today, and purchased insulation and liner panel. Tomorrow morning I'll start the insulation - R-19 Kraft faced batts for the walls.
Thursday - the steel will be delivered. Hopefully I can get it done before the end of weekend.
rixtrix1
Well-known member
Unique, and nice!
OP
LennyTheLizard
Well-known member
Sure glad I paid my contractor to hang my ceiling!
Finally received my finishing materials last Thursday. Got all the wall insulation installed, installed two new boxes for 220V welder receptacles, wired up garage door opener lights in attic. My FIL came over yesterday and helped get the liner panel started. Have about 40' of wall finished. It's not too hard of a job, but it's not easy. Don't think I could really do it by myself. It's gonna look sweet when it's done though.
Finally received my finishing materials last Thursday. Got all the wall insulation installed, installed two new boxes for 220V welder receptacles, wired up garage door opener lights in attic. My FIL came over yesterday and helped get the liner panel started. Have about 40' of wall finished. It's not too hard of a job, but it's not easy. Don't think I could really do it by myself. It's gonna look sweet when it's done though.
OP
LennyTheLizard
Well-known member
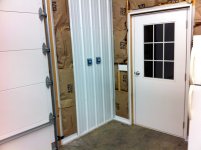
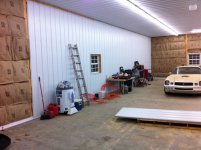
Almost didn't post these due to the mess in the shop. But here are a few in progress photos of my interior finishing.
24" Wide batts installed between the "bookshelf purlins". Had to buy rolls that come in ~40' lengths due to my posts being more than 8' apart.
Tried to staple up the facing on the studs, but the staples just kept pulling through. The batts fit tight in the cavities so I just tried to straighten out the kraft paper as i put the liner panel sheets up.
Also there's a pic of partially finished wall, and a close-up of corner where you can see the trim. Used "D" trim on the floor, "J" channel in corners and around all windows / doors, and there will be a 2.25" wide trim at the top of the wall to ceiling installed after the wall sheets.
24" Wide batts installed between the "bookshelf purlins". Had to buy rolls that come in ~40' lengths due to my posts being more than 8' apart.
Tried to staple up the facing on the studs, but the staples just kept pulling through. The batts fit tight in the cavities so I just tried to straighten out the kraft paper as i put the liner panel sheets up.
Also there's a pic of partially finished wall, and a close-up of corner where you can see the trim. Used "D" trim on the floor, "J" channel in corners and around all windows / doors, and there will be a 2.25" wide trim at the top of the wall to ceiling installed after the wall sheets.
Attachments

OP
LennyTheLizard
Well-known member
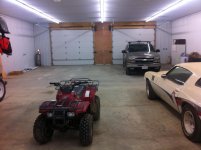
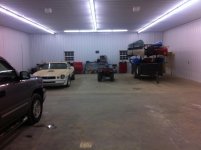
Finished my liner panel today. Took quite a while for me to do by myself, but it's finally all done. With all the super white panels, my Pearl White Camaro looks dull (but it's covered in dust). Guess it's time to resurrect it again
Next Job in shop: Start connecting the radiant lines to manifolds.
Next Job in shop: Start connecting the radiant lines to manifolds.
Attachments
dmhoppe
New member
Man that is awesome!
I'm working on plans now for a new shop that'll 33' x 60'. Very similar, but I'll likely use traditional pole barn construction. I'm planning 12' or 14' wall height, as I'd love to put in a lift - eventually.
My preference is to use roll-up doors instead of the overhead doors. I'm looking at a layout with the two 12' x 10' doors on the ends (kind of "pull-thru" layout). Haven't made any decisions about insulation yet, but I'm in Birmingham, AL, so not nearly as cold as you.
Love the Cutlass project. I'm working on the restoration of my 71 Cutlass Convertible. I'm going back with a Gen III (LS6) engine, and my paint will be 442 clone. Can't wait to get the project moving again.
I'm working on plans now for a new shop that'll 33' x 60'. Very similar, but I'll likely use traditional pole barn construction. I'm planning 12' or 14' wall height, as I'd love to put in a lift - eventually.
My preference is to use roll-up doors instead of the overhead doors. I'm looking at a layout with the two 12' x 10' doors on the ends (kind of "pull-thru" layout). Haven't made any decisions about insulation yet, but I'm in Birmingham, AL, so not nearly as cold as you.
Love the Cutlass project. I'm working on the restoration of my 71 Cutlass Convertible. I'm going back with a Gen III (LS6) engine, and my paint will be 442 clone. Can't wait to get the project moving again.
OP
LennyTheLizard
Well-known member
Latest Progress:
Sorry no pictures handy, but I made some new progress in the last couple weeks.
Blew in R40 insulation in my ceiling
Began install of Rapid Air System (3 drops finished)
Planning out control system for radiant heat.
Bought a DIY wood boiler for outside, but needs some finishing work (controls)
Sorry no pictures handy, but I made some new progress in the last couple weeks.
Blew in R40 insulation in my ceiling
Began install of Rapid Air System (3 drops finished)
Planning out control system for radiant heat.
Bought a DIY wood boiler for outside, but needs some finishing work (controls)
OP
LennyTheLizard
Well-known member
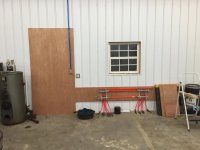
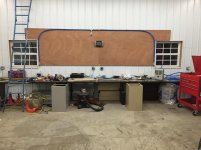
Made progress on Rapid Air Maxline install the last few days.
- Mounted a few sheets of Luan on shop walls
- 1 vertical piece on side wall will hold all my radiant heat controls / mechanicals
- 2 horizontal sheets on back wall of shop. This will be my future workbench and will have French cleats mounted on it in near future
- Purchased 2 3/4" Rapid Air Master kits
- Installed all 6 manifolds (1 in middle of each wall, 3 on back wall near work bench)
- Currently have all maxline connected to 5/6 manifolds
- Had my buddy make a custom manifold block to connect four max airlines on ceiling in center of shop. Save me some tubing by running this way + gave me an extra quick connect fitting near center of ceiling likely to be used for connection on future 4 post lift installation.
Future plans to run an air line out to my wood boiler for burning air/oil mixture.
Attachments


OP
LennyTheLizard
Well-known member
Bound and determined to get my in-floor heat working before winter.
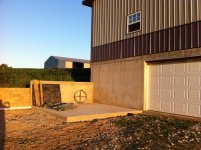
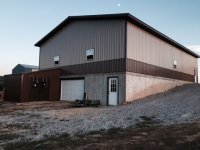
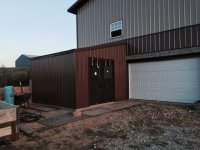
Decided to put a small addition on back of building. My wife was very opposed to looking out kitchen window to see a smoking wood boiler outside, so decided to put a 12 X 14' shed on back of basement portion and "hide" my boiler in there.
Poured the foundation a few weeks ago, and getting ready to add shed in the next week or so.
Going to run a 3/12 roof off at level where Wainscotting ends to 8' wall on North side wall of new shed. Should allow plenty of firewood storage inside near the woodstove.
Decided to put a small addition on back of building. My wife was very opposed to looking out kitchen window to see a smoking wood boiler outside, so decided to put a 12 X 14' shed on back of basement portion and "hide" my boiler in there.
Poured the foundation a few weeks ago, and getting ready to add shed in the next week or so.
Going to run a 3/12 roof off at level where Wainscotting ends to 8' wall on North side wall of new shed. Should allow plenty of firewood storage inside near the woodstove.
Attachments

Last edited:
FunkyfullWidth
Well-known member
Looking great man! One thing I don't understand though. The last picture on post 68, the regulator feeds the water trap? The way I like to do it, A shut off, water trap, regulator, outlet. That way I can shut that section off, and use the water trap to drain it easily if service is needed albeit an overhaul or just changing an air line fitting.
I'm working on setting up my maxline kit too. So far it works great, and has been wicked easy to connect.
I'm working on setting up my maxline kit too. So far it works great, and has been wicked easy to connect.
OP
LennyTheLizard
Well-known member
Haven't been on here in a while.
Funky* - Picture you refer is a little mis-leading. I don't have the air compressor connected to air line system. The Pipe coming down from regulator is actually the INPUT to the system from the air compressor that is located in the basement.
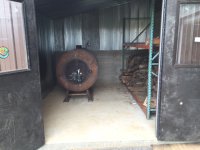
Finished my "Wood Shed", dressed up my Home made wood boiler and installed inside. Next I'm working on piping a chimney, and finishing radiant controls. I should of added up all the cost before starting this project. I could of bought several years of propane for what I'm speding on this radiant heat project.
Funky* - Picture you refer is a little mis-leading. I don't have the air compressor connected to air line system. The Pipe coming down from regulator is actually the INPUT to the system from the air compressor that is located in the basement.
Finished my "Wood Shed", dressed up my Home made wood boiler and installed inside. Next I'm working on piping a chimney, and finishing radiant controls. I should of added up all the cost before starting this project. I could of bought several years of propane for what I'm speding on this radiant heat project.
Attachments
OP
LennyTheLizard
Well-known member
Here's a photo of the Boiler after it was all hooked up.
It's been done for quite a while, but since I just figured how to post Google photos, I'll give it a whirl.

It's been done for quite a while, but since I just figured how to post Google photos, I'll give it a whirl.