To avoid these ads, REGISTER NOW!

let's see your craftsman block grinders

torqueman2002

Well-known member
Joined
Jun 3, 2009
Messages
6,139
Location
SE Michigan
TM, did you add that fuse in the back of ol' Blue?
I did Outlaw. Not my idea, but a suggested upgrade from on over at OWWM.

They have helped me sort out more than 1 puzzle. They do like you to do a search 1st, which is fine with me. I like that part too.

Thanks for looking.

Oh - Go-Blue! and in the spirit of equal time for my divided loyalties Go-Green!
:beer:
 
To avoid these ads, REGISTER NOW!

zkling

Well-known member
Joined
Jan 23, 2007
Messages
16,939
[
At speed, this beast makes nice whirring noises, and moves a lot of air around

That is really sharp, I like the two tone on the water trough. Where do you get your wire wheels, brand preference? The last one I used seemed to have a horrible balance issue. :dunno:
 

cbacres

Well-known member
Joined
May 28, 2010
Messages
5,998
Location
SW Florida
OK gang, here's my unscientific comparison of a regular and a industrial block grinders.
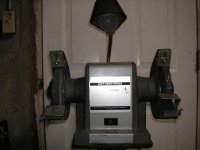
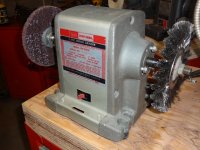
I have two 1/3 HP units, I'm going to call the standard one grinder "A", the industrial grinder "B". I'm going to group both grinders photos to try and make it easy for you to compare.
"A" note that it pulls 4.5 amps, one more than the industrial, the RPM is 3580.
Year built 1973
"B" pulls 3.5 amps, RPM is 3450
Year built 1966

Grinder "A"

Grinder "B"


Here is the differences that I found:
"A" Winding wire is .035", but the overall size of the bundle appears to be larger than the "B".
"B" winding wire is .042".

"A" has four wires going to the field, two separate circuits. I'm assuming one is the starting one.
"B" has three wires.


So, in this case, it appears the standard, grinder "A", is a little heavier grinder. There is 7 years between the two, so a same year build between two grinders would likely be a fair comparison. Anyone have one of the years that are the same as these?

All other items appear to be the same, castings look identical.
Hope I didn't bore you!
 

Itinerant

Well-known member
Joined
Nov 17, 2013
Messages
1,040
Location
Behind the Zion Curtain
Torque, your Blue resto looks outstanding!

This six-incher popped up on a local sale site this morning and although I wasn't looking for another one right now I ended up buying it just for the stand. It purrs like a kitten though, and I unbolted it from the stand and ran it on the bench and there's absolutely no vibration. I considered selling it but I'm going to keep it.

The only thing I can read on the label is 1/2 H. P. Bench Grinder, the S/N and the "sold by" verbage at the very bottom. It's missing the eye shields and quench tray but I know I can source those. I'll get some part numbers off of it tomorrow and see if I can determine the model number.
 

Attachments

  • 6 inch grinder and stand.JPG
    6 inch grinder and stand.JPG
    70.6 KB · Views: 32
  • 6 inch grinder.JPG
    6 inch grinder.JPG
    101.2 KB · Views: 32

SweetD

Well-known member
Joined
Feb 8, 2010
Messages
3,265
Location
Rhode Island
This six-incher popped up on a local sale site this morning and although I wasn't looking for another one right now I ended up buying it just for the stand.

We need to know (since you are not selling it)...how much did you pay????

Nice stand and great grinder, I have a very similar model 1/2HP, model #257.191.401.

grinderwithtray.jpg

Your label is a bit different than mine...

Grinder4.jpg

:beer:

Dave
 

torqueman2002

Well-known member
Joined
Jun 3, 2009
Messages
6,139
Location
SE Michigan
Nice score! :thumbup:

There maybe some 'tricks' to raise the info. on the label. I've use a technique I learned from my dad. He would breath on a glass vacuum tube to see the faint images of the p/n. Like cleaning eyeglasses, if you get my meaning.

Anyway, here's a link {http://tinyurl.com/CM-0-75HP-397-19350-Berry} to a 3/4 HP restore with a faded label.

When you are ready to put the label on your grinder, look for the word file posted by FrankLee in this thread post #306. You can edit and print it to suit you project.
http://www.garagejournal.com/forum/showthread.php?t=157794&page=16

Have fun. Be sure to post up pictures.

:beer:
 
Last edited:

drivesitfar

Well-known member
Joined
Oct 23, 2013
Messages
36,008
Location
Pacific Northwest
Tourque: thanks for all the information and just let me know if you want the trade and we'll have to try to find a way to ship or maybe meet in Montana to make the swap. i'm betting you might have been a Packers fan in the 60's so you had the winning combo in those years? Hard to root against Bart Starr and Lombaurdy (sp?) and the boys in green even from the west coast.

CB: nice information and good to know. with all the grinders you had i was a little surprised you didn't have same HP and same year grinders to test. thanks for the effort and hopefully you already had to pull them apart for cleaning or restoration.

IT: boy nice score on the grinder stand combo. a lot of stands are being scooped up lately.
 

torqueman2002

Well-known member
Joined
Jun 3, 2009
Messages
6,139
Location
SE Michigan
cb ...

Nice detective work.

I'm just guessing, but is there a differences in the number of steel laminations in the field core, or the dimension?

This will be interesting to unravel, I mean the differences between A and B.

:thumbup:
 

jakemac

Well-known member
Joined
May 21, 2013
Messages
9,035
Location
New England
Nice score! :thumbup:

There maybe some 'tricks' to raise the info. on the label. I've use a technique I learned from my dad. He would breath on a glass vacuum tube to see the faint images of the p/n. Like cleaning eyeglasses, if you get my meaning.

Anyway, here's a link {http://tinyurl.com/CM-0-75HP-397-19350-Berry} to a 3/4 HP restore with a faded label. When you are ready to put the label on your grinder, look for the word file posted by FrankLee. You can edit and print it to suit you project.

Have fun. Be sure to post up pictures.

:beer:

I've tried to download that file and all I get when I try to open it is a "file corrupt" warning. Then again, I'm on a Mac and don't have Word. I should still be able to translate and open it in another program, but no luck. :sad:

Has anyone translated that file to a PhotoShop format ?
 

torqueman2002

Well-known member
Joined
Jun 3, 2009
Messages
6,139
Location
SE Michigan
Tourque: thanks for all the information and just let me know if you want the trade and we'll have to try to find a way to ship or maybe meet in Montana to make the swap. i'm betting you might have been a Packers fan in the 60's so you had the winning combo in those years? Hard to root against Bart Starr and Lombaurdy (sp?) and the boys in green even from the west coast. ...
You betcha! Glad to do it.

Hehe, a trade and a road trip!

I was and still am in awe of those Packer games in driving snow storms! You called it, I was a Cheesehead, before they existed. :beer:
 

-Brent-

Well-known member
Joined
Dec 23, 2009
Messages
4,709
Location
Utah
attachment.php


No tech, but I did finish getting all the grinders mounted. There's only a couple little things I want to address before everything is completely done.
 

Attachments

  • IMG_20140329_174920.jpg
    IMG_20140329_174920.jpg
    133.9 KB · Views: 162

cbacres

Well-known member
Joined
May 28, 2010
Messages
5,998
Location
SW Florida
cb ...

Nice detective work.

I'm just guessing, but is there a differences in the number of steel laminations in the field core, or the dimension?

This will be interesting to unravel, I mean the differences between A and B.

:thumbup:

Yes, the "B" is slightly larger. I'll post the size tomorrow.
 

torqueman2002

Well-known member
Joined
Jun 3, 2009
Messages
6,139
Location
SE Michigan
I've tried to download that file and all I get when I try to open it is a "file corrupt" warning. Then again, I'm on a Mac and don't have Word. I should still be able to translate and open it in another program, but no luck. :sad:

Has anyone translated that file to a PhotoShop format ?

I should have said FrankLee's post #306 in this thread. Sorry.

Here's the link. Also read some of the posts after his for which Word version is needed. Oh, you need to change the file name, but that's in the post.

http://www.garagejournal.com/forum/showthread.php?t=157794&page=16
 
Last edited:

drivesitfar

Well-known member
Joined
Oct 23, 2013
Messages
36,008
Location
Pacific Northwest
Brent: can you post some close up pictures of all your wheels and maybe a little description of what each one is? and where you bought them all because i like your set up. it looks great and are your cabs on casters so you can move them around easily and then lock in place when you are ready to work?

:thumbup:
 
To avoid these ads, REGISTER NOW!

SweetD

Well-known member
Joined
Feb 8, 2010
Messages
3,265
Location
Rhode Island
Brent: can you post some close up pictures of all your wheels and maybe a little description of what each one is? and where you bought them all because i like your set up. it looks great and are your cabs on casters so you can move them around easily and then lock in place when you are ready to work?

:thumbup:

Yes please - I want to set mine up with a variety of grinding, wire, and buffing wheels, so this would be really helpful!

Thanks!

Dave
 

jakemac

Well-known member
Joined
May 21, 2013
Messages
9,035
Location
New England
I should have said FrankLee's post #306 in this thread. Sorry.

Here's the link. Also read some of the posts after his for which Word version is needed. Oh, you need to change the file name, but that's in the post.

http://www.garagejournal.com/forum/showthread.php?t=157794&page=16

Thanks tourque !

I don't know how many times I've read that post and downloaded the file, and I always skip over the part about changing the file extension's name. :tard:

None of my Mac programs will convert the file properly, but I have a freeware copy of OpenOffice which opened it (somewhat). The graphics are jumbled, but that's OK, I can now copy/paste the elements into another program to build my own copy of the decal. Yea ! Now I just need to find the time. :willy_nil

:beer:
 

G20-Budo

Well-known member
Joined
May 31, 2013
Messages
987
Location
Chandler, AZ
Jake, PM me with your email addy, and I'll email you the Word and PDF versions I did of the label. I changed it a bit and included the font that Craftsman used.
 

Itinerant

Well-known member
Joined
Nov 17, 2013
Messages
1,040
Location
Behind the Zion Curtain
This six-incher popped up on a local sale site this morning and although I wasn't looking for another one right now I ended up buying it just for the stand. It purrs like a kitten though, and I unbolted it from the stand and ran it on the bench and there's absolutely no vibration. I considered selling it but I'm going to keep it.

The only thing I can read on the label is 1/2 H. P. Bench Grinder, the S/N and the "sold by" verbage at the very bottom. It's missing the eye shields and quench tray but I know I can source those. I'll get some part numbers off of it tomorrow and see if I can determine the model number.

The model number is 397.19430. There's a fair amount of fine sawdust inside the guards so a thorough cleaning is in order but the original paint is so good that's all I'm planning to do.
 

sho92

Active member
Joined
Oct 14, 2009
Messages
39
Location
Upper Freehold, NJ
I was asked to post up the ID plate for my new 1/4hp. I got the best picture I could, the label is pretty far gone. Build date is 9/54 and the model is 115.7561. I also included a picture of the rust I'm having to deal with.

Unfortunately it looks like this sat under a leaky pipe in someones basement or garage for a long time. The left side mounting bolt is rusted solid to the grinder, so much so I think an air chisel might be needed to push it out, and I'm not even sure if that will work. I'll definitely be making a new center band, this one is toast.

I found out that the original color is a navy blue, I don't think I've seen that color here in the thread. I'll take picture of the case to show the color. Thankfully the interior of the machine is in really good shape.
 

Attachments

  • 20140330_180539 A.jpg
    20140330_180539 A.jpg
    90.5 KB · Views: 30
  • 20140322_163042 A.jpg
    20140322_163042 A.jpg
    108.6 KB · Views: 26

Kruck26

Member
Joined
Mar 9, 2014
Messages
10
Location
Cedarburg, WI
I posted so picks of the grinder and stand I picked up last weekend of $40. It had a some serious rust but the inside is perfect. I had some time today and took all the rust off and this is what it looks like now... There is a ton of pitting on the low 1/4 of the face plate and on the stand. It must of been in a damp garage at one point... any suggestions to get a smooth finish when painting.
 

Attachments

  • Front.jpg
    Front.jpg
    143.2 KB · Views: 19
  • Base.jpg
    Base.jpg
    141 KB · Views: 19

drivesitfar

Well-known member
Joined
Oct 23, 2013
Messages
36,008
Location
Pacific Northwest
JB weld has a steel product you can use to smooth out the imperfections or i hear a product called Devcon is a little spendier and works a lot better. one thing i can tell you if you use JB Weld product it does shrink so fill it a little over and then prepare for a little sanding after it is dry.

Nine's rustoleum idea is one I've used to because that pitting is a little character and most won't see it unless they are looking close under a bright light.

Bondo works too.
 

sho92

Active member
Joined
Oct 14, 2009
Messages
39
Location
Upper Freehold, NJ
I posted so picks of the grinder and stand I picked up last weekend of $40. It had a some serious rust but the inside is perfect. I had some time today and took all the rust off and this is what it looks like now... There is a ton of pitting on the low 1/4 of the face plate and on the stand. It must of been in a damp garage at one point... any suggestions to get a smooth finish when painting.

Kruck, it looks like we're in the same boat with rust. What did you use to remove it? I'd be pretty happy if mine came out that clean.
 

torqueman2002

Well-known member
Joined
Jun 3, 2009
Messages
6,139
Location
SE Michigan
I was asked to post up the ID plate for my new 1/4hp. I got the best picture I could, the label is pretty far gone. Build date is 9/54 and the model is 115.7561. I also included a picture of the rust I'm having to deal with.

Unfortunately it looks like this sat under a leaky pipe in someones basement or garage for a long time. The left side mounting bolt is rusted solid to the grinder, so much so I think an air chisel might be needed to push it out, and I'm not even sure if that will work. I'll definitely be making a new center band, this one is toast.

I found out that the original color is a navy blue, I don't think I've seen that color here in the thread. I'll take picture of the case to show the color. Thankfully the interior of the machine is in really good shape.
Welcome to the CM Block Grinder fan club.

I'm betting yours is the brother to one I picked up a few years back. A 1/3 HP 6" Craftsman Bench Grinder Model 115.7566 (2/59 - date of manufacture?)

It actually set me on the hunt for Block Grinders.

You might get some tips from the restore in the following link to the thread on GJ.
http://tinyurl.com/CM-GJ-Lil-Brownie-115-7566

A word of Caution, if your model is the same style as the 115.7556.
If the RH bearing wants to come with the arbor shaft when you attempt to remove it from the RH casting, do not proceed. There is an internal fiber backed switch that needs to be unscrewed from the casting first.

Good luck. Let us know if you get 'stuck.'

BTW - these great little grinders (Models with prefix 115.) are not the Block grinders the site is dedicated to, but I don't think others will mind us posting just a few times. Please consider starting a new thread on your rescue and posting a link to it here so others may follow it.
:thumbup:
 

torqueman2002

Well-known member
Joined
Jun 3, 2009
Messages
6,139
Location
SE Michigan
Kruck, it looks like we're in the same boat with rust. What did you use to remove it? I'd be pretty happy if mine came out that clean.
Once you get it apart, please no pneumatic hammering, or chiseling (the cast iron might not survive) media blasting or soak in a rust remover.

Liquid rust removal has a number of choices - vinegar, WD-40 Rust Remover Soak are 2 I've used with very good results.

I think the center sheet metal band would fair better in a liquid rust remover than in a blast cabinet, if it's condition is as bad as you suspect.

As far as getting it apart, soak it, soak it, soak it with your choice of penetrating oil. I like Kroil and PB Blaster. Others find ATF & Acetone works very well, but requires frequent mixing and re-application.

If the bolt(s) don't want to come out of the LH casting, you may be able to cut them off from the inside, once the center sheet metal band is removed.

Good luck. Post up pics of your progress.
:thumbup:
 

-Brent-

Well-known member
Joined
Dec 23, 2009
Messages
4,709
Location
Utah
attachment.php


33BA chuck and Standard Abrasive flap wheel.

attachment.php


Flap wheel from the side.

attachment.php


1/2 HP block with an Osborn knotted wire wheel and a Scotchbright wheel. I'm unsure of the part number. The place I get them from just has a big box of them without any numbers I've seen.

attachment.php


attachment.php


attachment.php


1/2 HP machines from the rear. I inserted qa 1/4-20 thread insert and used an 1/2" EMT bracket to organize the wires.
attachment.php
 

Attachments

  • Half HP Grinders.JPG
    Half HP Grinders.JPG
    136.4 KB · Views: 161
  • Standard Abrasive Flap Wheel.jpg
    Standard Abrasive Flap Wheel.jpg
    50.2 KB · Views: 161
  • Half HP Machine.JPG
    Half HP Machine.JPG
    129.9 KB · Views: 165
  • Osborn Knotted Wire Wheel.jpg
    Osborn Knotted Wire Wheel.jpg
    56.9 KB · Views: 163
  • ScotchBrite and Knotted Wheel.JPG
    ScotchBrite and Knotted Wheel.JPG
    146.1 KB · Views: 166
  • Secured Wires.jpg
    Secured Wires.jpg
    43.8 KB · Views: 157
  • Wires Secured with EMT Bracket.JPG
    Wires Secured with EMT Bracket.JPG
    121.2 KB · Views: 155
Last edited:

exmaxima1

Well-known member
Joined
Jun 25, 2011
Messages
6,340
Location
Midwest
When I see that open wire wheel I just cringe....

Sometimes when I use my 10" wire wheel I get wires shot into my hands and sleeves, so I imagine that open wheel throwing wires into walls and passerbys
 

-Brent-

Well-known member
Joined
Dec 23, 2009
Messages
4,709
Location
Utah
When I see that open wire wheel I just cringe....

Sometimes when I use my 10" wire wheel I get wires shot into my hands and sleeves, so I imagine that open wheel throwing wires into walls and passerbys

I'm the opposite. I prefer knotted wires and removing and changing them before they're losing wires. I cannot stand crimped wire wheels in any configuration. In guards they'll just eat the guard away and make a racket and open they're going to shoot wires - even new.

The Osborn knotted wheel (made in the USA) is an awesome wheel. You won't find it shooting off wires.
 
Last edited:
To avoid these ads, REGISTER NOW!
Top Bottom