To avoid these ads, REGISTER NOW!

let's see your craftsman block grinders

madoc1

Well-known member
Joined
Dec 11, 2012
Messages
1,242
Location
spicewood, tx
Yes, interesting ...

How about a capacitor or start-relay? Maybe the 1/4 HP don't use one? This is the 1st 1/4 HP I've taken the bottom plate off.

The next time I visit my brother back East, I'll ask to open up the 2 CM Block grinders he has.

1/4 HP Model 397.19400, I paid $15 on 7/20/11
1/3 HP Model 397.19580, I paid $20 on 8/13/11

BTW - what's the model number of yours, I can't quite make it out.

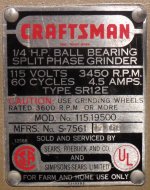
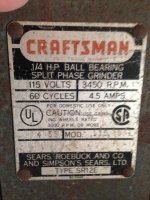
the model # is 115.7561 and it is a type sr12e. no cap or start relay.
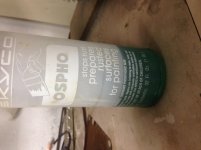
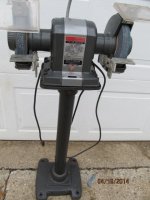
also did a bit of clean up. put a coat of ospho on it and liked the patina look so left and just cleared it.
 

Attachments

  • IMG_2819.jpg
    IMG_2819.jpg
    145.5 KB · Views: 57
  • IMG_2927.jpg
    IMG_2927.jpg
    136.9 KB · Views: 62
Last edited:
To avoid these ads, REGISTER NOW!

larryq

Well-known member
Joined
Jul 12, 2011
Messages
2,421
I'm in discussions for a grinder the same style as Torqueman's latest acquisition (below), in considerably better cosmetic shape-- though we all know you have to run these over with a tank before they stop working.

This one comes with the light and quench tray. Seller's asking $50, sounds good to me. Thoughts from the gallery?

033HPCM39719580forinternetP1040048.jpg
 

torqueman2002

Well-known member
Joined
Jun 3, 2009
Messages
6,139
Location
SE Michigan
madoc1,

Nice looking machine. Looks like a candidate for the Oldest CM pre-Block Grinder on the forum. 1955!

What did you use to clean it up?

The bottom pic. shows it is wired up like the 1/4 HP 115.19500 guy; no cap, no relay. Judging from the 3 wires going into the motor, I think it has a start-winding switch in the RH casting.

Are you thinking about re-doing the power cord and winding wires? Looks like some insulation has gone over to the bad side.

Have you split the windings from the LH & RH castings? Sometimes the RH bearing will want to come out with the arbor/shaft. If that happens, and the start-winding switch in the RH casting is still screwed to the RH casting, it will very likely not survive. I know of at least 1 guy who is still looking for a replacement start-winding switch.

Good job on preserving the patina. :thumbup:
 

madoc1

Well-known member
Joined
Dec 11, 2012
Messages
1,242
Location
spicewood, tx
thx. torque. just did a good scrubbing with water on the outside and the dirt daubers.
yes, it needs to be rewired. because the motor leads are so short I plan to coat them with liquid tape then add the new cord. not sure whether to solder or nut the wires. the originals lasted a long time.
not going to pull apart. it's real smooth as it is.
 

torqueman2002

Well-known member
Joined
Jun 3, 2009
Messages
6,139
Location
SE Michigan
I'm in discussions for a grinder the same style as Torqueman's latest acquisition (below), in considerably better cosmetic shape-- though we all know you have to run these over with a tank before they stop working.

This one comes with the light and quench tray. Seller's asking $50, sounds good to me. Thoughts from the gallery?
I'll be looking for a picture of it @ your house in 15 min. :beer:
 

-Brent-

Well-known member
Joined
Dec 23, 2009
Messages
4,709
Location
Utah
attachment.php


Anyone want to trade a quencher or, better yet, one of those quencher stands for some spare parts???
 

Attachments

  • Bench Grinder Parts.jpg
    Bench Grinder Parts.jpg
    49.6 KB · Views: 135

torqueman2002

Well-known member
Joined
Jun 3, 2009
Messages
6,139
Location
SE Michigan
thx. torque. just did a good scrubbing with water on the outside and the dirt daubers.
yes, it needs to be rewired. because the motor leads are so short I plan to coat them with liquid tape then add the new cord. not sure whether to solder or nut the wires. the originals lasted a long time.
not going to pull apart. it's real smooth as it is.
That should work.
I'm so OCD - I'd pull it apart and re-wire the windings, start-up switch, new grounded power cord, switch, as well as a new pair of bearings. That should give it another 50+ years of service. :thumbup:

Now that I think of it, I'd burnish/clean the start-up switch contacts, and verify the swing-out weights are not hanging up on the arbor/shaft. If the switch should stick in the at-rest (closed) position, the start-winding will not survive; if the switch should stick in the open position, the grinder will just hum and may over heat.

So what is: 'a coat of ospho'? :dunno:

I usually stick with how the grinder came from the supplier, in this case wire nuts. Solder may weaken with the vibration. Not sure though.
 

torqueman2002

Well-known member
Joined
Jun 3, 2009
Messages
6,139
Location
SE Michigan

madoc1

Well-known member
Joined
Dec 11, 2012
Messages
1,242
Location
spicewood, tx
ospho-a rust converter. I initially bought it to use on my golf cart battery frame. works well.

damn, can't get the orientation correct.
 

Attachments

  • IMG_2879.jpg
    IMG_2879.jpg
    134.1 KB · Views: 14
Last edited:

jakemac

Well-known member
Joined
May 21, 2013
Messages
9,035
Location
New England
I use Loctite Extend. I wire-brushed a 16' car trailer and repainted using the loctite under the primer, and 10yrs later it's still holding up.
 

Attachments

  • 419PTjD4l2L.jpg
    419PTjD4l2L.jpg
    28.9 KB · Views: 9
  • 316BoozQ+wL.jpg
    316BoozQ+wL.jpg
    8.3 KB · Views: 12
Last edited:

larryq

Well-known member
Joined
Jul 12, 2011
Messages
2,421
I'll be looking for a picture of it @ your house in 15 min. :beer:

Yes, I'm hoping to get this and share with the group. Not a slam dunk yet but fingers crossed.

Regarding an earlier post, how do you rewire the winding? Like you I've landed a couple of CMs recently, and I posted about an earlier grinder (without wheel guards) whose three wires going into the winding needed some love -- cracking sheath etc. Problem is the wires go into the winding itself and I have no way of getting at the root? :dunno:
 

torqueman2002

Well-known member
Joined
Jun 3, 2009
Messages
6,139
Location
SE Michigan
Yes, I'm hoping to get this and share with the group. Not a slam dunk yet but fingers crossed.

Regarding an earlier post, how do you rewire the winding? Like you I've landed a couple of CMs recently, and I posted about an earlier grinder (without wheel guards) whose three wires going into the winding needed some love -- cracking sheath etc. Problem is the wires go into the winding itself and I have no way of getting at the root? :dunno:
I've not done it myself. Have you searched/posted on OWWM.com ? They have a lot of members familiar with vintage motor rebuilds.

I sure hope you can replace the bad sections without having to tear into taking the windings out of the core.

If it does require that, you might have luck with a local electric motor rebuilder.
 

tedsters

Well-known member
Joined
Oct 29, 2012
Messages
1,443
Location
Michigan
Finally got the block home this is the one in post 866 this this is pretty clean there is some surface rust on the base and a few scratches on the grinder but both wheels are exactly 7in my buddy seen it and said they were the original wheels on it with the red writing, i could not get the washer off from the wheel without ripping the paper and i could not find my heat gun i may just paint the pedestal and leave the grinder alone this might have been used a couple times all off the paint is still inside the covers.
the best i can gather on the date is Nov. 15 1972

Would be nice if someone did know the color match on it this thread is way too long to look
 

Attachments

  • IMG_1712.jpg
    IMG_1712.jpg
    140.5 KB · Views: 70
  • IMG_1713.jpg
    IMG_1713.jpg
    134.7 KB · Views: 46
  • IMG_1710.JPG
    IMG_1710.JPG
    122.4 KB · Views: 35
  • IMG_1707.JPG
    IMG_1707.JPG
    87.2 KB · Views: 34
  • IMG_1704.JPG
    IMG_1704.JPG
    122.6 KB · Views: 47

organ

Well-known member
Joined
Jan 22, 2014
Messages
955
Location
Atlanta
Finally got the block home this is the one in post 866 this this is pretty clean there is some surface rust on the base and a few scratches on the grinder but both wheels are exactly 7in my buddy seen it and said they were the original wheels on it with the red writing, i could not get the washer off from the wheel without ripping the paper and i could not find my heat gun i may just paint the pedestal and leave the grinder alone this might have been used a couple times all off the paint is still inside the covers.
the best i can gather on the date is Nov. 15 1972

Would be nice if someone did know the color match on it this thread is way too long to look
Beautiful!
 

macgee

Well-known member
Joined
Jan 11, 2014
Messages
2,834
Location
Sepulveda Pass, CA
Hey guys,

I have a question and looking for advice, I have three old classic craftsman grinders, two are blocks.

They all could use a paint/restore job which is not a problem but two of them have faded metal label plates riveted in. Has anyone been able to restore them or make in new ones like the printed ones?

I've seen them done for old lathes at a reasonable price. Also looking to replace the original sticker label. I found the post showing the PDF file to print new ones but can't open it as my computer says the file is broken. Thanks!

EDIT: I gotta say that I love them, one has two different grit grinding wheels, one has buffing wheels (firm & soft) and the third one (1750 rpm) has (2 grades) wire wheels. They kick ***, I kept buying ones I came across to give to friends but there too useful.
 
Last edited:
To avoid these ads, REGISTER NOW!

larryq

Well-known member
Joined
Jul 12, 2011
Messages
2,421
I've not done it myself. Have you searched/posted on OWWM.com ? They have a lot of members familiar with vintage motor rebuilds.

I sure hope you can replace the bad sections without having to tear into taking the windings out of the core.

If it does require that, you might have luck with a local electric motor rebuilder.

Haven't done that, no. Still hoping I can avoid it. I stripped the crumbling insulation from the white wire (worst of the three by far) and twisted fresh wire strands around it, like a bandage wrap, then wrapped it all in Super 88 electrical tape. For cheap hacks it's hard to beat but if it gets the job done I'm happy. This particular grinder is earmarked for a buddy.
 

tedsters

Well-known member
Joined
Oct 29, 2012
Messages
1,443
Location
Michigan
Finally got the block home this is the one in post 866 this this is pretty clean there is some surface rust on the base and a few scratches on the grinder but both wheels are exactly 7in my buddy seen it and said they were the original wheels on it with the red writing, i could not get the washer off from the wheel without ripping the paper and i could not find my heat gun i may just paint the pedestal and leave the grinder alone this might have been used a couple times all off the paint is still inside the covers.
the best i can gather on the date is Nov. 15 1972

Would be nice if someone did know the color match on it this thread is way too long to look

does anyone know the paint match
 

drivesitfar

Well-known member
Joined
Oct 23, 2013
Messages
36,008
Location
Pacific Northwest
Finally my memory kicked in to remember to measure my Baldor arbors when I was at my shop. they stick out a total of 6.75 inches and the inch arbor scales down to 3/4 of an inch at 3 3/8 inch from the bearings covering. here are a few pictures of the arbor with a tape on it so you can see in pictures.

the one side of the buffer wheels holder has a notch in it and there is a protruding piece that it slides over to keep it from spinning. on the other side there is 2 bolts to tighten the other holder in place on the buffing wheel.

A tip i learned from a client that built race cars was to put a couple wraps of duct tape on the double bolts on the end. that way if he happened to push hard and come off the wheel the bolts wouldn't scar up his piece he was putting a final shine on.

i hope this helps some of you that want to make one or two of your block grinders into a buffer.

good luck
 

Attachments

  • WP_20140411_006.jpg
    WP_20140411_006.jpg
    89.8 KB · Views: 16
  • WP_20140411_007.jpg
    WP_20140411_007.jpg
    143.7 KB · Views: 16
  • WP_20140411_004.jpg
    WP_20140411_004.jpg
    129.1 KB · Views: 16
  • WP_20140411_003.jpg
    WP_20140411_003.jpg
    100.6 KB · Views: 15
  • WP_20140411_002.jpg
    WP_20140411_002.jpg
    122.9 KB · Views: 21

torqueman2002

Well-known member
Joined
Jun 3, 2009
Messages
6,139
Location
SE Michigan
... i hope this helps some of you that want to make one or two of your block grinders into a buffer.

good luck
:thumbup::thumbup:
drivesit...

Thanks!
Nice looking buffer ... :drool: I have Baldor envy. Please don't hate me; I like nice machines, even if they are not CM Block grinders.

I'll send off an I/M and ask for some idea what it will run to make a set for 1/2" x 1/2" arbors and 5/8" x 5/8" arbors.

Any other requests? 5/8" x 1/2" maybe?
(buffer shaft dia. x buffing wheel dia.)
 

torqueman2002

Well-known member
Joined
Jun 3, 2009
Messages
6,139
Location
SE Michigan
... looking to replace the original sticker label. I found the post showing the PDF file to print new ones but can't open it as my computer says the file is broken. Thanks!

You are welcome. :D

Are you refering to: Post #306 in the following page - http://www.garagejournal.com/forum/showthread.php?t=157794&page=16

If you are, did you follow the poster's instructions, below?
However, the size limit for a .doc file is limited. So the attached .pdf file is actually a Word document. Download this .pdf file to your PC and rename it with a .doc suffix.

A few caveats...

The label may be reformatted when opened with MS Word versions other than 2010.

This label was created by inserting various shapes, lines, and text boxes. A few of these elements could be tweaked.


If you follow the directions and are still having problems, post up again. Lots of friendly, helpful people here. :)
 

larryq

Well-known member
Joined
Jul 12, 2011
Messages
2,421
Yes, I'm hoping to get this and share with the group. Not a slam dunk yet but fingers crossed.

Ok, picked it up yesterday for $50. Very nice seller, he came into it through an in-law who kept it in great shape and even built a carrying case for it!

The seller is more into woodworking and so didn't have a need for this. I told him it will go to a good home.

Runs great and looks very nice. Debating on whether to scuff and repaint. Probably will, then get around to new bearings, which I'm not sure it needs but it is 40 years old.... The gooseneck light works with no issue.

00W0W_iFTI48penQA_600x450.jpg

00B0B_fK8f6lwyLiG_600x450.jpg


00H0H_iWohy9ByerN_600x450.jpg


Edit: should mention the eye guards on these models are one of the best features about them. Dual-pane 'shatterproof' glass, not like the plastic guards later CM grinders use. Very thick. Those who haven't seen them before are missing out.
 
Last edited:

drivesitfar

Well-known member
Joined
Oct 23, 2013
Messages
36,008
Location
Pacific Northwest
Larry: nice grinder. very old school. did you get the wood box with the handle to take it home in? i bought mine from a woodworker and once i remove the sawdust mine will look like new so yours probably will too.

Nice:thumbup:
 

larryq

Well-known member
Joined
Jul 12, 2011
Messages
2,421
Thanks guys. Yes, the wood box was part of the deal...and a well-made one it is, too.

Outlaw, I'll probably keep it as-is on the paint, do some scrubbing. As you know I have that other block grinder I'm restoring (just put on some new bearings) so don't need another disassembly on the bench.

Didn't think in the space of a month I'd pick up two block grinders. For a long time all I had a newer (1975 era) edition with the plastic eye guards, worked fine but I wanted to see about something older and never had any luck.

Sure don't need any more of these but if one pops up at the right price....there's a phrase to describe that reflex action, isn't there? :shocking:
 

balane

Well-known member
Joined
May 4, 2011
Messages
2,996
Location
Pacific Northwest
Nice shape for a 1960 block. This is just a 1/4 HP but wow, it's really heavy. I haven't weighed it yet but I bet it's over 40 pounds. Heavier than the size-relative newer ones I've seen. Runs great. Glass is cracked but that's about it. I don't see a lot of this specific model with the lamp, most were shipped without so that's a plus.

.
 

Attachments

  • Sam_7384.jpg
    Sam_7384.jpg
    145 KB · Views: 35
  • Sam_7383.jpg
    Sam_7383.jpg
    132.7 KB · Views: 30
  • Sam_7377.jpg
    Sam_7377.jpg
    110.4 KB · Views: 42
  • Sam_7381.jpg
    Sam_7381.jpg
    144.5 KB · Views: 37
  • Sam_7380.jpg
    Sam_7380.jpg
    143 KB · Views: 35
  • Sam_7371.jpg
    Sam_7371.jpg
    139.2 KB · Views: 41
  • Sam_7369.jpg
    Sam_7369.jpg
    144.8 KB · Views: 41

drivesitfar

Well-known member
Joined
Oct 23, 2013
Messages
36,008
Location
Pacific Northwest
Balane: that does look great for a litte 1/4 HP and stout too. other than the missing guards and the broken glass it looks almost new. are these broken glass shields replaceable or do you have to use plexy?

you might check with Brent that has a post on this thread with extra shields because he has open wire wheels on his grinders and he was looking for some cash for a water tray or trade if you might have an extra one.

nice work
 

balane

Well-known member
Joined
May 4, 2011
Messages
2,996
Location
Pacific Northwest
It does not have missing side guards. This model wasn't shipped with them originally and there is no method to attach them. The glass is easy to replace but that would be up to its future owner if he wants to. Any glass shop can cut you a piece of safety glass but it isn't exactly cheap.
 

sho92

Active member
Joined
Oct 14, 2009
Messages
39
Location
Upper Freehold, NJ
other than the missing guards and the broken glass it looks almost new.

Actually, these didn't come with a side guard. When I first got mine of the same vintage, I thought the gaurds were missing, till I looked and saw there are no mounting holes. Others I've seen since don't have a the guards either.

**Edit, I see Balane beat me to it with his reply, but that got me thinking...

My 1/4hp from 1954, doesn't have the bosses for the side guards, Balane's from 1960 doesn't either. However Torqueman's 1/3hp from 1959 does have the mount holes, as seen in his resto thread here.

Has anyone else noticed the same thing? I wonder if Craftsman decided the "baby" HP model didn't need the guards.
 
Last edited:

torqueman2002

Well-known member
Joined
Jun 3, 2009
Messages
6,139
Location
SE Michigan
Nice shape for a 1960 block. This is just a 1/4 HP but wow, it's really heavy. I haven't weighed it yet but I bet it's over 40 pounds. Heavier than the size-relative newer ones I've seen. Runs great. Glass is cracked but that's about it. I don't see a lot of this specific model with the lamp, most were shipped without so that's a plus. .
blane;
Very nice indeed!:drool:

They are heavier than you might expect. I remember when I bought my 1st one, I was amazed how much the little sucker did weigh.

That is a cool lamp. I have only seen them in the catalogues.

What's the history of this guy, is it a trailer queen or a driver?

What about the center band's color. Looks like a light Bronze or Gold. What do you think?

Also, looks like the band, lamp shade, and eye shield frames are the same color.

One last thing. A favor - for a couple of us who have just aquired these pre-Block motor grinders.

Can you take a shot of the tag/label square on to the face and as close as you can with good focus?

I'd like to use it as a 'go-by' for the restore I am starting with a really bad tag/label.

See what I mean? Pretty bad.
P1040029.jpg


Thanks for posting.

BTW - that would be a fine addition on the VintageMachine website.
 

torqueman2002

Well-known member
Joined
Jun 3, 2009
Messages
6,139
Location
SE Michigan
Actually, these didn't come with a side guard. When I first got mine of the same vintage, I thought the gaurds were missing, till I looked and saw there are no mounting holes. Others I've seen since don't have a the guards either.

**Edit, I see Balane beat me to it with his reply, but that got me thinking...

My 1/4hp from 1954, doesn't have the bosses for the side guards, Balane's from 1960 doesn't either. However Torqueman's 1/3hp from 1959 does have the mount holes, as seen in his resto thread here.

Has anyone else noticed the same thing? I wonder if Craftsman decided the "baby" HP model didn't need the guards.

92,

I think you're onto something. The 1/4 115.191500 I picked up last week does not look like it was cast with bosses for side guards/covers.

Just getting ready to start a new thread, and stopped by to check out my favorite thread on GJ. :thumbup:
 

torqueman2002

Well-known member
Joined
Jun 3, 2009
Messages
6,139
Location
SE Michigan
... The glass is easy to replace but that would be up to its future owner if he wants to. ...
As a collector ... OK hoarder, I can't beleive you said that.

How will you go about selling it?

Let us know, so we can watch how much it goes for. Unless you want to talk. Remember - last week I got one just like it with a CM stand - for $20.
CM025HP11519500Akronforinternet.png

:bounce:
 

balane

Well-known member
Joined
May 4, 2011
Messages
2,996
Location
Pacific Northwest
Thanks everybody.

The textured brown finish on the cast iron is original from Craftsman and has only been cleaned up. I did refinish the center band and the eye guard frames with Krylon Caramel Latte' Brushed Metallic (Honest, that's the paint's name.) It's an extremely close match to the original. It was clean when I got it but I like them to look very nice in photos for eBay and painting those things makes a huge difference. Sorry, no idea on the history. Found it at the antique mall.

Feel free to use these photos anywhere you like. These things are only in my possession for a week or so tops.

Here's a close up of the tag.

.
 

Attachments

  • Sam_7415.jpg
    Sam_7415.jpg
    146.5 KB · Views: 40

balane

Well-known member
Joined
May 4, 2011
Messages
2,996
Location
Pacific Northwest
As a collector ... OK hoarder, I can't beleive you said that.

How will you go about selling it?

Let us know, so we can watch how much it goes for. Unless you want to talk. Remember - last week I got one just like it with a CM stand - for $20.

I'm not a collector. I have two block grinders but i use them every day and they look horrible.

I'll auction this on eBay, starting at $0.99 and run it a week.

They usually do pretty well. Here's my last one;

http://cgi.ebay.com/ws/eBayISAPI.dll?ViewItem&rd=1&item=390791611412
 
To avoid these ads, REGISTER NOW!
Top Bottom