To avoid these ads, REGISTER NOW!

let's see your craftsman block grinders

torqueman2002

Well-known member
Joined
Jun 3, 2009
Messages
6,139
Location
SE Michigan
Thanks catcher. Will check it out. I hope it’s not the shaft causing the wobble.
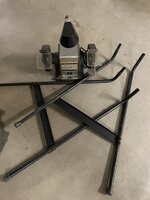
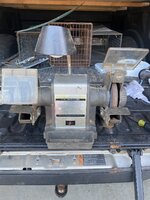
How does it start w/o the stones/flanges/nuts?

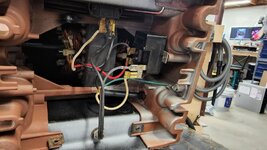
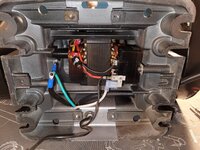
Also, the "the start winding thing", is the start-up relay. It's function is to Open the start-up coil circuit (thin windings) at about 75% run speed. It is used instead of a centrifugal switch that would be located in the RH end bell.

The capacitor is used in the CM Block grinders to shift the electromotive magnetic field phase, as an aide in starting.

I am very interested to know how the grinder starts without the stones/flanges/nuts.

Also, the grinder should spin freely and easily by hand - with the power off.
 
Last edited:
To avoid these ads, REGISTER NOW!

Fergiebear13

Member
Joined
Nov 9, 2021
Messages
14
Hello everyone. I'm new to posting here but have gained a lot of knowledge by reading all the posts. I have a Craftsman 1/3 hp block grinder model 397.19580. I just got done restoring it and I'm in need of help. The motor windings look in great condition after cleaning all the dust, the wires are in their correct terminals, the body is lined up correctly, and I was even lucky enough to find a new correct relay. After installing the relay I still have to jumpstart the wheels by slightly turning them by hand. Can anyone think of a reason it is not spinning up on its own other than the fact that it's old? I'm out of ideas...thanks in advance for your help.
 

Attachments

  • 20211208_162731.jpg
    20211208_162731.jpg
    398.9 KB · Views: 170
  • 20211108_134006.jpg
    20211108_134006.jpg
    330.9 KB · Views: 111
  • 20211124_221351.jpg
    20211124_221351.jpg
    504.8 KB · Views: 96

torqueman2002

Well-known member
Joined
Jun 3, 2009
Messages
6,139
Location
SE Michigan
Hello everyone. I'm new to posting here but have gained a lot of knowledge by reading all the posts. I have a Craftsman 1/3 hp block grinder model 397.19580. I just got done restoring it and I'm in need of help. The motor windings look in great condition after cleaning all the dust, the wires are in their correct terminals, the body is lined up correctly, and I was even lucky enough to find a new correct relay. After installing the relay I still have to jumpstart the wheels by slightly turning them by hand. Can anyone think of a reason it is not spinning up on its own other than the fact that it's old? I'm out of ideas...thanks in advance for your help.
Welcome to GJ and CM Block grinder ownership.

Nice looking restore. You may want to contact member mattblast for a replacement machine tag.

Have you tried starting the grinder with out the wheels. flanges, and arbor nuts? If it still needs a 'jump start', try re-aligning the coil assembly.

Here's a wiring diagram for reference.
P1100070 a.JPG
 

exmaxima1

Well-known member
Joined
Jun 25, 2011
Messages
6,339
Location
Midwest
Hello everyone. I'm new to posting here but have gained a lot of knowledge by reading all the posts. I have a Craftsman 1/3 hp block grinder model 397.19580. I just got done restoring it and I'm in need of help. The motor windings look in great condition after cleaning all the dust, the wires are in their correct terminals, the body is lined up correctly, and I was even lucky enough to find a new correct relay. After installing the relay I still have to jumpstart the wheels by slightly turning them by hand. Can anyone think of a reason it is not spinning up on its own other than the fact that it's old? I'm out of ideas...thanks in advance for your help.
You might not have the motor assembled exactly right. Try loosening the 3 long bolts and tapping the housing a bit and see if it will start on its own. Sometimes there is enough mis-alignment to bind the bearings and the start winding can't overcome it.
Also, are you sure you put the spring washer behind the bearing in correctly? That will definitely stall the grinder.
 

Fergiebear13

Member
Joined
Nov 9, 2021
Messages
14
Thank you both for the quick reply. I did wonder about the spring washers because even though i took a pic of how they came out I think I may have turned it around before I took the pic.lol. I have them in as the spring part toward the bearing and the flat side toward the wool washer. Is this correct? The pic is when I first took everything apart.
 

Attachments

  • 20211108_131305.jpg
    20211108_131305.jpg
    203 KB · Views: 89

Fergiebear13

Member
Joined
Nov 9, 2021
Messages
14
Yes, it is correct
Ok. I took the entire thing back apart. Put it back together exactly how it should, tapped everything back in alignment, plugged it in, and it still wont spin on its own. I looked for broken wires on the coil everything looks brand new. I guess I'll just have to live with jumpstarting it.
 

torqueman2002

Well-known member
Joined
Jun 3, 2009
Messages
6,139
Location
SE Michigan
Yup, it's correct. On mine, it was on the LH side end bell, and the rotor has the cooling fins on the LH side as well.
P1110345.JPG

Here is a shot of how the wiring on mine is done.
P1110349.JPG

Question: Why did you replace the relay? In my experience, they are very robust and do not fail very often. In the dozens of Blocks I have repaired or restored, I haven't found one relay that failed.

If it were mine, I'd put the original relay back and retry. I'd also verify all electrical connections are good. Just a note about the wire used for the windings - it is covered in a varnish type insulation coating, which must be removed to make a good connection.

Good luck. Oh, have you had a chance to check the resistance of the windings yet?
 
Last edited:

Fergiebear13

Member
Joined
Nov 9, 2021
Messages
14
Thanks. No I haven't had a chance to because electrical goes over my head. I have a multimeter that has different settings for resistance, but I'm not sure how to use it.lol. When I do figure it out, what should the numbers look like?
 

torqueman2002

Well-known member
Joined
Jun 3, 2009
Messages
6,139
Location
SE Michigan
Thanks. No I haven't had a chance to because electrical goes over my head. I have a multimeter that has different settings for resistance, but I'm not sure how to use it.lol. When I do figure it out, what should the numbers look like?
The resistance figures are in the table in post #13,083, above. The winding/coil terminals, must be disconnected from the components for testing: switch, relay, lamp, ...

There are a number of tutorials for multimeter basics on the Tube. Unfortunately, the one I saved is broken.
Try looking here. https://www.youtube.com/results?search_query=how+to+use+a+multimeter
 

Fergiebear13

Member
Joined
Nov 9, 2021
Messages
14
Well I thank you for your help, but I think it's done for. I spun the wheels earlier to jump start it with the wheels on because it spun up jump starting it without them after I put everything together again but it just spun really slowly and wouldn't pick up speed even though i was helping it along. It did that for a few seconds and then started smoking white smoke. It ran perfectly fine last night when the wheels were hand spun so idk. Very frustrating, but I guess I couldn't save it after all.
 

torqueman2002

Well-known member
Joined
Jun 3, 2009
Messages
6,139
Location
SE Michigan
"... I think it's done for."
Sorry my friend, that is not good news.

I believe the thin wired start-up winding has overheated and burned open. EDIT One thing - it's evident that the start-up coil was getting power at start up. Which mean the relay did the first part of it's job. the second and criticl part is to open the start circuit so it does not let the magic smoke out. This happens when the rotor reaches about 75% running speed.

You might be able to find and repair the section that is burnt, but unless we can find the root cause of it's slow start, it will happen again.

I'd say send it on to me, but with a burnt winding I would not have any way of fixing it for you. Sorry.

It's in nice shape, you could part-it-out in the classified section and/or on eBay.


Best of luck.
 
Last edited:

Smokeetr

New member
Joined
Dec 10, 2021
Messages
3
If gave you the model numbers and s/n would you be able to tell me what year it was made. No numbers on the bottom
 

Smokeetr

New member
Joined
Dec 10, 2021
Messages
3
I’m new here and I’m pretty sure I’m no posting correctly…sorry
 

Attachments

  • D961F9C2-A436-431E-AF92-73D72089612D.jpeg
    D961F9C2-A436-431E-AF92-73D72089612D.jpeg
    397.3 KB · Views: 86
  • CBBB3974-7499-441A-A349-77FB48947D44.jpeg
    CBBB3974-7499-441A-A349-77FB48947D44.jpeg
    495.9 KB · Views: 77
  • 64D549E1-7B3B-4196-920A-9FD66CC8FD5F.jpeg
    64D549E1-7B3B-4196-920A-9FD66CC8FD5F.jpeg
    327.1 KB · Views: 78

torqueman2002

Well-known member
Joined
Jun 3, 2009
Messages
6,139
Location
SE Michigan
If gave you the model numbers and s/n would you be able to tell me what year it was made. No numbers on the bottom
After a quick search I found a pdf copy of an Owners Manual for a 3/4-HP model 397.19350, Part No. 22013274 C3566 Printed 1/78.

In the Sears Craftsman 1977-78 Power And Hand Tools Catalog (16306.pdf). There is a 3/4-HP Block w/ 7" wheels, but with a *********** switch.
Screenshot 2021-12-10 220859.png

In the Sears Craftsman 1978-79 Power And Hand Tools Catalog (16540.pdf). There is a 3/4-HP Block w/ 7" wheels, also with a *********** switch.
Screenshot 2021-12-10 220042.png

I'm not sure when Sears started selling 3/4-HP Blocks w/ 8" wheels, but I have 10 listed in my spread sheet.

For Owners Manual and other Publication Reprints --> http://vintagemachinery.org/mfgindex/detail.aspx?id=222&tab=3

For Sears, Roebuck and Co. catalogs --> http://www.blackburntools.com/articles/rose-tools-catalog-archives/sears/index.html
UPDATE: I just followed the above link. Their list of Sears catalogs ends with 'Craftsman Power and Hand Tool Catalog (1972-73)'. Sorry, there's been a change since I down loaded the above mentioned catalogs.

Member mattblast does excellent reproduction machine labels!
 
Last edited:

Fergiebear13

Member
Joined
Nov 9, 2021
Messages
14
"... I think it's done for."
Sorry my friend, that is not good news.

I believe the thin wired start-up winding has overheated and burned open. EDIT One thing - it's evident that the start-up coil was getting power at start up. Which mean the relay did the first part of it's job. the second and criticl part is to open the start circuit so it does not let the magic smoke out. This happens when the rotor reaches about 75% running speed.

You might be able to find and repair the section that is burnt, but unless we can find the root cause of it's slow start, it will happen again.

I'd say send it on to me, but with a burnt winding I would not have any way of fixing it for you. Sorry.

It's in nice shape, you could part-it-out in the classified section and/or on eBay.


Best of luck.
Hi again! Wanted to follow up on this because you helped, the issue was the connection of a wire I had to extend from the coil. I scraped the lacquer off and had someone solder a piece on, got home and put it all back together and when I turned it on it ran like brand new!!! The smoke was likely the jelly in the connector I used burning.lol So I hope this helps if anyone is stuck between a rock and hard place with their restoration. Thanks for the help!
 
To avoid these ads, REGISTER NOW!

Chadwilliam1

Well-known member
Joined
May 13, 2012
Messages
2,788
Location
Cincinnati
Yup, it's correct. On mine, it was on the LH side end bell, and the rotor has the cooling fins on the LH side as well.
P1110345.JPG

Here is a shot of how the wiring on mine is done.
P1110349.JPG

Question: Why did you replace the relay? In my experience, they are very robust and do not fail very often. In the dozens of Blocks I have repaired or restored, I haven't found one relay that failed.

If it were mine, I'd put the original relay back and retry. I'd also verify all electrical connections are good. Just a note about the wire used for the windings - it is covered in a varnish type insulation coating, which must be removed to make a good connection.

Good luck. Oh, have you had a chance to check the resistance of the windings yet?
Hello, i just replaced the stator in my 397.19340. I know the old stator was bad because i broke some of the wires on it when putting it back together. This thing has been sitting on my shelf for over a year in pieces. I am finally putting it back togather since i purchased a replacement stator. I wired it back just like you have in the pictures, but it just sits there and hums just like it did with the old stator. I tried flipping the rotor around and even leaving the bolts out holding the two halves together because i thought i might have them too tight.

Thank you
Any ideas?
 

BSWS

Well-known member
Joined
Jun 2, 2019
Messages
355
Location
Tucson AZ
My grinder came with the cheap, frameless eye guards that were in pretty bad shape. I hoped to come up with a simple replacement. Not only was this simple but I already had a piece of Lexan and 2" x 1.5" aluminum angle. I used a 1/4" carriage bolt and wingnut to allow adjustment.

20220223_141539.jpg

20220223_141531.jpg
 

kenc184

Well-known member
Joined
Feb 25, 2012
Messages
718
Location
Nor Cal
I have two 1/3hp blocks, a 1/2hp block but couldn't resist this 3/4hp block on CL for $50.

The good: It works nicely, and is in pretty good condition.

The bad: Seller positioned it to not show the fact that a tool rest and a cover is missing (and two of the four rubber feet but that's not unusual). The 8" wheel is heavily glazed, but that's an easy fix. Also, not unusually, the water tray is gone.

The unusual: It's only a 6amp motor, vs the 5.8amps of my 1/2hp unit. I know input current isn't everything, and I would have to review the differences between a split phase and a cap start motor, but still 0.2A?

Still, for $50 I now have a 3/4hp block, 1974 vintage.

IMG-5054.JPG
 

kenc184

Well-known member
Joined
Feb 25, 2012
Messages
718
Location
Nor Cal
Now I see there's even a 6.2A "1/2hp" block, vs my 6.0A "3/4hp". Hmmmm.......

Is the 3.4hp block just another example of Sears horsepower?
 

WWShop

Well-known member
Joined
Aug 25, 2015
Messages
948
Location
MN
I haven't posted in a really long time but here is my most current setup. I have since done some power cord management to make it a bit cleaner.
 

Attachments

  • Screenshot_20220330-092408_Instagram.jpg
    Screenshot_20220330-092408_Instagram.jpg
    186.6 KB · Views: 74

Bro-Dozer

Well-known member
Joined
Aug 27, 2016
Messages
50
Is their a paint color resource someone could direct me to, or link me to? Rattle cans are my speciality haha. Thanks.
 

Chadwilliam1

Well-known member
Joined
May 13, 2012
Messages
2,788
Location
Cincinnati
Are these lights suppose to stay on when the bench grinder is plugged in or is the switch suppose to control it? Here is how i am wired up.
 

Attachments

  • 20220331_123340.jpg
    20220331_123340.jpg
    247 KB · Views: 55

Rod N

Well-known member
Joined
Jul 21, 2011
Messages
835
Location
Keswick, Ontario
Are these lights suppose to stay on when the bench grinder is plugged in or is the switch suppose to control it? Here is how i am wired up.
Lights should shut off with switch.
here is mine.
 

Attachments

  • 6DB28927-26A8-45BD-858F-A05A48467636.jpeg
    6DB28927-26A8-45BD-858F-A05A48467636.jpeg
    252.3 KB · Views: 24
  • 80D9EA29-BC3F-4375-9740-B2803A3F99A7.jpeg
    80D9EA29-BC3F-4375-9740-B2803A3F99A7.jpeg
    275.7 KB · Views: 64

exmaxima1

Well-known member
Joined
Jun 25, 2011
Messages
6,339
Location
Midwest
Are these lights suppose to stay on when the bench grinder is plugged in or is the switch suppose to control it? Here is how i am wired up.
Depends of if your lamp has a switch by the hood. Not many did, but those that did generally were factory wired to have power to them all the time.
 

Bro-Dozer

Well-known member
Joined
Aug 27, 2016
Messages
50
What's secret to removing the plastic power switch? Pinch the tabs and puuuuuuush? Hate to break it.
 

dapekema

Active member
Joined
Feb 18, 2021
Messages
37
Location
90804
First post! Just finished my restoration of a Craftsman model number 115.19500. New paint, bearings, power cord and general cleanup. Really fun first foray into this type of restoration - has me on the lookout for another similar project!

I picked up a lot of tips and tricks reading through this forum. Thanks all for the info!
 

Attachments

  • PXL_20220405_224336501.jpg
    PXL_20220405_224336501.jpg
    434.7 KB · Views: 71
  • 2.jpg
    2.jpg
    410.6 KB · Views: 70
  • 1.jpg
    1.jpg
    356.3 KB · Views: 63
  • PXL_20210221_002713823.jpg
    PXL_20210221_002713823.jpg
    397.4 KB · Views: 61
  • PXL_20210221_002718949.jpg
    PXL_20210221_002718949.jpg
    334.3 KB · Views: 60
  • PXL_20210214_232533344.jpg
    PXL_20210214_232533344.jpg
    381 KB · Views: 68
To avoid these ads, REGISTER NOW!
Top Bottom