To avoid these ads, REGISTER NOW!

Let's See Your Custom Made/Modified Hand Tools

Ratchet Guy

Well-known member
Joined
Nov 25, 2014
Messages
175
Location
Richmond, BC
hmm you could use an impact to rise and lower the kack faster, great, i did something similer for va drill

I tried an impact wrench, and it works, but 18v power drill at low speed is just perfect and it help a lot specially when you need to lift something up went you're working and needed a third hand to lift or lower something heavy
 
To avoid these ads, REGISTER NOW!

davethorik

Well-known member
Joined
Sep 14, 2013
Messages
4,992
Location
Norka, Ohio
I made this a few years ago when I was a machinist. Pin vises are pricy new, I already had the wooden file handle. Jacobs chuck was a freebie from the scrap hopper. Used a liberal amount of Loctite black adhesive. It's heavy and not well balanced, but it only cost me 10 minutes of my time to make.
 

Attachments

  • 20161229_190152.jpg
    20161229_190152.jpg
    147.2 KB · Views: 161
OP
G

gdocktor3

Well-known member
Joined
Apr 18, 2015
Messages
5,419
Location
Connecticut
This one is just a lengthened socket for the flywheel nut on OMC Wankel engines (Johnson and Evinrude sleds). The length is needed to clear the eccentric shaft once the primary clutch assembly is removed.
104_2694.jpg

..

You mean to tell me nobody sells a special made socket for this situation? Or did you want to make your own. You can't be the only one dealing with this..
 

avmaine

Well-known member
Joined
Dec 9, 2015
Messages
123
Location
Northeast
I worked for years flying and maintaining old radial-engined airplanes. I made a couple of special sockets for removing ignition leads from spark plugs in hard-to-reach places. Many times an open end or crowfoot wrench just won't fit, but there is pretty good access straight out from the spark plug. These were patterned on original Pratt & Whitney tools. The P&W wrenches were a smaller size than I needed because spark plugs changed over the years and went up in hex size twice.

The wrench on the left is an original P&W. The center tool is a 3/8" drive 3/4" deep impact socket sliced with a cutoff wheel and carbide die grinder. The tool on the right is a 1/2" drive 7/8" deep socket with similar modifications, plus shortened and with a 3/8" square drive welded on.

The cutout in the socket is to fit over the ignition lead that comes in the top of the spark plug. The hex has to be cut away and a relief made to clear the lead when the socket is turned. Unless there is corrosion or physical damage to the threads, the lead nut will only need about a 1/2 turn before you can use your fingers to finish unscrewing the nut. You may have to reposition the tool a couple of times to get the nut loose.

I used to volunteer at the transportation museum back home and we had a stearman. Some of the old guys had a set of those. I was educated on the finer arts of oil changes as well.
 

leg17

Well-known member
Joined
Aug 11, 2011
Messages
1,366
Location
Kentucky
Not auto related, but hand tools anyway.
In plastic injection molding hot runner systems, the nozzle tips were usually 7/16 hex but now usually 11mm 12 point ends. Manufacturers used to supply a Snap-On socket but they would split easily and, after a short time, the SO truck wouldn't take them back anymore.
Clearance is not an issue so I shrink-fitted a collar to add beef to the sidewalls of the 1/2" drive sockets.
Problem solved.
 

Attachments

  • P1000366.jpg
    P1000366.jpg
    21.6 KB · Views: 127
Last edited:

leg17

Well-known member
Joined
Aug 11, 2011
Messages
1,366
Location
Kentucky
Another shop-made modification for the molding business.
For various clearance reasons, some molds are mounted in the press by direct bolting, rather than with clamps. Often there is only enough room for a regular Allen wrench with a cheater to tighten them up. Lucky to have 90* wrench clearance so snugging them up in cruddy holes is a pain.
Modified a ratcheting box wrench by welding in a stub of an Allen wrench to speed things up. One end 5/8 inch, other end 17mm metric.
Final tightening is still with cheater pipe.
Problem solved.
 

Attachments

  • P1000367.jpg
    P1000367.jpg
    31.6 KB · Views: 133
Last edited:

The Original Fisho

Well-known member
Joined
Dec 30, 2014
Messages
109
0add025cfe8594905cd1c5e637a08e6b.jpg
4b323d7291e86ce3e40e50742f94564a.jpg
62ff02f7323da91f57955496a5de2461.jpg


Walnut mallet I made from some scraps I had laying around. Needed one for my chisels so the handles don't get destroyed.

Sent from my SM-G903W using Tapatalk
 

kansei

Well-known member
Joined
Mar 8, 2011
Messages
141
Location
Greenville, Michigan
gdocktor3: OMC offered a special tool for the task back in the day, but since the sleds haven't been sold new since the late '70s, and they were never "commodity" sleds due to their high pricing (just shy of $2,000), combined with fewer sales outlets than the big names, the original tooling for servicing wasn't exactly widespread on the used market, even back then. Very few seem to have survived today. I looked for years to no avail before, but I didn't mind having to come up with one... ; )
 
Last edited:

mbshop

Well-known member
Joined
Nov 23, 2010
Messages
1,539
Location
visalia ca
No pics but I had to modify a box wrench into a half u to reach the lower nut on the fi pump on mbs. Modified a nut driver to geg old antennae nuts off. Also had to grind down a wrench head thinner to be able to reach into a tight spot. Also had to grind thinner a box end so that it would fit into a tight spot. Even found that some special tools for a certain job still needed to be ground down or further bent to function properly.
 
To avoid these ads, REGISTER NOW!

goingtoarizona

Well-known member
Joined
Apr 5, 2015
Messages
761
Location
Central Valley California
I have a large screw driver that I cut a "V" notch into. It's for pushing the drum brake shoe hold down springs on 80's and 90's 3/4 ton trucks. You push the screwdriver handle in with your chest while you hold the shoes up to the backing plate, and connect the hold down clips to the springs.

I cut the handle off a 10" adjustable wrench. It's seldom used, but works great when the fastener is too tight to remove by hand, and there's not alot of space for a large end wrench. It's also easier to manuver than a 14" combo wrench.

Years ago I cut the handle off a 1/4 inch drive ratchet to remove the shifter housing bolt from underneath Ford Ranger. There wasn't enough room to move a 8 or 10 mm wrench and the bolts were too tight to loosen by hand.
 

drsung

Well-known member
Joined
Sep 27, 2011
Messages
274
Location
Louisiana
I received this "keychain" as part of my secret santa gift in 2012 I think. The person who sent it to me had also received it originally as a SS gift. He thinks it might have been made for snow skiing. I am not sure as we don't get much snow down here in Louisiana. Anybody recognize it as theirs or know what it might have been made for?


dbabicky

Well-known member
Joined
Dec 30, 2012
Messages
874
Location
NE Wisconsin
I received this "keychain" as part of my secret santa gift in 2012 I think. The person who sent it to me had also received it originally as a SS gift. He thinks it might have been made for snow skiing. I am not sure as we don't get much snow down here in Louisiana. Anybody recognize it as theirs or know what it might have been made for?


The only part of it I recognize is the Bottle Opener. LOL !!
 

BIG BACCHUS

Well-known member
Joined
May 7, 2016
Messages
181
Location
Kentucky
I worked for years flying and maintaining old radial-engined airplanes. I made a couple of special sockets for removing ignition leads from spark plugs in hard-to-reach places. Many times an open end or crowfoot wrench just won't fit, but there is pretty good access straight out from the spark plug. These were patterned on original Pratt & Whitney tools. The P&W wrenches were a smaller size than I needed because spark plugs changed over the years and went up in hex size twice.

The wrench on the left is an original P&W. The center tool is a 3/8" drive 3/4" deep impact socket sliced with a cutoff wheel and carbide die grinder. The tool on the right is a 1/2" drive 7/8" deep socket with similar modifications, plus shortened and with a 3/8" square drive welded on.

The cutout in the socket is to fit over the ignition lead that comes in the top of the spark plug. The hex has to be cut away and a relief made to clear the lead when the socket is turned. Unless there is corrosion or physical damage to the threads, the lead nut will only need about a 1/2 turn before you can use your fingers to finish unscrewing the nut. You may have to reposition the tool a couple of times to get the nut loose.

I'm currently in class to be an A&P, we have a few of those for a Wasp Junior that our instructor made. I'd bet you have some AMAZING stories!
 

Beerhippie

Well-known member
Joined
Oct 13, 2023
Messages
9,642
Location
Far NE Oregon
Our new boiler will, gawd willin' and the Creek don't rise, be here tomorrow.

In commissioning it, I'll be opening and closing this gate valve a lot:

54467232076_9eed058253_o.jpg

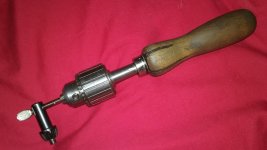
Gate valves stick. I've been using a big screwdriver for a lever, but a real tool would be nice--like a big pin spanner. I could order one, but... I haven't broken out ol' Sparky in a while, so it's off to the boneyard again.

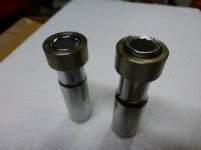
An off-cut of some 1/4" cold-rolled plate, 1" wide and a foot long--perfect! A shaft from ... something... 3/8" x 4" long. Clean the edges up on the off-cut, cut the shaft into two 1 1/2" long pieces. Drill some slightly undersized holes at the right spacing, countersink them about 3/4 the thickness of the plate. "Turn" the pieces of rod down using a drill and angle grinder until I have a press-fit. Drive 'em in with a hammer to where they sit flush on the countersunk side.

Break out ol' Sparky and:

54467424519_cfa2785baf_o.jpg

A couple of belly-button welds. With the countersunk holes, I can grind them flush:

54467232081_f0159791e9_o.jpg

Perfect fit.

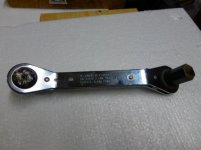
It's getting a coat of gloss black paint oven-cured right now, then it'll get the handle end dipped in Plasti-Dip--blue this time.

Gotta love a welding project that takes less time than unwinding the cables.
 

Chipm

Well-known member
Joined
Mar 10, 2020
Messages
423
Location
Georgia
When I was teaching myself to work on cars, the only places I knew to buy tools were Sears, Ace, or the parts store. This sawn-off* 7mm hex for E36 rear brake calipers was my first special purpose tool.

IMG_7761.jpeg

*in the south we say "sawed-off."
 
Last edited:

Beerhippie

Well-known member
Joined
Oct 13, 2023
Messages
9,642
Location
Far NE Oregon
When I was teaching myself to work on cars, the only places I knew to buy tools were Sears, Ace, or the parts store. This sawn-off* 7mm hex for E36 rear brake calipers was my first special purpose tool.

IMG_7761.jpeg

*in the south we say "sawed-off."
That's what we called the shorts you made from your Levis when the knees were shot out. "Sawed-offs".
 

Beerhippie

Well-known member
Joined
Oct 13, 2023
Messages
9,642
Location
Far NE Oregon
While working on my Vanagaru project, I needed a pulley holder for the crankshaft pulley. I priced the proper Suby tool (Vanagaru has a Suby EJ 2.5 mill)--just nope. I'll make my own.

Then it occurred to me that I already had the transaxle out, so all I needed was a flywheel lock.

Back to the shop. Fifteen minutes later:

55010840439_7c303930f0_o.jpg

55010840434_a58c02db48_o.jpg

55002052766_23289b33da_o.jpg

It ain't purty, but it works very well. The bolt that secures the pulley on the EJ 2.5 is torqued to 130 ftlb, and that lock never budged With me doing a pull-up on the torque wrench. It'll come in handy for replacing the clutch, too.

I used a 1 1/2" piece of 1 1/2" square tube. I cut off one side,. mashed the opposing sides together just a bit to fit the tooth spacing on the ring gear and welded the side I cut off on the new top. A 1/2" hole and it was done.
 
Last edited:
To avoid these ads, REGISTER NOW!
Top Bottom