jeffmoss26
Well-known member
Never posted thereYellowbullet.
Zim


Never posted thereYellowbullet.
Zim
beautiful set up! Can I ask you what kind of overhead light that is? I was thinking of something similar - always liked toolbox hutches but I don't need a locking door for my garage
And with vise added

It's a fabricated sheet metal box that I made up and painted red to match, with an under cabinet LED 40" strip light mounted. I had the shop that made the SS counter top make the brushed SS trim piece for the front of the light box.beautiful set up! Can I ask you what kind of overhead light that is? I was thinking of something similar - always liked toolbox hutches but I don't need a locking door for my garage


 greenlightingwholesale.com


Okay sorry Jeff. Mistaken identity.Never posted there
its amazing! Perfect match to the whole set up. SS trim is a great touchIt's a fabricated sheet metal box that I made up and painted red to match, with an under cabinet LED 40" strip light mounted. I had the shop that made the SS counter top make the brushed SS trim piece for the front of the light box.
40-inch Nickel Selectable LED Under Cabinet Light
40-inch Nickel Selectable LED Under Cabinet Light Selectable color temperature (2700K, 3000K, 4000K) Full range dimming
Here is mine in my small basement workshop.
I made it out of 2x6 lumber ripped down to 4.5" and then laminated, filled, and painted.
Short stretchers are a laminated tenon joint. Long stretchers are through bolted. Bolt heads & oversized washers are countersunk into legs so they can't be seen from the front. Top is two layers of 1" fir ply laminated together, with a layer of tempered hardboard. After 6 years, it is still super sturdy and with the 40lb vintage Record # 53 Vise, it weighs close to 400 lbs.


Do you have a build thread for the detached? It's looking really nice!
Ahhh …. I think we need to see more of this garage !
Thats a Beautiful Set up!

I‘m not sure if this shows what you’re asking but here are some measurements of my old Wilton.Putting together a couple workbenches for myself in my shop, i have a 6 footer and am curious, would like to add a wood workers vise underneath on one side. I haven't picked one up at this point, how much room should i leave on the side to accommodate the vise? I assume this will depend on size of the actual vise, but general, is there a rule of thumb up to 10 inches will 6, 7, 8 suffice for bench mounting on the underside?


") lol.
lol.I really don’t have much experience with other woodworking vises so I really can’t say.Thanks the input darn it i already got the top completed gahhhh, wow didn't think the footprint would be that wide, is 12 inches typical or is that just a big *** Wilton
My ancient Monkey Wards vise is about 8"wide, takes up maybe 6 inches below the top, and it's easily 12 inches under the bench. It sticks out about 4 inches from the edge.Thanks the input darn it i already got the top completed gahhhh, wow didn't think the footprint would be that wide, is 12 inches typical or is that just a big *** Wilton

This looks great, I think I'd try to fab that attachment piece to the underside of the table.Not big but big enough for my use.
It’s a machine base out of a factory I got cheap off a scrapper.
Damned summertime power failures! The last few we've had, it's been far too hot to even think of lighting of those up!That looks like it will be well lit in a power failure.
This your home shop or the one at the brewery?
You shoulda' seen it before the big organization push!
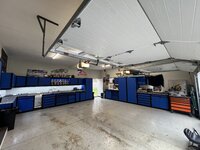
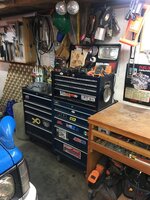
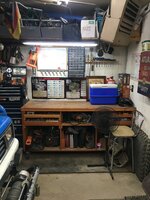
I think you've got a tidy space there. Interesting choice on the compressor placement.I have been a vocal advocate of shop organization so at risk of seeming hypocritical have been reluctant to show my own shop. My shop is 16x24 so every available surface has been used. First picture is my main work bench with all the hand tools close by. Second picture is my welding bench which I was lucky enough to get from a shop that my buddy worked at for free. 3'x6' with a 1/2" top. Third picture is my woodworking bench. It has a 30" wing off the back and can be rolled out and made to be twice as large for assembly or glue ups. I use this bench the least so it does become a parking lot for new stuff, truck cooler, etc. Fourth picture is my tool boxes for less used tools, hardware and charging center.
Subtle but very effective lantern flex! You have some nice ones there!
You shoulda' seen it before the big organization push!
But did he get approval to "collect" them from you know who?Subtle but very effective lantern flex! You have some nice ones there!
Brewery.This your home shop or the one at the brewery?
That ain't the half of them!Subtle but very effective lantern flex! You have some nice ones there!

All found "in the wild" by myself or a picker. All are fully restored by yours truly--a few repainted--and "ran when parked".But did he get approval to "collect" them from you know who?
easy to drain lolI think you've got a tidy space there. Interesting choice on the compressor placement.
The compressor took up too much floor space and it is easier to drain. I use it probably twice a month and I bought it almost 30 years ago used. I'm ready to get something much smaller but it will probably go in the same place....I think you've got a tidy space there. Interesting choice on the compressor placement.
Dude, it's not **** but man is it functional. The wall mounted air compressor? Genius! I'm totally ripping off that one. Love the classic welder too. Very cool.I have been a vocal advocate of shop organization so at risk of seeming hypocritical have been reluctant to show my own shop. My shop is 16x24 so every available surface has been used. First picture is my main work bench with all the hand tools close by. Second picture is my welding bench which I was lucky enough to get from a shop that my buddy worked at for free. 3'x6' with a 1/2" top. Third picture is my woodworking bench. It has a 30" wing off the back and can be rolled out and made to be twice as large for assembly or glue ups. I use this bench the least so it does become a parking lot for new stuff, truck cooler, etc. Fourth picture is my tool boxes for less used tools, hardware and charging center.
It is a working shop so all about function. I like the old Forney, I bought it from the original owner, he bought it in 1958! He still had the original book, the soldering iron and carbon arc torch - what a package deal. I have another old Forney up at the farm, guess I'm a collector.Dude, it's not **** but man is it functional. The wall mounted air compressor? Genius! I'm totally ripping off that one. Love the classic welder too. Very cool.