JustVicingIt
Well-known member
- Joined
- May 6, 2025
- Messages
- 179
Nice clean setup, I dig it.


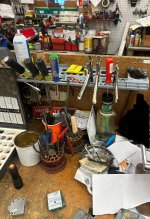
Hey, I see a 914 , what year and is that Bahia redThis mornings cup of coffee. Pushed a pile of junk off to the side for the pic as I clean out the Huot upper box I picked up yesterday.

I like the blue and the improvisation. And the 914This mornings cup of coffee. Pushed a pile of junk off to the side for the pic as I clean out the Huot upper box I picked up yesterday.
They are all put away and organized.Couldn’t afford any tools huh?
I think he was jokingThey are all put away and organized.
")
Only ONE vise?This mornings cup of coffee. Pushed a pile of junk off to the side for the pic as I clean out the Huot upper box I picked up yesterday.
Got one on my other workbench in my other garage. Yeah, im slacking. LolOnly ONE vise?
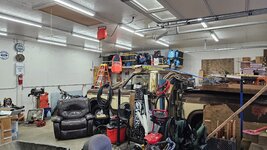
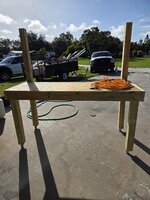
Here are a few wall mounted solutions that might help clean up any work bench/area clutter.We started moving everything out of the house garage and into the new building/shop.
My old work bench layout in the attached garage...
The new work bench layout in the detached garage/shop...


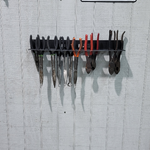


Check out @lilscorpion fab space and his rivnut wall solution. This dude is next level.Here are a few wall mounted solutions that might help clean up any work bench/area clutter.


Finally got myself to clean it all off and said only one project at any time on there, NOT one on one and another on the other.
A clean shop is a sign of a demented mind!
That may not be any bigger or smaller that what I use. It may be a perfect size. Doesn’t take up too much space but can accommodate most projects. Good setupFinally got myself to clean it all off and said only one project at any time on there, NOT one on one and another on the other.
A clean shop is a sign of a demented mind!
Pretty sure this garage will be renamed the sanatarium, wife said so how do you figure a clean shop is the sign of a sick mind…..I replied uhmm you do see that crazy truck of mine?Looks great and I see no problem with your philosophy of one project on the workbench at a time.
This is also on the North side under the patio to boot. Plans are to pink board up the gap between plywood and AC then cover with ship lap or white washed brick wall board.Strategically located A/C! My garage had a window like that, but it's been boarded up. Thinking about replacing the top half for some natural light since it's on the N side no direct sun.

There’s one more bench that I currently using for bronco parts storage. Slowly it’s getting cleared off.That may not be any bigger or smaller that what I use. It may be a perfect size. Doesn’t take up too much space but can accommodate most projects. Good setup
@LXCam you can see my emblem just below the S on Snap-On on the top of the box, I have another one somewhere. I glued magnets to them to see if I wanted to put some on my FJ fuel tank. Have a couple tank emblems from Viragos on there as well.My disaster as I closed up last night. Many, many things that need attention and time.
Rd, I’ve always been a bike nut so I understand the catch. In this case it was 100% unintentional, I bought this box almost completely covered in stickers. And after way to much effort cleaning as much of as possible, there's still some reminders of its past life.@LXCam you can see my emblem just below the S on Snap-On on the top of the box, I have another one somewhere. I glued magnets to them to see if I wanted to put some on my FJ fuel tank. Have a couple tank emblems from Viragos on there as well.


Absolutely stunning jobThis update has been a longtime coming. My Roubo style workbench is just about there. It's been a fun journey. A bit annoying at parts as these things usually are, but overall fun.
The top is now attached to the base.
Vise parts are benchcrafted for both tail and leg vise.
Dialing in the Tail Vise took some time, but the Leg Vise worked perfectly the first time.
I'm opting for a raw linseed finish. It'll take time to fully cure but that's a-okay for me and it l;ooks so good especially on the mahogany bits.
The top is a reclaimed maple laminated stair tread. The owner gave it to me for free. They had attempted to cut it down for disposal but didn't finish the cut. That's why there's a strip in the middle of it and some bowties.
These were my first bowties (African mahogany as it's what I had on hand at the time) and I cut the recess first instead of making the bowties and then tracing them for removal so they are a bit janky. Nothing some two part epoxy can't fix. It's messy but should sand out okay.
The tail vise endcap is a large piece of walnut. I ordered it in 16/4 so it would be solid and not laminated.
Opted for a 12/4 piece of African Mahogany for the leg chop. It takes the raw linseed oil very nicely.
The legs are 4 laminated oak legs I got off of Facebook marketplace for $20. Couldn't pass up the opportunity for such a cheap option.
Overall the most expensive stuff was the Benchcrafted Hardware but totally worth the investment. It's so well made.
Have short list of things to finish on it.
Adding the shelf (going to use some reclaimed white oak pieces from an old library shelving system), cutting dog holes, etc but it's probably 90% done.
Enjoy the photos!

Gorgeous work! Definitely an heirloom.This update has been a longtime coming. My Roubo style workbench is just about there. It's been a fun journey. A bit annoying at parts as these things usually are, but overall fun.
The top is now attached to the base.
Vise parts are benchcrafted for both tail and leg vise.
Dialing in the Tail Vise took some time, but the Leg Vise worked perfectly the first time.
I'm opting for a raw linseed finish. It'll take time to fully cure but that's a-okay for me and it l;ooks so good especially on the mahogany bits.
The top is a reclaimed maple laminated stair tread. The owner gave it to me for free. They had attempted to cut it down for disposal but didn't finish the cut. That's why there's a strip in the middle of it and some bowties.
These were my first bowties (African mahogany as it's what I had on hand at the time) and I cut the recess first instead of making the bowties and then tracing them for removal so they are a bit janky. Nothing some two part epoxy can't fix. It's messy but should sand out okay.
The tail vise endcap is a large piece of walnut. I ordered it in 16/4 so it would be solid and not laminated.
Opted for a 12/4 piece of African Mahogany for the leg chop. It takes the raw linseed oil very nicely.
The legs are 4 laminated oak legs I got off of Facebook marketplace for $20. Couldn't pass up the opportunity for such a cheap option.
Overall the most expensive stuff was the Benchcrafted Hardware but totally worth the investment. It's so well made.
Have short list of things to finish on it.
Adding the shelf (going to use some reclaimed white oak pieces from an old library shelving system), cutting dog holes, etc but it's probably 90% done.
Enjoy the photos!
That was the goal. I feel like the workbench build is the first major shop build for something that stays with you until the end. Thanks for the kind wordsGorgeous work! Definitely an heirloom.
Thank you!Absolutely stunning job
Definitely saved so much on materials that helped absorb some of the pricier Benchcrafted bits.@JustVicingIt Beautiful. Looks like a $5k or more workbench.
What's the advantage of raw linseed oil over boiled?

Thanks! It's almost all the way there. Just a few more small things and it'll be done. I'm psyched to start beating it up lol@JustVicingIt - Your new bench is a beauty. Nice job!
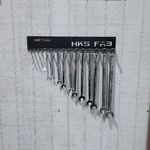
Just picked up almost every one of these over the weekend.. err.. "from Santa", wife should be thrilled LOLHere are a few wall mounted solutions that might help clean up any work bench/area clutter.


Looks like the only thing enjoying that 97 TA has been the cat that walks all over it!We started moving everything out of the house garage and into the new building/shop.
My old work bench layout in the attached garage...
The new work bench layout in the detached garage/shop...
96 TA, but you are correct.Looks like the only thing enjoying that 97 TA has been the cat that walks all over it!
This mornings cup of coffee. Pushed a pile of junk off to the side for the pic as I clean out the Huot upper box I picked up yesterday.
Yeah, its **** jointed 2x8s with several coats of shellac. I originally planed on replacing it with butcherblock but I like it how it is.I really like this. Building a new shop and have two 42 inch chests waiting for pick up. I'd like to build long continous bench like this. Looks like the top is just **** jointed, correct? Are those 2x6's?
Jeff