jeffmoss26
Well-known member
Yes that is a key machine, I'm not a locksmith - just a collector/hobbyist.


My build.
Harbor Freight Box
Simpson Strong Ties & 4x4 posts
4x4 posts
2x4 cross beams
3/4 finished plywood top and shelf
1x2 pine edging on top
Minwax Polyshades Antique Walnut Stain
36" height 24" depth 15' length


Thinking about picking up these 50s era metal kitchen cabinets for a work bench. The guy wants $30 for them. Do You guys think they'd be worth working with, or should I hold out for something else?
Sent from my SM-G920V using Tapatalk
Thanks. The friend who helped me pick them up just now is judging pretty hard. They are pretty ugly, but now I have a work bench.
Sent from my SM-G920V using Tapatalk
")
All,
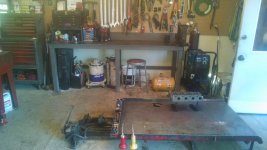
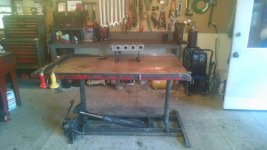
Here are a few benches I have been installing into a shop I am building for myself. The tool bench is deeply influenced by contributions from this very thread. You will see some familiar themes in the fab table as well.
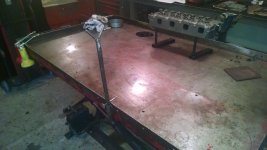
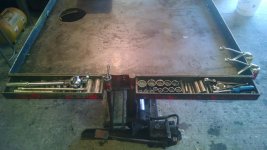
The tool bench is 35' long and about 28" deep. The slab was poured to accommodate the footprint and provides a dry base for the chests. The frames are 1/4" x 2-1/2" square stock and the surface is 3/4" plate.
The construction of the fab table is similar, but it features a full 1" surface and threaded rods for critical leveling. It is 25' long and 4' wide, or just about my ability to easily reach from one side to the other... There is still quite a bit of work to do on both of these to complete the details. Air, power, tool rests, back splash etc.
If anybody is interested is some of the fab images, there is a more complete library here: https://www.icloud.com/sharedalbum/#B03G6XBubGsK2Ng
Great forum, and many thanks to those that have contributed here and provided inspiration.
-WAM
Here's mine that I slapped together last night so I could have some more useful space around my HF 44" box.

With regards to what I will be fabricating, I wish I had an exotic answer. I don't.
In reality, my day job has me developing complex algorithms that are used in evidence based health care. I have always wanted a place to pursue my need to tinker at scale, and finally I am building it.
The facility itself has been a bit neglected, so I am working quite a bit on building related rehab. New roof, reconfiguring the layout, etc. As was observed, I also dabble in very very very grass roots racing. It's a bug that has bitten me hard. In addition to a small collection of street cars, I have some track cars, and now house and maintain a few BMW E30's as well that my race teammates and I campaign across the country. The children of Zuffenhausen are my first love, but hay... the BMW's are kinder on the budget when endurance racing.
All and all, this shop will be a place for me to house a few machine tools that I am woefully under qualified to use, my car collection, and the race assets. It's not a commercial venture, just a personal indulgence.
-WAM
Sent from my iPad using Tapatalk

Awesome job!!My build.
Harbor Freight Box
Simpson Strong Ties & 4x4 posts
4x4 posts
2x4 cross beams
3/4 finished plywood top and shelf
1x2 pine edging on top
Minwax Polyshades Antique Walnut Stain
36" height 24" depth 15' length
Well, that's not gone well. Upside down and missing images... Hum.. Perhaps while I figure that out, those interested can review via the link...
-WAM
Restoration project . Found original workbench at habitat for humanity for $50.
Restoration project . Found original workbench at habitat for humanity for $50.
Here's one my son and I built for his room.

it probably tilted to what it looks like now.


Here's my attempt at a frameless style work bench/tool storage. Not entirely finished but the fronts will be painted blue (hoping for a high gloss finish to mimic metal tool chest). Also building upper cabinets to match. More pictures when its done. 8' wide 40" tall 22" deep. This is my first build of any kind. Never even tried my hand at a birdhouse. Kreg jig is where it's at.
Just put mine together about a month ago... after having lived here for 5 and half years.

My main benches. First one is my main spot for "bench" work. I've posted it in the past when it was still in my Grandfather's shop. Pa hung it up last year and his bench is now mine. Behind it against the wall in my back bench. I use that bench for vise work or to lay tools or parts out of the way when working on the main bench. I doubt the back bench is going anywhere, all six legs are bolted to the floor.
Just made my 3rd workbench which now completes the set. All are on casters and can be moved and psotioned to create various size work surfaces.
from 3'x16' to 6'x8'.

Yes it's a winter thing. When I pull my vehicle in there and it's covered with salt and snow it accumulates pretty bad... I destroyed the legs of a metal shelf that way lol!Legs in Tupperware containers... does it help to seal in the freshness? [emoji38]_hitti
Just kidding. Is it a winter thing, or do you get regular water in there? I was considering coating the bottom 6" or so with Plasti-Dip or something when I build mine.
Finally put my free cabinets/countertops together

Hi BCD,
Love that bench. Do you have a link to more images of it?
Really clever idea being able to drop it down like that.
Sent from my iPhone using Tapatalk
This is a great idea. I have a similar idea to refinish and older bench I have. It currently has a 2" thick particle board top with a poor quality laminate type material covering it. I have a good selection of 5" wide hickory flooring leftover from my house project that I'd like to cover it with. I thought about glueing and nailing it down, then putting several coats of clear to finish it.
For those with wood tops with a clear finish on them, is there any brand or type of finish that I should use that is impervious to basic garage type chemicals. As in accidental carb clean, brake clean, gas, diesel, etc?