

You are using an out of date browser. It may not display this or other websites correctly.
You should upgrade or use an alternative browser.
You should upgrade or use an alternative browser.
Lets see your workbench
- Thread starter speedingpenguin
- Start date


EOC_Jason
Well-known member
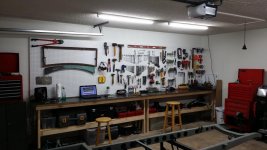
Constructed using Unistrut channel strut and 2 x 1/2" ply on top
I've never seen anyone use unistrut that way, very creative!
Vbwiley92
Well-known member
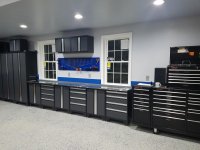
Happy wife, happy life.powder coat, tired to get it as close to the snap-on box as we could spent like an hour looking at color chips and trying to match it.
thats the wife, she wanted to make it look better and some some vw fabric, there is route 66 themed fabric for the one over the side door.
Sent from my SM-T320 using Tapatalk
akdiesel
Well-known member
Constructed using Unistrut channel strut and 2 x 1/2" ply on top
Nice build and will be plenty strong for what ever you need.

AustinRob
Member
View media item 65864One and one being builtView media item 65863
Last edited:
JRC3
Well-known member
JD, I like it...Needs a backsplash of some sort.
dittle fart around
Well-known member
View media item 10146
Here's the lovely Donna, pointing out the new in 2011 workbench. The bench made it's way to Napa and back home over the last 5 years.
View media item 65893
Now back to it's original garage. Please note the work bench has developed a nice patina with 5 years of use, indoors and out.
All part of the 2017 garage clean up and referb. Not putting that "done by the first of the year" pressure on myself, it might roll in 2018.
tweidman
Well-known member


Constructed using Unistrut channel strut and 2 x 1/2" ply on top

Simple, tough, and inexpensive - nice work! What did you use to anchor into the block? What was your thought process on the vise placement? I like keeping mine off to the side a bit more to utilize both edges.
Attachments
saabman
Well-known member

DUSTIN@STI
Well-known member

drivesitfar
Well-known member
Dustin: if you are going to have FSD (flat surface disease) you might as well have some SWEET benches. what was the steel bench used for in a previous life? a lathe or do tell if you know and more pictures of it and specs like size and weight if you have time.
cheers
ALL: happy holidays to all of you and hope you all help me cure my FSD and maybe yours too in 2017.
cheers
ALL: happy holidays to all of you and hope you all help me cure my FSD and maybe yours too in 2017.
johndeereman
Well-known member
Man you know there is no cure for Flat Surface Disease.
doorfx
Well-known member
I believe it is contagious as well!!
Simple, tough, and inexpensive - nice work! What did you use to anchor into the block? What was your thought process on the vise placement? I like keeping mine off to the side a bit more to utilize both edges.
Used M8 Rawl bolts for the floor and walls:

Countersunk these to hold the ply down:

To be honest I didn't do much thinking about it! I've used it a fair amount and it's placement hasn't let me down..yet!
More recent photo:

Attachments


myredracer
Well-known member
Built this workbench from scratch and is 12' long and 30" deep with 16 ga. galv. top. Frame is 2x2 tubing and angle with 2 layers of 3/4" plywood on top. HF tool cabinet at one end and 2 cabinets with doors recessed back 6" from front so I can comfortably sit on the stool. Added footrests c/w oak trim. Pegboard and shelves are from a hardware store that was closing down. Air compressor line & filter is a small part of my main setup on another wall.
I have had the full lengths of 2x2 steel for over 25 years from a gate project - rather rusty from sitting outside all that time but with a bit of cleanup and some Tremclad looks like new. After numerous moves and hanging on and hanging on to that dang stuff for some "unknown" future project one day, it finally got a good home.
I have to say that the HF tool cabinet is pretty decent for the price I paid for it.
Last edited:
bulletpruf
Well-known member
Built this workbench from scratch and is 12' long and 30" deep with 16 ga. galv. top. Frame is 2x2 tubing and angle with 2 layers of 3/4" plywood on top. HF tool cabinet at one end and 2 cabinets with doors recessed back 6" from front so I can comfortably sit on the stool. Added footrests c/w oak trim. Pegboard and shelves are from a hardware store that was closing down. Air compressor line & filter is a small part of my main setup on another wall.
I have had the full lengths of 2x2 steel for over 25 years from a gate project - rather rusty from sitting outside all that time but with a bit of cleanup and some Tremclad looks like new. After numerous moves and hanging on and hanging on to that dang stuff for some "unknown" future project one day, it finally got a good home.
I have to say that the HF tool cabinet is pretty decent for the price I paid for it.
Nice setup. What kind of car is that in the corner of the picture?
myredracer
Well-known member
Nice setup. What kind of car is that in the corner of the picture?
Thx. Have been following your Alfa project here and elsewhere.
It's an original '66 Fiat Abarth 1300/124. Looks like a standard 850 coupe but Abarth used an engine out of a 124 sedan and did various performance upgrades to the car. Less than 300 built and few around today. Needs some extensive rust repair but have a couple of stock coupes with good donor sheet metal. Collected a lot of parts for it off ebay all over the world before about '05 when ebay went through a big change and killed the vintage car parts market.
Just started rust repairs on a '58 Fiat 600 which I'm doing a bunch of period correct Abarth mods to plus some later Abarth mods like 1 liter engine (about 80-90HP up from original 24.5HP) c/w all the correct ancillaries some original and some reproductions from Berni Motori in Italy. Considering they made millions of 600s OEM parts are getting hard to find and are expensive. Just ordered a floor pan from Bosnia for about 1/3 the cost.


L@urens
Well-known member


Finally arrived and mounted against the wall:
Why place the bench with the back side out rather than against the wall? You eliminated the leg and foot space.
L@urens
Well-known member
Why place the bench with the back side out rather than against the wall? You eliminated the leg and foot space.
I didn't want the legs on the front edge. The frame is about 20cm from the front edge now so lots of clearance actually.
Also, I will place a shelf on the lower frame beam and want that to be furthest back.

Sent from my iPhone using Tapatalk
Attachments

bob_the_builder
Well-known member
- Joined
- Apr 25, 2010
- Messages
- 404
Where did you get the bench from? It's nice.
RagTopTA
Well-known member
bulletpruf
Well-known member
Thx. Have been following your Alfa project here and elsewhere.
It's an original '66 Fiat Abarth 1300/124. Looks like a standard 850 coupe but Abarth used an engine out of a 124 sedan and did various performance upgrades to the car. Less than 300 built and few around today. Needs some extensive rust repair but have a couple of stock coupes with good donor sheet metal. Collected a lot of parts for it off ebay all over the world before about '05 when ebay went through a big change and killed the vintage car parts market.
Just started rust repairs on a '58 Fiat 600 which I'm doing a bunch of period correct Abarth mods to plus some later Abarth mods like 1 liter engine (about 80-90HP up from original 24.5HP) c/w all the correct ancillaries some original and some reproductions from Berni Motori in Italy. Considering they made millions of 600s OEM parts are getting hard to find and are expensive. Just ordered a floor pan from Bosnia for about 1/3 the cost.
I like the '66 Abarth! Do you have a build thread or more pictures somewhere?
Interesting that you found parts in Bosnia for your '58. I travel to the Balkans (Macedonia, Bosnia, Kosovo, and Serbia) for work fairly often but don't often see vintage cars on the road.
Thanks
Scott
schor
Well-known member
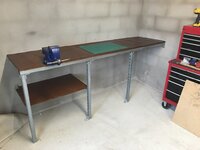
1-3/4" solid red oak.


isb cornbinder
Well-known member
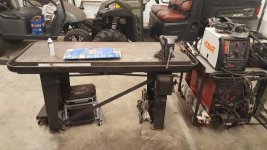
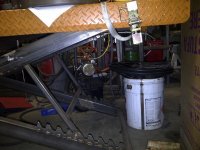
I needed a dual purpose motorcycle lift table and adjustable height work bench. Pneumatic was not my favorite, so I was left with hydraulic.
I bought a 4' by 8' .125" sheet of steel diamond plate at the Metal Supermarket then cut and folded it where I used to work.
I opted for twin hydraulic lift cylinders for stability and to slow the loft speed by 50%.
The 12 volt remote hydraulic power-pack and lift cylinders came from Princes Auto. I added an adjustable oil return valve to slow the lowering speed. The valve allows 100% flow in the lift mode.
I added remote control to the power unit and hydraulic quick disconnect so the unit could be rolled away to serve as a battery booster. The booster cable is also on a quick disconnect. The lift table can go as low as 4 inches and as high as 48 inches.
The motorcycle wheel clamp is a floating caliper style made from the hydraulics of a small floor jack from Canadian tire.
Attachments


Last edited:
nicholam77
Well-known member
View media item 66285
Just got it as a Xmas gift. Parents got me the bench and surface and wife got the drawer module. Plan on adding another drawer module on the other side. Not as cool as some of the outstanding custom fabricated benches in this thread, but I am pretty excited about it!
Just got it as a Xmas gift. Parents got me the bench and surface and wife got the drawer module. Plan on adding another drawer module on the other side. Not as cool as some of the outstanding custom fabricated benches in this thread, but I am pretty excited about it!
JRC3
Well-known member
I needed a dual purpose motorcycle lift table and adjustable height work bench. Pneumatic was not my favorite, so I was left with hydraulic.
I bought a 4' by 8' .125" sheet of steel diamond plate at the Metal Supermarket then cut and folded it where I used to work.
I opted for twin hydraulic lift cylinders for stability and to slow the loft speed by 50%.
The 12 volt remote hydraulic power-pack and lift cylinders came from Princes Auto. I added an adjustable oil return valve to slow the lowering speed. The valve allows 100% flow in the lift mode.
I added remote control to the power unit and hydraulic quick disconnect so the unit could be rolled away to serve as a battery booster. The booster cable is also on a quick disconnect. The lift table can go as low as 4 inches and as high as 48 inches.
The motorcycle wheel clamp is a floating caliper style made from the hydraulics of a small floor jack from Canadian tire.
This is just like why I always push one use of a mid-lift as an adjustable work table/bench. You can do brakes/suspension on your van...Or work on a push/riding mower. Heck, I just had to replace the belt and service the drum rollers on my dryer...Shame my mid lift was at the old house...I woulda wheeled it on and done it at waist level instead of on the ground.

Aahz
Well-known member
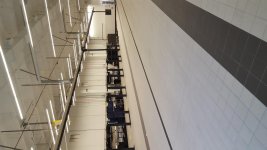
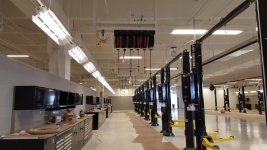
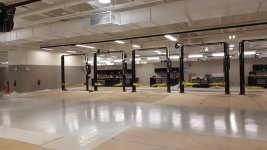
Some pics of a Mercedes dealer we built last year in Chicago..They went all out for their techs..Shure Workbenches and cabinetry. Even had us lay out paper models during construction so that everyone could agree on the looks, fit & finish prior to finishing construction..Entire facility was somewhere in the neighborhood of $120 million..workbenches and cabinetry for the 3 shops was close to $1 million all by itself..I know it isn't relevant to the "home garage", just thought it was cool and ya'all might be interested!
Attachments


Tundra
Well-known member
I want my garage to be like that!!!!
JimVonBaden
Well-known member
Some pics of a Mercedes dealer we built last year in Chicago..They went all out for their techs..Shure Workbenches and cabinetry. Even had us lay out paper models during construction so that everyone could agree on the looks, fit & finish prior to finishing construction..Entire facility was somewhere in the neighborhood of $120 million..workbenches and cabinetry for the 3 shops was close to $1 million all by itself..I know it isn't relevant to the "home garage", just thought it was cool and ya'all might be interested!
That "Mercedes" dealer services Audis?
Aahz
Well-known member
That "Mercedes" dealer services Audis?
The dealer has one 50 bay floor for Audi, a 2nd 50 bay floor for Mercedes and the lowest level has about 30 bays for Sprinters. That is the facility with the above ground lifts.
I also posted an AutoNation Audi dealer we did with Rousseau cabinetry..sorry for mixing 'em up!
D45
Well-known member
I have three work benches..........I took these pics when I was installing 15 new LED shop lights, so excuse all the boxes!
1) Chemistry slate table, over 1" thick
It is nice and tall, rock solid........and VERY heavy.
I scored it for free
It is tall enough that my spare/scrap wood pieces in a rolling crate underneath


2) I have an L shaped corner work around.....for the microwave, hot plate, and more of a storage area underneath for the shop-vac, power washer, and snowblower


3) I then have my long (main) workbench area......with two vises. Some of the bench top area is covered with a steel sheet, which is drill and countersunk

1) Chemistry slate table, over 1" thick
It is nice and tall, rock solid........and VERY heavy.
I scored it for free
It is tall enough that my spare/scrap wood pieces in a rolling crate underneath
2) I have an L shaped corner work around.....for the microwave, hot plate, and more of a storage area underneath for the shop-vac, power washer, and snowblower
3) I then have my long (main) workbench area......with two vises. Some of the bench top area is covered with a steel sheet, which is drill and countersunk
Redboy
Well-known member
1) Chemistry slate table, over 1" thick
It is nice and tall, rock solid........and VERY heavy.
I scored it for free
It is tall enough that my spare/scrap wood pieces in a rolling crate underneath
Wow, I have some SERIOUS jealousy goin' on over here!! I've been hoping something like that would turn up in my neighborhood for quite a few years, but so far... nada.
And you got it for free?!! Shaking my head, here... :-/
Very nice!
dirt_dobber
Well-known member
The main one I use in is this one...
I can access it from either side which is great. Has my Wilton vise on it and my 20 year old
craftsman compressor under it.
I recover it with cheap stick on floor tiles every year or so - easy to clean stuff off of etc.


I can access it from either side which is great. Has my Wilton vise on it and my 20 year old
craftsman compressor under it.
I recover it with cheap stick on floor tiles every year or so - easy to clean stuff off of etc.
Last edited:
D45
Well-known member
Wow, I have some SERIOUS jealousy goin' on over here!! I've been hoping something like that would turn up in my neighborhood for quite a few years, but so far... nada.
And you got it for free?!! Shaking my head, here... :-/
Very nice!
I actually got two........and could have taken dozens
The other one is in my basement........what a PITA to get it down there, they are HEAVY