To avoid these ads, REGISTER NOW!

Lets see your workbench

afbrian13

Well-known member
Joined
Nov 23, 2014
Messages
163
I didn't want the legs on the front edge. The frame is about 20cm from the front edge now so lots of clearance actually.

Also, I will place a shelf on the lower frame beam and want that to be furthest back.

25ebc766debacfc5b85d791e8ab8db04.jpg


Sent from my iPhone using Tapatalk

What kind of bench is that? I'm looking for a good one in DE and trying to get brand suggestions.

Didn't even notice your location until I saw what your wall outlets looked like...just picked up a couple at OBI!
Brian
 

Attachments

  • 25ebc766debacfc5b85d791e8ab8db04.jpg
    25ebc766debacfc5b85d791e8ab8db04.jpg
    259.6 KB · Views: 17
To avoid these ads, REGISTER NOW!

L@urens

Well-known member
Joined
Aug 18, 2009
Messages
70
Location
Enschede, NL
What kind of bench is that? I'm looking for a good one in DE and trying to get brand suggestions.


Didn't even notice your location until I saw what your wall outlets looked like...just picked up a couple at OBI!

Brian


I have no idea about the brand honestly. Try Google image search I guess. There are from a trader out of a bankrupt lot.

The steel frame and 40mm multiplex are key. As is the 90cm height.


Sent from my iPhone using Tapatalk
 

myredracer

Well-known member
Joined
Nov 1, 2015
Messages
557
Location
Langley, BC
I like the '66 Abarth! Do you have a build thread or more pictures somewhere?
Scott

I do want to start an on-going build thread somewhere. Not sure if on the AlfaBB, Xweb, retrorides and/or here. It's hard enough sometimes to stay on top of just one forum. I do have a few more photos and need to get them organized.
 

driftpin

Well-known member
Joined
Dec 22, 2016
Messages
11,178
Location
Miami-Dade/Broward Co. Florida
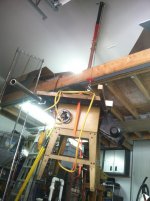
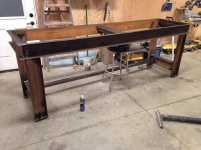
Here are some shots of a work in-progress (we all say this, yes?) I only have a double car garage but I tried to maximize the space by spec'ing a loft above the rear half of the garage. No plans for a car hoist, but I did make a lift to help place items into the loft. It's a 1 ton cherry-picker w/a 1 ton electric winch mounted to a plate between the stationary 'foot' and the 360-degree rotating upper cherry picker upright & boom. No I don't expect to pick-up anything 2,000 lbs. The loft was designed to accommodate anything I can get up there. The front support for the loft floor joists is a 4" x 8" x 1/2" wall thickness steel box beam. It's welded into steel flitch plates cast-into the masonry side walls of the garage. Ridge beam height is a bit under 5', and there are no stairs going up there.

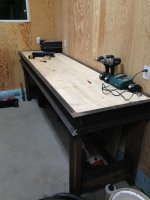
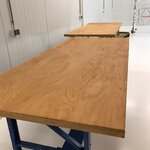
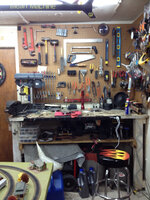
First shot is part of the main workbench, 24" x 8' Craftsman frame, w/Craftsman roller cabinets underneath. The top of the workbench is 3/4" 2-layer (so 1-1/2" total thickness) plywood, glued & screwed. On top of the workbench is a 3/16" steel plate cut to overhang enough ton the front & sides to allow me to band the plywood top underlayment with 1-1/2" steel stock screwed in place w/countersunk wood screws. The top steel/plywood 'sandwich' is fastened with 1/4" flat-head machine screws to the frame.

I used the Galdiator pvc grooved track above the workbench, which provides a lot of flexibility in hanging things. I mounted my cordless chargers on it. I have a mix of brackets for frequently-used pliers, hammers, metric and SAE wrenches, screwdrivers, parts bins, other hand tools and shelving. The front of the shelving has a US General magnetic strip where I put my 1/4, 3/8, 1/2" hex shank square drive adapters, wire strippers, and whatever else I may need. There are multiple duplex outlets every 3 ft around the perimeter of the garage, and three 220 V outlets for floor tools.

One end of the workbench has a grinder, wire wheel & a stone wheel. The opposite end has a vintage vise and a swinging magnifying head. I have a double buffing wheel in a cabinet.

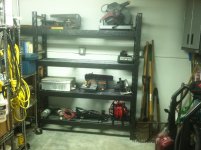
I got some Gladiator (Whirlpool Corp. home storage line) pallet-style shelving, and modded it to fit the side wall return depth of the side wall space available next-to the overhead doors. That's on the side wall opposite the workbench.

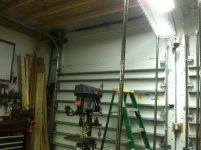
The overhead doors are insulated and reinforced to withstand Category 5 hurricane gusts needed in a 'high-velocity hurricane zone (HVHZ).' I put a shop light between the pair of OH doors. I also added a pair of duplex outlets low, and another duplex outlet up high for the shop light. A switch is on the wall for the upper light. I usually position my floor drill press between the OH doors and use the lower outlets to power it.

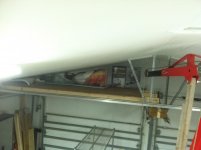
I have 'high-lift' OH garage doors and in the space above the doors I installed some wedge-shaped storage for light, bulky stuff, like Christmas decorations. I also have space for longer material like boards, conduit, pvc pipe, or unistrut.

On the rear wall I have space for the air compressor, right now I'm using a 30 gal. 220 V twin cyl air compressor, I have a 60 gal. upright 220 V at another property that will eventually make its way into the space. I ran a 3/8" line from the compressor quick disconnect to an automatic hose reel I have above the workbench.

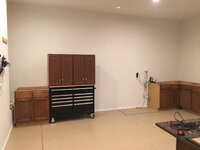
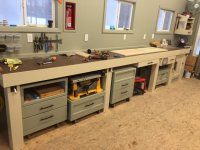
On the other rear wall bay I have three Gladiator steel cabinets. I used a ledger to support the lower end, and tapcons into the CBS/CMU wall they're mounted-to. The Gladiators are welded steel, the doors are diamond-plate and magnetic, each cabinet is 30" x 30" x 12" and has adjustable shelving, the inside of the doors have steel pegboard, very handy for easy access to materials. I have one for abrasive discs, and hang the discs on the pegboard of the doors. One side is masonry, one side is metal. The other cabinets have other materials in them, the center one has screws and nails, sorted by style and size. These were a great deal when I got them at Sears, I paid $84 apiece and got five, one I haven't found a home for.

The shot of the lift is hoisting my Powermatic table saw off the floor to test the lift. Not much of a weight test, maybe 400 lbs.

In the back of the bay where the workbench is I have a floor-standing Kobalt steel cabinet I got at Habitat for Humanity for $40. I have it filled w/a stick welder, a flux wire welder, large tools like wrecking bars; and storage of lots of fasteners. I use the pegboard on the inside doors to store plastic envelopes of fasteners, and drill bits and hole saws. I have a lot more tools, both hand tools, floor tools, and Craftsman stackables at another location, just waiting for me to make space for them. In the open floor space I have a radial arm saw, a table saw, and a blasting cabinet, the last is yet to be assembled.

My use of the space is to work on my collection of motorcycles, stored elsewhere, and to do whatever woodworking projects around the house I have to do. If I had to, I could move all the mobile storage into one bay and have the second available for a vehicle. Both our vehicles, a car and a truck, fit, just not at the same time!

I did this install before I joined here, but I've gotten good ideas from reading all the posts. I wish I had a larger space, but I'm doing what I can with the space I have.

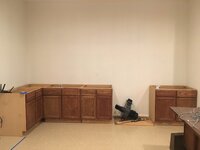
The last pic is of a site inspection I had by these two guys, they were very serious! But I passed.
 

Attachments

  • 20161222_110158.jpg
    20161222_110158.jpg
    148.5 KB · Views: 533
  • iPhone Dec. 8 2016 1022.jpg
    iPhone Dec. 8 2016 1022.jpg
    141.4 KB · Views: 430
  • iPhone Dec. 8 2016 1043.jpg
    iPhone Dec. 8 2016 1043.jpg
    143.4 KB · Views: 428
  • iPhone Dec. 8 2016 1001.jpg
    iPhone Dec. 8 2016 1001.jpg
    140.6 KB · Views: 433
  • iPhone Dec. 8 2016 776.jpg
    iPhone Dec. 8 2016 776.jpg
    141.1 KB · Views: 453
  • iPhone Dec. 8 2016 883.jpg
    iPhone Dec. 8 2016 883.jpg
    150.9 KB · Views: 504
  • iPhone Dec. 8 2016 909.jpg
    iPhone Dec. 8 2016 909.jpg
    154.8 KB · Views: 427
Last edited:

hobie1dog

Well-known member
Joined
Nov 21, 2007
Messages
2,833
Location
Cornelius,NC
View media item 66285
Just got it as a Xmas gift. Parents got me the bench and surface and wife got the drawer module. Plan on adding another drawer module on the other side. Not as cool as some of the outstanding custom fabricated benches in this thread, but I am pretty excited about it!

Simple, can put a chair up with your legs under the bench. One of my favorites so far.:bounce:
 

Tinsmith

Member
Joined
Dec 5, 2013
Messages
11
Location
Fort St John B.C.
Here is my contribution to this thread. Just welded this up today. Still need to come up with a top, Thinking 2x10 for now.
 

Attachments

  • IMG_0800.jpg
    IMG_0800.jpg
    138.2 KB · Views: 545

Dusty-NZ

Well-known member
Joined
Aug 19, 2010
Messages
149
Location
Canterbury NZ
Inside work bench , wood frame and 3mm steel top.

Outside bench , (in the open car port) all steel , frame and top.
 

Attachments

  • 20 08 08 garage stuff 014.jpg
    20 08 08 garage stuff 014.jpg
    148.6 KB · Views: 473
  • OCT 2012 032.jpg
    OCT 2012 032.jpg
    150.4 KB · Views: 421

AMCguy

Well-known member
Joined
Dec 23, 2009
Messages
2,022
Location
Sunshine Coast, BC Canada
I needed a dual purpose motorcycle lift table and adjustable height work bench. Pneumatic was not my favorite, so I was left with hydraulic.
I bought a 4' by 8' .125" sheet of steel diamond plate at the Metal Supermarket then cut and folded it where I used to work.
I opted for twin hydraulic lift cylinders for stability and to slow the loft speed by 50%.
The 12 volt remote hydraulic power-pack and lift cylinders came from Princes Auto. I added an adjustable oil return valve to slow the lowering speed. The valve allows 100% flow in the lift mode.
I added remote control to the power unit and hydraulic quick disconnect so the unit could be rolled away to serve as a battery booster. The booster cable is also on a quick disconnect. The lift table can go as low as 4 inches and as high as 48 inches.
The motorcycle wheel clamp is a floating caliper style made from the hydraulics of a small floor jack from Canadian tire.

I really like your lift table. Do you have any more pictures or details on how you built it?
 

bdbecker

ALLIANCE MEMBER
Joined
Nov 18, 2015
Messages
5,542
Location
Iowa
Here is my contribution to this thread. Just welded this up today. Still need to come up with a top, Thinking 2x10 for now.

Lol... this reminds me of a conversation a buddy and I had about beards. The conclusion was that, no matter how hard you try to have biggest and greatest beard, there will always be someone who will "out-beard" you.

You sir, have "out-benched" us all.
 

Maddog10

Well-known member
Joined
Nov 16, 2016
Messages
151
Location
Paducah, Kentucky
Here are a few pics of my relatively simple workbench.

Frame:
DSC_1249_zpsgqyg6pmm.jpg


DSC_1252_zpsgqlogea3.jpg


Finished:
DSC_1507_zpsehlfmmvf.jpg


DSC_1530_zpsj8dhhzcj.jpg


Bottom shelf needs another coat of poly.
DSC_1520_zpsrxjxklgz.jpg
 

Tinsmith

Member
Joined
Dec 5, 2013
Messages
11
Location
Fort St John B.C.
HAHAHAHA, Thanks, bdbecker. I unfortunately don’t have the needed floor space for both a bench and welding table. So I was wanting it to be a do-all bench. need to add the receiver tubing behind each leg, for vise and bench grinder. As well as looking to add two of the tool box add-on cabinets beside each leg. And a steel top when more funds permit. It is surprisingly not as heavy as I thought it was going to be. It’s a two person grunt for moving around if needed. Originally was going to make the table top removable from the bottom, fearing that equipment was going to be needed to move. But decided to weld it solid, after trying a couple Dead-man lifts with it.
 
Last edited:

drivesitfar

Well-known member
Joined
Oct 23, 2013
Messages
35,989
Location
Pacific Northwest
Tin: i too love your steel workbench frame that looks like it's made out of a highway's bridge material. sounds like you don't want to put a nice piece of steel plate on it which would be my option if i had one.

i'd like to see your hitch mounts for a vise and grinder and other tools and would love pictures and details of how you made it if you do.

ALL: nice workbenches everybody
 
To avoid these ads, REGISTER NOW!

Catadj78

Well-known member
Joined
Aug 11, 2014
Messages
1,009
Location
Alabama
6f8bbee820b432d39ee7eee181580090.jpg


In progress


Sent from my iPad using Tapatalk
 

Attachments

  • 6f8bbee820b432d39ee7eee181580090.jpg
    6f8bbee820b432d39ee7eee181580090.jpg
    291.6 KB · Views: 20

Catadj78

Well-known member
Joined
Aug 11, 2014
Messages
1,009
Location
Alabama
5fa0fa4e6ac9528646168ee91b96d9d8.jpgba239daf1a4b1629bee7e283a6341adc.jpg


Sent from my iPad using Tapatalk
 

Attachments

  • 5fa0fa4e6ac9528646168ee91b96d9d8.jpg
    5fa0fa4e6ac9528646168ee91b96d9d8.jpg
    291.1 KB · Views: 13
  • ba239daf1a4b1629bee7e283a6341adc.jpg
    ba239daf1a4b1629bee7e283a6341adc.jpg
    349.8 KB · Views: 15

hendooman

Member
Joined
Jul 4, 2011
Messages
15
Location
KC
That's a great looking setup, as far as I'm concerned.

Thanks

I would Agree. You can almost hear the Solitude of the Man Cave in that Image... Wicked little spot...

Thanks, it is a good get away, although my boys like hanging out there as well, you can't see it but there is an xbox set up, so the neighbor kids gather!

Putting a small TV over my workbench is on my wish list for the winter.

Nice looking workshop!

Thanks, TV a must for me so I don't miss games, I don't have too many things to work on, house is fairly new, work on my 4runner some, but mainly tinkering with RC Cars, Quad Copters and fixing the boys bikes and skateboards is a constant job.

Hendooman won't be watching any more Chiefs games, our season is over!!

Just now coming to grips with last night :sad::sad::sad:
 

Ty.

Well-known member
Joined
Dec 21, 2015
Messages
171
Location
Northern Wi
here is the bench I built this summer, I used to have a bench that ran the full width of the back wall of my garage, but I got a new truck that is quite a bit longer than my old truck so half of it had to go. it was also just to big to be useful. I wouldn't actually put anything away because there was so much real estate, and I found my self working off of a small clean spot all the time. this smaller bench is much better built, and is easier to keep clean. I want to say its 13' long, and almost 30" deep, and 40" or 42" tall. I know its higher than most people prefer, but I love it. right now the bottom shelves are mostly a catchall which bugs me, but it will stay that way until I get more stuff or make other storage elsewhere. the bench is built like a brick s*** house and should last me a life time aside from maybe replacing the top boards.

attachment.php
 

Attachments

  • 20170118_175016.jpg
    20170118_175016.jpg
    145.9 KB · Views: 2,602
Last edited:

HockeyDave13

Member
Joined
Jun 22, 2012
Messages
18
Location
Siloam Springs, AR
0563c36003696daca308d31e50251f18.jpg

Here's mine. Would love to take full credit but a good buddy had access to a full woodworking shop. This was rough cut red oak that was used in a horse stall.
 

Attachments

  • 0563c36003696daca308d31e50251f18.jpg
    0563c36003696daca308d31e50251f18.jpg
    780.2 KB · Views: 21

Tinsmith

Member
Joined
Dec 5, 2013
Messages
11
Location
Fort St John B.C.
Good day Gentlemen! I got around to putting the top on my bench. Went with 2x10 for now. First project on the new bench was repairing the two broken Makita drills on top. Let me tell you this sure beats working off an ATV rack :) next order of business is finding a vise.
 

Attachments

  • IMG_0808.jpg
    IMG_0808.jpg
    128.1 KB · Views: 371

drivesitfar

Well-known member
Joined
Oct 23, 2013
Messages
35,989
Location
Pacific Northwest
Tin: great looking bench and i would have thought a 1/2 inch steel plate with that frame, but that wood is growing on me too.

if you go in your GJ profile and put in your location it might be easier for you to maybe get help when saying you need a vise or something that is area specific to avoid shipping costs. i've been selling a few vises to members so they can have an old US made vise on their bench, but if you are too far for local pick up shipping costs could put the costs of one of mine over what you want to spend.

if you might need a little advice on a vise you are welcome to PM me and if you put in your email i might be able to send you a few pictures of a few i might be selling or ones to look for to buy in your area. or enjoy the hunt on your own and maybe you already know what you want.

DAVE: pretty sweet to have a friend that can swing by with that sort of work bench top. or did he bring the entire bench?

ALL: i always like looking at this thread so keep posting up pictures of your benches and shop if you have time to. thanks in advance!!:bowdown:
 

bdbecker

ALLIANCE MEMBER
Joined
Nov 18, 2015
Messages
5,542
Location
Iowa
Good day Gentlemen! I got around to putting the top on my bench. Went with 2x10 for now. First project on the new bench was repairing the two broken Makita drills on top. Let me tell you this sure beats working off an ATV rack :) next order of business is finding a vise.

I really like how that turned out. The only thing you might want to do yet is round off that corner a little, or at least put something next to it so you don't accidentally stab yourself in the hip. Also, are you planning to paint the frame, or just leave it rawesome? (raw + awesome = rawesome)
 
To avoid these ads, REGISTER NOW!
Top Bottom