To avoid these ads, REGISTER NOW!

Lets see your workbench

Bob Heine

ALLIANCE MEMBER
Joined
Oct 24, 2009
Messages
10,703
Location
Boca Raton, Florida
Nope, all original. I designed the whole thing myself, about two weeks of thinking about what I wanted it to do then 2 days of sketching before I pulled the trigger and built it. I was originally thinking steel but quickly realized weight would be a serious issue.

Sent from my iPhone using Tapatalk Pro
Very nice! Especially impressive time frame.
 
To avoid these ads, REGISTER NOW!

Bmwtie

Well-known member
Joined
Dec 29, 2018
Messages
89
Location
Littleton, CO
Added a flip-up outfeed support with some gas props. Its 1/8” lower to ensure material can never catch a lip.

IMG_1071.jpg

IMG_1072.jpg

IMG_1073.jpg

Hole is so I can still manually turn on vacuum if needed. It automatically kicks on when running any of the 4 tools.

IMG_1076.jpg


Sent from my iPhone using Tapatalk Pro
 

redheelerdog

Well-known member
Joined
Jan 19, 2019
Messages
87
Location
Montana
Made some progress this weekend with wiring and outlets. I think I will add air fitting outlets under the bench at several locations.

Bench 36.jpg Bench 37.jpg

Bench 38.jpg Bench 39.jpg

Bench 40.jpg Bench 41.jpg

Bench 42.jpg
 

LXCam

ALLIANCE MEMBER
Joined
Apr 23, 2013
Messages
19,072
Location
AZ
Added a flip-up outfeed support with some gas props. Its 1/8” lower to ensure material can never catch a lip.

IMG_1071.jpg

Holy smokes BMW, now that's one knarly mobile bench! :bowdown:

What do you think that thing weighs?


And nice job heeler, the bench looks great but I have to ask why you filled all the holes for the base plates. Granted it would have my OCD on overdrive not too but from a practical standpoint of potentially changing it up sometime down the road wouldn't have. At least not with a stud anchor, but an insert instead. Just wondering.
 

Bmwtie

Well-known member
Joined
Dec 29, 2018
Messages
89
Location
Littleton, CO
The wood / framing is exactly 400lb. Fully loaded with all of my stuff right around 950.


Sent from my iPhone using Tapatalk Pro
 

Kirk T

Well-known member
Joined
Jan 23, 2019
Messages
338
Location
NW Oklahoma
I always wanted a bench with a vise attached that didn't move around when using a 6' cheater on a 48" pipe wrench, so after years of wishing my son and I built one with a 1 1/2" thick top.
 

Attachments

  • Bench & Vise.jpg
    Bench & Vise.jpg
    96.1 KB · Views: 579
  • Bench3.jpg
    Bench3.jpg
    146.8 KB · Views: 529
  • Bench2.jpg
    Bench2.jpg
    149 KB · Views: 585

LXCam

ALLIANCE MEMBER
Joined
Apr 23, 2013
Messages
19,072
Location
AZ
The wood / framing is exactly 400lb. Fully loaded with all of my stuff right around 950.


Sent from my iPhone using Tapatalk Pro

Ya, it looks every bit of that too. I like what you did since it keeps everything in one location and can be moved to wherever for use or storage. I rarely do wood work but have most everything to do it with and get sick of pulling it all out when needed. I might just have to follow your lead on the WW bench from hell, it's pretty cool.

When I built my lista bench originally it was going to be on rollers. Then I started thinking why in the hell would i try to roll around 5klbs worth of **** so I bowed out. But for the wood stuff, it's a damn fine idea.

I always wanted a bench with a vise attached that didn't move around when using a 6' cheater on a 48" pipe wrench, so after years of wishing my son and I built one with a 1 1/2" thick top.


No kidding wow! That's impressive :bowdown:
 

Kirk T

Well-known member
Joined
Jan 23, 2019
Messages
338
Location
NW Oklahoma
We welded the bench up with it upside down. Utilized adjustable pads on all four corners so the bench could be leveled and any wobble stabilized. Made an area in one corner for the chopsaw to sit recessed to where the working surface of the chopsaw would level with the tabletop. Yet to have put the chopsaw in its place. Didn’t want the mess where the bench is now. We store short lengths of steel under the bench supported on the cross braces. With storage steel in place I estimate it to weigh 3000 pounds. It doesn’t move! Before we built this bench I had a lighter bench bolted to the floor. It didn’t move because it was bolted down but it wobbled around.fe867040dfefe446e0abfe967c8bfb43.jpg
 

Attachments

  • fe867040dfefe446e0abfe967c8bfb43.jpg
    fe867040dfefe446e0abfe967c8bfb43.jpg
    248.7 KB · Views: 109

jesse72

Well-known member
Joined
Sep 26, 2011
Messages
352
Location
California
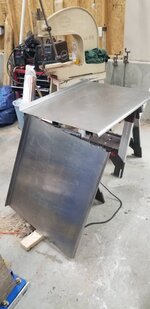
I have moved around the country a few times, sadly not always having a garage. Here are the different work benches I have built.

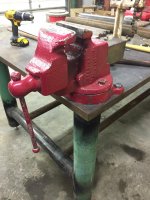
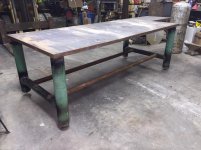
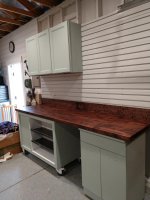
Pictures 1 and 2 are ones I built at different homes, picture 3 was an existing bench in the basement of that home (no garage there).

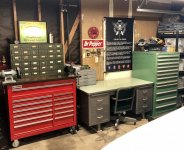
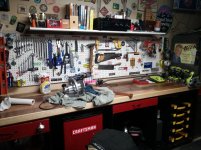
Picture 4 is my current workbench set up. I put a doubled 24x48” plywood top on my HF 44” tool cabinet and it is screwed into a 2x4 stringer that is lagged into the studs behind the tool cabinet so it does not move, even while using the vise. This also keeps the cabinet from wobbling when opening and closing the drawers.

The tanker desk is a Steelcase with matching chair I got a few years ago, I usually have it in a home office but no longer have a room for that.

I think my taste in tools and style has changed a lot as time has passed, I really enjoy quality vintage equipment and the industrial look and feel.
 

Attachments

  • 3587B0F6-D697-4F74-BF27-0A2E74586E9F.jpg
    3587B0F6-D697-4F74-BF27-0A2E74586E9F.jpg
    154.5 KB · Views: 732
  • 558B07CB-58D3-4340-8706-15D1737CBB6A.jpg
    558B07CB-58D3-4340-8706-15D1737CBB6A.jpg
    158.4 KB · Views: 699
  • 748E51EC-9E10-493B-89A5-6ABAE81C1BFD.jpg
    748E51EC-9E10-493B-89A5-6ABAE81C1BFD.jpg
    152.9 KB · Views: 709
  • 43942DB4-1B9F-4035-AD0C-970C1751AF17.jpg
    43942DB4-1B9F-4035-AD0C-970C1751AF17.jpg
    114.8 KB · Views: 714
Last edited:

BlueBomber

Well-known member
Joined
Sep 14, 2013
Messages
3,201
Location
Outside Boston, MA
I just finished a stainless steel work bench next to my powder coating oven to handle duties related to that task. I cut down a 6-ft utility table to fit the space, and screwed a 2x6 to the bottom of the oven box to support that side. The other two side sit on pressure treated 2x6s on the knee wall.fe0d70ca5ed86eb84816bbd078e8e2ff.jpg814ded43380ce06abc75951fcd68afc4.jpg8008b891651c41defc9c86e1214ce57c.jpg039e4af18bb495979e53858815a8138c.jpg

Sent from my SM-G950U using Tapatalk
 

Attachments

  • 8008b891651c41defc9c86e1214ce57c.jpg
    8008b891651c41defc9c86e1214ce57c.jpg
    55.8 KB · Views: 72
  • fe0d70ca5ed86eb84816bbd078e8e2ff.jpg
    fe0d70ca5ed86eb84816bbd078e8e2ff.jpg
    34.7 KB · Views: 54
  • 814ded43380ce06abc75951fcd68afc4.jpg
    814ded43380ce06abc75951fcd68afc4.jpg
    57.5 KB · Views: 45
  • 039e4af18bb495979e53858815a8138c.jpg
    039e4af18bb495979e53858815a8138c.jpg
    30.7 KB · Views: 58

28HopUp

Well-known member
Joined
Mar 16, 2010
Messages
295
Location
Lowcountry SC
I already had the lower right cabinet, but everything else was damaged mark-downs at Lowe's. The cabinets are painted the same color as the house and is the main accent color in the garage. The walls are color-matched to the Gladiator Gear-Wall. I haven't laid out the Gear-Wall accessories yet, but Craftsman Versa-Trak items will also fit. This is placed on the right wall of my 24'(D) x 20'(W) garage, but my main bench is along the back wall. As shown below, I have about $270 into it. Thanks for looking!
 

Attachments

  • IMG_20190301_134658847.jpg
    IMG_20190301_134658847.jpg
    86.6 KB · Views: 494

BlueBomber

Well-known member
Joined
Sep 14, 2013
Messages
3,201
Location
Outside Boston, MA
I already had the lower right cabinet, but everything else was damaged mark-downs at Lowe's. The cabinets are painted the same color as the house and is the main accent color in the garage. The walls are color-matched to the Gladiator Gear-Wall. I haven't laid out the Gear-Wall accessories yet, but Craftsman Versa-Trak items will also fit. This is placed on the right wall of my 24'(D) x 20'(W) garage, but my main bench is along the back wall. As shown below, I have about $270 into it. Thanks for looking!
Nicely done, 28HopUp. Tell us about your work surface--what kind of material is it?

Sent from my SM-G950U using Tapatalk
 

28HopUp

Well-known member
Joined
Mar 16, 2010
Messages
295
Location
Lowcountry SC
Thanks. The surface is 8' butcher block sold at Lowe's. This piece was boogered up on the edge (which is towards the back side), so it was marked down. The back stop is 1x8. I stained it Red Mahogany by Minwax, with 2 coats of polyurethane. The color closely matches my main bench on an adjacent wall, which I posted here:

https://www.garagejournal.com/forum/showpost.php?p=7548415&postcount=68
 
Last edited:
To avoid these ads, REGISTER NOW!

Jazz1

Well-known member
Joined
Jan 3, 2016
Messages
4,184
Location
Thunder Bay On.
I made my workbench with left over plywood from building my garage. 4x4 legs were left from fencing my property and 3/16" steel top is from another project. The drawers were tossed by local cable company. Upper cabinets I had dibs on when a friend redid his kitchen. I don't buy squat if I don't have to:thumbup:
 

Attachments

  • IMG_3557.jpg
    IMG_3557.jpg
    135.4 KB · Views: 1,330
Last edited:

BlueBomber

Well-known member
Joined
Sep 14, 2013
Messages
3,201
Location
Outside Boston, MA
Love your pic! These are the kind of workbenches I love best: clearly a working bench, not a show piece; tidy enough to use, but not sterile, and built from at hand materials, but still well crafted.

I struggle with the second one, myself. Well done!

Sent from my SM-G950U using Tapatalk
 

rzims

Well-known member
Joined
Oct 25, 2006
Messages
451
Location
Grass Valley, CA
Not a great picture - the bench was in place when I bought the house 25 years ago. It's just plywood and 2x4s with homemade drawers.
I recently peeled the yellow formica top and covered with leftover laminate from my daughter's flooring project.
Small fridge fits perfectly and I built a rack for the small parts bins to fit inside as well...
 

Attachments

  • saw3.jpg
    saw3.jpg
    159.6 KB · Views: 1,026

Loose Ctrl

Well-known member
Joined
Dec 21, 2014
Messages
759
Location
Upstate SC
I made my workbench with left over plywood from building my garage. 4x4 legs were left from fencing my property and 3/16" steel top is from another project. The drawers were tossed by local cable company. Upper cabinets I had dibs on when a friend redid his kitchen. I don't buy squat if I don't have to:thumbup:
I wish I could get those kind of deals. I can barely get stuff at full price. :lol_hitti
 

Fishy66

Well-known member
Joined
Jan 17, 2013
Messages
115
Location
Bonita, CA
The kids and I put a $20 led light strip in to give a little more light.
46572649565_a8e9ecabcf_b.jpg

After light strip:
32545976517_d931c627b4_b.jpg

47487941271_0b785ef05d_c.jpg

46764579374_ee1d5e0260_c.jpg

It even changes colors for when I am on a disco meth binge.
33611289078_d5d839194d_b.jpg

47435049722_229fd0efea_b.jpg

40521949723_575c62e1eb_b.jpg
 

lowside67

Well-known member
Joined
Sep 29, 2017
Messages
135
Location
Vancouver, BC
I've only been in this house for 5 weeks, so it is a work in progress, but here's my workbench after my toolboxes were delivered today.

Overall_Boxes.jpg


-Mark
Version "2.0" of my workbench after removing the wheels off the boxes and building a 2x4 frame for the toolbox side, plus 2x 5/8" top sheets glued and screwed:

IMG_6392.jpg


Version 3.0 when money permits will be a stainless top over the plywood.

-Mark
 

bherren

Well-known member
Joined
Aug 12, 2015
Messages
111
Location
Tennessee
Version "2.0" of my workbench after removing the wheels off the boxes and building a 2x4 frame for the toolbox side, plus 2x 5/8" top sheets glued and screwed:

IMG_6392.jpg


Version 3.0 when money permits will be a stainless top over the plywood.

-Mark

Looking good Mark! How deep did you make it? Is it sufficient so far? I may do something very similar.
 

bherren

Well-known member
Joined
Aug 12, 2015
Messages
111
Location
Tennessee
Not a great picture - the bench was in place when I bought the house 25 years ago. It's just plywood and 2x4s with homemade drawers.
I recently peeled the yellow formica top and covered with leftover laminate from my daughter's flooring project.
Small fridge fits perfectly and I built a rack for the small parts bins to fit inside as well...

Mountain biker?
Me - GF superfly and a BH 29er. Working on getting my shop picture worthy. :beer:
 

lowside67

Well-known member
Joined
Sep 29, 2017
Messages
135
Location
Vancouver, BC
Looking good Mark! How deep did you make it? Is it sufficient so far? I may do something very similar.
Mine is intentionally not very deep as I have a very small double car garage so am trying to maximize space at all time. The "narrow" side (over the toolboxes) is 22" deep and the "deep" side (under the cabinets) is 26" deep.

22" is great for what I wanted, essentially a "prep" area so I have space to spread out whatever I am working on. It would be a little shallow as a primary work space in my opinion, but the 26" side is great. If I had unlimited depth, I would probably still do something in the 26-27" range.

-Mark
 

Bmwtie

Well-known member
Joined
Dec 29, 2018
Messages
89
Location
Littleton, CO
Version "2.0" of my workbench after removing the wheels off the boxes and building a 2x4 frame for the toolbox side, plus 2x 5/8" top sheets glued and screwed:


IMG_6392.jpg


Version 3.0 when money permits will be a stainless top over the plywood.


-Mark


Sweet Posters!


Sent from my iPhone using Tapatalk Pro
 

BajaScout

Well-known member
Joined
May 1, 2011
Messages
4,608
Location
San Diego, CA
The kids and I put a $20 led light strip in to give a little more light.
46572649565_a8e9ecabcf_b.jpg

After light strip:
32545976517_d931c627b4_b.jpg

47487941271_0b785ef05d_c.jpg

46764579374_ee1d5e0260_c.jpg

It even changes colors for when I am on a disco meth binge.
33611289078_d5d839194d_b.jpg

47435049722_229fd0efea_b.jpg

40521949723_575c62e1eb_b.jpg

Howdy Neighbor. Nice garage! Just up the hill from you in Paradise Hills. Will keep an eye out for your Mopar.
 

T2R9

Member
Joined
Oct 26, 2010
Messages
14
Just got done with the basic build on mine. Its 15' long x 8'. Now to start accessorizing it.
 

Attachments

  • IMG_1062.jpg
    IMG_1062.jpg
    101.1 KB · Views: 551

zmotorsports

ALLIANCE MEMBER
Joined
Oct 20, 2009
Messages
21,312
Location
Northern Utah
I made my workbench with left over plywood from building my garage. 4x4 legs were left from fencing my property and 3/16" steel top is from another project. The drawers were tossed by local cable company. Upper cabinets I had dibs on when a friend redid his kitchen. I don't buy squat if I don't have to:thumbup:

Love this picture. Reminds me of my dad's workbench in his old workshop on the farm. Shows a history and well used. My workbenches in my old shop were getting to that point after 25+ years in that shop before I started over. Don't know that I will ever see my current setup get to that point but I sure like seeing them.
 

anythingyoucanimagine

Well-known member
Joined
Feb 6, 2019
Messages
423
Location
New England
idk how there are so many pictures of clean benches/garages in this thread.

My garage & bench is so full of **** I can't even see it. The only things that are barely accessible in my shop are the radial arm saw table and my beer fridge.
 
To avoid these ads, REGISTER NOW!
Top Bottom