To avoid these ads, REGISTER NOW!

Lets see your workbench

YOM1963

Well-known member
Joined
Dec 9, 2011
Messages
55
Location
MA
Building out the inside of my shop now, with the first workbench completed and more to come. This one is 11’ long, 32” deep, and 37” high. 6x6 posts, 2x6 to tie those together, and 2x12 for the top base. I then had 10 gauge (1/8”) steel formed to fit over that, with a 4” backstop formed up as part of it.

Not sure what the laws are in OR, but here in MA you have to leave 3 feet clear in front of the breaker panel. You might want to put casters on that bench in case you have to move it.
 
To avoid these ads, REGISTER NOW!

cderalow

Well-known member
Joined
Nov 13, 2011
Messages
1,326
Location
Potomac, MD
Not sure what the laws are in OR, but here in MA you have to leave 3 feet clear in front of the breaker panel. You might want to put casters on that bench in case you have to move it.

that's a general NEC requirement, 110-26

You need a 2'6" wide, 3' deep, 6'6" tall volume of space in front of it clear of obstructions.
 

drivesitfar

Well-known member
Joined
Oct 23, 2013
Messages
35,988
Location
Pacific Northwest
OR: yes you are and probably 75% or more if the people that work in their garages that actually know how to turn off or change a breaker might be too.

I’ve seen more than a few breaker boxes or service panels in kitchens, laundry area and bathrooms that might have also been inside a cabinet.
 

schurtjl

Well-known member
Joined
Jan 24, 2016
Messages
147
Location
Oregon
Tpopz: looks like you've made a nice bench and cabinet set up. care to post a few more pictures of how you supported your bench top cause I don't see any legs on it.

also WELCOME TO GJ and hope you need a few more tools and a some skills cause if you hang around that's what you'll get.

Schurt: looks like a great shop. sounds like maybe you had the 1/8 inch top made for you? how much and was it at a steel fab or machinist shop locally?

GK Machine, a local business that manufactures agricultural equipment as well as fabbing up anything you request. They do great work, for what I think is a reasonable price. Charged me $230 for the materials and labor to form it up.
 

schurtjl

Well-known member
Joined
Jan 24, 2016
Messages
147
Location
Oregon
Not sure what the laws are in OR, but here in MA you have to leave 3 feet clear in front of the breaker panel. You might want to put casters on that bench in case you have to move it.

Yes, by code it probably shouldn’t be there. I have a forklift to lift and move it wherever I need it, especially during inspection time. Unfortunately it’s the best location along that wall for it. I didn’t want the panel in that location but code limited where I could put it.
 

Tpopz

New member
Joined
Dec 9, 2019
Messages
2
Location
Ky
Tpopz: looks like you've made a nice bench and cabinet set up. care to post a few more pictures of how you supported your bench top cause I don't see any legs on it.

also WELCOME TO GJ and hope you need a few more tools and a some skills cause if you hang around that's what you'll get.

Thanks!

The bench is pretty shallow so it doesn’t take much space....14”, with a decent work area in the corner. I used 12” welded shelf brackets at every stud, plus a Rockler 1000lb 21” bracket in the corner. It won’t support a Chevy small block, but is perfect for reassembling a carb.

Eventually, I’ll be setting up a wood shop in the basement with a more substantial bench. This one in the garage will just be for light maintenance tasks.

Re color: I am a big fan of Jacks 12 gauge garage, so that’s where the color process started. But, it ended up looking like Kitty Foreman’s kitchen on “That 70’s Show”. Wife loves the color, so there’s that.

Cabinets are Habitat Restore finds.
 

Attachments

  • 0F722842-2A5C-46C7-AC0D-DD8865E83C1C.jpg
    0F722842-2A5C-46C7-AC0D-DD8865E83C1C.jpg
    92 KB · Views: 552
Last edited:

skulldrinker

Well-known member
Joined
Dec 25, 2011
Messages
1,171
Location
Bolingbrook, IL
Late 1980s Craftsman workbench with drawers.78fcc8fb95fb3c0cbbe4ea19434f3a47.jpg

Sent from my SM-N960U using Tapatalk
 

Attachments

  • 78fcc8fb95fb3c0cbbe4ea19434f3a47.jpg
    78fcc8fb95fb3c0cbbe4ea19434f3a47.jpg
    199.9 KB · Views: 102

mc4life27

Well-known member
Joined
Jul 2, 2014
Messages
404
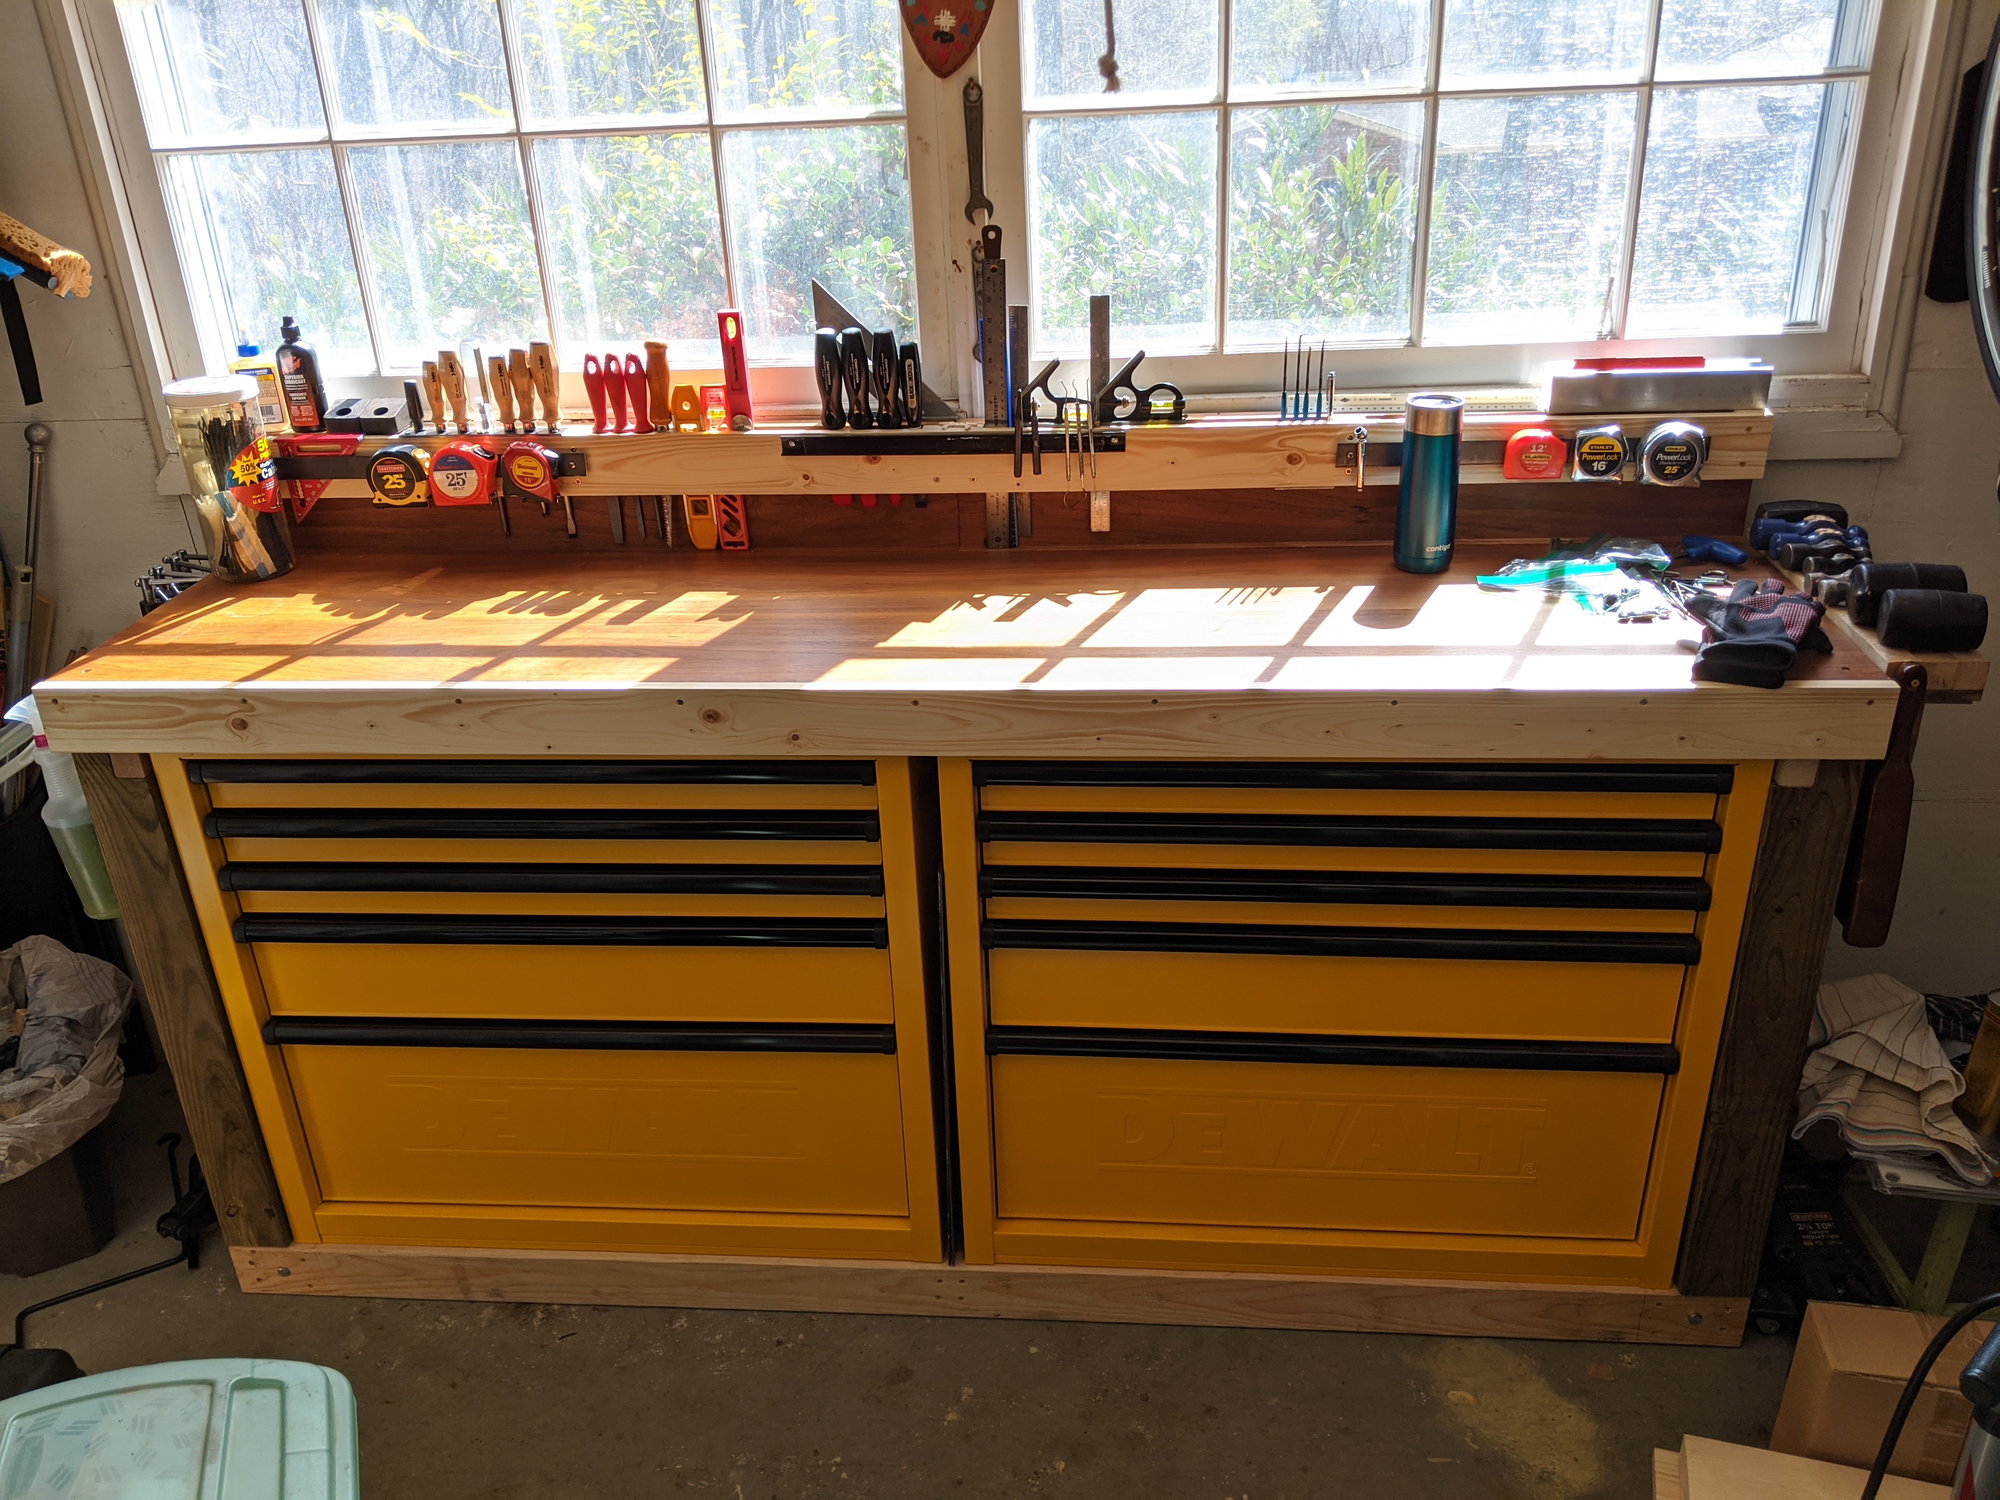
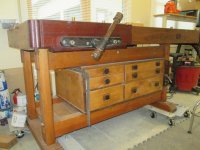
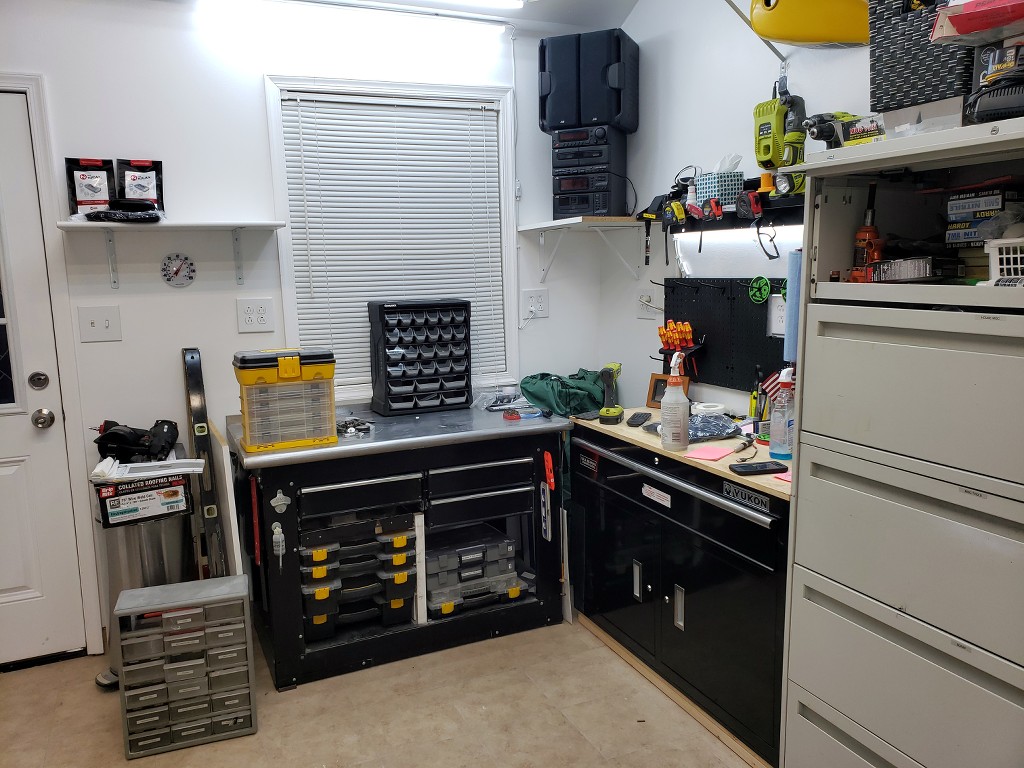
I finally finished my upgraded electronics workbench. The bottom is a nice deep surface for working on large TVs. Two of the famous Lowes Waterloo toolboxes underneath with various electronics emblems on the drawers.

The top is a test fixture of sorts. It has a 19" LCD in the center, with the input jacks connected to the patch plate on the left (there is also a tiny hole where the remote signal passes through). It is flanked by two 4" LCD monitors too. Why? Because I had them in my parts bin, lol. And it's nice to be able to test multiple streams simultaneously. I used plexiglass to cover each of the monitors, with back-painted black trim.

There is a large server power supply inside the cabinet to provide 12v and 5v to the banana jacks (this also provides power to the ancillary video devices). There are 4 4-ohm speakers wired to a terminal plate for testing audio devices. I can pair them up in series or parallel if I need 2 or 8 ohm loads too.

Across the bottom from left-to-right I have a SD-Card video player, it has 4 HDMI ports, a VGA port, a component and composite output too. This provides test videos for when I do burn-in testing on TVs. The second white device is also a SD player but it only has VGA and composite. I use this one for stills and test patterns. Then on the right is a small amplifier that I use to test speakers.

There is a fan on each end of the cabinet to pull air from the nearby AC vent through the cabinet interior for cooling.

I have a couple blank plates in there for future expansion. I might add a variable power supply at some point. The monitor on the back wall is just for security cameras. And of course the trusty Tektronix scope on the right. There is also a PC in the rack to the right (not pictured), but that's what's displaying on the LCD (Will Ferrell's "You're Welcome America")

Total cost for me was about $150. I had all of the parts in my junk bins. The only thing I had to buy was the wood, the two Waterloo boxes, and the AV jack plate.

Sorry for the crappy cell phone pics.

attachment.php

attachment.php

attachment.php

attachment.php


Nice set up and I’m moving in a similar direction with mine. I just have to say one thing you over tightened the metal plate covers, can notice where te screw has pulled the plate down and bent it.


Sent from my iPhone using Garage Journal
 

CoogarXR

Well-known member
Joined
Jan 11, 2016
Messages
6,843
Location
Ohio
Nice set up and I’m moving in a similar direction with mine. I just have to say one thing you over tightened the metal plate covers, can notice where te screw has pulled the plate down and bent it.


Sent from my iPhone using Garage Journal

Funny, it looks pretty bad in the pictures, but it's not that noticeable in person. I was more OCD about the screw heads being straight, lol.
 

drivesitfar

Well-known member
Joined
Oct 23, 2013
Messages
35,988
Location
Pacific Northwest
RED: nice looking shop and great picture. is that unistrut legs on that cool bench? did you have the stainless top made or did you bend it or find it?

I didn't see a vise so is it on another bench or maybe you've got one on a stand with a grinder?

thanks for sharing
 

Craig Balzer

Well-known member
Joined
Sep 21, 2005
Messages
854
Location
Colorado Springs
Building out the inside of my shop now, with the first workbench completed and more to come. This one is 11’ long, 32” deep, and 37” high. 6x6 posts, 2x6 to tie those together, and 2x12 for the top base. I then had 10 gauge (1/8”) steel formed to fit over that, with a 4” backstop formed up as part of it.

Schurtjl

Coupla questions on your bench, please:

How much do the items weigh that you are gonna work on the bench?

What drove you to build an 11' bench? -- looks like you have plenty of room for an even longer one.

With the strength of the wood you used, why did you choose to place a pair of legs in the middle of your bench? -- what is the rule of thumb for determining when/where to include intermediate legs?
If you had built a longer bench than 11', when and where would you have added another set of legs? (I guess this kinda rephrases the previous question.)

Did you consider putting the bench on castors?

How did you determine the 37" height?

TIA -- Craig
 

drivesitfar

Well-known member
Joined
Oct 23, 2013
Messages
35,988
Location
Pacific Northwest
Mecha: what kind of toolboxes are those you built your bench around? also nice thinking putting in the magnets and tool holders. also like the spot you located your workbench with the window and view. WELL DONE!!
 
To avoid these ads, REGISTER NOW!

Mecha

Well-known member
Joined
Dec 28, 2016
Messages
194
Location
Volunteer State
drivesitfar: It's two 36" wide Dewalts that I got for $60 each two years ago after Christmas on clearance. Held on to them forever it seems like. They are shallow but fit this space real well. I have a nice long and narrow room off of the garage, like 6.5' by 22'. It's a work in progress but a great spot by a window for this. It's nice.

Thanks to you both for the compliments.
 

turbowoodworker

Well-known member
Joined
Mar 18, 2012
Messages
3,519
Location
Apex NC
Cleaned up my working surface and added some paste wax. ready for another project.
 

Attachments

  • IMG_2932.jpg
    IMG_2932.jpg
    118.9 KB · Views: 488
  • IMG_2933.jpg
    IMG_2933.jpg
    80.9 KB · Views: 425

drivesitfar

Well-known member
Joined
Oct 23, 2013
Messages
35,988
Location
Pacific Northwest
Mecha: you're welcome and congrats on finally getting that little project done.

Turbo: that is some serious BENCH ****. WOW!!

how long did it take you to make that cool bench?
 

turbowoodworker

Well-known member
Joined
Mar 18, 2012
Messages
3,519
Location
Apex NC
Hey Drives,

At the risk of being accused of boosting my own post count, I've actually shown that bench a number of times, notably in the first few pages of Jim's Woodworking 101 thread and someplace deep in this thread years ago. But here are a couple more bench **** pics.

To answer your question, it wasn't really how long (maybe a few weeks working on weekends) but more interesting are the materials. Mostly salvaged stuff went in to it. The base is some big, old ,hard lumber that was salvaged from rafter material in an office building I refurbished in Phoenix (think hard and very dry). The maple top is from a neighbor's counter top discarded when they redid the kitchen to granite. and the skirt is walnut (purchased) as well as the vise faces (brazilian cherry or jatoba).

The drawer/cabinet module easily lifts out (when empty!) and is made from alder leftover from another project.

Thanks for browsing. Rick
 

Attachments

  • IMG_4362.jpg
    IMG_4362.jpg
    98.6 KB · Views: 330
  • IMG_4371.jpg
    IMG_4371.jpg
    84.3 KB · Views: 312
  • IMG_4364.jpg
    IMG_4364.jpg
    111 KB · Views: 326
  • IMG_4360.jpg
    IMG_4360.jpg
    145 KB · Views: 343
  • IMG_4358.jpg
    IMG_4358.jpg
    146.4 KB · Views: 387

turbowoodworker

Well-known member
Joined
Mar 18, 2012
Messages
3,519
Location
Apex NC
Drives, I just remembered something too. When I posted these originally, you commented and asked if the bench was meant to be up on the HF car dollies. So these pics are in my computer dated 9/2015, not sure when I actually posted. But I remember your question. I should probably update my pictures...off the dollies.:beer:
 

drivesitfar

Well-known member
Joined
Oct 23, 2013
Messages
35,988
Location
Pacific Northwest
Turbo: if you can remember my questions from 4+ years ago without looking at old thread posts there will be a good chance dementia or Alzeimer's won't bother you in your future.

I thought i'd seen you post your bench before and that was one Nov. 2016 in the Woodworking 101 thread so you are allowed to post that cool bench again cause it's a keeper. I agree updating your pictures might be a good thing and also showing us how you use those cool vises with steering wheel type handles would be nice too. are your bench dogs made of metal or wood?

again it's a great bench and sounds like you found some great materials for it along the way that made it a gem.
 

turbowoodworker

Well-known member
Joined
Mar 18, 2012
Messages
3,519
Location
Apex NC
Thanks for the comments on my bench.

Sorry for the delayed response folks. So Drives, no steering wheel vise handles but I did turn some rosewood handles on the lathe.

For the twin screw tail vise I did a really fun miniproject. I started with a 8/4 piece of walnut, routed the inside to accommodate the gear and chain drive for the screws. Then I drilled fastener holes and rounded over the cover. It reminds me of a valve cover. Fun project.
 

Attachments

  • IMG_2942.jpg
    IMG_2942.jpg
    148.8 KB · Views: 200
  • IMG_2943.jpg
    IMG_2943.jpg
    142 KB · Views: 179

turbowoodworker

Well-known member
Joined
Mar 18, 2012
Messages
3,519
Location
Apex NC
Concerning the bench dogs, I wanted to go with metal over wood for no particular reason except that Veritas (Canada) makes some really nice dogs.

I chose the round dogs for the face vise as they can rotate to hold odd shaped material if needed.

The square dogs are placed in a square dog hole. You might be able to tell from the picture how the channel in the apron was made from laminated walnut behind the apron face. It consists of three layers of 4/4 walnut. The middle layer is made from blocks cut at 5 degrees and routed with a recess for the dog head. All is sandwiched together.
 

Attachments

  • IMG_2940.jpg
    IMG_2940.jpg
    138 KB · Views: 183
  • IMG_2939.jpg
    IMG_2939.jpg
    129.4 KB · Views: 182
  • IMG_2937.jpg
    IMG_2937.jpg
    120.8 KB · Views: 178
  • IMG_2938.jpg
    IMG_2938.jpg
    129.6 KB · Views: 186

turbowoodworker

Well-known member
Joined
Mar 18, 2012
Messages
3,519
Location
Apex NC
Last bit of "bench ****" for the night: I added a pop up planing block on the left end of the bench.

The other addition was a pullout deadman to support long pieces being held in the face vise. I can't tell you how handy that simple addition is and how often I use it, be it for planing long boards or supporting panels. Simple tool very helpful.

Thanks for looking.
Rick
 

Attachments

  • IMG_2941.jpg
    IMG_2941.jpg
    123.7 KB · Views: 196
  • IMG_2944.jpg
    IMG_2944.jpg
    109.8 KB · Views: 242

drivesitfar

Well-known member
Joined
Oct 23, 2013
Messages
35,988
Location
Pacific Northwest
Turbo: I scan through a lot of threads and saw a bench with 2 old cast iron wheels turning it's end vise and confused it with yours which is also very nice and well made.

thanks for all the new pictures and all the cool things you added to your wood working bench that made it easier to work on. I love the little pull out that would hold a long piece while you are planing or cutting.

did you eventually put the bench on casters so you can move it into the middle of your shop or does it have a permanent spot where it sits?
 

turbowoodworker

Well-known member
Joined
Mar 18, 2012
Messages
3,519
Location
Apex NC
Drives, I can only guess how much that bench weighs with all the planes and chisel sets in the drawers. Even with casters it would be a tough move. But really, when planing, I don’t want my bench moving. So now that I have it placed in front of my big window, that’s where it stays. The HF dollies are in the corner, lonesome.:beer:
 

964haus

Well-known member
Joined
Nov 1, 2010
Messages
498
Location
Vancouver, BC
So I finally got around to tackling my workbench. Started off with a 5 hour roundtrip drive and border crossing to pick up a couple of the HF44” tool boxes. Then had to manhandle them into my tiny garage while I figured out the best way to build the bench. Given the slope of my floor it was a little tedious as no 2 cuts were the same….

My design changed once I had the boxes home and I could see the underside. My approach was to use the rails that the casters are attached to as the main supports to build the ‘ladder’ base, then set the boxes on those and build the workbench around it all.

After a couple of days, here’s the result. I’m very pleased as it’s all level! Picked up the Kreg jig system and it worked a treat. Just got to pick a bench top - laid a piece of oversized ply on it just to show my wife.

Step one done - will add paint once the weather warms up a bit, then ready for upper cabinets….

M.
 

Attachments

  • IMG_5411.jpg
    IMG_5411.jpg
    69 KB · Views: 464
  • IMG_5413.jpg
    IMG_5413.jpg
    81.9 KB · Views: 444
  • IMG_5396.jpg
    IMG_5396.jpg
    76.1 KB · Views: 415
  • garage bench 2 copy.jpg
    garage bench 2 copy.jpg
    68.8 KB · Views: 385
  • IMG_5404.jpg
    IMG_5404.jpg
    83.6 KB · Views: 449

CJseven

Well-known member
Joined
Mar 4, 2007
Messages
344
Location
Southeast Missouri
Looks good, how tall is your work top with the boxes set up like that? I’m waiting for them to get my box in, I had to preorder it a few weeks ago.
 

zanyad

ALLIANCE MEMBER
Joined
Apr 26, 2018
Messages
2,755
Location
NE Ohio
So I finally got around to tackling my workbench. Started off with a 5 hour roundtrip drive and border crossing to pick up a couple of the HF44” tool boxes. Then had to manhandle them into my tiny garage while I figured out the best way to build the bench. Given the slope of my floor it was a little tedious as no 2 cuts were the same….

My design changed once I had the boxes home and I could see the underside. My approach was to use the rails that the casters are attached to as the main supports to build the ‘ladder’ base, then set the boxes on those and build the workbench around it all.

After a couple of days, here’s the result. I’m very pleased as it’s all level! Picked up the Kreg jig system and it worked a treat. Just got to pick a bench top - laid a piece of oversized ply on it just to show my wife.

Step one done - will add paint once the weather warms up a bit, then ready for upper cabinets….

M.

Looks good! I can relate to non-level floors :eyecrazy:

Why did you cut into the horizontal supports for the lip on the tops of the toolboxes? Won't that affect the capacity of the bench top?
 

964haus

Well-known member
Joined
Nov 1, 2010
Messages
498
Location
Vancouver, BC
Looks good! I can relate to non-level floors :eyecrazy:

Why did you cut into the horizontal supports for the lip on the tops of the toolboxes? Won't that affect the capacity of the bench top?

The struggle is real (re: uneven floors).
My thought was that the uprights at the end and in the middle (made of 2x6) will carry the load. I also used a ledger board screwed into the studs which will anchor the rear of the bench top. The flat boards are effectively just spacers (lifted just off the toolbox surface) so I was fine with trimming them like I did.

I sat on the top and it's super sturdy!
M
 

Black300zx

Well-known member
Joined
Apr 8, 2019
Messages
781
Location
Elkton, Md
The struggle is real (re: uneven floors).
My thought was that the uprights at the end and in the middle (made of 2x6) will carry the load. I also used a ledger board screwed into the studs which will anchor the rear of the bench top. The flat boards are effectively just spacers (lifted just off the toolbox surface) so I was fine with trimming them like I did.

I sat on the top and it's super sturdy!
M

I did the same to get my worksurface ~3/4" lower and to avoid having a small gap for junk to collect in. With 1.5" of plywood glued and screwed to the frame, any strength reduction is negligible and the leveling legs I used will fail long before the notches become an issue.
 
To avoid these ads, REGISTER NOW!
Top Bottom