To avoid these ads, REGISTER NOW!

Light gauge metal box fabrication

hans109h

Well-known member
Joined
Dec 27, 2017
Messages
261
Location
Upper Midwest
I've decided I want to fabricate about 25 small boxes made of sheet metal, either light gauge steel or aluminum. The end product will be 4.5"x4.5"x11.5" (WxHxD). Each will be used as a "liner" for a old mail slot shelf that has 5"x5"x12" openings. I realize I could farm this out to a shop, but it's a project that I want to do myself.

Currently my only dedicated sheet metal tool is a bar fold brake, so I'm looking for some advice on how best to go about bending up a box that is 4.5" deep.

In reading many posts, it seems that a finger brake with a maximum depth of at least 5" would be ideal, but this seems to translate into nothing under $500 being up to the job. I do have a 20 ton press and have considered the Swag finger press, but to get the depth I'd need the gooseneck addons, and even with those I haven't found a source for how deep a box can be pressed.

I'm open to ideas, let me know how you'd go about this.

Thanks,

Hans
 
To avoid these ads, REGISTER NOW!

f150skidoo

Well-known member
Joined
Dec 29, 2012
Messages
1,206
Location
Ontario, Canada
With that many to make I would be getting pricing on outsourcing to a sheet metal fab shop. A shop with a laser or plasma table and a cnc press brake would knock those out in a hurry. Making a couple boxes making due without proper equipment is one thing but 25 is a lot to make.
 

LeeG

Well-known member
Joined
Nov 29, 2012
Messages
1,539
Location
Phoenix, AZ
I'd look at making a die to do the final bends. Get your piece of steel cut to the shape you need, then use your brake to make the bends on the ends and the tabs (1 bend on each side), then place it in a die on your 20 ton press and do the sides.
 
OP
H

hans109h

Well-known member
Joined
Dec 27, 2017
Messages
261
Location
Upper Midwest
I'd look at making a die to do the final bends. Get your piece of steel cut to the shape you need, then use your brake to make the bends on the ends and the tabs (1 bend on each side), then place it in a die on your 20 ton press and do the sides.
I'm intrigued by this and will need to learn more about press dies.

Thanks,

Hans
 

LeeG

Well-known member
Joined
Nov 29, 2012
Messages
1,539
Location
Phoenix, AZ
Hans,

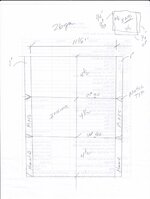
I drew up what I was thinking to maybe give you a better idea. This is what I assume your starting piece will look like. This gives you a bottom and 4 sides, with tabs on the sides to allow you to spot weld the box together.


With the shape cut out, you can use a normal brake to bend up the ends and the tabs, then use a die in your 20 ton press to fold it all together.

Lee
 

Graham08

Well-known member
Joined
Dec 10, 2007
Messages
715
Location
Iron Station, NC
If your bar folder is like my brake, you can bend three sides of a pan without trouble, it's the fourth side that you can't do. I would do the ends as a shallow pan with three flanges so you can rivet or spot weld it to the center part, then do the center as a simple "U" shape in two bends. That is unless you want a flange around the top...
 
OP
H

hans109h

Well-known member
Joined
Dec 27, 2017
Messages
261
Location
Upper Midwest
Lee,

That is exactly what I have in mind. The only thing I've ever really used my shop press for is bearings and bushings, so I'm curious what type of die/how to set up such a press.

Thanks so much.

Hans
 

danski0224

Well-known member
Joined
Jan 29, 2005
Messages
13,689
Location
Near Naperville, IL
How are you going to "attach" the sides that are folded up?

In the drawing above, the 2 "ears" would typically be made separately.

The middle u-shaped piece would be made with a Pittsburgh seam where the ears attach. A Pittsburgh seam can be made in a brake if you don't have a machine.

Alternatively, the 1" "tabs" would be riveted or spot welded to the separate pieces. An air riveter can be purchased relatively inexpensively for so-called hard rivets (aircraft style).

Making the box as shown in the drawing is a huge waste of material. The 4 corner cutouts are waste unless you are bending it up and welding the corners (it saves 1 weld).
 

matt_i

Well-known member
Joined
Mar 14, 2008
Messages
10,772
Location
SE Michigan
If you get the blanks laser cut then you avoid needing a shear and notcher.

Not sure of machining capabilities but you could build a little finger brake for 12" to 16" width and 5" depth. Most of the finger brakes I've used max out at 4" deep....if you could live with that change then you could purchase a tool for the job, use it, and sell it later.

With accurate bending and a little gentle hammer action the outside corners can be tig welded easily. If you want, then they can be metal-finished with sanding discs, etc.
 

cvairwerks

Well-known member
Joined
Aug 12, 2016
Messages
7,294
Location
Within hearing distance of Texas Motor Speedway
If I'm reading your dimensions correctly, this will be an 11.5" deep cup essentially. You will have to make it in two pieces unless you want to get fancy in your forming. If you want to form in one piece, you would need to form two of the long bends via a brake, then form the other two with hand forming to a wooden block.

Easiest way, if you can tolerate the seams, would be form two angles and use a lock seam to complete the box, then bend up the one end section and bond into the other part.
 
OP
H

hans109h

Well-known member
Joined
Dec 27, 2017
Messages
261
Location
Upper Midwest
All good suggestions, thanks. My initial thought was to spot weld or rivet the tabs. Cvairwerks, the "cup" is only 4.5" deep. A better explanation of what I'm making are "drawers" that slide into a wooden cubby. The "drawer" slides in 11.5 inches from front to back, and is 4.5 inches wide and 4.5 inches tall.

Thanks for all the good things to consider before jumping into this.

Hans
 
To avoid these ads, REGISTER NOW!

tarbellb

Well-known member
Joined
Apr 17, 2011
Messages
5,795
Location
Oregon
What gauge? If 20g> specially aluminum you could easily cut some heavy steel bars to widths needed and make a
interchangeable brake. Couple of set screws and a simple pivot point.

Unfortunately the bar to entry on sheet metal work is pretty high, between brake, press, shear, notcher, etc...

You could also farm out to laser with perforated seams and bend literally by hand. Spot weld along seams/tabs post bend to
beef it up.
 

danski0224

Well-known member
Joined
Jan 29, 2005
Messages
13,689
Location
Near Naperville, IL
If it will be made out of 24 or 26 gauge galvanized (or lighter, or even 0.032 aluminum) , you could cut it out like the picture above and bend the long sides by hand over a 90* edge and the 1" sides can all be bent with a pair of hand seamers.

A little tapping with a wood mallet if necessary.

It would be easier to cut out and bend up in 3 pieces. The "ears" on the left and right sides would need a 1" tab in the middle to attach to, like the "top" and "bottom" tabs in the drawing.

Simple project.

No need for laser cutting or a press.

Couple of chunks of 3/4 plywood to bend the metal over, and a couple of hand tools are all that's needed. You could even bend the tabs over on the plywood and skip the hand seamer if you don't own one already.
 
Last edited:

gorilla

Well-known member
Joined
Dec 13, 2007
Messages
1,660
IMHO the best way to make those box's would be to bend the 4.5"x4.5"x11.5" part as one piece and form ends that would close off the ends with tabs or by welding. The drawing by lee g won't work unless you bend the tabs so that they are inside the bend of the end piece. or bent the ends so that their outside of the tab. That kind of bending puts you into press brake work.
 

mrobins297aaa

Well-known member
Joined
Sep 20, 2010
Messages
3,283
Location
south east michigan
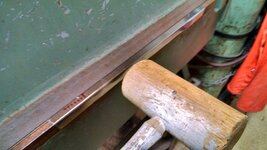
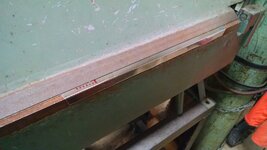
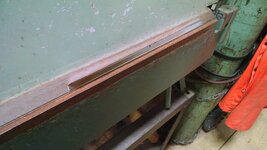
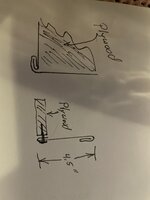
This is how I would make it. if you have a hand brake it's pretty quick and easy and even if you don't you can have someone make it for you it doesn't require any screws or spot welds.
the ends have a 1/4" turned up 90 deg and they hammer into the hand pittsburghs on the sides and botom.IMG_20211018_0001.jpgIMG_20190115_115155677.jpgIMG_20190115_115238083_HDR.jpgIMG_20190115_115244204.jpgIMG_20190115_115305279.jpgIMG_20190115_115328223.jpgIMG_20190115_115405067.jpgIMG_20190115_115437657.jpg
 

mrobins297aaa

Well-known member
Joined
Sep 20, 2010
Messages
3,283
Location
south east michigan
The last picture your looking at the inside. starting at the left going to the right it would be 4.5" 4.5" and 4.5" the metal would be bent up 90 deg at those points. the ends hammer into the lock and then the small flange you see would be bent over..........go look at your ductwork in your basement the fittings have the same pittsburgh lock on them.

couple of the bend by bend photo's didn't up load so there is a couple of steps missing in the picture.
 

Mallen

Well-known member
Joined
Aug 11, 2021
Messages
649
Making the box as shown in the drawing is a huge waste of material. The 4 corner cutouts are waste unless you are bending it up and welding the corners (it saves 1 weld).
Depends on how many boxes you cut out and how you cut them.
 

danski0224

Well-known member
Joined
Jan 29, 2005
Messages
13,689
Location
Near Naperville, IL
Depends on how many boxes you cut out and how you cut them.
The person asking how to make a box probably doesn't have a nesting program or a plasma table, much less a laser table.

Cutting them out by hand, or on a shear line, as drawn way back, will use more material than making them (by hand) in 3 pieces.

🙂
 

Mallen

Well-known member
Joined
Aug 11, 2021
Messages
649
The person asking how to make a box probably doesn't have a nesting program or a plasma table, much less a laser table.

Cutting them out by hand, or on a shear line, as drawn way back, will use more material than making them (by hand) in 3 pieces.

🙂
True,ideally, for minimal waste, you'd tile the surface with them with only enough space between them for the cuts.

But could he use a jig saw with a 32tpi blade and space them maybe a half inch or so apart. Cut them out as best you can. You could either cut the sides exactly right but cut a radius at the corner and then cut out the corners with snips. Or maybe be lazy, cut down the middle between them, trim them with a shear or snips and then as before, snip the corners out. That should be a lot less waste. Or alternatively, drill holes at the corners or maybe even use a punch on the press. That would make it easier to cut out as you'd only be making straight cuts. Cut straight, turn the sheet. Cut again between two holes. Set up some boards and leave a 3/8" gap and just cut along that line so the metal stays supported and held between the saw and the boards when cutting. A band saw could do it too with the right blade.
 

bradpac

Well-known member
Joined
Sep 8, 2013
Messages
721
Location
Central TX
For your brake, if you don't mind tool modification. You can always cut a slot in the clamping beam where you need to put the bent piece in it for the final bend. If you clamp is tall enough to have a slot and still have strength.
 

danski0224

Well-known member
Joined
Jan 29, 2005
Messages
13,689
Location
Near Naperville, IL
The heck with all that cutting for
True,ideally, for minimal waste, you'd tile the surface with them with only enough space between them for the cuts.

But could he use a jig saw with a 32tpi blade and space them maybe a half inch or so apart. Cut them out as best you can. You could either cut the sides exactly right but cut a radius at the corner and then cut out the corners with snips. Or maybe be lazy, cut down the middle between them, trim them with a shear or snips and then as before, snip the corners out. That should be a lot less waste. Or alternatively, drill holes at the corners or maybe even use a punch on the press. That would make it easier to cut out as you'd only be making straight cuts. Cut straight, turn the sheet. Cut again between two holes. Set up some boards and leave a 3/8" gap and just cut along that line so the metal stays supported and held between the saw and the boards when cutting. A band saw could do it too with the right blade.
Probably a good idea for expensive material (or, if I had *just enough* to make whatever parts), but if I was making these boxes out of plain old galvanized sheet, making these cuts with a jigsaw or the like is a real PITA.
 

hawkeye2

Well-known member
Joined
May 22, 2006
Messages
135
Here’s how I’d do it.
- Buy 6” roof flashing (25’ cost ~ $16.00)
- Cut in 32 1/2” strips.
- Fold a double 1/2” seam along one long edge.
- Fold a single 1/2” fold on the other long edge.
- Fold around a 1/2” plywood bottom, secure with tacks or screws.
- Fold a seem where the ends of the flashing over lap.

Plywood or angle iron, clamps and a hammer will work to make all the bends.
 

Attachments

  • image.jpg
    image.jpg
    170.1 KB · Views: 17

mrobins297aaa

Well-known member
Joined
Sep 20, 2010
Messages
3,283
Location
south east michigan
Great idea mrobins! Thanks for the details!

Hans
Just a couple of other thoughts, I know you said you didn't have a brake but you could lay these out and take them to sheet metal shop and they could run those pittsburgh locks on there machine, thats not a lot of work for them.

you said you have a bar folder so you could make the ends.

if you make the ends add a 1/8" to the dim. across the bottom to make it 4 5/8" that'll make it easier to assemble.
Most important if you have a shop do the machine pittsburghs find out before hand what the allowance is for there machine pittsburghs. It varys I had 1" on the sketch because that it is what it is for my brake.
I would add a 3/8" 180 deg hem either out or in on the top, it'll make the top more rigid.

You'll have to figure out a way to do the 90 deg bends, couple pieces of angle clammed together or maybe have the shop do them. Don't forget the notches in the allowances for the pittsburgh seams where your going to make the 90 deg bends it'll make it much easier to bend the metal 90 at that point.

26 ga galv is plenty heavy enough
 
Last edited:
To avoid these ads, REGISTER NOW!
Top Bottom