To avoid these ads, REGISTER NOW!

Light/Vent over shower

green.bubbly

Well-known member
Joined
Dec 14, 2008
Messages
2,156
Location
Lafayette, LA
Planning ahead on my home build. Over my shower, I would like one or two light fixtures and a ventilation fan. Ceiling will be 8 feet.

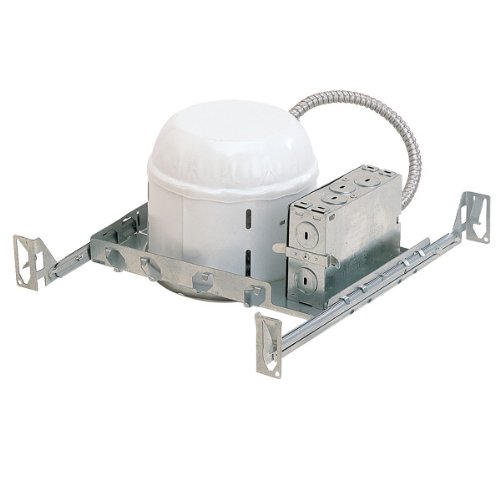
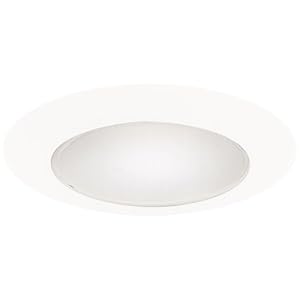
Are there any special considerations or suggestions on what to use. I would like them installed directly over the shower. Nothing fancy, I am a simple plain man. I see around the Internet using a typical light box with a moisture sealed ring cover and then I see special shower fixtures. Not sure of the pros or cons on each.


I was looking to go this route but am open to suggestions...


Halo H7T:


41twGEUBD4L.jpg


Cooper Lighting 70PS 6-Inch Wet Location and AirTite Listed Trim:

21kMf9xMbfL._SL500_AA300_.jpg


For the fan, I was going to use this...


Air King BFQ 90 High Performance Bath Fan:


41jAb-0WhjL._SL500_AA300_.jpg
 
To avoid these ads, REGISTER NOW!

bmcdowell40

Well-known member
Joined
Nov 12, 2009
Messages
80
Location
Lanse, PA
I have a similar setup in my bathroom. I have a recessed can with shower/wet location rated trim installed directly over the shower and a light/exhaust fan combo installed in the center of the bathroom. The light over the shower provides more than enough light for the shower and the light on the light/fan combo makes enough to light the rest of the bathroom.
 

bluesman2a

Well-known member
Joined
Aug 16, 2005
Messages
1,312
Location
Atlanta, Ga.
I used these from Depot, they are rated for wet locations, for a 5X5 shower, I used 4, they use up to a 50W halogen.

http://www.homedepot.com/h_d1/N-5yc...splay?langId=-1&storeId=10051&catalogId=10053

They are fairly inexpensive. Also you can add the rails/pan for a couple dollars more, for new construction. See the link for links to those.

Here's one you can see it in the corner. I also added a dimmer which in retrospect was a nice touch.

DSCF10232.jpg
 

dodgepolara500

Well-known member
Joined
Aug 16, 2006
Messages
557
Location
San Jose, CA.
we have a fan in the bath, but not directly in the shower stall. We did this as the fan drawing air over your wet skin can cause you to get chilled, but having it elsewhere in the room means the steam will travel further and get the rest of the room wet. Just something to consider when placing it.
 

Toolfool

Well-known member
Joined
Aug 22, 2011
Messages
4,982
Location
Tallahassee, FL
Most codes do not allow for exhaust fans in the shower / tub area. Technically, they are NOT designed for moisture removal, but for 'stink' removal alone. A good exhaust fan placed in the center of your bathroom will do both jobs just fine. I usually have the electrician install a switch that operates the lights and the fan, with a delay timer built in. Separate switch for vanity lights.
 
Last edited:

Aceman

Well-known member
Joined
Jan 28, 2007
Messages
2,513
Location
Eastern Oregon
It's been a while so I don't remember, but double check your instructions when installing them over a shower space as it may call for a GFCI protected circuit.
 
OP
G

green.bubbly

Well-known member
Joined
Dec 14, 2008
Messages
2,156
Location
Lafayette, LA
I used these from Depot, they are rated for wet locations, for a 5X5 shower, I used 4, they use up to a 50W halogen.

http://www.homedepot.com/h_d1/N-5yc...splay?langId=-1&storeId=10051&catalogId=10053

They are fairly inexpensive. Also you can add the rails/pan for a couple dollars more, for new construction. See the link for links to those.

Here's one you can see it in the corner. I also added a dimmer which in retrospect was a nice touch.

[/IMG]


Did you do your shower yourself? That looks a lot like what I want to build. If you have any info on the construction on it, I would be grateful if you could share that with me.
 
OP
G

green.bubbly

Well-known member
Joined
Dec 14, 2008
Messages
2,156
Location
Lafayette, LA
Thanks to all for all the feedback and suggestions. The fan will probably not be directly over the shower. I will probably install it near the shower to vent out as much steam and moisture as possible.

A GFCI breaker will be used and I like the timer idea as well. Thanks again for all the input and links.
 

bluesman2a

Well-known member
Joined
Aug 16, 2005
Messages
1,312
Location
Atlanta, Ga.
Did you do your shower yourself? That looks a lot like what I want to build. If you have any info on the construction on it, I would be grateful if you could share that with me.

I did the parts I COULD, and farmed out/coordinated the rest.

Here's the photo-album that takes you through the project from dirt up through finished product.
http://s270.photobucket.com/albums/jj91/bluesman2a/Bathroom/

Some key points:

1) When I had the slab poured, I had a couple of things done up front.

2) There is a 6" tall concrete curb all the way around the shower, and the slab itself is sloped towards the drain, no need to repour pan alone and it keeps ALL the moisture in the shower stall regardless of leaks.

3) I used a 4" commercial drain with P-trap, cause I NEVER want to have a problem cleaning the drain
All framing is with pressure-treated wood.

4) All insulation is with Roxul (better r-value and mold resistant).

5) The substrate is hardi-backer board.

6) On ALL seams surfaces, punctures, and areas that MIGHT get wet, we used Red-Gard (it's just a roll-on membrane for waterproofing.

7) Many tile people want to build a bench with lumber. this is BAD. I had mine built out of block, so there will NEVER be any issue with water/rot.

8) On the plumbing side there are two full shower walls. Both have a shower-head and 4 body-jets. One side also has a hand-shower. I did a LOT of research on how to do this as cheaply as possible still using quality parts. If you want more info on the components, PM me and I can get you the parts-list and sources.

9) On the tile side I used porcelain tile for easiest clean-up.

10) I HATE dealing with grout lines, so I wanted to minimize anything that would be hard to clean. To this end we used EPOXY grout in a darker color. A little more expensive but WELL worth it. Will NOT support mold/mildew or other grout-gunk.

11) My tile guy talked me into using 2" tiles for the floor. I really did NOT want to do this. He explained it would be easier to lay and get an even surface. We compromised on a border of 6" around the perimeter of the floor and 2" on the interior, down to the drain. In retrospect this was a GREAT recommendation, the 2" has a MUCH better feel under your feet, and better wet/slippery traction.

12) The walls and all other surfaces are done with 12" tiles.

13) The door is a 3/8" frameless that will swing in or out.

14) As a finishing touch, we also put in a handicap hand rail, this is a no-brainer, but I did the blocking to support it in the framing before we tiled.

15) On the ventillation side I'm running a Broan 140CFM ultra-quiet fan (2.0 sonnes) this keeps things pretty clear.

Is that the kind of stuff you were looking for?
 
To avoid these ads, REGISTER NOW!
OP
G

green.bubbly

Well-known member
Joined
Dec 14, 2008
Messages
2,156
Location
Lafayette, LA
I did the parts I COULD, and farmed out/coordinated the rest.

Here's the photo-album that takes you through the project from dirt up through finished product.
http://s270.photobucket.com/albums/jj91/bluesman2a/Bathroom/

Some key points:

1) When I had the slab poured, I had a couple of things done up front.

2) There is a 6" tall concrete curb all the way around the shower, and the slab itself is sloped towards the drain, no need to repour pan alone and it keeps ALL the moisture in the shower stall regardless of leaks.

3) I used a 4" commercial drain with P-trap, cause I NEVER want to have a problem cleaning the drain
All framing is with pressure-treated wood.

4) All insulation is with Roxul (better r-value and mold resistant).

5) The substrate is hardi-backer board.

6) On ALL seams surfaces, punctures, and areas that MIGHT get wet, we used Red-Gard (it's just a roll-on membrane for waterproofing.

7) Many tile people want to build a bench with lumber. this is BAD. I had mine built out of block, so there will NEVER be any issue with water/rot.

8) On the plumbing side there are two full shower walls. Both have a shower-head and 4 body-jets. One side also has a hand-shower. I did a LOT of research on how to do this as cheaply as possible still using quality parts. If you want more info on the components, PM me and I can get you the parts-list and sources.

9) On the tile side I used porcelain tile for easiest clean-up.

10) I HATE dealing with grout lines, so I wanted to minimize anything that would be hard to clean. To this end we used EPOXY grout in a darker color. A little more expensive but WELL worth it. Will NOT support mold/mildew or other grout-gunk.

11) My tile guy talked me into using 2" tiles for the floor. I really did NOT want to do this. He explained it would be easier to lay and get an even surface. We compromised on a border of 6" around the perimeter of the floor and 2" on the interior, down to the drain. In retrospect this was a GREAT recommendation, the 2" has a MUCH better feel under your feet, and better wet/slippery traction.

12) The walls and all other surfaces are done with 12" tiles.

13) The door is a 3/8" frameless that will swing in or out.

14) As a finishing touch, we also put in a handicap hand rail, this is a no-brainer, but I did the blocking to support it in the framing before we tiled.

15) On the ventillation side I'm running a Broan 140CFM ultra-quiet fan (2.0 sonnes) this keeps things pretty clear.

Is that the kind of stuff you were looking for?


Great information and sadly points out a couple of things I should have done. I thought about using treated lumber after I finished framing it but I think I will apply a generous coat of Copper Green Wood Preservative to the studs.

The grout was a concern as well so I will look into the epoxy grout. I will shoot you a PM on the shower faucets. :thumbup:
 

brewchief

Well-known member
Joined
Sep 20, 2008
Messages
2,370
Location
Michigan
As far as bath fans go Panasonic has some of the nicest ones I've worked with, only complaint I've ever gotten was that it was too quiet and kept getting left on.
 

kbs2244

Well-known member
Joined
Nov 11, 2006
Messages
14,065
I like to put the fan on a timer switch.
You can set it for up to an hour, after that it turns its self off.
 

rburke65

Well-known member
Joined
Nov 10, 2007
Messages
12,349
Location
Canfield, Ohio
I never did a lot of new wiring, but does not the switch for the shower light have to be at least 3' from the shower door? This is to prevent you from being able to operate the switch while standing on the wet shower floor......I think? Anyone?
 

Norcal

Well-known member
Joined
Mar 16, 2008
Messages
13,769
I never did a lot of new wiring, but does not the switch for the shower light have to be at least 3' from the shower door? This is to prevent you from being able to operate the switch while standing on the wet shower floor......I think? Anyone?


There is nothing in the NEC preventing that, local codes / amendments may differ.
 

Norcal

Well-known member
Joined
Mar 16, 2008
Messages
13,769
Thanks to all for all the feedback and suggestions. The fan will probably not be directly over the shower. I will probably install it near the shower to vent out as much steam and moisture as possible.

A GFCI breaker will be used and I like the timer idea as well. Thanks again for all the input and links.

A "blank face" GFCI will be cheaper.
 

Scamilleri1228

New member
Joined
Nov 10, 2011
Messages
3
Location
Buffalo, ny
I think the world of the Panasonic fans myself, I can not speak of the others mentioned. The housings are much nicer, not cheap sheet metal and plastic. The fan is serviceable from the finish side, like most I have seen. As for electric around the shower, my suggestion is place the entire rom on a gfci, the dead face(blank space w/o a receptical) duplex outlet or breaker is great. Then the whole room is protected. The the recessed lighting is fine assuming you have covers for the lights that are approved for a shower, I has to myself. When you install the fan read the directions as to where you should put it in the room for best results and size it for the space. Finally the piping is where most people mess up. The less flex pipe the better. If you run 30 ft of it across the joints lopping up and down if just will not work. It will choke the fan and if will make it noisy. Shorter runs are better, hard pipe is preferred as little flex as you can since it doesn't flow well. I've never thought that you should use it that stop vibration but it makes sense just don't use a 6 foot piece when 1 foot will do, stretch it somewhat tight and cut it.
 

kbs2244

Well-known member
Joined
Nov 11, 2006
Messages
14,065
Something I just noticed today in the fine homebuilding drawing.
The downward slope of the vent pipe.
I had forgotten about that need.
It is to keep any condensation from flowing back into the fan.
This is another reason not to use flex hose up to a roof vent as you see done so often.
 

cowboyjosh

Well-known member
Joined
Mar 11, 2010
Messages
1,066
If placing the fan directly over the shower, it indeed DOES need to be on a GFCI. Sometimes I like to offset the fan about 2-3 feet off the shower door so we don't have to go to the hassle of GFCI'ing the fan; also you don't get the chill of moving air over wet skin.

The light does not need to be on a GFCI so long as you have a fixture rated for such use or a approved cover. Panasonic fans IMO are some of the best. I typically use Panasonic for steam removal, Broan in power rooms where a little extra noise is sometimes needed.
 
To avoid these ads, REGISTER NOW!
Top Bottom