To avoid these ads, REGISTER NOW!

Lights on the GARAGE DOOR

go4dave

Active member
Joined
Sep 18, 2008
Messages
37
Location
Las Vegas
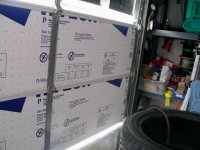
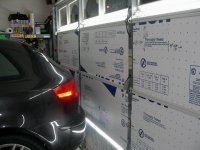
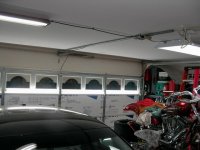
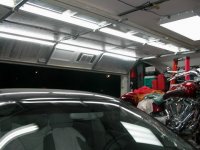
Ok,, they say it couldn't be done,,, or it's not worth the hassle. But believe me, it's worth every dollar. I've got 8 - 4 ft T5 fluorescent bulbs mounted on my garage door. They of course move up and down with the door, and it's great. I've got NO shadows down low,, and then,, when it's darker then hell outside, way to uncomfortable to keep the garage door down, and ya just need the door open..... i've got all that additional light over head. If it's cold outside, i got the door down, it's a wonderful thing, having all the light coming in,,, just light if the door was open. Check out the photos. :beer: :thumbup: :) :beer:
 

Attachments

  • Garage door lights small .jpg
    Garage door lights small .jpg
    70.8 KB · Views: 350
  • Garage door lights (9) small .jpg
    Garage door lights (9) small .jpg
    76.4 KB · Views: 332
  • Garage door lights (8) small .jpg
    Garage door lights (8) small .jpg
    73.9 KB · Views: 336
  • Garage door lights (7) small .jpg
    Garage door lights (7) small .jpg
    64.1 KB · Views: 338
  • Garage door lights (6) small .jpg
    Garage door lights (6) small .jpg
    62.6 KB · Views: 329
  • Garage door lights (4) small .jpg
    Garage door lights (4) small .jpg
    72.1 KB · Views: 389
To avoid these ads, REGISTER NOW!
OP
G

go4dave

Active member
Joined
Sep 18, 2008
Messages
37
Location
Las Vegas
That's a GREAT idea. How did you attach and get power to them?

Ray
------------

Hey Ray, if you look close at 1 of the last pics,,, you'll see the power cord. It runs coils (back & forth) on a low profile piece of uni-strut,,, it coils back (like a FESTOON cable) The trick is,, i didn't want to overload my 15 amp circuit,, which runs my overhead lights. WATTS = VOLTS X AMPS Each of my fixtures is 53watts, (rounded up to 60) i got 8 of them. I did the math,, figured with a little play,, i had 500 watts on the door. The 15amp circuit has 1800 watts capacity. I gave 20% head room for that. Therefore i didn't want to run more then 1400 watts total. Now that i knew all the figures,, i made sure to get a very good 14 gauge 3 wire cord, to run my cable management. It coils nice, and it runs back & forth on the uni-strut track.
:thumbup:
 

tfi racing

Well-known member
Joined
Apr 19, 2008
Messages
2,907
Location
Cedar,BC
How do you keep the tubes from falling out?Most of the fixtures I have worked with barely keep them in stationary,yet alone while moving.Good
idea,I might have to give it a try.:thumbup:
 
OP
G

go4dave

Active member
Joined
Sep 18, 2008
Messages
37
Location
Las Vegas
How do you keep the tubes from falling out?Most of the fixtures I have worked with barely keep them in stationary,yet alone while moving.Good
idea,I might have to give it a try.:thumbup:

-- --
:)
the fixtures i have use T5 bulbs. there is a slot on the fixture at each end, where the pins from the bulb slide into. Then you rotate the bulb 90* and it's locked in. (see pics) :pimpflash 
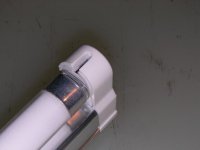
The fixture itself, is snapped into spring bracket riveted onto the garage door. :thumbup:
 

Attachments

  • T5 bulb fixture (5) small .jpg
    T5 bulb fixture (5) small .jpg
    24.5 KB · Views: 32
  • T5 bulb fixture (1) small .jpg
    T5 bulb fixture (1) small .jpg
    34.8 KB · Views: 29

SOA-Nova

Member
Joined
Oct 31, 2008
Messages
17
Location
Affton Missouri
When I put the lights in my door years ago all I could say was WOW, what a difference. I modified an old drop light retractor removing the stop catch so the wire could be pulled out and easily drawn back in. I’ve had mine done for a few years and have not had any problems with it except for replacing some ballasts. The lights I used were 36” to fit more into the door sections and I’ve never had a problem with any of the tubes falling out.
Adding these to my garage door made it easier when I was doing bodywork to sight down the sides and check my work.

Below are some links as to how I did mine:

Retractor mounted to the end of the garage door rail:

http://rides.webshots.com/photo/1186968923049730488vYmPoG

Strain Relief on top door section:

http://home-and-garden.webshots.com/photo/2530936410060464735tOveGM

Wiring from one section to the next with grommets:

http://home-and-garden.webshots.com/photo/2540579440060464735hbSWJy

http://home-and-garden.webshots.com/photo/2599838880060464735bqNTug

http://home-and-garden.webshots.com/photo/2773090550060464735NDDsvq

Jim
 
To avoid these ads, REGISTER NOW!

eldirector

Well-known member
Joined
Sep 18, 2008
Messages
608
That is awesome! I just wired in new lighting for my little garage, and might have to try this. I purposely didn't put lights where they would be covered by the door when up. This would solve that quite handily.
 

jay8s

Well-known member
Joined
Mar 5, 2007
Messages
653
Location
St. Louis
I currently have a fluorescent light hanging by a pair of bungie chords, so it swings off the door when it is open, and hangs along side it while it is closed. I love having it to detail my cars. I am putting up lights on my walls to help with the sides of the cars. Best money I ever spent for lighting.

Jay8s
 

alberto

Well-known member
Joined
May 28, 2007
Messages
756
I'm sorry, but I guess I'm being dense. I can't figure how you brought the power to the lights. I can understand the one with the portable light reel, but the OP's set up I cannot figure out. Any help would be appreciated.

BTW, this is a great idea.
 
OP
G

go4dave

Active member
Joined
Sep 18, 2008
Messages
37
Location
Las Vegas
hey guys thanks for the kind words. I really proud of this install,,, i dig it more and more every time i'm working on my cars or bike.

To answer a couple of your questions. :thumbup:
I love the LIFTMASTER 3800. It was so simple to install. :beer: Make sure you have a good set of solid rods to UN-load and PRE-load the tension on the garage door spring.

My garage door itself, i raised it 11" during the LIFTMASTER install. This took a little doing, and finding some old used door track,, to extended the bottoms. With the door down, I raised all the brackets, installed the LIFTMASTER, re-tensioned the door spring, then, using the manual release on the opener, i lifted the door up, onto the tracks, so could extend the tracks on the bottom. I had to use a couple extra brackets, and elevator bolts to make this all work. But everything came together. I lowered the door back down,, making sure it would run its course, with me lifting it,, before i reattached the opener.
Once it ran smooth, with the door down, opener reattached, i gave the LIFTMASTER some power,,, and started to set the limits. Everything went according to plan, :drool: and i was up and running. It took me a full day,, by myself,, start to finish.

The power cord for the lighting, if you look close at 1 of the last pics,,, you'll see the power cord. It runs coils (back & forth) on a fabricated low profile uni-strut roller i came up with. It coils back (like a FESTOON cable) It coils nice, :pimpflash and it runs back & forth on the uni-strut track. I used a 1/2" conduct connection strain relief on the top of the door to secure my 14/3 S.O. electrical cord.

that's about it. Just time,, to make sure,, i had the right combo for the power cord. :lol_hitti It was tough,, since my door runs withing 1" of the ceiling. I broke a few "uni strut rollers" before i came with the right one. :headscrat
 
To avoid these ads, REGISTER NOW!
Top Bottom