To avoid these ads, REGISTER NOW!

Above 1200 Sq/FT LilScorpion’s Fab Space

Wokspaces above 1200 squarefeet.
OP
L

lilscorpion

Well-known member
Joined
Mar 15, 2010
Messages
3,613
Location
Colorado
Seems a little undercooked ? (yeh yeh too obvious a joke) :sigh:
We have these ads that frequently appear on Australian TV for Duracell Energiser Batteries. They usually have some battery powered Bunny operating past all other batteries etc etc ( do you guys have similar ?)
I have written a letter to your Duracell corporate office in USA (well, not really , can't trust us Aussies LOL) recommending you as the next Energiser Bunny, to feature state wide- no - country wide- heck no...
worldwide-
(You're welcome)
yeh, done joking:
VERY MUCH Enjoying your posts little scorpion ! (can I still call you bunny?)
Yes, we have the energizer bunny, we’ll have in years past. Haven’t seen those commercials for a while. I suppose I’m like that in some regards. If it keeps the blood flowing anyway!
 
To avoid these ads, REGISTER NOW!
OP
L

lilscorpion

Well-known member
Joined
Mar 15, 2010
Messages
3,613
Location
Colorado
After work i decided it was time to install a few upgrades to my fireball dragon wagon welding table. Most ends of projects start with a delivery from McMaster. Seems like I get one weekly now.

This is a storage rack that is designed to keep the welding table accessories readily available but also Tucker out of the way. Winch purchase I’ve found that keeping the clamps in a drawer is inconvenient and as a result I tend to leave them on the table which takes up a lot of space. Designed the rack in cad and cut it out of 3/16.

IMG_8983.jpeg

The concept was vetted last week so this post is purely install. All cutting, fab, and powder coating has already been done.
IMG_8981.jpeg

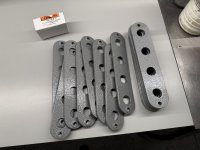
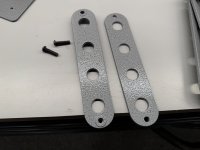
The grey things are inserts that allow me to customize the storage options in the future. The hole spacing of this setup matches the table - 3/4” holes in a 2x2-inch pattern. The clamps need more than 3/16” of depth to stand up correctly so two inserts sandwich the rack creating almost .600 of thickness when including the rivnut head.
IMG_8982.jpeg

The clamps sit in the rack very well amd will be very easy to grab.

IMG_8985.jpeg

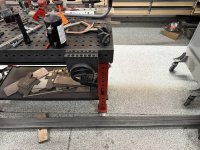
The rack is tucked out of the way enough so that I’ll be able to use the end of the table without kneeing the clamps as I do
IMG_8986.jpeg

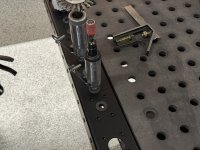
Upgrade 2 - I use a lot of pneumatic fab tools. Most are now kept on my tooling wall. Even tho the wad is almost within reach of the table I tend to not put the tools back between fab tasks, I set the on the table or stand them up in one of the dog holes. It works but inevitably I’m having to move them around as I fixture, unfixture, or weld. Decided I’d try make a tool caddy to help keep things organized.
IMG_8987.jpeg

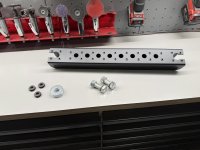
It clamps to the table thru 3/4” dog holes on the side skirt. With the heads of the rivnuts, the surfaces sits about .065 below the table surface so long parts can still overhang the end of the table (and caddy if/when emptied) easily.

IMG_8988.jpeg

Grommets fit into .800 holes cut into the top which allow air tools to stand up nicely but are easily accessible and removable.
IMG_8991.jpeg

Voila! Tool caddy. All the extra holds and rivenuts enable future upgrades to hold custom tool racks and adapters for things like clamps and such. I’ll add as I go and see need. For now my tools will stay off the table surface.

IMG_8989.jpeg
 
To avoid these ads, REGISTER NOW!

signcrafter

Well-known member
Joined
May 9, 2012
Messages
12,577
After work i decided it was time to install a few upgrades to my fireball dragon wagon welding table. Most ends of projects start with a delivery from McMaster. Seems like I get one weekly now.

This is a storage rack that is designed to keep the welding table accessories readily available but also Tucker out of the way. Winch purchase I’ve found that keeping the clamps in a drawer is inconvenient and as a result I tend to leave them on the table which takes up a lot of space. Designed the rack in cad and cut it out of 3/16.

IMG_8983.jpeg

The concept was vetted last week so this post is purely install. All cutting, fab, and powder coating has already been done.

IMG_8981.jpeg

The grey things are inserts that allow me to customize the storage options in the future. The hole spacing of this setup matches the table - 3/4” holes in a 2x2-inch pattern. The clamps need more than 3/16” of depth to stand up correctly so two inserts sandwich the rack creating almost .600 of thickness when including the rivnut head.

IMG_8982.jpeg

The clamps sit in the rack very well amd will be very easy to grab.

IMG_8985.jpeg

The rack is tucked out of the way enough so that I’ll be able to use the end of the table without kneeing the clamps as I do

IMG_8986.jpeg

Upgrade 2 - I use a lot of pneumatic fab tools. Most are now kept on my tooling wall. Even tho the wad is almost within reach of the table I tend to not put the tools back between fab tasks, I set the on the table or stand them up in one of the dog holes. It works but inevitably I’m having to move them around as I fixture, unfixture, or weld. Decided I’d try make a tool caddy to help keep things organized.

IMG_8987.jpeg

It clamps to the table thru 3/4” dog holes on the side skirt. With the heads of the rivnuts, the surfaces sits about .065 below the table surface so long parts can still overhang the end of the table (and caddy if/when emptied) easily.

IMG_8988.jpeg

Grommets fit into .800 holes cut into the top which allow air tools to stand up nicely but are easily accessible and removable.

IMG_8991.jpeg

Voila! Tool caddy. All the extra holds and rivenuts enable future upgrades to hold custom tool racks and adapters for things like clamps and such. I’ll add as I go and see need. For now my tools will stay off the table surface.

IMG_8989.jpeg
Any chance you have a link to the grommets you are using? I threw together this air tool storage years ago using a 2x10 and it works pretty decent. I just drilled some holes for the air couplers to sit in but would be nice to have a little snugger fit. Need to make a new organizer for the new shop and the grommets are a great idea. Thanks for sharing.

KIMG20260806_104350818.JPG
 
OP
L

lilscorpion

Well-known member
Joined
Mar 15, 2010
Messages
3,613
Location
Colorado
Any chance you have a link to the grommets you are using? I threw together this air tool storage years ago using a 2x10 and it works pretty decent. I just drilled some holes for the air couplers to sit in but would be nice to have a little snugger fit. Need to make a new organizer for the new shop and the grommets are a great idea. Thanks for sharing.

KIMG20260806_104350818.JPG
Sure, don’t mind at all. 1/2” ID is key, there’s many different OD’s which may help make retrofitting your setup easier.

Buna-N Rubber Grommet for 13/16" Hole Diameter and 1/8" Material Thickness, 1/2" ID
https://www.mcmaster.com/product/9307K27
 
Last edited:
To avoid these ads, REGISTER NOW!
Top Bottom