

mattblast
Well-known member
I picked up two older Lista cabinets a few weeks ago off Craigslist.
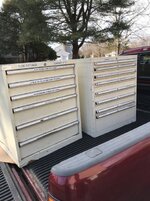
The slides were improperly lubricated with gummed up grease. After removing all the drawers I soaked each bearing in kerosene and then lubricated with a few drops of 3-in-1 oil.
Got it all back together and drawers are nice and smooth but I realized that the latch mechanism wasn’t working for all the drawers. Lista cabinets have a feature that only one drawer can be opened at a time, presumably to prevent a heavily loaded cabinet from tipping. On my cabinets the latches were missing for one entire cabinet (guessing previous owner removed them to bypass them), and one drawer of the other cabinet.
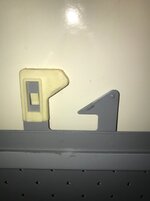
On the back of each drawer are two tabs. The metal one on the right is used to keep drawer locked and the plastic one on the left is what toggles the locking bar when a drawer is pulled.
The problem is that over time the plastic eventually fails. Lista no longer has replacements. The original part is labeled X2421.

I found someone on eBay that has a set of 5 for $25 that they make themselves and that inspired me to make my own using some scrap material I had on hand.
First I pulled off one of the existing latches and traced it using a scanner and vectorization software. Hand tracing would work too but I wanted to be able to quickly make 10 of these.
I then used a vinyl cutter to make templates out of an adhesive backed polyester. Printing on paper and glueing would work too but I have easy access to a vinyl cutter. Poly material was used rather than vinyl to avoid any shrinkage or stretch. Not that I have to be so precise but I wanted them to be as close to OEM as possible.

Each template was then put on a piece of 1/8” Sintra (pvc sheet) and I used a coping saw and file to get the shape. A 1/8” drill was used to position two holes for attachment. I placed the holes so they are equidistant from the rectangular opening on the tab.
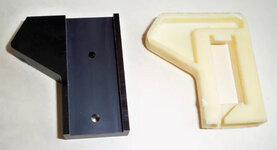
The replacements sold on eBay are made from 3/8” ABS and have a groove on the bottom to aid in positioning. But it’s easy to position without the groove. I’ll see how well the PVC holds up and may redo in a more durable plastic if needed.

(Not mine - replacements found on eBay)

Then I positioned and center punched the holes to be drilled.

And a couple rivets completed the repair.


The lock mechanism works perfectly now and I can start filling up the drawers.
Two GJ members helped me get these cabinets fully restored.
Thank you Jeff Moss for making a new key.
Thank you American Workspace for the drawer pull caps and replacement stickers.
The slides were improperly lubricated with gummed up grease. After removing all the drawers I soaked each bearing in kerosene and then lubricated with a few drops of 3-in-1 oil.
Got it all back together and drawers are nice and smooth but I realized that the latch mechanism wasn’t working for all the drawers. Lista cabinets have a feature that only one drawer can be opened at a time, presumably to prevent a heavily loaded cabinet from tipping. On my cabinets the latches were missing for one entire cabinet (guessing previous owner removed them to bypass them), and one drawer of the other cabinet.
On the back of each drawer are two tabs. The metal one on the right is used to keep drawer locked and the plastic one on the left is what toggles the locking bar when a drawer is pulled.
The problem is that over time the plastic eventually fails. Lista no longer has replacements. The original part is labeled X2421.
I found someone on eBay that has a set of 5 for $25 that they make themselves and that inspired me to make my own using some scrap material I had on hand.
First I pulled off one of the existing latches and traced it using a scanner and vectorization software. Hand tracing would work too but I wanted to be able to quickly make 10 of these.
I then used a vinyl cutter to make templates out of an adhesive backed polyester. Printing on paper and glueing would work too but I have easy access to a vinyl cutter. Poly material was used rather than vinyl to avoid any shrinkage or stretch. Not that I have to be so precise but I wanted them to be as close to OEM as possible.
Each template was then put on a piece of 1/8” Sintra (pvc sheet) and I used a coping saw and file to get the shape. A 1/8” drill was used to position two holes for attachment. I placed the holes so they are equidistant from the rectangular opening on the tab.
The replacements sold on eBay are made from 3/8” ABS and have a groove on the bottom to aid in positioning. But it’s easy to position without the groove. I’ll see how well the PVC holds up and may redo in a more durable plastic if needed.
(Not mine - replacements found on eBay)
Then I positioned and center punched the holes to be drilled.
And a couple rivets completed the repair.
The lock mechanism works perfectly now and I can start filling up the drawers.
Two GJ members helped me get these cabinets fully restored.
Thank you Jeff Moss for making a new key.
Thank you American Workspace for the drawer pull caps and replacement stickers.
Attachments
-
 157dfae2928eed75b6ec2c4608bd2dba.jpg373.6 KB · Views: 1
 -
 247409a44842489aa7ed3c486f3ee723.jpg210 KB · Views: 0
 -
 4bf09dae5f5c5e30b34a1449ca604b11.jpg194.4 KB · Views: 1
 -
 82789fcc0ecb93a5359c2d771f8f5511.jpg232.5 KB · Views: 1
 -
 0fa77fa8f314f4b22c2b1091aca5ea23.jpg146.5 KB · Views: 2
 -
 bc1bbfb729ea577e95c2c11f40bd0707.jpg290.2 KB · Views: 1
 -
 4725132c1ece15eee90be9a711c1b46d.jpg262.4 KB · Views: 1
 -
 73848995c8e3d0be7cb91ab8d898b8b2.jpg218.9 KB · Views: 0
 -
 ae78f18f5b8130a3833c9cb86f6de769.jpg203.1 KB · Views: 0