To avoid these ads, REGISTER NOW!

Little Basement Shop

383 240z

Well-known member
Joined
Dec 4, 2006
Messages
4,295
Location
Findley Twp. Allegheny Co.
Here is a little thread about my little basement shop. The portion of my basement that I'm focusing on right now is 11' wide and 19' deep. There is a similar sized room on the other side of the center divider wall. It will be my little downstairs wood shop. I don't do fine woodworking or anything. It's just some bookcases, and little projects I have in mind.

The house was built in 1924. It is a very basic 2 bedroom, all on one floor 1100 sq ft place. It's perfect for where I am in my life right now. I have a small one car garage and a 10x12 shed. The basement shop is the only one with heat, so it will be my wintertime workshop for all my projects.


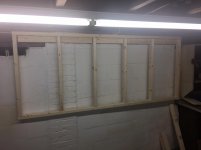
My first problem, other than that it is only 5' 10" under the joists, and I'm 6' in bare feet, is the lack of light. So I ran some Romex and mounted 2 8' (4 4' bulbs each) and solved that problem.
 

Attachments

  • Lights.jpg
    Lights.jpg
    139 KB · Views: 153
To avoid these ads, REGISTER NOW!

sean Buick 76

Well-known member
Joined
May 7, 2013
Messages
3,221
Location
Edmonton Alberta
Cool, I am only 5 foot 8... Sorry had to say LOL! Thats a drag man about the lack of headroom, but you will get used to hunching over a bit. Maybe get a cool rolling chair or go cart and roll around?
 
OP
3

383 240z

Well-known member
Joined
Dec 4, 2006
Messages
4,295
Location
Findley Twp. Allegheny Co.
The floor has some sort of leveling compound on it, covered in a green paint, the walls have a flaking white paint on them. I'm scraping the loose stuff off and will paint it soon. Some sort of dry-loc type of paint on the walls, and some light grey for the floor. If for nothing else just to seal it up and help with the dust.

However, I felt that a decent bench is more important right now. I wanted a bench that would incorporate my little Harbor Freight table saw, and my sliding compound miter saw. I, of course, want storage, an assembly space, and a way to swap out the table saw for a router table, once I buy one.

I remember seeing a rolling workshop table in an issue of Family Handyman that I liked so I started building.

A sheet of plywood and a few 2x4's later I have this table. The overhang is there to give me a place to clamp to. I won't have a vice on this bench, There will be another bench elsewhere in the basement.
 

Attachments

  • Bench.jpg
    Bench.jpg
    135.6 KB · Views: 80
Last edited:
OP
3

383 240z

Well-known member
Joined
Dec 4, 2006
Messages
4,295
Location
Findley Twp. Allegheny Co.
My plan is to add a lower shelf, bolt some casters to the legs, then put adjustable shelf rails on it. The SCMS and table saw will sit on these shelves with their tables flush with the workbench.

I've attached the workbench pic that got this all started.

My bench is 3'x7' That size fits well in the space, and whoever designed the steps into the basement didn't take into account that I might want to get a 4x8 sheet of anything down there. A full sheet just can not make it down there.
 

Attachments

  • Inspiration.JPG
    Inspiration.JPG
    23.2 KB · Views: 83
OP
3

383 240z

Well-known member
Joined
Dec 4, 2006
Messages
4,295
Location
Findley Twp. Allegheny Co.
The basic plan is to add shelves along the back (11') wall about 18" deep, floor to ceiling, and about 9' long. The two-foot gap is to allow access to the breaker box.
The left side, face the back wall, will get a French Cleat system and I'll blow my sawdust against the opposite wall. In the warmer months, I'll put a fan in the window to help with the dust and fresh air.

The little workbench on the back of the left-hand side wall will get removed once I finish the worktable. I'm also running some more wire and adding a handful of outlets.
 
OP
3

383 240z

Well-known member
Joined
Dec 4, 2006
Messages
4,295
Location
Findley Twp. Allegheny Co.
The low headroom will always be an issue. I, however, have a nice comfy roller chair, and I have learned to stand between the joists. So I'm learning to live with it.
 
OP
3

383 240z

Well-known member
Joined
Dec 4, 2006
Messages
4,295
Location
Findley Twp. Allegheny Co.
Got a little more work accomplished today. I added some more framing and a lower shelf
I ripped the "joists" so that the 3/4" plywood fits flush with the top of the outer 2x4's.
 

Attachments

  • Shelf.jpg
    Shelf.jpg
    131.7 KB · Views: 41
To avoid these ads, REGISTER NOW!
OP
3

383 240z

Well-known member
Joined
Dec 4, 2006
Messages
4,295
Location
Findley Twp. Allegheny Co.
After I had the location of the shelf rails set, I flipped the bench over. I have it up on some 2x blocks. The casters I had in my garage, the ones I wanted to use, well I remembered that they were 5" tall and that all four of them were casters. What I forgot was that they were not locking casters. So I'll have to pick up new casters.

You can see how I have the saw set on a shelf, the saw table sits about 1/16" proud of the bench. Just where I wanted it.
 

Attachments

  • Saw.jpg
    Saw.jpg
    138 KB · Views: 54
Last edited:
OP
3

383 240z

Well-known member
Joined
Dec 4, 2006
Messages
4,295
Location
Findley Twp. Allegheny Co.
I decided that I didn't want to put the miter saw on a shelf. There were a few reasons, packaging was the main one. So I decided to build 2 boxes. These would raise the surface of the bench and make it even with the top of the miter saw table. My plan is to use clamps to hold the saw and these boxes down on the bench.

I made a new plate for my Kreg Jig, it works the same as everything else. Align the edges and clamp it down.

I know a lot of people say pocket holes have no place in woodworking, but I really love the things!
 

Attachments

  • Miter.jpg
    Miter.jpg
    141 KB · Views: 57
Last edited:

C.L S2000

Well-known member
Joined
May 3, 2017
Messages
180
Location
LB, CA
After I had the location of the shelf rails set, I flipped the bench over. I have it up on some 2x blocks. The casters I had in my garage, the ones I wanted to use, well I remembered that they were 5" tall and that all four of them were casters. What I forgot was that they were not locking casters. So I'll have to pick up new casters.

You can see how I have the saw set on a shelf, the saw table sits about 1/16" proud of the bench. Just where I wanted it.

that's a nice looking bench :thumbup:
btw I like the "real genius" quote as well haha
 
OP
3

383 240z

Well-known member
Joined
Dec 4, 2006
Messages
4,295
Location
Findley Twp. Allegheny Co.
Thanks for the compliment. I think it turned out pretty decent. It's not fancy, but it should suit my needs well.

I loved that movie the first time I saw it. When I started engineering school, it popped back into my memory. I watch it every so often for some comic relief.
 
OP
3

383 240z

Well-known member
Joined
Dec 4, 2006
Messages
4,295
Location
Findley Twp. Allegheny Co.
Spent a little time in the basement today. Ran up to the Home Depot picked up some 2x3's and a sheet of plywood. Knocked up a little stud wall, mounted it to the main bean in my shop, and skinned it with some plywood. The plan is to put some French Cleats on it. If it works out well, after I remove that little work area, I will extend it farther, I can go another 4'.

I just need to figure out how far I want to space the cleats. I'm thinking I will cut them from some 3/4" plywood. I'm thinking about ripping the plywood into 3" strips and then ripping them again on the bias at a 45* angle. I'm not hanging anything super heavy here. Just some basic hand tools and supplies.
 

Attachments

  • French cleat studs.jpg
    French cleat studs.jpg
    107.5 KB · Views: 50
  • French Cleat skinned.jpg
    French Cleat skinned.jpg
    127.1 KB · Views: 50
OP
3

383 240z

Well-known member
Joined
Dec 4, 2006
Messages
4,295
Location
Findley Twp. Allegheny Co.
Started making holders for my cleats tonight. The first one is a combo laptop/ cordless tool holder. It holds my impact driver, drill, cut off tool, and jigsaw. All of the tools will fit with their battery attached, and a standard blade in the jigsaw. The top plate I left deep enough to hold my 17" laptop comfortably. This is my first go at French Cleats, so far I like them. I made the cleats from some 3/4" plywood I had, I just ripped it into 3"x4' strips. My plywood was already cut into half sheets.

Then I ripped them on a 45* angle right down the center and put them up with 1 5/8" drywall screws. I think my air nailers need a place to go next.
 

Attachments

  • laptop cordless holder.jpg
    laptop cordless holder.jpg
    132 KB · Views: 36
  • Laptop cordless 2.jpg
    Laptop cordless 2.jpg
    136.7 KB · Views: 36

gahrajmahal

Well-known member
Joined
Dec 12, 2008
Messages
2,527
Location
Cincinnati, Ohio
I bought a bump cap that fits inside a baseball cap at home depot. If I don't lift and clamp garage door #2 all the way up I clock myself on that door by not ducking down. Get one of those to ease the bumps on your noggin.

Love the work bench! Run some wiring and outlets in your stud wall before it gets too filled up with stuff. The perfect time to do it.
 
To avoid these ads, REGISTER NOW!
Top Bottom