To avoid these ads, REGISTER NOW!

Loading up Woody

zer0cell

Well-known member
Joined
Aug 25, 2010
Messages
1,325
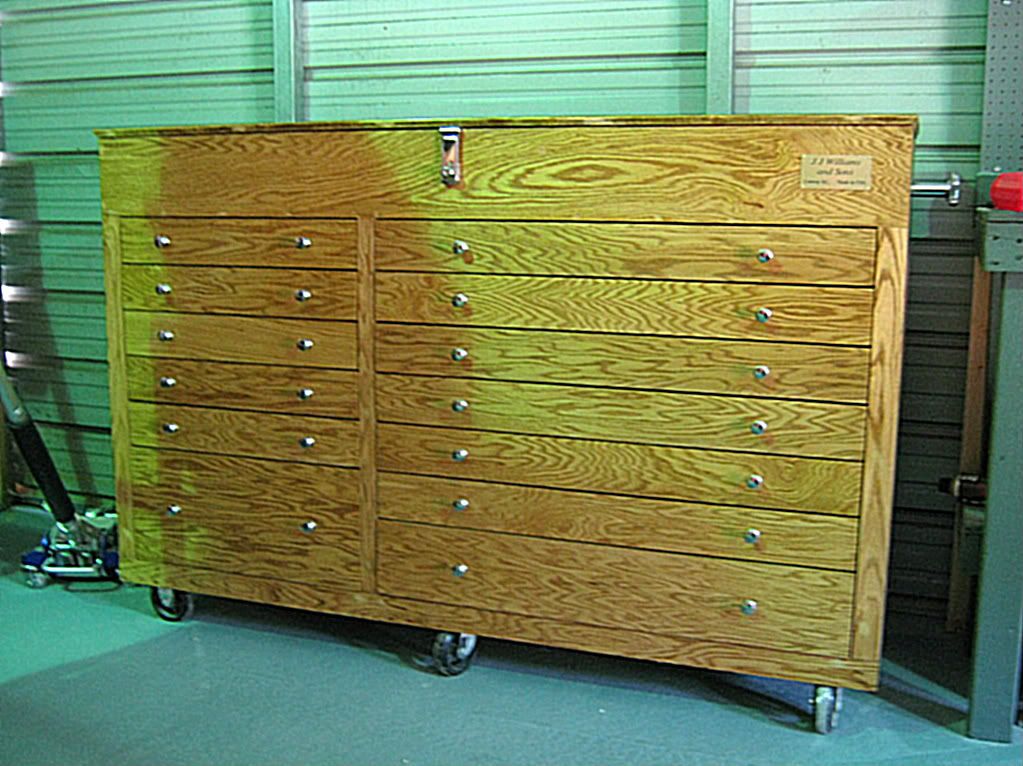
Here is my new pull handle. It will have a wood strip down the length of the wrench to cover the "Pittsburg" It has two 13/16 deep well sockets with bolts welded inside and the wrench welded from the bottom.I still need to clean up my welds and clear coat the welds. Works great. Whacha think?


What do I think???
I think your name plate that says "made in the USA" should be changed to "Assembled in the USA from Global components" seeing that you have an import Pittsburg wrench set as handles :lol_hitti


HAhaha, just kidding... really nice box. I may be inspired enough to make my own now...
 
Last edited:
To avoid these ads, REGISTER NOW!
OP
M

mrholeshot

MEMBER EMERITUS
Joined
Jun 22, 2010
Messages
8,043
What do I think???
I think your name plate that says "made in the USA" should be changed to "Assembled in the USA from Global components" seeing that you have an import Pittsburg wrench set as handles :lol_hitti


HAhaha, just kidding... really nice box. I may be inspired enough to make my own now...

If hiding forgein components is good enough for Snap-On it's good enough for me. At least my roller slides are made in the USA, :beer:
 

bchee

Well-known member
Joined
Aug 20, 2007
Messages
6,148
Location
Texas
That wrench handle is slick.

It's weird to see a wooden box with mechanics tools. Not sure why.
I'm expecting to see calipers and drill bits, etc.
 

Stick Figure

Well-known member
Joined
Aug 3, 2009
Messages
1,395
Location
Omaha, Ne
If i wouldn't have known you wanted to do that i would have saved you a couple of older Williams wrenches i had that would have been perfect for that. Looks cool though.
 

zer0cell

Well-known member
Joined
Aug 25, 2010
Messages
1,325
Hey mrholeshot's,
You wouldn't happen to have a rough sketch of the frame for the cabinet you built would you? (actually; the framing and dimensions, how the casters were secured, and how you designed the drawers to handle that weight) I have some some great ideas for building a cabinet and in my mind I have a pretty good idea of how I may want to put it together but it would help seeing some examples from a cabinet that is already well built to handle the weight of all those tools you know?
 

Rickster55

Well-known member
Joined
Jun 22, 2009
Messages
1,132
Location
Syracuse, NY
Very nice! I have been designing my box for quite some time now. It always seems there's another project in front of it. Maybe someday I'll get around to actually making it. Redoing the garage now so it'll be a while. Enjoy and again, nicely done!
 

zer0cell

Well-known member
Joined
Aug 25, 2010
Messages
1,325
Thanks, mrholeshot. That helps a lot. If/when I finish mine I will post pictures for everyone to see as well :) Great job.
 
OP
M

mrholeshot

MEMBER EMERITUS
Joined
Jun 22, 2010
Messages
8,043
im gonna stop by your house on my way to Myrtle Beach and steal that box...That thing is beautiful.
better bring some help. That thing is really heavy loaded. I moved it into it's new home this morning. Not an easy task. I'm building a drawer lock system for it now. I had to put ratchet straps around it to keep the drawers closed during the move.
 
OP
M

mrholeshot

MEMBER EMERITUS
Joined
Jun 22, 2010
Messages
8,043
You mean locks, or detents?

Well.......... You won't be able to open the drawers without the key for the box. I'm using a pair (one for each bank of drawers) of steel 3/8 rod. I'm drilling down from the top inside compartment right up agaist the drawer fronts all the way into the bottom floor of the box. with all the drawers in the closed position the rod will go all the way from top to bottom and keep the drawers locked in place. Then I am putting on a Nickel plated Hasp with a built in lock for the top. You wont be able to open the drawers until you unlock the top and pull the rods.
 
To avoid these ads, REGISTER NOW!
OP
M

mrholeshot

MEMBER EMERITUS
Joined
Jun 22, 2010
Messages
8,043
Im talking about the drawer pulls lol I should of mentioned that.

You mean the side handle. If I had welded it all the way around I would have had to have it rechromed. The only gap is where the socket tapers. It's really more of a taper down than a gap. The socket is sitting flat on the wrench.
 

arkangel06

Banned
Joined
Jan 31, 2009
Messages
4,642
Location
ontario
You mean the side handle. If I had welded it all the way around I would have had to have it rechromed. The only gap is where the socket tapers. It's really more of a taper down than a gap. The socket is sitting flat on the wrench.

It would still look better welded fully then ground flush/polished
 

2chipped

Well-known member
Joined
Aug 14, 2009
Messages
641
Location
Jesup Ga USA
Very nice job Mrholeshot , when I was 16 i drew plans to build something very similar, but I still have the plans and 15 #3/4 oak plywood hmmmm.:beer::bowdown::bowdown:
 

dgarage

Well-known member
Joined
Oct 24, 2009
Messages
101
MrH, it's coming along great. I hope you're satisfied with it. I've enjoyed it very much and look forward to your continued modifications.
 

TEXACMAN

Well-known member
Joined
Feb 6, 2006
Messages
284
Location
Mount Pleasant Texas
That is a beautiful tool box :bowdown:!!! I am quite jealous , makes me want to push my metal boxes out into the road , startover and build one out of wood.(It would take me years though!!!:wtf:)
 
OP
M

mrholeshot

MEMBER EMERITUS
Joined
Jun 22, 2010
Messages
8,043
Here is the new locking system.

2 3/8 steel rods that pass from the inside compartment through the inside front drawer. I have a 90 degree bend in each rod so I can reach up and pull the rods out from my wheelchair. The rods pass from the first floor down to about 1 inch into the bottom floor. Then I have a nickel plated hasp with built in lock. Now I can lock up my tool box. Here are some photos.

The rods

IMG_1009.jpg


Left bank rod

IMG_1011.jpg


Right hand rod

IMG_1012.jpg


Front Hasp lock

IMG_1013.jpg


All locked up

IMG_1008.jpg
 
To avoid these ads, REGISTER NOW!
Top Bottom