

You are using an out of date browser. It may not display this or other websites correctly.
You should upgrade or use an alternative browser.
You should upgrade or use an alternative browser.
Log splitter wings
- Thread starter sberry
- Start date
How do you adjust for longer or shorter wood to split? Such as:
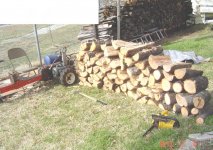
1. I can adjust my wedge out approx 24” from my ram. On 12” dia Oak, Pecan, Ash and Etc as firewood I usually cut and setup for 16” long logs. The larger the dia, the closer to ram due to ram’s side wear costing me two identical repairs from pushing at angles IMO.
2. On 16” – 24” dia wood I’ll usually setup for 12” long logs as I find pre cut wood behind tree trimmers (for easier rolling onto splitter and splitting with less ram.
3. Working wood for BBQ I’ll usually setup for 8” long logs and use an adapter to quarter logs. It works good from a chair with wood in reaching dist due to being low.
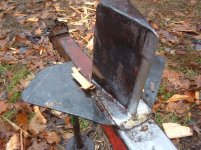
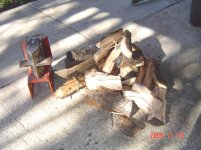
4. As for catching the split sections, I'll try added side wings to my adjustable wedge. That will be a future project (since 09) vs using a log on each side to load/catch. I have had fun with this splitter given to me. I’ll show where it started and where it is now. It’s time to fire it when I get some room to stack some split green wood in my approx 3 cord stack.
Have A Good Winter!
1. I can adjust my wedge out approx 24” from my ram. On 12” dia Oak, Pecan, Ash and Etc as firewood I usually cut and setup for 16” long logs. The larger the dia, the closer to ram due to ram’s side wear costing me two identical repairs from pushing at angles IMO.
2. On 16” – 24” dia wood I’ll usually setup for 12” long logs as I find pre cut wood behind tree trimmers (for easier rolling onto splitter and splitting with less ram.
3. Working wood for BBQ I’ll usually setup for 8” long logs and use an adapter to quarter logs. It works good from a chair with wood in reaching dist due to being low.
4. As for catching the split sections, I'll try added side wings to my adjustable wedge. That will be a future project (since 09) vs using a log on each side to load/catch. I have had fun with this splitter given to me. I’ll show where it started and where it is now. It’s time to fire it when I get some room to stack some split green wood in my approx 3 cord stack.
Have A Good Winter!
Attachments
-
 Splitting-Firewood-4-21-08- 2.jpg130.9 KB · Views: 99
 -
 Re-Stocking-Working Oak & Pecan (5).jpg147.6 KB · Views: 102
 -
 Splitting Last Winter's Wood (7).jpg133.6 KB · Views: 120
 -
 Log Splitter 4-2012 union & Guard (4).JPG114.7 KB · Views: 115
 -
 Four Way Slip On Log Splitter's Adapter 3 (1).jpg70.4 KB · Views: 118
 -
 Equipment, Log-Splitters-Final-Modifications-3-13-08 13.JPG92.9 KB · Views: 124
 -
 Equipment, Log-Splitter-Working-Good Before Modifying.jpg137.5 KB · Views: 127
We don't adjust it. This splitter is a simpleton unit, I have fixed a few things but nothing revolutionary. This little wing mod simply keeps the log from falling while being held, can send the splitter in reverse and then 2 hand a piece for resplit or some other size varations I have down fairly well. It works super fast with 2 men.
I love the electric drive on that one.
I love the electric drive on that one.
Last edited:
junkman104
Well-known member
I have this same splitter that runs off my tractor hydraulics. The "wings" work quite well and are removable.

JDMopar
Well-known member
Although I don't have a pic of it, we do a temporary setup with a pallet set up on cinder blocks. We put it on the opposite side from the control valve, where my wife always is positioned. The chunk on her side, no matter how large, is easily controlled to fall on the pallet. I work on the control valve side, and load the wood onto the splitter. Our splitter is old as the hills, and home made...with a railroad iron main beam. I set it up so the working height is waist high. That way, we don't have to bend any to work. I use my tractor to lift a pallet load of wood up on my side, and position it so a chunk can fall back on the pallet on my side too if needed. We stack our busted wood onto pallets, and I set them on our covered porch with the tractor. We bought an old pallet jack at the flea market to move the pallets around once they're on the porch. Using the tractor, and stacking the wood on pallets saves us a LOT of handling. That was the part I always hated....handling the wood 20 times between the tree laying on the ground, to the stove. I'll try to remember to take some pics of our setup when we bust our remaining wood this weekend.
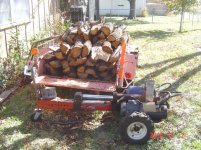
My trailer is a matching height to my splitter and I block the splitter to the back side roll logs onto split. Mainly from a chair as the operator and cycle it back to the trailer to burn off it if the wood is seasoned. On higher trucks (helping friends) we use plywood to let the logs roll down onto the splitter and cycle back onto the truck. We always use a plan to minimize handling the wood. My dreaded jobs are stacking two rows of wood along our back fence. At times, I need to throw wood out or in to keep green on the bottom. Then transferring about ¼ cord as needed to our covered recessed patio (with a vinyl drop with vinyl windows to roll-up or drop as needed).
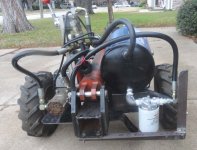
The concern with the Electric Splitter is not letting the electric motor get too hot to place my hand on it. When the temperature is 70s this might take just over an hour, vs no problems 60s and down (on the “sealed” 1 HP Farm Motor, 50’ 12 ga extension at the most if needed). It is thermal protected and has shut down from standing off too long. The cylinder or 5 gal tank of fluid has not shown any signs of heat.
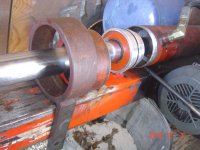
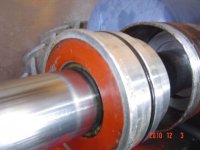
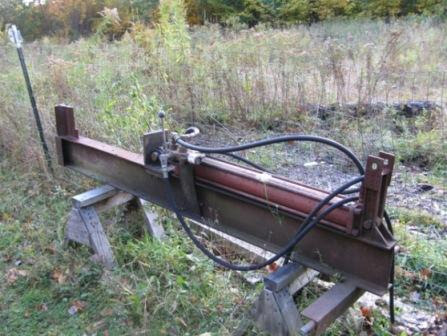
The filter kit was my last add-on after damaging the cyl and seals twice. Two things got my attention. 1. Pushing larger knotted wood at angles (trying to split the challenging wood. 2. The ram w/n forced to travel straight on the rail. Splitting clean and short large dia wood and adding a guide to the ram to flower the rail appears to work (two season/years now). Looking at the Pics, I need to re-visit my ram’s guide challenging 1/16 total clearance while traveling on the rail. One or two brass roller will be my goal. As it is now I know it has some play and can pivot to keep it from binding. Bolting the guide to the ram (to stop the pivoting) and adding a brass shims inside the bottom might work just as good with less work. The Pros will have Machined Guides/Tracks. There is Always Something Needed, “That Should Be Fun At This Stage”!!!
The wear damages were obvious on the cyl, pistons and O-rings both times. I was offered to pay for the seal kits and honing/polishing vs R&R but I liked his needed equipment. I had accidentally managed to Peek before and after the 1st job and that int rust color vs rust was spotless. . LOL!
The concern with the Electric Splitter is not letting the electric motor get too hot to place my hand on it. When the temperature is 70s this might take just over an hour, vs no problems 60s and down (on the “sealed” 1 HP Farm Motor, 50’ 12 ga extension at the most if needed). It is thermal protected and has shut down from standing off too long. The cylinder or 5 gal tank of fluid has not shown any signs of heat.
The filter kit was my last add-on after damaging the cyl and seals twice. Two things got my attention. 1. Pushing larger knotted wood at angles (trying to split the challenging wood. 2. The ram w/n forced to travel straight on the rail. Splitting clean and short large dia wood and adding a guide to the ram to flower the rail appears to work (two season/years now). Looking at the Pics, I need to re-visit my ram’s guide challenging 1/16 total clearance while traveling on the rail. One or two brass roller will be my goal. As it is now I know it has some play and can pivot to keep it from binding. Bolting the guide to the ram (to stop the pivoting) and adding a brass shims inside the bottom might work just as good with less work. The Pros will have Machined Guides/Tracks. There is Always Something Needed, “That Should Be Fun At This Stage”!!!
The wear damages were obvious on the cyl, pistons and O-rings both times. I was offered to pay for the seal kits and honing/polishing vs R&R but I liked his needed equipment. I had accidentally managed to Peek before and after the 1st job and that int rust color vs rust was spotless. . LOL!
Attachments
-
 Log Splitter's Motor Specs 2 (2).jpg72.6 KB · Views: 16
 -
 Log Splitter's 1-4-2012 upgrade (3).JPG98 KB · Views: 17
 -
 Log Splitter's 1-4-2012 upgrade (2).JPG98.5 KB · Views: 21
 -
 Log Splitter's Cylinder Leak Continued (7).JPG92.8 KB · Views: 17
 -
 Equipment, Log Splitter Noise Exp (8).JPG87.7 KB · Views: 20
 -
 Equipment, Log Splitter Noise Exp (7).JPG58.5 KB · Views: 17
 -
 Equipment, Log Splitter Noise Exp (6).JPG56.8 KB · Views: 22
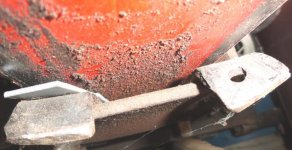
I jumped right on checking The Ram’s Guide Clearance on the rail to try and avoid another repair bill. It appears I can add ¾” X 1/8” angle iron inside all 4 corners of the guide to rail (per checking with 1/8” shims). If that is too tight, I’ll add two on top or bottom. Plus, I’ll add ½” tempered bolt to resist the guide’s pivoting on the 1” pin causing resistance or locking on the rail.
I see too many without the machined guide but I see the advantage once the rod is out over a foot and not pushing straight. I once felt no guides and play would allow the ram to adjust until I received damages 12 mo apart (after I started splitting larger knotted wood 12-16” dia and clean 24” dia).
Metalworking, Woodworking, Automotive/Small Engines Handyman Etc has been my life of work in my garage since 1972. I planned on increasing my volume after retirement and did approx 10 yrs (03 - 2013 before my body said “Slow The Work”. LOL!
Sberry, should I be able to see your complete splitter at your link (I c/n open)? I would like to see “Yours and Other’s Ram’s Guides Or No Guides”. Get opinions on the needs or not and how to avoid damages to the cylinder.
Thanks And Have Fun In Your Garage!
Attachments


Thanks Excavator! All appears to have good guides on I-Beam rails that will accept guides w/o a conflict. The 4” X ¼” square tubing as mine is not a good design for good guides. Looking back, I-Beam or Related Steel appears the choice of steel for most Commercial Log Splitters. The beam allows good ram guides with fixed wedges/stops vs adjustable. The adjustable wedge and square tubing is a conflict for “Good Easy Ram Guides” IMO.
I know in your Business you want to Prevent Hydraulic Repairs.... The donated splitter has been a good project, allowing split logs vs round 2-8” limbs (with this tired body after 30 yrs of a maul and wedge).
I know in your Business you want to Prevent Hydraulic Repairs.... The donated splitter has been a good project, allowing split logs vs round 2-8” limbs (with this tired body after 30 yrs of a maul and wedge).