I recently constructed a 30'x40' red iron bolt together building. I poured a slab and constructed the red iron skeleton followed by insulation and sheet metal. It came with the somewhat cheap roll insulation with the plastic backing. I have a pearling at 7 foot all the way around the building. Im wanting to construct a studded either plywood or sheetrock interior wall all the way around the inside the building to both protect the insulation and have a place to hang tools etc. Any ideas or pointers or wisdom would be much appreciated. This shop's soul purpose is for building on my hot rods.

You are using an out of date browser. It may not display this or other websites correctly.
You should upgrade or use an alternative browser.
You should upgrade or use an alternative browser.
Looking for ideas for interior wall framing.
- Thread starter spdntkt22
- Start date
TheEquineFencer
Well-known member
I recently constructed a 30'x40' red iron bolt together building. I poured a slab and constructed the red iron skeleton followed by insulation and sheet metal. It came with the somewhat cheap roll insulation with the plastic backing. I have a pearling at 7 foot all the way around the building. Im wanting to construct a studded either plywood or sheetrock interior wall all the way around the inside the building to both protect the insulation and have a place to hang tools etc. Any ideas or pointers or wisdom would be much appreciated. This shop's soul purpose is for building on my hot rods.
Do you have a Girt around the wall at around 4 ft also? What is you exterior metal screwed to at the bottom? What is you wall height? Are your girts beside the columns or behind the columns? A picture of the interior wall would help a lot.
s10xtremist
Well-known member
I'm pretty much at that stage with my 30x40. Mine is a Mueller building and the girts run behind the columns (I think they call it pass-through girts?) on the 40' walls. The girts on the 30' walls deadhead into the columns.
My plans for walls are to stand 4x8 sheets of OSB all around the perimeter. I plan to attach 2x4 studs to the girts with the wide side facing out using >THESE SCREWS<. I'll put them on 16" centers. I'll have these studs toenailed to 2x4s that will be anchored to the floor. I'll screw the OSB to the studs then run a top border of 2x4s to tie the tops together and to give it a bit of a dressed border. The OSB will be painted with tinted primer (some shade of gray), and the top border will be untinted primer (white).
I'm gonna run the wall behind the center columns so I can attach things (hose reel, hangers, etc.) to the columns by welding on whatever brackets. I'd rather do this than box around the columns.
My plans for walls are to stand 4x8 sheets of OSB all around the perimeter. I plan to attach 2x4 studs to the girts with the wide side facing out using >THESE SCREWS<. I'll put them on 16" centers. I'll have these studs toenailed to 2x4s that will be anchored to the floor. I'll screw the OSB to the studs then run a top border of 2x4s to tie the tops together and to give it a bit of a dressed border. The OSB will be painted with tinted primer (some shade of gray), and the top border will be untinted primer (white).
I'm gonna run the wall behind the center columns so I can attach things (hose reel, hangers, etc.) to the columns by welding on whatever brackets. I'd rather do this than box around the columns.
TheEquineFencer
Well-known member
I'm pretty much at that stage with my 30x40. Mine is a Mueller building and the girts run behind the columns (I think they call it pass-through girts?) on the 40' walls. The girts on the 30' walls deadhead into the columns.
My plans for walls are to stand 4x8 sheets of OSB all around the perimeter. I plan to attach 2x4 studs to the girts with the wide side facing out using >THESE SCREWS<. I'll put them on 16" centers. I'll have these studs toenailed to 2x4s that will be anchored to the floor. I'll screw the OSB to the studs then run a top border of 2x4s to tie the tops together and to give it a bit of a dressed border. The OSB will be painted with tinted primer (some shade of gray), and the top border will be untinted primer (white).
I'm gonna run the wall behind the center columns so I can attach things (hose reel, hangers, etc.) to the columns by welding on whatever brackets. I'd rather do this than box around the columns.
It sounds like yours is similar to the shop here at home. We have a 44x62x16 witha 15x62 shelter. I lined the inside with the same metal I did the outside with. I have the base channel at the bottom, a girt at 4 ft or so and another at around 7ft4in. I used 8ft panels and butted them up to my columns, it has a trim edge around the top. My electrical boxes are mounted to my 4ft girt and the wires are BX cable 12 gauge and come through the back, through the wall. I ran a 3/4 conduit inside the "trough" that's created by the 8ft panel and the 7ft4 in girt. If you do use the screws and the way you plan to with the wood, I'd go get a 1/4 inch impact driver combo from Lowe's or something similar. I watched my neighbor cuss and burn up his 18V DeWalt drill trying those screws. Then he saw what I used for lining the inside of our run-in sheds, same screws different method of installation. It took 4 guys 4 hours to do the inside of this shop. IMO, by the time you figure the paint, and it's going to take a LOT of it to cover, the wood and labor, metal is going to get cheap in a hurry. The first two times this shop was built, it was wood lined. Yes TWO times, this is the THIRD one. #1 build was taken down by a Tornado, #2 burned down by an electrical short in a tractor sitting inside. #3 is mostly all metal but for the studs in the office walls. Here's a link to give you and idea of what it looks like. http://s642.photobucket.com/user/TheEquineFencer/media/Misc%20pics/20140608_194712_zps218d2a4c.jpg.html
That picture is of the back/end wall. I drilled a 7/8 hole in the middle of the beam to run a 3/4 conduit through it after consulting with an engineer and the building supplier. My end walls are not really "load bearing"; they're there to just mount the metal to. I can turn it into an open sided building if I like.
Last edited:
s10xtremist
Well-known member
I'll be running my wiring on the girts, too. It's all gonna be 12-2 MC as I scored a 1000' spool of it for less than half price on CL. So, no conduit necessary. For the screwing, I have a couple of DeWalt DW268s. I have DeWalt and Ridgid 18V 1/4" impacts drivers if I wanna go cordless. I'm a firm believer in impacts being used instead of wearing out "regular" drills.
I considered using R-panels for the walls. But, they're about $2.85/ft. taxed/shipped, or $22.80 per 8' panel. I would need about 47 panels for my perimeter wall, totaling $1,071.60. Sure, I could screw them directly to the girts and forgo the stud wall, but the wall wouldn't have the strength of wood and I'd have to take special precautions and extra steps for mounting anything to the wall, especially due to the R-panel's shape. I'll leave the top trim out of the equation for now. 35 sheets of OSB will cost $299.60 out the door.
Regardless of how it's sheathed, I'm going with the stud wall:
Overestimating a few on the studs with 130 at $3.25 out the door comes to $422.27. I figure about $100 (after quick price browsing) for the wood-to-metal screws and about $20 for the framing nails. I'm not yet sure how I'm gonna anchor the floor plate, but between the few options I'm considering, $50 would get me more than enough anchors. I already have a hammerdrill and plenty of bits. So, I'm looking at about a $600 stud wall.
I don't have a price on the primer I was recommended (Farrell-Calhoun #597), nor the additional cost of having it tinted. I'll just estimate it at the cost of what their flat ceiling paint was- $120 per 5 gallon bucket. The spec sheet says it covers 350-400 sq. ft. per gallon (I'm calling it 300) and I need to cover 1,120 sq. ft. (overestimated). Just saying I'll end up needing twice the estimated amount, that's 2,240 sq.ft. divided by 300 sq. ft. of coverage per gallon = 7.47 gallons. 10 gallons would be $240 assuming the same price as their flat ceiling paint that I used on my ceiling and top 4' of the walls.
So, for the stud wall, OSB, and paint, I'm looking at about $1,250 once I factor in the painting materials. For the stud wall and R-panels, I'm looking at $1,700+ the cost of trim. The OSB would be a bit more labor, but would be cheaper and much more convenient for future use and changes. All of these prices are from Home Depot's site and Mueller's R-panel pricing.
I considered using R-panels for the walls. But, they're about $2.85/ft. taxed/shipped, or $22.80 per 8' panel. I would need about 47 panels for my perimeter wall, totaling $1,071.60. Sure, I could screw them directly to the girts and forgo the stud wall, but the wall wouldn't have the strength of wood and I'd have to take special precautions and extra steps for mounting anything to the wall, especially due to the R-panel's shape. I'll leave the top trim out of the equation for now. 35 sheets of OSB will cost $299.60 out the door.
Regardless of how it's sheathed, I'm going with the stud wall:
Overestimating a few on the studs with 130 at $3.25 out the door comes to $422.27. I figure about $100 (after quick price browsing) for the wood-to-metal screws and about $20 for the framing nails. I'm not yet sure how I'm gonna anchor the floor plate, but between the few options I'm considering, $50 would get me more than enough anchors. I already have a hammerdrill and plenty of bits. So, I'm looking at about a $600 stud wall.
I don't have a price on the primer I was recommended (Farrell-Calhoun #597), nor the additional cost of having it tinted. I'll just estimate it at the cost of what their flat ceiling paint was- $120 per 5 gallon bucket. The spec sheet says it covers 350-400 sq. ft. per gallon (I'm calling it 300) and I need to cover 1,120 sq. ft. (overestimated). Just saying I'll end up needing twice the estimated amount, that's 2,240 sq.ft. divided by 300 sq. ft. of coverage per gallon = 7.47 gallons. 10 gallons would be $240 assuming the same price as their flat ceiling paint that I used on my ceiling and top 4' of the walls.
So, for the stud wall, OSB, and paint, I'm looking at about $1,250 once I factor in the painting materials. For the stud wall and R-panels, I'm looking at $1,700+ the cost of trim. The OSB would be a bit more labor, but would be cheaper and much more convenient for future use and changes. All of these prices are from Home Depot's site and Mueller's R-panel pricing.
Last edited:
TheEquineFencer
Well-known member
This is just an idea, instead of framing nails, have you looked at the Torx head decking type screws? I've had a lot of success with them. When I need to "move" something, I just unscrew it. I've found in a lot of "projects" around here, I waste less wood with them. Things must cost a lot more down south, PBR-panels are only about $2 a foot here. Here I think the Bx cable is $0.45 p/ft, I got mine free from a friend. I did spring for the "Snap-it" connectors. I'd like to see how the base channel your outer R-panels are attached at the floor. I built some "boxes" inside behind my liner panels by notching a 2x4 so it fit inside the base channel at the bottom, but the narrow edge was flush with the where the liner panel was going. At the top to attach it, I drill in through the top girt into the end of the 2x4. If your base channel is like mine, if you do that you can screw the OSB to the girt and save some wood. I tired to keep as much wood out of the shop this time, it just made the fire spread that much faster. If I were attaching wood to the floor for a studded wall, I'd use pressure treated and either nail it down with a sledge hammer or drill it and use "blue screws." The old shop I just studded the walls like framing a house, stood it up and use some good fluted concrete nails and drove them through the wood into the concrete. On my PBR panel walls, when I attach things like cabinets, I just paint a 2x4 white and screw it to the girts and base channel, then attach to it. I use the exact same screws you're using.
Last edited:
cj6
Well-known member
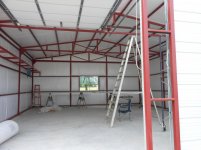
I initially set my shop up for interior walls also. I welded my c-purling in flush and set them at 2 inches from concrete then 4ft, 8ft and then 12 ft. all the way around perimeter of shop. The intention was to stand 8 ft plywood up and go all the way around shop.
Things have changed:
Decided to stud up 12ft all the way around (16" centers) and use cedar 4ft up from floor then sheetrock the rest of the way.
I mostly decided to do this because I could run Romex all the way around instead of messing with conduit.
I also splurged and gonna double insulate while I'm at it. Texas heat.
Things have changed:
Decided to stud up 12ft all the way around (16" centers) and use cedar 4ft up from floor then sheetrock the rest of the way.
I mostly decided to do this because I could run Romex all the way around instead of messing with conduit.
I also splurged and gonna double insulate while I'm at it. Texas heat.
Attachments
TheEquineFencer
Well-known member
Just a note about using OSB for the walls, it will wick moisture up from the floor. I think they make a track to put at the bottom to prevent this. I guy near me did a steel building with OSB liners,it's about three years old and his OSB is starting to swell at the bottom and come apart.
s10xtremist
Well-known member
This is just an idea, instead of framing nails, have you looked at the Torx head decking type screws? I've had a lot of success with them. When I need to "move" something, I just unscrew it. I've found in a lot of "projects" around here, I waste less wood with them. Things must cost a lot more down south, PBR-panels are only about $2 a foot here. Here I think the Bx cable is $0.45 p/ft, I got mine free from a friend. I did spring for the "Snap-it" connectors. I'd like to see how the base channel your outer R-panels are attached at the floor. I built some "boxes" inside behind my liner panels by notching a 2x4 so it fit inside the base channel at the bottom, but the narrow edge was flush with the where the liner panel was going. At the top to attach it, I drill in through the top girt into the end of the 2x4. If your base channel is like mine, if you do that you can screw the OSB to the girt and save some wood. I tired to keep as much wood out of the shop this time, it just made the fire spread that much faster. If I were attaching wood to the floor for a studded wall, I'd use pressure treated and either nail it down with a sledge hammer or drill it and use "blue screws." The old shop I just studded the walls like framing a house, stood it up and use some good fluted concrete nails and drove them through the wood into the concrete. On my PBR panel walls, when I attach things like cabinets, I just paint a 2x4 white and screw it to the girts and base channel, then attach to it. I use the exact same screws you're using.
I was just gonna use the framing nails to assemble the stud walls since they can easily be shot from a pneumatic gun. I could either assemble the walls on the ground by shooting the nails up through the underside of the floor plate into the end of the studs then stand them up and anchor/screw them into place. Or I could anchor the floor plate (2x4s) then toenail each stud to the floor plate. I think it the pre-assembly method would be better. For attaching the OSB to the stud wall, I'd definitely use screws in case I needed to remove any of them for build-out and/or wiring changes. At $2 per foot, that's still $16 per panel- more than twice the cost of the OSB. I don't know what the price of MC (I think BX has been phased out) is, but that $0.45/ft. sounds about right. IIRC, one 1000' spool of 12-2 w/ground is about $500 after tax. I got a 1000' spool of 12-2 w/ground, a 1000' spool of 12-3 w/ground, and a spool of 12-2 w/ground about 600' remaining for $400.
 I'm probably gonna get the snap-in connectors as well. I think I understand how you did your walls, but I don't have a "base channel", I have a "base angle" like so:
The girts are 8" wide, and the base angle is something like 3"x4", so I'll need to anchor a floor plate to the slab, parallel to the base angle, so that the edge is 8" out to match the girts. Through all of this thinking, I'm starting to reconsider even making the stud wall. I'd probably be just fine making the floor plate, then screwing the OSB straight to that, the girt at ~40" and the girt at ~90". I'll still screw some 1x3s along the top edge to act as a border and to ensure the tops of the OSB panels stay flush. The more I think about it, I really don't think I'll have cabinets and stuff to hang. It's all standalone shelves. If I ever do have something heavy to hang on the wall, I'll just use reinforce that one area as needed. The removable OSB panels would make this easy. Not doing the stud wall would save me about $400.
I initially set my shop up for interior walls also. I welded my c-purling in flush and set them at 2 inches from concrete then 4ft, 8ft and then 12 ft. all the way around perimeter of shop. The intention was to stand 8 ft plywood up and go all the way around shop.
Things have changed:
Decided to stud up 12ft all the way around (16" centers) and use cedar 4ft up from floor then sheetrock the rest of the way.
I mostly decided to do this because I could run Romex all the way around instead of messing with conduit.
I also splurged and gonna double insulate while I'm at it. Texas heat.
Base channel probably would've been a simpler option, but I never even considered that when I was ordering my building. Although, I would've needed 8" channel, and I'm sure that would've been far more expensive that a 2x4 floor plate. Oh well, we'll all have about the same outcome.
Just a note about using OSB for the walls, it will wick moisture up from the floor. I think they make a track to put at the bottom to prevent this. I guy near me did a steel building with OSB liners,it's about three years old and his OSB is starting to swell at the bottom and come apart.
Good point. But, I think (I'd better!) have that covered. I'm epoxy coating the floor with two coats before I build the walls. The concrete surface should be completely sealed and not in direct contact with the OSB, or even the floor plate for that matter.


theoldwizard1
Well-known member
I think you mean "purlin".I have a pearling at 7 foot all the way around the building.
Actually purlins go between roof rafter. Girts go between the studs/columns.
Yep ! You are going to need a girt near the floor and at least 1 more in the middle to attach the drywall.Do you have a Girt around the wall at around 4 ft also? What is you exterior metal screwed to at the bottom? What is you wall height? Are your girts beside the columns or behind the columns?
If you want to hang drywall on them, their face need to be flush with the stud/column or protrude out past them.
Last edited:
98XJ
Well-known member
nice area, like the c10
theoldwizard1
Well-known member
Ok thanks for the info.... Sorry for my lack of knowledge of terms.
Apology not required ! We all should learn something new everyday !!!
EarlyBroncoGuy
King Of The World
- Joined
- Aug 15, 2013
- Messages
- 940
http://www.garagejournal.com/forum/showthread.php?t=221114&page=3
I framed out a corner office in my 40 x 60 steel building, and put up OSB and workbenches in another corner. Details in my thread.
I framed out a corner office in my 40 x 60 steel building, and put up OSB and workbenches in another corner. Details in my thread.
TheEquineFencer
Well-known member
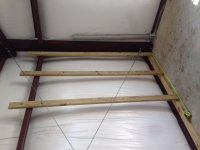
Would this work with 3/4 osb
I think you're going to have a lot of flex in the wall and you'll need something where the joints are. Going with the OSB like you are, I'd probably just stud up a wall and stand it up in place and attach it to the building.
s10xtremist
Well-known member
Would this work with 3/4 osb
I was gonna do the same thing, only with the studs on 16" centers and on top of the floor plate so the sheets would be reinforced along the bottom. This would give me only 12.5" of unsupported span between the studs. Going with 7/16" OSB, I'll need the extra support. I won't be mounting anything heavy to the panels. If I do, I'll just reinforce it as needed, where needed. Since you're using 3/4", you would probably be fine with 24" centers. It depends on what you plan to do with your wall, the chances of objects hitting it, etc.
TheEquineFencer
Well-known member
If you get the OSB that locks together with that rib , I think it might be sub-flooring or something like that, it'll take a lot of the give out of it.
s10xtremist
Well-known member
Walls are mainly just to protect the insulation and to hang signs on. I will have work benches in front of the walls so nothing heavy.
Same here, which is why I'm using the $8 per sheet 7/16". Since you don't have a girt mid-way from the floor to the one at ~7', you should make a stud wall like what you posted a picture of. Put the studs on 24" centers and laid flat just like they are in the pic. The joints where each sheet meets would fall out on the center of a stud, so you'd have plenty of surface to screw to and the joint would be supported. There would be another stud in the center of each sheet for extra support. 7/16" OSB isn't all that flimsy, especially when used in this manner and would be plenty strong for the purpose. Just put the studs on top of that floor plate instead of in front. This way, the whole bottom of the sheet has reinforcement instead of that 1.5" gap.
Last edited:
JTS
Well-known member
Would this work with 3/4 osb
I think that would work just fine. Take a look at page 3 of this thread.
http://www.garagejournal.com/forum/showthread.php?t=42257&page=3