To avoid these ads, REGISTER NOW!

Looking for some AL welding critque

600SL

Well-known member
Joined
Apr 26, 2012
Messages
1,794
Location
Connecticut
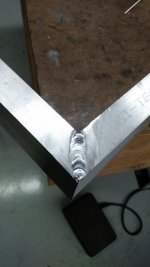
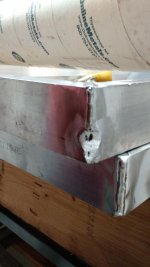
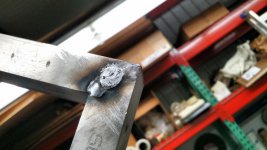
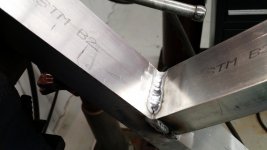
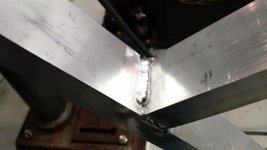
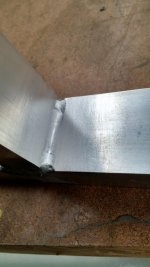
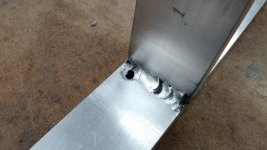
Some reasonable welds and some real bad welds but at least I got it to stick together.

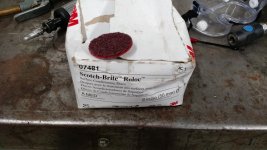
I believe most of my problems are due to cleaning. But after sandblasting Acetone wipe and scotch bright Roloc wheels WTF.

Biggest problem was the outside corner welds. The puddle just would not flow. I looked like a bead of filler would form on top of a molten slag covered puddle and not fuse together. Most of the places where I blew a hole through I was able to fill in quite easily like that ugly **** weld. But the outside corners would only get worse.

Someone at work told me not to use the maroon Roloc wheels. I should be using the grey ones. But I have no part number and there are several grey ones available.

Any ideas

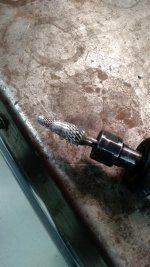
Also does anyone know of better die grinder burrs that wont fill up.
 

Attachments

  • IMG_20160911_195715437.jpg
    IMG_20160911_195715437.jpg
    141.1 KB · Views: 409
  • IMG_20160917_225239439.jpg
    IMG_20160917_225239439.jpg
    149.9 KB · Views: 310
  • IMG_20160917_225550136.jpg
    IMG_20160917_225550136.jpg
    147.8 KB · Views: 312
  • IMG_20160917_225155037.jpg
    IMG_20160917_225155037.jpg
    143.6 KB · Views: 334
  • IMG_20160917_225129104.jpg
    IMG_20160917_225129104.jpg
    138.8 KB · Views: 350
  • IMG_20160911_212148516.jpg
    IMG_20160911_212148516.jpg
    137 KB · Views: 367
  • IMG_20160911_192721179.jpg
    IMG_20160911_192721179.jpg
    147 KB · Views: 374
Last edited:
To avoid these ads, REGISTER NOW!

Buckgnarly

Well-known member
Joined
Oct 8, 2010
Messages
7,654
Location
VT
Use single cut burrs, they are made for Al. You can also use wax to lube/keep burrs clear.
 

vpd66

Well-known member
Joined
Mar 1, 2010
Messages
712
Location
Central Wisconsin
Get rid of the Roloc wheels. Get a new stainless steel wire brush and only use it on aluminum. After wire brushing, wipe with acetone and you should be good to go. The Roloc wheels might be imbedding things into the aluminum. Take a couple pieces and just wipe them with acetone and see how they weld. Aluminum is a real strange animal to weld. There are so many different alloys and most of the time you have no idea what alloy you have.
 

sberry

Banned
Joined
Jun 18, 2005
Messages
35,747
Location
Brethren, Michigan
Alum is very fussy for techniques, even minor errors show up. These gaps are tight especially on the3 corners, no place for filler to go. The push angle is critical especially when in flat position. Agree, toss that other stuff and get simple wire brush.
 

Attachments

  • alum 210.JPG
    alum 210.JPG
    97.5 KB · Views: 245
  • alum hyd bead.jpg
    alum hyd bead.jpg
    145.4 KB · Views: 252
Last edited:
OP
6

600SL

Well-known member
Joined
Apr 26, 2012
Messages
1,794
Location
Connecticut
Get rid of the Roloc wheels. Get a new stainless steel wire brush and only use it on aluminum. After wire brushing, wipe with acetone and you should be good to go. The Roloc wheels might be imbedding things into the aluminum. Take a couple pieces and just wipe them with acetone and see how they weld. Aluminum is a real strange animal to weld. There are so many different alloys and most of the time you have no idea what alloy you have.

Thanks

The rectangular tube is 6061-T6. It is generally all I weld in AL.
 
OP
6

600SL

Well-known member
Joined
Apr 26, 2012
Messages
1,794
Location
Connecticut
Alum is very fussy for techniques, even minor errors show up. These gaps are tight especially on the3 corners, no place for filler to go. The push angle is critical especially when in flat position. Agree, toss that other stuff and get simple wire brush.

Thanks for the reply.

I'm starting to see one common thing here: The stainless steel brush. I just ordered both a new die grinder type brush and hand brush as well as single cut burrs and Bowlube paste.

The trick will be to keep the SS brush only for AL. The beauty of the Rolocs are they are disposable. I did also order the grey Rolocs as they were recommended and used regularly by certified aircraft welders at an aircraft manufacturer. So I will give them a try.

Another thing I have found in my reading is that condition of the gas lens and cups is important. In fact I read that a Gas lens should not be used for AL as it will not last. Does anyone agree with that. I have never treated these as consumables and have never changed them. I will say they certainly don't look new but how would I know when its time to change?

I did order some new ones and will try a bunch of thing out and will post my findings.

Thanks
 

sberry

Banned
Joined
Jun 18, 2005
Messages
35,747
Location
Brethren, Michigan
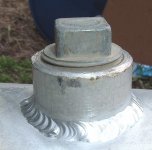
Pics. 1st 2 are wire, 3rd is tig
 

Attachments

  • alum coupling.JPG
    alum coupling.JPG
    40 KB · Views: 200
  • alum 210.JPG
    alum 210.JPG
    97.5 KB · Views: 148
  • alum hyd bead.jpg
    alum hyd bead.jpg
    145.4 KB · Views: 157
OP
6

600SL

Well-known member
Joined
Apr 26, 2012
Messages
1,794
Location
Connecticut
Pics. 1st 2 are wire, 3rd is tig

Looks real nice

I have only used my MIG spool gun once for AL and I find it need about one inch of weld before I can get the heat to settle out and weld nicely. Since these welds are all 1" to 2" I'm going to pass for the moment.

I attached some pictures of the torch setup I was using. The last picture is the best GL I could find so I will be using that shortly. Aside from the fat that I stuck the tungsten in the puddle the last time I was using it is there any reason to be concerned as to the condition of these parts.

Also does anyone has a suggestion for cutting tungsten. If I cut them with a diagonal cutter they tend to shear right up the middle. I would prefer not to have to grind them apart.
 

Attachments

  • IMG_20160918_131620980[1].jpg
    IMG_20160918_131620980[1].jpg
    149.9 KB · Views: 115
  • IMG_20160918_121953348[1].jpg
    IMG_20160918_121953348[1].jpg
    145.8 KB · Views: 120
  • IMG_20160918_121932507[1].jpg
    IMG_20160918_121932507[1].jpg
    151.4 KB · Views: 131
  • IMG_20160918_121829477[1].jpg
    IMG_20160918_121829477[1].jpg
    149.9 KB · Views: 138
  • IMG_20160918_121654742[1].jpg
    IMG_20160918_121654742[1].jpg
    149.1 KB · Views: 141

dffay

Well-known member
Joined
Jul 9, 2015
Messages
435
2% Lanthanated is superb for both Al and steel. In one pic I see soot like a contaminated electrode. And, I think the arc was wandering on the outside corners. The trick with that can be too sharp of a point. Or, some have the issue with a balled point that is too large for the small stuff they are welding. A gas lens works awfully well anyway so I'm not sure I would blame that.
 

dffay

Well-known member
Joined
Jul 9, 2015
Messages
435
Maybe also take a moment to go around with a flare nut wrench and tighten all plumbing on your welder. TIG hates air leaks.
 

Daveo

Well-known member
Joined
Nov 24, 2012
Messages
146
2% Lanthanated is superb for both Al and steel. In one pic I see soot like a contaminated electrode. And, I think the arc was wandering on the outside corners. The trick with that can be too sharp of a point. Or, some have the issue with a balled point that is too large for the small stuff they are welding. A gas lens works awfully well anyway so I'm not sure I would blame that.

I would say you dipped your electrode and contaminated the puddle...When you dip it.... Stop! And re grind it...
 

vpd66

Well-known member
Joined
Mar 1, 2010
Messages
712
Location
Central Wisconsin
Put the tungsten on the edge of the table with a 1/4" hanging over the edge and snap the end off with a pliers or small hammer. Then regrind it. I've welded aluminum mostly 6061 extrusions like that for 12 years and 90% of the time we just wipe the joint with acetone before we weld it.
 

dacuda

Well-known member
Joined
Aug 22, 2016
Messages
130
Location
st cloud ,fl
all advice sounds good.as i was learning aluminum welding an old timer told me never to sand or sandblast cuz it contaminates the aluminum.only use clean stainless brush that only touches aluminum and acetone.how you grind the tungsten is also critical using a proper grinder that is used only to grind tips.
 
OP
6

600SL

Well-known member
Joined
Apr 26, 2012
Messages
1,794
Location
Connecticut
2% Lanthanated is superb for both Al and steel. In one pic I see soot like a contaminated electrode. And, I think the arc was wandering on the outside corners. The trick with that can be too sharp of a point. Or, some have the issue with a balled point that is too large for the small stuff they are welding. A gas lens works awfully well anyway so I'm not sure I would blame that.

Definitely contaminated the electrode on several occasions. And I definitely have issues with a balled electrode. I don't seem have control like a sharp one on steel. Doesn't seem like a sharp one would stay sharp too long. Typically I have been grinding to a 45° point and then blunting the tip. After 5 sec of welding its a ball. I was actually thinking of going to a larger electrode and sharpening to a point.

Thanks
 
OP
6

600SL

Well-known member
Joined
Apr 26, 2012
Messages
1,794
Location
Connecticut
Maybe also take a moment to go around with a flare nut wrench and tighten all plumbing on your welder. TIG hates air leaks.

Well it hold pressure when I turn the valve off on the bottle so I should be good up to the solenoid. From there its the hose connections. Didn't seem to make any difference when I upped the gas from 15 to 20 CFH. But I will check the hose.
 
OP
6

600SL

Well-known member
Joined
Apr 26, 2012
Messages
1,794
Location
Connecticut
I would say you dipped your electrode and contaminated the puddle...When you dip it.... Stop! And re grind it...

Definitely. The black stuff appears as soon as I dip it. But a good question about re grinding the tungsten. After I cut the ball off there is still about 3/4" of exposed tungsten that is discolored. Should that be cut off as well. I have been being cheep about my tungstens.
 
OP
6

600SL

Well-known member
Joined
Apr 26, 2012
Messages
1,794
Location
Connecticut
Put the tungsten on the edge of the table with a 1/4" hanging over the edge and snap the end off with a pliers or small hammer. Then regrind it. I've welded aluminum mostly 6061 extrusions like that for 12 years and 90% of the time we just wipe the joint with acetone before we weld it.

Thanks I will give it a try.
 
To avoid these ads, REGISTER NOW!
OP
6

600SL

Well-known member
Joined
Apr 26, 2012
Messages
1,794
Location
Connecticut
all advice sounds good.as i was learning aluminum welding an old timer told me never to sand or sandblast cuz it contaminates the aluminum.only use clean stainless brush that only touches aluminum and acetone.how you grind the tungsten is also critical using a proper grinder that is used only to grind tips.

There seams to be a lot of popular votes for the stainless steel brush. As far as the grinding I only have my bench grinder that is used for everything. I will look into alternate grinders if nothing else gets this under control.

Thanks
 

sberry

Banned
Joined
Jun 18, 2005
Messages
35,747
Location
Brethren, Michigan
Get a BD or similar grinder, 30$ at Walmart and dedicate a wheel to it. If I am doing lotso I put a wire wheel on a 4 inch air, mostly for cleaning castings and when I want to be a speed demon, they are so aggressive that while it tends to wipe I doubt it embeds. But those little toothbrushes are usually good on good material.
My expertise is in steel, only do alum when I have to and really don't know anything about it.
 
OP
6

600SL

Well-known member
Joined
Apr 26, 2012
Messages
1,794
Location
Connecticut
I think I have some pretty good ideas.

Things are getting better but I still managed to blow a good sized hole in the last one.

The **** welds appear clean but not as uniform as I would like. I also have difficulty starting the **** welds into the fillet corner area so that the fillet welds will come around and overlap onto the **** welds The first 1/8" of my **** welds are not there at all and I cant get the last 1/8 to wrap over into the fillet weld ares. Therefore the joint between the **** and fillet welds ends up with a small porous pocket.

Place I am still having the most trouble with is starting the puddle in the fillet welds. Working these welds towards myself and starting the puddle on the far edge is giving me fits. I found that for the last two welds, I would start in the middle and then come towards my self. Then turn it around and finish the other side. Those welds came out reasonably well. I just cant seem to get a bead to form at the far face without piling in a bunch of molten aluminum from the rod until it finally melts in and starts a puddle. Buy then I'm applying a full pedal of current and things get hard to control (I was set at 110 amps full pedal). Starting in the center was still difficult but significantly more manageable. Once I got the puddle going I was kind of simultaneously feeding the rod without dipping as I pulled the torch toward me.

But as someone mentioned the tungsten being balled would not seem to focus the arc to the point I needed it. This was true even with a freshly ground tungsten. So I think my focus needs to be keeping the tungsten clean but in order to do that I need to overcome the initiation of the puddle issue I'm having at the far side. I also am having difficulty terminating the welds as I try to come over onto the **** welds.

Hope this makes sense
 

Attachments

  • IMG_20160918_172306060.jpg
    IMG_20160918_172306060.jpg
    138.1 KB · Views: 103
  • IMG_20160918_172313344.jpg
    IMG_20160918_172313344.jpg
    139.6 KB · Views: 103
  • IMG_20160918_174011788.jpg
    IMG_20160918_174011788.jpg
    142.7 KB · Views: 104
  • IMG_20160918_182518686_HDR.jpg
    IMG_20160918_182518686_HDR.jpg
    145.1 KB · Views: 96
  • IMG_20160918_182311632.jpg
    IMG_20160918_182311632.jpg
    146.9 KB · Views: 97
OP
6

600SL

Well-known member
Joined
Apr 26, 2012
Messages
1,794
Location
Connecticut
Get a BD or similar grinder, 30$ at Walmart and dedicate a wheel to it. If I am doing lotso I put a wire wheel on a 4 inch air, mostly for cleaning castings and when I want to be a speed demon, they are so aggressive that while it tends to wipe I doubt it embeds. But those little toothbrushes are usually good on good material.
My expertise is in steel, only do alum when I have to and really don't know anything about it.

That's what I'm thinking of. I heard I need to use 1 wheel for steel and one for AL.
 

Daveo

Well-known member
Joined
Nov 24, 2012
Messages
146
Be a lot cheaper if you stacked up some flat stock and practiced on:dunno:
 

ovrrdrive

Well-known member
Joined
Sep 13, 2015
Messages
642
Location
Central Florida
What welder are you using and what settings?

Btw, I've seen Jody ball a tip on purpose before welding aluminum. Pretty sure that's what you should be using. Have you watched any of his videos on youtube? weldingtipsandtricks?


It wouldn't hurt to post this on Weldingweb either. Lots of pros over there. http://weldingweb.com/forum.php
 

MoonRise

Well-known member
Joined
Nov 5, 2010
Messages
4,030
Location
NJ
Post all the info about who/what/where/why from the get-go to get better answers.

In other words, specify the aluminum alloy you are dealing with and the filler type and size you are using and the process and machine you are using.

Instead of 6+ posts into the thread.

You are working with 6061. Which should be weldable. (note: not all aluminum alloys are even weldable!). But what thickness?

You are using GTAW aka TIG. What machine? Using AC or DC? Because I really don't see a typical 'cleaning stripe' along side your attempted weld beads like you usually get when welding aluminum with AC. Until your third bunch of pictures, where I see some 'cleaning stripe' in a few pictures.

What filler and what size? What size and type electrode?

And then halfway through the thread you 'admit' to dipping the tungsten.

Dip the tungsten = stop, grind out the spot of the weld bead where you dipped, and also 'redo' the tungsten tip (break off the contaminated section and regrind the tip).

And your tungsten pic shows a large length of the tungsten all crudded up. No good.

Abrasive blasting? What media? Leaving microscopic bits of blast media in the soft aluminum is NOT going to make your welding attempts any easier or lead you towards 'good' welds either.

TIG on aluminum means you need the aluminum to be clean first. Clean of any and all grease or oil or what not. So, acetone (or other appropriate solvents) wipe down first. The you need to remove the (naturally occurring) oxide layer. A hand-powered dedicated to aluminum use ONLY stainless steel brush is the usual go-to there. Then another wipe/wash down with some more acetone/solvent. A spray can of 'new style' brake cleaner (the non-chlorinated kind, which is pretty much all I see available nowadays), which is pretty much acetone in a spray can, is my usual go-to there.

Your media blasting and then use of the Roloc disks probably left 'crud' in/on the aluminum.

And welding aluminum is typically hot-n-fast. Get that puddle started, dip the filler, and start moving on down the seam. Taper off on the pedal as the aluminum heats up.

And yes, often a GMAW aka MIG weld on aluminum starts out 'cold'. Hence often using a back-step when starting the weld, or start tabs, or a machine with a 'hot start' setting.

You have some practice to do. Cleaning, technique, etc.

Practice on some plain flat stock for a little bit.
 
OP
6

600SL

Well-known member
Joined
Apr 26, 2012
Messages
1,794
Location
Connecticut
What welder are you using and what settings?

Btw, I've seen Jody ball a tip on purpose before welding aluminum. Pretty sure that's what you should be using. Have you watched any of his videos on youtube? weldingtipsandtricks?


It wouldn't hurt to post this on Weldingweb either. Lots of pros over there. http://weldingweb.com/forum.php

Its an old Lincoln SW175

Amperage was set to 110

1/16" tungsten

1/16" wall tube

1/16 filler 4somthing
 
OP
6

600SL

Well-known member
Joined
Apr 26, 2012
Messages
1,794
Location
Connecticut
Post all the info about who/what/where/why from the get-go to get better answers.

In other words, specify the aluminum alloy you are dealing with and the filler type and size you are using and the process and machine you are using.

Instead of 6+ posts into the thread.

You are working with 6061. Which should be weldable. (note: not all aluminum alloys are even weldable!). But what thickness?

You are using GTAW aka TIG. What machine? Using AC or DC? Because I really don't see a typical 'cleaning stripe' along side your attempted weld beads like you usually get when welding aluminum with AC. Until your third bunch of pictures, where I see some 'cleaning stripe' in a few pictures.

What filler and what size? What size and type electrode?

And then halfway through the thread you 'admit' to dipping the tungsten.

Dip the tungsten = stop, grind out the spot of the weld bead where you dipped, and also 'redo' the tungsten tip (break off the contaminated section and regrind the tip).

And your tungsten pic shows a large length of the tungsten all crudded up. No good.

Abrasive blasting? What media? Leaving microscopic bits of blast media in the soft aluminum is NOT going to make your welding attempts any easier or lead you towards 'good' welds either.

TIG on aluminum means you need the aluminum to be clean first. Clean of any and all grease or oil or what not. So, acetone (or other appropriate solvents) wipe down first. The you need to remove the (naturally occurring) oxide layer. A hand-powered dedicated to aluminum use ONLY stainless steel brush is the usual go-to there. Then another wipe/wash down with some more acetone/solvent. A spray can of 'new style' brake cleaner (the non-chlorinated kind, which is pretty much all I see available nowadays), which is pretty much acetone in a spray can, is my usual go-to there.

Your media blasting and then use of the Roloc disks probably left 'crud' in/on the aluminum.

And welding aluminum is typically hot-n-fast. Get that puddle started, dip the filler, and start moving on down the seam. Taper off on the pedal as the aluminum heats up.

And yes, often a GMAW aka MIG weld on aluminum starts out 'cold'. Hence often using a back-step when starting the weld, or start tabs, or a machine with a 'hot start' setting.

You have some practice to do. Cleaning, technique, etc.

Practice on some plain flat stock for a little bit.


Machine is a Lincoln Square wave 175

Gas is Argon at 15 CFH tried 20 no difference

filler is 1/16" 4043

Material is 1" x 2" 0.063" wall 6061 T6 rectangular tubing

Tungsten is 1/16" green

Cup size is I believe 5

Settings AC TIG dialed in at 110 AMP

Sand blasting was performed with **** Blast ??? came with the machine. But I stopped the sand blasting and went with Roloc only for the second set. No difference.

Previous practice was on the bench with same cut offs from these, same types of welds. Those went reasonably well since the parts were only about 3" long and I could get at it from any where. Once they are on a large assembly that you have to work around the reality comes in.

Practice will definitely bring the quality of the weld in on the **** welds but starting the puddle on the fillet welds from the far side became an issue that I did not understand why it was so difficult and that is where 90% of the dipping the tungsten occurred.

On the other hand the back corner welds were also difficult and I had no problems with these on the practice pieces. It seamed like the reason for the difference between the practice piece and the whole structure was that I could clamp the practice pieces with the seam straight up in a vise and get the welds applied evenly to the seam as compared to essentially welding with the seam at a 45° angle. But I believe I should be able to weld at this angle.

Thanks
 
OP
6

600SL

Well-known member
Joined
Apr 26, 2012
Messages
1,794
Location
Connecticut
What welder are you using and what settings?

Btw, I've seen Jody ball a tip on purpose before welding aluminum. Pretty sure that's what you should be using. Have you watched any of his videos on youtube? weldingtipsandtricks?


It wouldn't hurt to post this on Weldingweb either. Lots of pros over there. http://weldingweb.com/forum.php

Square Wave 175

Yes balling a tip with AL is pretty standard. They will Ball by themselves.
 

alexb2000

Well-known member
Joined
Feb 7, 2010
Messages
664
Location
Fort Worth, TX
I believe your machine has a balance control? If you turn the knob to favor the Electrode Negative side you will get more penetration and less of the cleaning that appears in a lot of your welds. (Black lines about a 1/4" out from the welds)

For cleaning I use a three step process:

Wipe with acetone lint free paper towel (painters type you get in a box at HD)

Stainless brush to break oxidation, be thorough, really thorough. I use three passes from different angles.

Wipe again with a different towel. ANY marks on the towel mean you need to wipe again with a fresh towel.

When there is ANY doubt use a new cup.

I wipe the tungsten with acetone and then use Chemsharp. You will see **** burning off the tungsten.

Just some ideas.
 
Last edited:

Daveo

Well-known member
Joined
Nov 24, 2012
Messages
146
Another good suggestion would be to get comfy! Blocks of wood to prop your arms up if necessary... Do a dry run of moving your arms around the work. The main thing is, get in a comfy position!... Less dipping!
 
OP
6

600SL

Well-known member
Joined
Apr 26, 2012
Messages
1,794
Location
Connecticut
Use a much bigger tungsten. Like, 1/8".

1/8" I was actually thinking about that.

Miller welding sight recommended 1/16 pure tungsten with 60 to 75 amps. In reality I had to boost the current up to ~ 110-115 to get it started. The 1/16 tungsten can only handle 80 amps so I was pushing it and some times it came out bent like it was starting to melt.

I actually found the tungsten I was using was too small for the current I was running at least when starting out. I believe when I get better at this the current will come down and these smaller tungsten's will work. but I did some research and found Zirconium tungsten will carry ~ 120 Amps in 1/16" size and is highly recommended for AC AL and Magnesium only. I ordered these in 1/16" and 3/32"

I even hear Thoriated for thin stuff and the Lincoln web sight recommends sharpened Thoriated if you have an inverter, which I don't.

Needless to say I will be playing with Tungstens
 
OP
6

600SL

Well-known member
Joined
Apr 26, 2012
Messages
1,794
Location
Connecticut
I believe your machine has a balance control? If you turn the knob to favor the Electrode Negative side you will get more penetration and less of the cleaning that appears in a lot of your welds. (Black lines about a 1/4" out from the welds)

For cleaning I use a three step process:

Wipe with acetone lint free paper towel (painters type you get in a box at HD)

Stainless brush to break oxidation, be thorough, really thorough. I use three passes from different angles.

Wipe again with a different towel. ANY marks on the towel mean you need to wipe again with a fresh towel.

When there is ANY doubt use a new cup.

I wipe the tungsten with acetone and then use Chemsharp. You will see **** burning off the tungsten.

Just some ideas.

The square wave 175 has auto balance. Some way the machine knows how dirty your weld is and adjusts the balance for it.

I believe I did pretty good with wiping with the acetone I even wiped the welding rods, but I never wiped the tungsten. One question I have is when I cut the tungsten should I cut back about 3/4" or just cut the ball off. It gets pretty ugly behind the ball as well so I will try not to be so cheep and cut them down further.

I think I can definitely use a new cup. I have some coming in.

Thanks
 
Last edited:

tractordude

Well-known member
Joined
Nov 16, 2009
Messages
2,226
Location
WI
One question I have is when I cut the tungsten should I cut back about 3/4" or just cut the ball off. It gets pretty ugly behind the ball as well so I will try not to be so cheep and cut them down further.
Thanks

Dress your tungsten on a belt sander.
 
OP
6

600SL

Well-known member
Joined
Apr 26, 2012
Messages
1,794
Location
Connecticut
Another good suggestion would be to get comfy! Blocks of wood to prop your arms up if necessary... Do a dry run of moving your arms around the work. The main thing is, get in a comfy position!... Less dipping!

Well actually I think you hit it right on the nose. I did some practice welds on the same material on the bench and that is a lot easier. But with this 5' x 3' shelf I found myself free hand in the air for most of it. Sometimes I was able to move my drill press into position and rest my arm on the table which can be adjusted to any height. But some of this I just have to learn to do free hand. I always do a dry run pretty much for every weld.

Thanks
 
To avoid these ads, REGISTER NOW!
Top Bottom