To avoid these ads, REGISTER NOW!

Maddog's 8' x 16' Workshop

Maddog10

Well-known member
Joined
Nov 16, 2016
Messages
151
Location
Paducah, Kentucky
Hey guys. First post on the board. I've been lurking for a month or so since started my new fall project, but just now decided to join because I'm sure I'll have some questions on how to best implement a few of the ideas I have in my head for this building.

In the meantime, I thought I'd show some progress of where I'm at. To provide a little backstory, there is an 8'x16' storage building behind the house I bought a year or so ago, and up until now it has been nothing more than junk storage. I've decided to change that. The end goal is a functional workshop/man cave area.

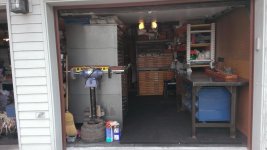
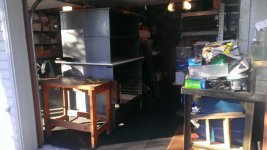
These are the best pictures of where I started from, which aren't great.

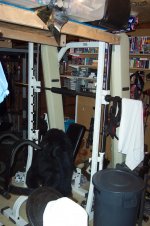
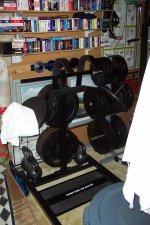
Junk still in there:
Building%201_zpscdneawfp.png


Mostly cleaned out:
Building%203_zpsb1wohllx.png


Next step was electricity, which meant I needed a trench. Elected not to rent a trencher so I dug it by hand, which wasn't alot of fun. About 80' long.

778FE0B5-C26A-4F26-8915-AEBC6A99FD02_zpslstmjvdp.jpg


Line entering shed on left is electric, right is ethernet.

DSC_0140_zpsoqi23dtc.jpg


I regrettably didn't take any pictures of the wiring process before insulating, but it is two circuits. Lights and AC are on one circuit which is controlled by switches, and the outlets are on a separate circuit. Once complete, on to insulation.

DSC_0142_zps3rss7lsp.jpg


DSC_0149_zpsj5i6dowq.jpg


DSC_0150_zpsa7mdrffz.jpg


Junction box and ethernet entering the building.

DSC_0151_zpsn489dymq.jpg


Night photo with lights on.

DSC_0153_zpsqyvuyar8.jpg


Installed reflectix insulation on the rafters.

DSC_0163_zps6bbb05e9.jpg


After insulation was complete, I hung 19/32" OSB paneling for the walls. In these photos they have been primed with Kilz primer and are ready for paint. As you can see, doors haven't been insulated or paneled at this point but they are completed now with indoor handles installed.

DSC_1123_zpsnns62uqr.jpg


DSC_1124_zpsy40qzlwf.jpg


DSC_1125_zpsytqkfjmj.jpg


DSC_1130_zpsdbrkuzj8.jpg


Front wall is not screwed down yet, but you can see switches as well as junction box and ethernet.

DSC_1126_zpsj8sxc35u.jpg


I haven't taken any more dedicated pictures since that point, but here is a crappy cell phone picture of it's current state. The floor has been sanded and stained, the upper portion of the wall has been painted white, and the lower portion has a sloppy black coat of paint on it. I am covering the bottom 38" in some old panel wood that I had laying around, so the black is just to provide a dark background and prevent any gaps in the wood from being as noticeable.

B26A7BC1-D660-4F80-ABD1-281104F98E37_zpsgst6r9ip.jpg


The general layout of what I have in mind is this, although I may only make the workbench 24" deep as opposed to 30", and the computer desk will likely be wall mounted all the way up against the front wall instead of the gap shown here. I'm trying to maximize this space so that I can later add additional fold-out workbenches, cabinets, and other useful things.

Storage%20Shed_zpsvt1dnwdj.png


Anyways, that's where I stand at the moment. Glad to be a part of this forum. Look forward to talking with you guys.
 
Last edited:
To avoid these ads, REGISTER NOW!

shelteredV

Well-known member
Joined
Sep 3, 2015
Messages
532
Location
The Rock
Re: Storage Shed Restoration

Great start. Your lacking windows so I assume you either don't have much to look out at, or you'd rather not let anyone see in, or both?
 

bczygan

Well-known member
Joined
Nov 4, 2009
Messages
22,002
Location
DETROIT! Arsenal of Scrappers
Re: Storage Shed Restoration

Welcome to GJ.

Please put your location in your profile.

What is your plan for machines and their layout?

What kind of work will you do in there?

Bill
 
OP
M

Maddog10

Well-known member
Joined
Nov 16, 2016
Messages
151
Location
Paducah, Kentucky
Re: Storage Shed Restoration

Great start. Your lacking windows so I assume you either don't have much to look out at, or you'd rather not let anyone see in, or both?

Actually neither, although there isn't much to look at. I guess I just never really considered adding additional windows. The building stayed when I bought the house, and I just started fixing it up as is. Didn't consider making any real structural changes. The one window faces west so it gets a lot of afternoon sunlight, but I wouldn't mind some windows on the north wall.

Welcome to GJ.

Please put your location in your profile.

What is your plan for machines and their layout?

What kind of work will you do in there?

Bill

Location is taken care of. Apologies. I assume state is sufficient?

Initial layout is as shown above. Computer desk in front-right corner with wall mounted TV that will swivel above the desk, and primary work bench in the back-left corner. Those are the current priorities. Once they are completed, I have a couple options I'm undecided on, most of which deal with the back-right corner. One is a permanent workbench that wraps around the corner that would have my vice and grinding wheel. Other option is a fold down table that runs perpendicular to the workbench and would serve as an additional workspace when necessary. I'll see if I can sketch something up to better illustrate my considerations.

Work will be basic woodworking and tinkering. I'm a mechanical engineer and just enjoy piddling around with my ideas. Won't be anything major going on in there just because of the limited space and inability to put larger tools. I live about 150 yards from my dad who has a large shop with the more serious tools. This building is more about having a place I can be proud of, while also allowing me to better organize my tools and tinker with my various ideas.

Thanks for the welcome, fellas. :beer:
 
OP
M

Maddog10

Well-known member
Joined
Nov 16, 2016
Messages
151
Location
Paducah, Kentucky
Re: Storage Shed Restoration

Here are the options I'm considering.

Capture_zpswohoodb7.png


Option 1- This option has a permanent bench along the wall with a secondary fold out workbench and a third on casters that can be moved around. Probably leaning toward this option just for flexibility and space savings.

Option 2- This option maximizes working space, but is 100% fixed. I have my concerns that portions of the workbench will end up being covered up in junk instead of being used as intended.
 

drivesitfar

Well-known member
Joined
Oct 23, 2013
Messages
35,997
Location
Pacific Northwest
Re: Storage Shed Restoration

MD: welcome to the forum. nice job so far digging the trench, putting in electrical, insulation, and the painting and wood trim.

to really help you i (we) would need to know more about what you plan for the space, but i'll assume it's going to be a quiet place for you to hang out maybe get on computer or watch a game or some sporting event and maybe do some general DIY type home projects. ok?

my portion of our home's garage is maybe close to the same size at 9x15 and I've had a car in it, full almost commercial grade gym and now i'm trying to GET MY STUFF ORGANIZED so i have 3 benches, 2 good size racks, more than a few metal cabinets. i'll post a picture or two to show how you can really pack in a space that size if you want an idea. i had to move the big flat files 3 inches to get this wood bench in my shop so the bench got more stuff than usual on it. it's clean today, but not sure how long that will last and i can only hope to keep it that way. the other wood bench isn't clear, but maybe after showing a picture of it i'll get up after this post and start cleaning it.

i also have FSD (Flat surface disease) where if there is a flat space open it won't be for long whether it be a bench or shelf and i need to cure that so i completely understand your comment about all the bench space. mostly my issues are things get set on a bench or shelf because i don't have a good spot to store them and don't want to shove them in a box.

here's my suggestion. move the computer back in there by the AC and maybe build an L shaped bench so you can do some projects back there too if you want to. i'd add a couple more light fixtures and maybe have 2 switches.

i'd put a workbench where you have the computer so if you need to do a quick grinding or DIY homeowner type job you have good access. i'd get some carts that can be used as a bench sort of or rolled under the shelving when not in use. i'd almost cut a hole in the front above the door so i could put long lumber, pipes, and DIY stuff up on the trusses or might be just as easy to build a little lien too alongside the shed for that kind of stuff if you don't have it in the house's garage.

if you have some time you might check out the guy's threads on the forum that live in Europe cause they have very small garages and they get a lot in there and a lot accomplished in them.

good luck
 

Attachments

  • WP_20160809_013.jpg
    WP_20160809_013.jpg
    143.9 KB · Views: 189
  • Nautilus hip sled power rack and smith.jpg
    Nautilus hip sled power rack and smith.jpg
    140.3 KB · Views: 183
  • Nautilus Smith with gorilla on bench.jpg
    Nautilus Smith with gorilla on bench.jpg
    143.3 KB · Views: 172
  • Zane Blaster.jpg
    Zane Blaster.jpg
    147.3 KB · Views: 180
  • weight plates.jpg
    weight plates.jpg
    145 KB · Views: 182
  • WP_20161108_006.jpg
    WP_20161108_006.jpg
    145.8 KB · Views: 174
  • WP_20161108_005.jpg
    WP_20161108_005.jpg
    140.9 KB · Views: 164
OP
M

Maddog10

Well-known member
Joined
Nov 16, 2016
Messages
151
Location
Paducah, Kentucky
Re: Storage Shed Restoration

Drive, I appreciate the feedback and pictures. Always good to see how other people have utilized small spaces because while it's not ideal, if you plan for practical and efficient use then it's possible to make a lot out of a little. Would love to see pictures from anyone else that has a mini-shop.

You pretty much nailed the use of this building. As I said before, serious work will take place at my father's house which is just a short walk away, but right now I have no good means of storing my tools or getting simple projects done so I'm tired of having to dig to find tools or take my stuff to his house just to use the workbench. I'm young (25) and don't have a lot of the major tools yet, but I have the primary homeowner stuff along with saws, grinders, etc and just want somewhere to build stuff. Along with that, I live in a small house with my wife and 1.5 year old daughter, so as you can imagine sometimes she wants to watch Barney while the big game is on. This building will doubly serve as a place me and a couple buddies can go to drink a beer and watch the game, just as you mentioned. That is another reason I want to prevent it from becoming excessively cluttered.

I have a few reasons for having it laid out as I do, but I'm always open to suggestions. I wanted to create as much distance between the primary workbench and the computer desk as possible in order to best protect my electronics (computer & tv) from sawdust, pieces of lumber being moved around, or just incidental bumping. Along with that, I put the computer desk towards the front of the building to create distance from the AC unit so that the television volume isn't battling with the sound of the AC unit. It's a new unit and is quiet, but of course it isn't silent. 16 feet of separation isn't going to make a huge difference in a room with wooden walls, but it should be better than 3 feet of separation.

This building sits right next to a another 8'x10' storage building where we keep our lawn equipment and store various things. There is about a 3' gap between the two buildings, so I think what I am going to do is build walls and a roof around that space and use it for lumber storage. I could easily build a simple lean-to in order to make it dry-storage, and it would be a great place to store lumber without having to use space inside the building.
 

drivesitfar

Well-known member
Joined
Oct 23, 2013
Messages
35,997
Location
Pacific Northwest
Re: Storage Shed Restoration

MD: i still think you should put your computer in the corner by the AC or maybe better idea is to pull out the AC and make a window up near the front of the shed that will give you more light too. not sure which side is open to the yard and which side is next to the other shed, but i'd put the window on the yard side.

i'm saying this because if you work on anything going in and out by your TV and computer you'll eventually hit it or just create a lot of dust where you might be able to control it better in the back. also with an L shaped bench you might put a small sofa against that wall that would have been the U side of the bench in the drawing in case you want to have a few buddies out there or catch a nap. maybe extend the bench from the back all the way to the front and have one side for chairs, sofa and stuff? you might get some ideas off of this thread or feel free to add a few of your own.

http://www.garagejournal.com/forum/showthread.php?t=335623&highlight=organizing+201

i'd suggest maximizing storage in the one shed and have your fun stuff and maybe a work bench for a quick project that you didn't want to run over to dad's to do.

good luck and keep thinking. also keep asking questions cause there are a lot of helpful and smart guys here to help if they see your questions.
 
OP
M

Maddog10

Well-known member
Joined
Nov 16, 2016
Messages
151
Location
Paducah, Kentucky
Re: Storage Shed Restoration

Drive, I think you bring up some great points. I used a different line of thinking when designing the layout but in hindsight you bring up some points I should have considered.

Adding windows is not something that I think is likely for a few different reasons. Cost aside, the electric was run through the studs at essentially the same height as the outlets you see on the walls, so adding a window would require me to re-route some of the electrical. Also, everything was sort of designed around the layout I had in my mind. You can see the low outlet where the computer desk is theoretically going to be, the Ethernet coming out right there at the desk, and the distance between there and the A/C unit. In theory, I figured when working at the bench I would be doing more labor-intensive things, and would want to be where the A/C is blowing right on me. However, if the computer desk is at the back then the AC will be right at head height, which I don't think would make for a pleasant working environment from a sound or temperature perspective.

I don't mean to disagree with your ideas because I think they are 100% valid, and there were probably some design flaws on my end despite having a justification for designing it this way. Without relocating the AC though, I think I've somewhat committed to this layout based on the way I routed my outlets and other things. I think you are absolutely right though that from a dust management perspective it makes sense not to constantly be walking past the computer and television, as well as better protects them from incidental damage. The idea originated as using the shop for more a studio/work purpose, where I would mostly use the computer for video editing and work purposes but have the workbench when I needed it, and thus is the reason why it was designed with priority around the computer desk. However, as my plans have developed I think it will become more of a 50/50 blend.

I don't intend for it to be a heavy dust environment honestly. All cutting with my table or circular saw will take place outside the building. I could potentially see myself using the miter saw inside if working on small pieces and definitely some use of the grinding wheel, but major cuts will be outdoors. I will be walking in and out a lot though so dust will get pushed around. Again, I don't mean to dismiss your ideas whatsoever. I think they are 100% valid. I just wish I had joined a month ago before I laid everything out the way I did.
 

drivesitfar

Well-known member
Joined
Oct 23, 2013
Messages
35,997
Location
Pacific Northwest
Re: Storage Shed Restoration

MD: work with it and if you don't like it in a few months or year it wouldn't be that hard to change then as opposed to where you are at now.

no worries on not agreeing with me and in the end it's your space so you get the call. sounds like you are thinking and that is a good thing so keep it up and keep moving forward.

best of luck and keep taking pictures and asking questions.

i just put few links in the Organizing 201 thread i gave you the link for and there are some great vise and grinder stands in the thread i started for those a couple years ago so check it out. you can make mounts for them so you can have a nice clean bench top and store the vise and grinder under it if you like that better.
 

GLTHFJ60

Well-known member
Joined
Oct 31, 2013
Messages
821
Location
Durham, NC
Re: Storage Shed Restoration

As for the workbench layouts, I say go fixed. Depends on the type of person you are if they'll get filled with junk. I'm learning that I'm a FSD kind of guy and just leave stuff around on my horizontal surfaces, so I'm actually thinking of eliminating one of my workbenches and converting that stuff to hanging shelving.

Speaking of shelving, what about shelving attached to the wall, hanging down from the ceiling? You might be able to run with option #1 for workbenches if you have shelving, but personally, I'd go with #2.

For windows, what about some short casement windows that would be above the outlets? That'd give you more light on the sides where you won't have shelves
 

Squashfest81

Well-known member
Joined
Jan 14, 2012
Messages
1,475
Location
MA
Re: Storage Shed Restoration

Just started a similar sized shop thread. Even have the next door, well across the yard, smaller storage shed.
Care to go into more detail on the wiring as I need to do the same. Size? 2 circuits?
I so want to get mine insulated. Next spring. Got to get mine re-leveled before the snow.
Your interior choices look great. Oddly enough, I'm thinking pallet boards for my interior, cheap.
Unless your projects are complicated and must be set up over many surfaces, I suggest less bench top. Force yourself to work a project on a bench and store it away on a shelf or in a box. I struggle with flat surfaces.
Oh, a high shelf ringing the space. This adds tons of above head storage and a place for objects of inspiration.
Bowling trophy or the like.
Great start, I'm watching.
 

sublime68charger

Well-known member
Joined
Sep 9, 2014
Messages
5,415
Location
SW Wisconsin
Re: Storage Shed Restoration

this looks nice.

Id go with option 2 on the layout design but either will work good.

put your bench together with screws that way if you want to change it comes apart fairly easy.
 

bczygan

Well-known member
Joined
Nov 4, 2009
Messages
22,002
Location
DETROIT! Arsenal of Scrappers
Re: Storage Shed Restoration

Something I like to do to a simple structure like this, is open it up as much as possible. Being in KY, you have a good portion of the year where weather is good.

At the same time, I like to minimize horizontal surfaces.

I would actually only have a window on one wall. It would also be the wall with a wall to wall workbench with tool storage cabinets above and below the window.

The other three walls would be almost wall to wall french doors that swing out and will swing flat against the outside wall. The headers for these walls would be LVL's.

The French doors would open out to paved areas with shed roofs covering them.

This could quadruple the usable space during good weather days. And the covered areas would be good for semi-protected storage.

Also opening the space to outdoor activities like BBQ, would make it better for entertaining.

I would also install operable skylights.

All tools on rolling bases and a work table also mobile.

Bill
 
Last edited:
OP
M

Maddog10

Well-known member
Joined
Nov 16, 2016
Messages
151
Location
Paducah, Kentucky
Re: Storage Shed Restoration

As for the workbench layouts, I say go fixed. Depends on the type of person you are if they'll get filled with junk. I'm learning that I'm a FSD kind of guy and just leave stuff around on my horizontal surfaces, so I'm actually thinking of eliminating one of my workbenches and converting that stuff to hanging shelving.

Speaking of shelving, what about shelving attached to the wall, hanging down from the ceiling? You might be able to run with option #1 for workbenches if you have shelving, but personally, I'd go with #2.

I'm afraid that option 2 provides so much flat surface that it will end up cluttered. Plus I think I like the ability of option 1 to open the floorspace up if I want by folding the bench out of the way. All benches will likely be built to the same height, so I could also move the mobile bench to the end of the fixed bench if I needed more linear feet, or could push it up against the fixed bench if I needed more depth. I think there is a lot more versatility in #1, just less bench space. I think #2 is excessive for my needs, and I may rather have the wall space down the road for cabinetry or something of that nature.

Shelving will certainly have it's place somewhere. I'm just not sure how I want it set up yet.

Just started a similar sized shop thread. Even have the next door, well across the yard, smaller storage shed.
Care to go into more detail on the wiring as I need to do the same. Size? 2 circuits?
I so want to get mine insulated. Next spring. Got to get mine re-leveled before the snow.
Your interior choices look great. Oddly enough, I'm thinking pallet boards for my interior, cheap.
Unless your projects are complicated and must be set up over many surfaces, I suggest less bench top. Force yourself to work a project on a bench and store it away on a shelf or in a box. I struggle with flat surfaces.
Oh, a high shelf ringing the space. This adds tons of above head storage and a place for objects of inspiration.
Bowling trophy or the like.
Great start, I'm watching.

For wiring I ran two 10 gauge wires off of the panel in my attached garage through 1.5" conduit. Initial plans were to have a very small subpanel, but my brother-in-law is an electrician and said for something like this he would just run the circuits direct, so they feed into the junction box shown in the pictures. From there they each tie into 12-2 romex. One circuit feeds the switches inside the door, the overhead outlet where my shop lights are plugged in, and the low outlet below the window. Switch #1 controls the overhead outlet (lights), switch #2 controls window outlet (AC). I could have forgone the switches and just operated the lights by their pullcord and the AC on the unit, but I knew there would be times I forgot to turn something off. This way as I leave I just flip the switches and it kills everything, plus no fumbling for the pull cords on the lights in the dark. The second circuit feeds all of the outlets on the side walls, which are always hot. If you foresee yourself using a lot of equipment that has a heavy draw such as a welder or something, I would certainly advise running a heavier service to a subpanel. For my uses though, I have had no issues thus far and don't foresee any. I've ran two air compressors at the same time (20 gallon and 6 gallon), ran a table saw, circular saw, etc and never tripped a breaker. That's about as demanding as my shop will get.

Back to layouts, one consideration I had and am still toying with is building my workbench along the entire back wall instead of the side. I believe this is what bczygan was referring to. Because of the peak of the roof, this would allow for more overhead storage room. I'm just not sure how much the AC unit would be in the way while working. I kind of lose the ability to have pegboard or something of that nature directly over the center of the bench if I go with that layout.
 

Squashfest81

Well-known member
Joined
Jan 14, 2012
Messages
1,475
Location
MA
Re: Storage Shed Restoration

Just the kind of electric specifics I was looking for!
As to layout. It all comes down to use. For me, corners are always a problem, so corners are for storage, not tools. A corner bench or desk could work in your instance. I'd be lining the two long walls with tools and benches. You mentioned a table saw. Keep it mobile. My Shopsmith (table saw) will go beside the door where it can be rolled in front of the door when out feed space is needed.
 
To avoid these ads, REGISTER NOW!

drivesitfar

Well-known member
Joined
Oct 23, 2013
Messages
35,997
Location
Pacific Northwest
Re: Storage Shed Restoration

MD: look at it this way. it sounds like you have 2 of these outbuildings/sheds so if you don't end up liking this final design you are putting together you will know how to remodel the other one and maybe turn this one into a storage. we don't always (or maybe ever) get it right on the first try so keep pushing forward with your plan and see how you like it.

any pictures of the outside and maybe of both the sheds in the pictures too?

good luck
 
OP
M

Maddog10

Well-known member
Joined
Nov 16, 2016
Messages
151
Location
Paducah, Kentucky
Re: Storage Shed Restoration

More progress has been made. After my last update, I began sanding the floor in preparation for stain. I first went over it with some 80 grit followed by another sanding with 120 grit. Then applied two coats of Cabot Gold Sunlit Walnut. It went on a little darker than I'd hoped, but overall I'm pretty pleased with it. Then I began researching paint ideas that I'd like to use on the walls. Originally the plan was to paint the bottom 3' in a darker color to hide scuff marks, followed by a black line, and then white or a light color around the top for light reflection. However, I ran across some old pallets I had laying around so I decided to put those to good use. I put down a rough coat of black paint along the bottom 36" to provide a dark background for hiding gaps in the pallet wood, then set the topline of the pallets at 38" would eventually be the height of my workbench top.

DSC_1237_zps6uwnefqa.jpg


DSC_1239_zps63joxm16.jpg


In the midst of doing that, I decided to go ahead and start building the computer desk since it was going to be wall-mounted and I wanted the supports screwed directly into the wall instead of having a layer of pallet wood in between. The supports are made from 1x4 pine, and the desktop is cut from a door that I picked up at a local junk sale. As you can see from the pictures, I need some veneer strips to go around the edges, but overall I'm very pleased with how it turned out.

DSC_1246_zpsxeuzhbf3.jpg


DSC_1256_zpss5j3x7wf.jpg


In this image you can see where I made a small folding door to allow access to my junction box, as well as the ethernet cable coming through. You can also see the black paint where I haven't completely finished the pallet work.

DSC_1247_zpsrgan2rd9.jpg


Then I needed a workbench, so I started considering different design options for that. I wanted something unique and practical, so I played with designing a few options before settling on this one. The frame is to be made out of 2x4's, and the top/shelf is to be made of two layers of 3/4" MDF for a total thickness of 1.5", which is going to be more than sturdy enough.

Option%201_zps4hnchco9.png


WB%20Frame%20Front_zpssakzujgz.png


WB%20Frame_zpsblqzqwef.png


WB_zpsxl5qon2k.png


WB%20Front_zpst1mebgpx.png


WB%20Bottom_zpsrwmcfzlx.png


Then, time to turn the design into reality.

DSC_1203_zpsc7tlplff.jpg


DSC_1205_zpsoanffrex.jpg


Here are a few shots of it inside the shop. The end result of the table will be 75" long, 27" wide, and 38" tall. The main workspace will be the MDF I mentioned earlier cut to 72" x 23", and then 1.5" trim around the perimeter.

DSC_1252_zpsgqlogea3.jpg


DSC_1253_zpstto4wlj8.jpg


And a look back towards the front of the building with the unfinished wall and tv mounted on a swivel mount.

DSC_1250_zps6vglhubr.jpg


DSC_1254_zpsg3xnez2q.jpg


Now just have to finish up the walls, put a top on the workbench, and then time to start moving stuff in. Can't wait! :rocker:
 

drivesitfar

Well-known member
Joined
Oct 23, 2013
Messages
35,997
Location
Pacific Northwest
Re: Storage Shed Restoration

MD: it looks pretty good and you are making a lot of progress. i might knock off the corners on your door/desk especially the one next to the door that opens. if you think you'll never hit it with a hip or have a 5 year old catch it in their forehead or eye then leave it, but my guess is you won't miss that little space on your desk top.
 
OP
M

Maddog10

Well-known member
Joined
Nov 16, 2016
Messages
151
Location
Paducah, Kentucky
Re: Storage Shed Restoration

MD: it looks pretty good and you are making a lot of progress. i might knock off the corners on your door/desk especially the one next to the door that opens. if you think you'll never hit it with a hip or have a 5 year old catch it in their forehead or eye then leave it, but my guess is you won't miss that little space on your desk top.

Good point, and I am already contemplating moving it to the back corner as we discussed earlier in the thread, but I'm going to work with it this way for a while to see how it goes. Either way I'm going to have a corner sticking out into the entry door whether it be the computer desk or workbench. One of the many downfalls of having a tiny space.
 

drivesitfar

Well-known member
Joined
Oct 23, 2013
Messages
35,997
Location
Pacific Northwest
Re: Storage Shed Restoration

MD: you can still knock off a few inches of the corner so it's not a point hitting you or somebody else as they walk in. i don't have a picture handy as an example to show you what i mean. i'd probably take 4 inches in on each side and cut about a 45 degree angle at least on the door side. your call for sure.
 

theoldwizard1

Well-known member
Joined
Feb 22, 2011
Messages
43,077
Location
SE MI
Re: Maddog's Storage Shed Renovation

Line entering shed on left is electric, right is ethernet.

DSC_0140_zpsoqi23dtc.jpg

First, fantastic job !

Second, if those are NOT Schedule 80 conduits, you need some kind of shield to prevent your string trimmer from breaking them.
 

-Brent-

Well-known member
Joined
Dec 23, 2009
Messages
4,709
Location
Utah
Re: Storage Shed Restoration

I really like that floor. How is it holding up under foot traffic now that it's done?
 

jd_1138

Well-known member
Joined
May 8, 2013
Messages
17,028
Location
NE Ohio
Re: Storage Shed Restoration

Wow awesome mancave/shed. That's nicer than some people's houses. :)
 
OP
M

Maddog10

Well-known member
Joined
Nov 16, 2016
Messages
151
Location
Paducah, Kentucky
Re: Storage Shed Restoration

Thanks for the compliments, fellas. I envy the space most of you guys have, but I'm pretty proud of how it's turned out thus far. I've stepped out of my comfort zone by tackling a few things that I have very little experience with, and mistakes aside I think it's come out nicely. Not to mention I've learned a few things along the way.

I really like that floor. How is it holding up under foot traffic now that it's done?

It's holding up pretty well considering the beating it has already taken. It has a bit of a glossy finish when new, and if something heavy scoots across the floor or if it is hit hard it will leave a scuff mark on that glossy coat, but aside from that I've been pleased with it. Kind of pricey, but so far I have no regrets with it. Cleans very easily.
 

tedo2007

Well-known member
Joined
May 19, 2014
Messages
104
Re: Maddog's Storage Shed Renovation

Looks great!


Sent from my iPhone using Tapatalk
 
OP
M

Maddog10

Well-known member
Joined
Nov 16, 2016
Messages
151
Location
Paducah, Kentucky
Re: Maddog's Storage Shed Renovation

First, fantastic job !

Second, if those are NOT Schedule 80 conduits, you need some kind of shield to prevent your string trimmer from breaking them.

Good catch. They are schedule 40 conduits. I had not considered that, but will look into making a shielding for them. Thanks for pointing that out. :beer:
 
OP
M

Maddog10

Well-known member
Joined
Nov 16, 2016
Messages
151
Location
Paducah, Kentucky
Little more progress since last time. Hope you enjoy the update.

I'll lead off with a sort of overview of the outside. The shed on the left has no power whatsoever, and is used for storage of lawn equipment as well as other various things. The right shed is the one I have been insulating, and then the deck on the far right was built for a dog kennel, but after my dog passed we turned it into a fire pit area for when we have company. Picking up another dog on Friday, so the kennel (seen between the buildings) will probably be going back up come spring-time. Also have plans to add a roof over the gap between the sheds along with a door and some type of basic lumber storage system for sheet lumber and long boards.

DSC_1487_zps1cjzmkru.jpg


DSC_1489_zpskfweuyej.jpg


Fire pit deck needs a little weed-control.

DSC_1491_zpsbqn9jvmp.jpg


DSC_1493_zpsxpk1juju.jpg


Because of receiving a significant amount of rain over the last week, I ended up cleaning copious amount of mud out of the shed that had been tracked in through my trips in and out. Needless to say, I got tired of doing that, so I decided today to build a makeshift porch out of a pallet I had laying around. Really no building required other that cutting a couple 4 by's to size and screwing them to the bottom, along with a little digging for leveling. It's not perfect, but it'll do until I decide to upgrade.

DSC_1490_zpsmffqiq5v.jpg


Now to the inside...

DSC_1495_zpsjxputhhl.jpg


DSC_1497_zpstoskxms3.jpg


DSC_1498_zpsjli6oj4d.jpg


Added a rotating extension cord reel that comes in handy when projects branch outside the shop.

DSC_1505_zpskzszylup.jpg


DSC_1506_zps9pta6cef.jpg


A little wall decoration just because I liked it .

DSC_1500_zpso8gonb9f.jpg


As you may have noticed, the workbench has been cleaned up some since the last update. Pine trim was cut for the edges of my MDF benchtop, and three layers of semi-clear polyurethane was added to seal the surface from spills as well as add a little durability. Pleased with how the semi-gloss turned out. I was concerned about glare with a full gloss, so this gave the look I was going for without giving off any glare off the overhead lights.

DSC_1507_zpsehlfmmvf.jpg


A look to try to display the "shine without glare" look that I was trying to achieve. Before long it will be beat to hell so might as well show it off now.

DSC_1508_zpslxeninkm.jpg


Undoubtedly the biggest (and least productive) modification to the shed was the addition of a mini-fridge.

DSC_1509_zpsuwkgogkr.jpg


DSC_1510_zpsbd0pwvlt.jpg


Picked up a really nice metal bookshelf from work. Employer is having new carpet put in one of the office buildings. During the clean-out phase, we realized how much junk was laying around and underwent a massive purging, which resulting in some empty bookshelves that were no longer needed. Now one is mine.

DSC_1511_zpsjgds8vov.jpg


Shot of stuff on lower shelf of workbench. It needs a couple more coats of poly, but I'll get to that when I feel like it.

DSC_1512_zpsinaodhfs.jpg


DSC_1520_zpsrxjxklgz.jpg


My best friend during these winter months. With the small space and insulation, this little guy can take my shed from 40 degrees to 60 degrees in about 30 minutes, and 70 degree in about an hour. Had it 65 in there on a 20 degree night last week. Love it.

DSC_1513_zpsshxebrp8.jpg


DSC_1526_zps6wbhtamj.jpg


Sweet new tool bag I got as a Christmas gift from the in-laws.

DSC_1522_zpsdglujrx6.jpg


My favorite addition to the shed is a new Milwaukee M18 Brushless Drill/Impact kit. These tools are SWEET! Not pictured is two more M18 XC (3.0 Ah) batteries that came "free" with the brushless combo kit.

DSC_1514_zpsbdlgane9.jpg


DSC_1515_zpsnyzwqumw.jpg


DSC_1516_zpshbsff2xe.jpg


A look back towards the front of the shed. Still haven't finished the front wall. Considering its solely aesthetic, it has taken a backseat to some more important productivity projects. I'll finish it eventually.

DSC_1519_zpsbgylaa0u.jpg


Also borrowed a shop dog from my brother in law, who is currently out of town. He's a mutt of some sort (lab/golden retriever, I think) but he's a pleasant pup to be around. Never complains about any of my work... Next update should include the new addition to my family, which will be a well pedigreed yellow lab that will hopefully pick up all my ducks for me.

2F35BC5A-E93E-4FB1-8C5C-F56D8A74AB31_zpsyaqr8dam.jpg


Last but not least, need to give a shout-out to my dad for letting me borrow his mule numerous times during this restoration. It's an awesome machine that I'm fortunate to be able to use all the time. Takes care of everything from hauling tons of stuff to just playing music through it's sweet stereo.

DSC_1523_zpsauezanlr.jpg


Six-seater/short bed setup:

DSC_1524_zpsqu5gyh8v.jpg


Three-seater/long bed setup:

DSC_1525_zpsfgkfmhip.jpg


That's it for now. Moving forward I have some projects lined up to help with storage and productivity. I picked up supplies today to build a station for my cordless power tools (shown next to window). Also have plans to build a sliding pegboard cabinet over the workbench, a pegboard or drawer system (shown to right of bench), and a folding table (shown in up/down position). Here is a to-scale drawing of the shop that shows the current layout with the addition of my future plans.

Iso%201_zpsbkmvvssa.png


Iso%202_zpscaa5wtz9.png


Iso_zpsweujm0vv.png


That's all, folks. Would love to hear your thoughts/input. Happy New Year!
 

CoyoteDuster

Well-known member
Joined
Dec 21, 2016
Messages
49
Location
USA
You could swap out the double doors for a single with a window. that would be the easiest way to get more light and a view out, but would alse add security risk if that's a concern.

Its nice to see how people handle the challenges of a small space.
 
OP
M

Maddog10

Well-known member
Joined
Nov 16, 2016
Messages
151
Location
Paducah, Kentucky
You could swap out the double doors for a single with a window. that would be the easiest way to get more light and a view out, but would alse add security risk if that's a concern.

Its nice to see how people handle the challenges of a small space.

Security risk isn't a major concern, but I kind of like having the double doors for getting large items in and out. Makes it easier to pack in things like my table saw, shop vac, etc. I pretty much use it as a single door 95% of the time. You can see where the right side latches into the floor via a floor bolt. That allows me to use the left door only for my typical entry/exit.

More natural light wouldn't be bad. I may experiment with the idea of adding windows to the double doors. That would provide a view back toward the house, which in addition to the back window would provide a view of the only two directions I really care to see.
 
Last edited:
OP
M

Maddog10

Well-known member
Joined
Nov 16, 2016
Messages
151
Location
Paducah, Kentucky
Some new projects developing that I thought I'd share with you guys.

First, my work was getting rid of an old office desk that is no longer used. It was a very well built desk and I'm sure quite expensive new, so I couldn't let it go to waste. I disassembled it and am using the various parts for project. It's main purpose though is to make me a tool box since I don't currently have one. I am going to have to cut the depth down some, as it's currently too deep for my bench.

Currently:


Plans are to paint it and mount underneath. Not sure if I want to go with red and black or tan and black.


Also restoring this old vise that I found at my grandfather's shed. It is a Columbian 604, and is in pretty good overall condition. I'm painting the swivel base black, the jaws tan, and then either polishing the handle or painting it black if it doesn't polish up well. Thus the reason I'm considering tan/black for the toolbox. This picture is after it's been through a hot tank and sandblasted.


Picked up this small part drawer at a local shop sale for $5. A little TLC and I think it will clean up nice.


Built this power tool holder based off a picture my wife found online. Love it!


Also got me a shop dog. Yellow lab, 9 weeks old today.


That's it for now. Would love to hear your thoughts on the tool box. I'll keep you posted as the projects develop.
 
Last edited:

captain14

Well-known member
Joined
Dec 19, 2012
Messages
7,019
Location
Near College Park Maryland 20740
I have followed your build from the first posting. Nice little shop and fire pit area.

Have your thought about lowering the bottom Shelf so the drawers will fit without surgery?

Post your pup's photo In the GJ garage dogs thread. Gotta show off the security team member.
 
OP
M

Maddog10

Well-known member
Joined
Nov 16, 2016
Messages
151
Location
Paducah, Kentucky
I have followed your build from the first posting. Nice little shop and fire pit area.

Have your thought about lowering the bottom Shelf so the drawers will fit without surgery?

Post your pup's photo In the GJ garage dogs thread. Gotta show off the security team member.

Thanks for the compliments and for following along. It's come a long way so far and is a long way from where I want it to be, but it's something I'm proud of because I've done it all myself and just learned as I went.

I am having to lower the shelf 3/4 of an inch to accommodate the height of the drawers. I was speaking towards the depth front to back. Notice how they overhang by a few inches in the picture? In the model they are already cut down to the size I want. I don't think I could stand them sticking out past the edge of the bench, and if I ever needed something vertically in the vise they would interfere. Was hoping for a perfect fit, but I need to take a few inches off to have them how I want them. Just hope I can make the cut look fairly clean.
 
To avoid these ads, REGISTER NOW!
Top Bottom