To avoid these ads, REGISTER NOW!

Made me a drill press stand =)

reznunt

Well-known member
Joined
Dec 13, 2009
Messages
273
Location
Socal
drillpressstand-0.jpg


I scored a Jet JDP-14M for $200 from craigslist in very good condition and I needed a stand for it. The flimsy-looking, basic stationary stand offered on amazon was $40 so I figured I'd make a much sturdier mobile stand from scratch. I ended up with a beefy, portable stand and a little fabrication practice. It is supposed to have a 1/4" top but I can't afford a 4'x8' sheet right now so I tacked it on until I get the cash. My only regret is not designing it to hold my chop saw. The lower area was going to have a simple shelf for misc items. If I only made it an inch longer! :mad:

Materials:
- 20-foot stick of 2"x2"x.120" HRP&O with a few feet left over ($53)
- One foot of 3"x3/16" A36 flat bar (Scrap)
- Four HF 330lb-rated casters I was going to use for a welding table that never happened ($30 +tax)
- Stainless hardware

Tools:
- DeWalt D28715 chop saw
- Hobart Handler 140 110v welder
- 75/25 mix
- HF auto-darkening lid (great value for the price)
- Jet JDP-14M drill press
- HF bench grinder (weak and vibrates a lot but price is right)
- Clamps, magnets, cutting oil, step drill bits, HF angle grinders, cutting/grinding/flap disks, angle finders, squares, and other misc tools
- Break-Free CLP


Total cost: About $85

Progress pics:
drillpressstand-1.jpg


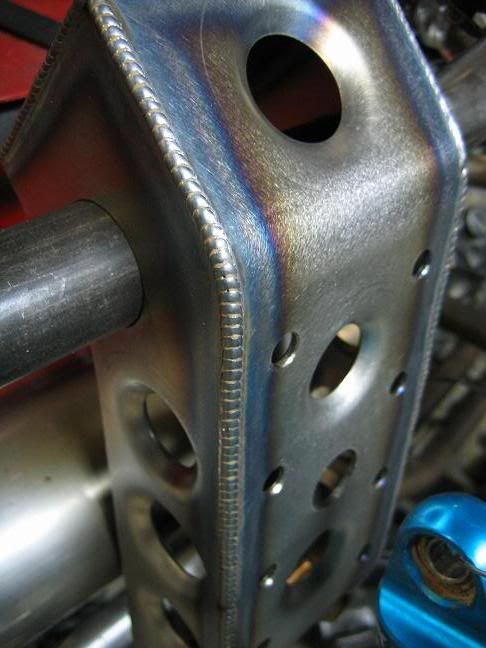
Don't mind the spatter... dirty workpiece.
drillpressstand-2.jpg


drillpressstand-3.jpg


drillpressstand-4.jpg


drillpressstand-5.jpg


drillpressstand-6.jpg


drillpressstand-7.jpg


drillpressstand-8.jpg


drillpressstand-9.jpg


drillpressstand-10.jpg


drillpressstand-11.jpg


drillpressstand-12.jpg


drillpressstand-13.jpg


drillpressstand-14.jpg


My budget mobile tool army that gets the job done
drillpressstand-15.jpg


Check out my buddy's web site and learn different welding techniques, fabrication tips, equipment set up, and more terrific welding information!

http://www.profabricationtechniques.com/
 
Last edited:
To avoid these ads, REGISTER NOW!

ambenz

Well-known member
Joined
Dec 12, 2010
Messages
4,236
Location
NW Chicago Suburbs
I like it!
Looks like some pro welds too!!
Good job.
I would paint it, that is NOT stainless and cap that open end...my 2 cents.
 
To avoid these ads, REGISTER NOW!

browntown

Well-known member
Joined
Feb 28, 2010
Messages
599
Location
Salem, OR
Do you have a way to lock the casters? Does the whole assembly move on you while drilling?

2nd'ing the paint suggestion, and the weld applause
 
OP
R

reznunt

Well-known member
Joined
Dec 13, 2009
Messages
273
Location
Socal
Thanks for all of the comments!

Very nice.. how are you liking the height ? Whats the stand height and overall height with the drill on it ?

The overall height is 67". The stand height (without a top) is 28". The table height in that picture is 46". It's in the perfect height range for me.

I like it!
Looks like some pro welds too!!
Good job.
I would paint it, that is NOT stainless and cap that open end...my 2 cents.

Thanks! I was going to paint it but I sort of like the raw look better. Most of the guys that build prerunners out here leave everything raw to allow for visual inspections of damage. That look just grew on me. A coat of linseed oil or other protectant will do. I may need to go over it once a year with some steel wool and a rust remover to keep it as fresh as it can be, but it's worth it to me to keep the raw look.

I do like your idea of capping the ends. I don't know why I didn't take care of that yet. Gotta keep the rust out.

nice looking welds. did you use a weaving pattern for that?

Thanks. The joints were tight with nothing more than the bevels I made so I didn't need to weave it. I used a standard push-pull technique. If there is a larger gap between the workpieces, I'll use cursive i's, e's, c's, or whatever the joint or direction of weld calls for.

You dun good!!!!!! Like the chip brush holder too. Great looking welds.

Thanks! The chip brush holder is actually a cutting oil container with a brush in it. I have a larger brush for the chips.

Do you have a way to lock the casters? Does the whole assembly move on you while drilling?

2nd'ing the paint suggestion, and the weld applause

Thanks! The casters aren't lockable but the whole unit doesn't move at all. The stand weighs over 100lb and the drill press weighs 150lb. The chop saw below weighs 40lb. I have to put a lot of weight into when I try to move it. The casters hardly even want to swivel. Once they are pointed in the same direction, it rolls smoothly though. I was planning on swapping out the casters for locking ones, but after using the press on the stand I realize I don't need to.
 

Jzytaruk

Active member
Joined
Apr 23, 2011
Messages
43
Location
Edmonton, Alberta
did you tack the drill press base to your stand? It might be a weak point if your setup vibrates at all.. I'd bolt it. Looks awesome otherwise!

push pull method of travel seems odd to me for use with mig. "Pro Fab" from that site seems to want to replicate the "Dab Dab" Tig technique on his thinwall tube mig welds.
 
OP
R

reznunt

Well-known member
Joined
Dec 13, 2009
Messages
273
Location
Socal
did you tack the drill press base to your stand? It might be a weak point if your setup vibrates at all.. I'd bolt it. Looks awesome otherwise!

push pull method of travel seems odd to me for use with mig. "Pro Fab" from that site seems to want to replicate the "Dab Dab" Tig technique on his thinwall tube mig welds.

thanks! i guess you may have missed it, but this is what i wrote in the first post:
It is supposed to have a 1/4" top but I can't afford a 4'x8' sheet right now so I tacked it on until I get the cash.

as for the technique, it is also commonly known as "mig like a tig" and only replicates the finished look of a tig weld. it is not a pulse technique since it is one constant weld and gets as much penetration as a weave, only resulting in a "stack of dimes" look (instead of a single worm-like bead). it is common and widely used among offroad fabricators. here are a few (much better) examples i googled:

IMG_2400.jpg


attachment.php


attachment.php


attachment.php
 
Last edited:
OP
R

reznunt

Well-known member
Joined
Dec 13, 2009
Messages
273
Location
Socal
If you want to keep it raw looking, maybe just a clear coat? Nice welds.

good idea. but i wonder if oily, dirty fingerprints containing different chemicals and contaminants will stain the clear coat after a while?

I like the stand Buddy. I would leave the end of the tube open so I could store a file in it. I always have one handy near the drill press to deburr round parts.

thanks! that's a great idea. i'm going to do that right now :)
 

Jzytaruk

Active member
Joined
Apr 23, 2011
Messages
43
Location
Edmonton, Alberta
I will have to try it once i have access to a MIG and some thin material. I just left my job at the HD Equipment repair shop for a Refinery Shutdown... It looks intriguing.
 

wrencheshurt

Well-known member
Joined
Dec 4, 2006
Messages
60
Location
High desert, CA
you're in pomona leave it raw, no need to protect it, rust is an extremely slow process out here at worst you'll get a nice "pre-runner patina".
 
To avoid these ads, REGISTER NOW!
Top Bottom