To avoid these ads, REGISTER NOW!

madmagnus garage (Sweden)

madmagnus

Well-known member
Joined
Feb 14, 2012
Messages
56
Location
Sweden - Holmsund
At first i would like to say hi and present myself,

My name is Magnus and im 35 years old, married and have 2 small kids ( 3 and 5 years old ). I make my living as an maintenance mechanic at the Volvo trucks facility in the small town of Umeå located in the north of Sweden,
the population is about 110000 i think.
My house is located in an even smaller town (suburb) by the coast called Holmsund, this is the place where the Umeå harbour is locaten.

My house was built in 1926 and has gone through renovations during the years, i have a quite small yard by Swedish standard witch made this build a bit tougher than normal.

This is a simple blueprint of the garage / workshop.

bygglovsritninggaragejournal.png


And this is the latest outdoor picture i have at the current state of the build ( picture taken in january i think)

garagebygget338.jpg


I hope its ok if i stick to the metric system for dimentions etc....
 
To avoid these ads, REGISTER NOW!

Hesketh

Well-known member
Joined
Oct 21, 2011
Messages
217
Location
Scotland
That looks like a cosy place to spend a dark winter night? what heating are you using and how do you get up stairs?
 
OP
M

madmagnus

Well-known member
Joined
Feb 14, 2012
Messages
56
Location
Sweden - Holmsund
Here we go, today i will show you the first stage of the build.
The first picture was taken less than a year ago.

All work was done by me learning by doing, no contractors at any stage exept for prefab trusses and a friend helping me with heavy lifting a couple of times.

Here we go, foundation work ahead, but first dirt and gravel......

Pictures speak for themself, this is how we roll in sweden.

garagebygget001.jpg

garagebygget007.jpg

Drainage going down.
garagebygget030.jpg

garagebygget030.jpg

More gravel.
garagebygget046.jpg

garagebygget050.jpg

Forming.
garagebygget070.jpg

garagebygget071.jpg

garagebygget079.jpg

garagebygget085.jpg

Concrete. me holding the pipe
garagebygget099.jpg

garagebygget098.jpg

garagebygget103.jpg

garagebygget104.jpg


Thats all i have time for today but i will continue posting tomorrow........
 
OP
M

madmagnus

Well-known member
Joined
Feb 14, 2012
Messages
56
Location
Sweden - Holmsund
That looks like a cosy place to spend a dark winter night? what heating are you using and how do you get up stairs?

For now i use a small electric fan-heater (2 kw), with heavy insulation it works quite well but will be replaced by a air-air heaterpump, very common heating here.
The loft is only for storage at the moment and i get up there trough a hatch in the sealing using a ladder.
 

bams50

Well-known member
Joined
Feb 23, 2012
Messages
2,784
Location
Central NY State
All work was done by me learning by doing, no contractors at any stage exept for prefab trusses and a friend helping me with heavy lifting a couple of times.

Wow, learning by doing?? I don't have the skills for ANY of that. Nor do I have the courage to try to figure it out. Very well done!:beer:
 

ConCretin

Well-known member
Joined
Jan 20, 2011
Messages
3,379
Location
Central Maine
Welcome to GJ. It looks like you used some kind of modular insulation system to form your monolithic slab. Very very cool!

Are the perimeter panels coated with a cementitious material on the outside face?

It looks like the vertical panels taper at the top. What is the purpose of this and how are the walls framed?

Love your build.
 
OP
M

madmagnus

Well-known member
Joined
Feb 14, 2012
Messages
56
Location
Sweden - Holmsund
Welcome to GJ. It looks like you used some kind of modular insulation system to form your monolithic slab. Very very cool!

Are the perimeter panels coated with a cementitious material on the outside face?

It looks like the vertical panels taper at the top. What is the purpose of this and how are the walls framed?

Love your build.

Thank you!
This is a forming system that became more or less standard when floorheating went popular, due to cold winters the ground freeses wery deep ( 1-1,5 meters ) so insulation under the slab is good for the economy.
Even if dont use floorheating myself the concretefloor stays the same temperature as the air, if not insulated it would be colder and drain heat from the air.
And yes, the outside of the form is covered with fiber reinforced cement.

Tomorrow i will post pictures of the next stage and maby answer some of your other questions, im off to work now.
 

M. Blue 240

Well-known member
Joined
Nov 8, 2011
Messages
261
Location
Beaverton, OR
Welcome to GJ. Looks like a good build, but I'm excited to see what you have parked in it. I'll cross my fingers and hope for a patina Duett.

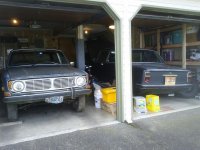
My garage at the moment:
 

Attachments

  • 144s.jpg
    144s.jpg
    94.6 KB · Views: 68
OP
M

madmagnus

Well-known member
Joined
Feb 14, 2012
Messages
56
Location
Sweden - Holmsund
Welcome to GJ. Looks like a good build, but I'm excited to see what you have parked in it. I'll cross my fingers and hope for a patina Duett.

My garage at the moment:

Thanx! nice set of cars u got :thumbup:
I havent had any space for a project car since i bougth the house 4 years ago, rented a space in a club garage for 10 years before, working mainly on vintage german cars ( BMW )
The only toy sitting in the garage at the moment is this little *******.
garagebygget415.jpg
 

ericburns4

Well-known member
Joined
Sep 9, 2011
Messages
47
Hey Magnus I should say one thing about you. You have done the fantastic job of taking pictures from time to time. This is really helping us to get the idea as to how the work was actually done.
 
OP
M

madmagnus

Well-known member
Joined
Feb 14, 2012
Messages
56
Location
Sweden - Holmsund
Back to the build......
The day we made the floor was a bit to hot and sunny for concrete work, it burnt to fast in combination with lack of manpower.
We did the best we could and the result was ok in the end.

One thing did not work out however, i was supposed to put down rebar along the wall footings before the concrete hardened, because the process was quick there wasnt time for this so i had to let it be for the moment.
This took me an extra day of work drilling holes in the floor, using anchorcement to fasten the U-shaped rebar.

After this i built an internal form of plywood for the footing ( about 8 inches high )

I took a few days of from the build between the first and second pour of concrete.

Here's the pictures of the mess.......

garagebygget123.jpg

garagebygget126.jpg

garagebygget129.jpg

2 days after the second pour of concrete i trashed the form.
garagebygget135.jpg

Some minor cosmetic adjustments.
garagebygget138.jpg

garagebygget140.jpg

garagebygget141.jpg


More to come.
 
OP
M

madmagnus

Well-known member
Joined
Feb 14, 2012
Messages
56
Location
Sweden - Holmsund
Hey Magnus I should say one thing about you. You have done the fantastic job of taking pictures from time to time. This is really helping us to get the idea as to how the work was actually done.

Thank you, i'm trying to show you the differense and similarities in the various stages when butting up a building.
I have about 400 pictures from the start one year ago up until today, i cant post everything but i will try to cover every step as i bring you up to date.

Pictures i post today is almost one year old.
 

abstamaria

Well-known member
Joined
Jun 24, 2010
Messages
1,338
Location
Manila
Magnus, great job and thank you for posting.

Coming from the tropics (32 degrees C today), I loved the picture of your garage in snow.

Best,

Andy
 
OP
M

madmagnus

Well-known member
Joined
Feb 14, 2012
Messages
56
Location
Sweden - Holmsund
Lets continue.

I took a few days of for som recreation before i got to the woodwork, because i had no help i had to raise the wall sections piece by piece.

First i started with the sill. the main isolation and moistbarrier is a new type of foamplastic made by the same company that delivered the ground isolation (Jackon) I also added strips of tarpaper for leveling.

The sill is fastened with large expanding nails, a hole is drilled through the sill and concrete with a drillhammer and then you just wham the nail in place.
garagebygget144.jpg

garagebygget146.jpg

garagebygget142.jpg


Raising the first wall.
garagebygget148.jpg

garagebygget149.jpg

Got some material to continue.
garagebygget153.jpg

garagebygget153.jpg

garagebygget157.jpg

garagebygget159.jpg

garagebygget164.jpg

garagebygget165.jpg

garagebygget167.jpg

A heavy truck with an impressive crane mounted stopped by with the trusses on a rainy Friday, this day i actually had some extra hands ( we were 4 ) the mounting took us only an hour and a half.
garagebygget172.jpg

garagebygget173.jpg

garagebygget175.jpg


Thats all i had for today folks, I hope you enjoy.
 

John in OH

Well-known member
Joined
Jun 2, 2007
Messages
2,444
Location
SE Ohio & Eastern Virginia
Magnus, Nice build!! For someone learning as he goes, you are doing a really nice job! I really enjoy seeing the building materials available and building techniques used in different countries. There seem to be lots of really good ideas and materials out there that aren't used in the US.

Also, I like the very unique red/white color scheme!! :)
 

abstamaria

Well-known member
Joined
Jun 24, 2010
Messages
1,338
Location
Manila
Snow

Lucky *******! but i guess the tropic heat can be a pain when your working hard.

Haha. Yes, heat can be a problem when working outdoors. I do wish it were cooler sometimes. I also miss the snow (I lived in the US for some years a long time ago).

Great build, and it's good of you to post, Magnus.

Best,

Andy
 
OP
M

madmagnus

Well-known member
Joined
Feb 14, 2012
Messages
56
Location
Sweden - Holmsund
Magnus, Nice build!! For someone learning as he goes, you are doing a really nice job! I really enjoy seeing the building materials available and building techniques used in different countries. There seem to be lots of really good ideas and materials out there that aren't used in the US.

Also, I like the very unique red/white color scheme!! :)

Thank you.
Internet is a great resource for knowlege theese days.
I've been helping out on building projects before but this is the biggest challange so far. In Sweden we dont have inspections during the build, instead you apply or hire for someone to be in charge of that ( Quality responsibility ) in my case it is my father that works in the construction business, he's dropping by from time to time to check out the progress. He also works as a consultant for me when i need phone support.

I guess the climate is the biggest reason for the development of new building materials. It is very expensive to hire craftsmen in Sweden therefore we get used to do everything by ourself.

The red / white is a wery classical colour scheme here, especially on barns and houses built before the 30:s.
I'm ging for a vintage look of the building so it will blend in with the surroundings.
 
To avoid these ads, REGISTER NOW!
OP
M

madmagnus

Well-known member
Joined
Feb 14, 2012
Messages
56
Location
Sweden - Holmsund
It's getting late here but i'll post some pictures of the roof construction before i go to bed.
This part was also done without help so you can imagine how many times i ran up and down with the material. The roofconstruction is a bit overkill even by swedish standards but that's the way i like it.
garagebygget184.jpg

garagebygget183.jpg

garagebygget181.jpg

garagebygget186.jpg

garagebygget187.jpg

garagebygget190.jpg
 
OP
M

madmagnus

Well-known member
Joined
Feb 14, 2012
Messages
56
Location
Sweden - Holmsund
So, the roof was watertight and i was able to work even if it would rain ( witch it did often last summer ) I had to decide witch type of wind barrier to use for the walls. i was choosing between a impregnated outdoor sheetrock or the oldshool asfaboard,
I decided to go for the asfabord since it's been around atleast 60 years, it was half the price and it's extremely lightweigt. Weight is very important when working alone i have notised ;)
2011-08-23_13-31-59_530.jpg

garagebygget191.jpg

garagebygget194.jpg

garagebygget195.jpg

I also found a used door to mount.
garagebygget219.jpg
 

admranger

Well-known member
Joined
Feb 16, 2012
Messages
482
Location
Las Vegas, NV
Your dimensional lumber looks very clean and straight. Seems like all we can get here now is warped 2x4's with sap oozing out all over...

What is the spacing on your vertical pieces? 1/2 meter?

Nice build!
 
OP
M

madmagnus

Well-known member
Joined
Feb 14, 2012
Messages
56
Location
Sweden - Holmsund
Your dimensional lumber looks very clean and straight. Seems like all we can get here now is warped 2x4's with sap oozing out all over...

What is the spacing on your vertical pieces? 1/2 meter?

Nice build!

There are several supplyers of material in this small city, i didn't go for the cheapest one. Since im normally working with steel and used to high precision it was a big challange to convert to lumber that's never 100% straight.
The spacing between the vertical pieces are 60 cm (center to center) to match insulation and board measures that's european standard.
 
OP
M

madmagnus

Well-known member
Joined
Feb 14, 2012
Messages
56
Location
Sweden - Holmsund
It's been a couple of days since my last update but here are som pics.
The photos are from last fall as i was trying to race against mother nature.

garagebygget205.jpg

garagebygget196.jpg

garagebygget213.jpg

garagebygget208.jpg

garagebygget220.jpg

garagebygget222.jpg

garagebygget223.jpg
 
OP
M

madmagnus

Well-known member
Joined
Feb 14, 2012
Messages
56
Location
Sweden - Holmsund
That looks fantastic! It looks like you are building a very high quality building. I look forward to seeing the completed shop and the projects you work on!

M_P

thank you for the positive feedback.

These are random photos from the work with the outer panel. There will also be a thinner rib covering the gaps between the first layer but it's not mounted yet because i wanted to start with the inside as soon as the building was weatherproof.
As the winter was closing in on me i didn't bother to cut any holes for windows since i didnt have any at the moment.

garagebygget228.jpg

garagebygget229.jpg

garagebygget234.jpg

garagebygget235.jpg

garagebygget241.jpg


Powercable between garage and house going down.

garagebygget264.jpg


And finally the aluminium framed door arrived, put some oil on it for conservation because it was to cold to paint it.

garagebygget289.jpg

garagebygget291.jpg


To be continued........
 

GOLF for LIFE

Well-known member
Joined
Apr 8, 2012
Messages
173
Location
NORTHERN ILLINOIS
Magnus, the shop looks very nice and have to look up to the European building methods. Some here in the USA have lost there quality standards. Looking forward to the next installments.
 

magnusk750

Well-known member
Joined
Nov 6, 2010
Messages
501
Location
Estonia
Hej Magnus hälsar Magnus!

Great project, and inspiring for me who have a similar project in mind. Think I've seen it on some swedish forum. byggahus.se?
 
OP
M

madmagnus

Well-known member
Joined
Feb 14, 2012
Messages
56
Location
Sweden - Holmsund
Magnus, the shop looks very nice and have to look up to the European building methods. Some here in the USA have lost there quality standards. Looking forward to the next installments.

Thank you! The garage is built in the same way as most buildings here in sweden, my workshop might be a little "better" then a normal Swedish garage but i will spend lots of time in there and since i'm doing all the work myself i can spend more money on building material.
 
OP
M

madmagnus

Well-known member
Joined
Feb 14, 2012
Messages
56
Location
Sweden - Holmsund
That looks like a cosy place to spend a dark winter night? what heating are you using and how do you get up stairs?

The past winter iv'e had a temporary small heaterfan (2kw) a permanent installation of a air-air heaterpump this fall.
The loft storage area is entered with a ladder trough a hatch in the seling.
 
OP
M

madmagnus

Well-known member
Joined
Feb 14, 2012
Messages
56
Location
Sweden - Holmsund
The power was connected to the new central + one 230/400 volt outlet.
garagebygget297.jpg

Starting with the celing.
garagebygget300.jpg

garagebygget298.jpg

garagebygget304.jpg

And finally in January the insulation was delivered.
garagebygget308.jpg

garagebygget314.jpg
 

Shoottx

Well-known member
Joined
Jan 30, 2011
Messages
314
Location
Plano Tx
You have a great build documented here. I really like the clean and neat nature of your garage.

As Andy from the Philippines mentioned, this site is a great window into the construction methods around the world. Please keep posting pictures.
 
OP
M

madmagnus

Well-known member
Joined
Feb 14, 2012
Messages
56
Location
Sweden - Holmsund
got some time to kill tonight so i post some more pictures of the process of insulation.
I use Rockwool because it's the most fire resistant insulation on the market, it's also a lot more comfortable to work with compared to fiberglass.
As u can se i decided to dismount the horisontal 2x2 i put up earlier, it was a pain to get the insulation in place with them in the way and i had some regrets about the nails i used to fasten them.
when i put them back i used large woodscrews insted :thumbup:
garagebygget310.jpg

garagebygget311.jpg

60 sheets of osb!
garagebygget313.jpg

You can also see that i mounted the vapour barrier 1/4 into the wall, this is very common when the electric wires and outlets are drawn inside the walls, my reason for this was that i didn't want to worry about penetrating the plastic everytime i put something up on the wall.
garagebygget316.jpg

garagebygget318.jpg

garagebygget319.jpg

garagebygget321.jpg

garagebygget322.jpg
 

admranger

Well-known member
Joined
Feb 16, 2012
Messages
482
Location
Las Vegas, NV
Excellent work. Good idea on using rock wool instead of fiberglass. I hate working with fiberglass.

I like the way you took care of the vapor barrier to avoid puncturing it in the future. Vapor barriers are something we do not have in Las Vegas -- too dry to worry about moisture! I can leave a bag of potato chips open for a week and they are still crisp and tasty!
 

Jagmandave

Well-known member
Joined
Nov 6, 2011
Messages
6,304
Location
Overland Park, Ks.
Pics don't show for me, it says you need to upgrade your Photobucket account.

Another reason why I hate Photobucket and all those other online photo repositories!

It's also why I'm dreading when everything moves to "the cloud", it's all gonna cost us - big time. When someone else has control of your access to your own stuff, it can't be good......

Back to your regularly scheduled build thread!
 
OP
M

madmagnus

Well-known member
Joined
Feb 14, 2012
Messages
56
Location
Sweden - Holmsund
Pics don't show for me, it says you need to upgrade your Photobucket account.

Another reason why I hate Photobucket and all those other online photo repositories!

It's also why I'm dreading when everything moves to "the cloud", it's all gonna cost us - big time. When someone else has control of your access to your own stuff, it can't be good......

Back to your regularly scheduled build thread!

I paid up for a pro account ( one month ) i don't have the time to re-post on a different host.
 
To avoid these ads, REGISTER NOW!
Top Bottom