To avoid these ads, REGISTER NOW!

Magnetic Drill Presses

c7z06

Well-known member
Joined
Nov 4, 2020
Messages
125
Location
Edgewater, MD
These two drill presses were built using bases and tables from old drill presses along with 2 3/4" 1/4" wall DOM steel tubing. One of the mag drills has power down-feed and the other has variable speed and reverse for threading. They are mounted to 3/4" thick steel plates.

The drills can be yanked off if needed elsewhere.
 

Attachments

  • IMG_9182.jpg
    IMG_9182.jpg
    121.7 KB · Views: 254
  • IMG_9124.jpg
    IMG_9124.jpg
    97.9 KB · Views: 181
To avoid these ads, REGISTER NOW!

matt_i

Well-known member
Joined
Mar 14, 2008
Messages
10,723
Location
SE Michigan
Great idea! Some questions about the design & fab...How did you setup the top mounting plate? Did you have a lathe big enough to face the long tube? Or was it already squared? Also curious how you are holding down the mounting plate to the end of the tube, welded or ?
 
To avoid these ads, REGISTER NOW!
OP
C

c7z06

Well-known member
Joined
Nov 4, 2020
Messages
125
Location
Edgewater, MD
Both mag drills are BDS, made in Germany. One is an AUTOMAB 450 with a 2" cutting capacity with annular cutters, a two speed gearbox, and power downfeed. The other one is a MAB 465 and also has a 2" capacity, a two speed gearbox with variable speed in each, and reverse for threading.

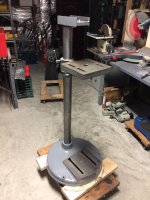
I made 4" long section of steel tubing that was a slip fit into the ID of the column. I faced the 4" long section and welded it to the 3/4" cold roll plate that supports the mag drill. I slid the short tube into the end of the column as far as it would go. I then welded the column to the 3/4" plate over top of the previous weld.

One of the tables is perfectly square to the column, but I had to shim the other table very slightly to get it perfectly square.

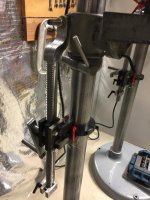
A 1/2" capacity chuck can easily be mounted on either mag drill. The throat depth problem normally associated with mag drills is gone, as is the depth limitation.
 

Attachments

  • weld.jpg
    weld.jpg
    126 KB · Views: 54
Last edited:
OP
C

c7z06

Well-known member
Joined
Nov 4, 2020
Messages
125
Location
Edgewater, MD
Since the photo above was taken, I added rack & pinion table height adjustments using some Bugo torch holder assemblies I had on hand. I fabricated cranks to replace the knobs that originally came on the torch holders.
 

Attachments

  • table adj 2.jpg
    table adj 2.jpg
    94.7 KB · Views: 62

WAS Jr

Well-known member
Joined
Nov 8, 2014
Messages
275
That's a sweet way of making those presses more useable. I know a guy who did something similar, but he had a welding shop weld a solid six inch long round, same size as the internal diameter of the column, to the base, and dropped it down the hollow column of the drill press. Then secured it with a bolt thru the column. He said one day he might find a replacement head to the original drill press.
Bill S
 

wolfsburged

Well-known member
Joined
Jan 31, 2011
Messages
128
Location
Cary, NC
Since the photo above was taken, I added rack & pinion table height adjustments using some Bugo torch holder assemblies I had on hand. I fabricated cranks to replace the knobs that originally came on the torch holders.
More details on your table height adjuster please!

Sent from my E6910 using Tapatalk
 
OP
C

c7z06

Well-known member
Joined
Nov 4, 2020
Messages
125
Location
Edgewater, MD
The table height adjusters were made from some torch holder assemblies I bought off eBay. I only wanted the torch holders (2nd photo) themselves for a couple of small CNC plasma tables I was building, but it all came as a package for next to nothing. Bought new, the stuff is quite expensive.

The top of the rack is fastened to the bolt at the rear of the table clamp. A couple of fingers engage a 2 1/2" ID two piece shaft collar on the drill press column. When I loosen the table clamp nut, the crank raises or lowers the table. I then retighten the table clamp and reposition the safety collar directly under the table clamp.

These items were not intended for this purpose, but they worked out well for me.
 

Attachments

  • IMG_7417.jpg
    IMG_7417.jpg
    148.8 KB · Views: 24
  • IMG_9260.jpg
    IMG_9260.jpg
    135.5 KB · Views: 24
  • IMG_9263.jpg
    IMG_9263.jpg
    95.1 KB · Views: 22
  • IMG_9264.jpg
    IMG_9264.jpg
    122 KB · Views: 23
To avoid these ads, REGISTER NOW!
Top Bottom