To avoid these ads, REGISTER NOW!

Maintenance Free Big Green Egg Table

MBeaty

Well-known member
Joined
Feb 1, 2010
Messages
237
Location
Middle Tennessee
After searching endlessly for a new set of patio furniture, I could not settle for any that I liked that was in my price range. Almost everything was not made for long term durability or lack of maintenance. Finally I settled on building my own table out of aluminum and Ipe wood. A year later I have been quite happy with the table so I am going to build a matching table to hold by large Big Green Egg.

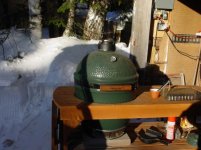
When I bought the BGE, I did not buy a nest with it because I always planned on building a nice table. Here I am a year later still using my "temporary" makeshift stand. While it works, I really want to get the grill up on the deck as well as raise its height to make cooking on it much more comfortable. Lastly, with the grill having to drop into a table, I will feel safe not having it chained up. A thief would have to be pretty motivated to want to steal a large BGE based of the weight alone, especially if they would have to lift it 30 inches to get it up from the table, then carry it down a set of deck stairs.

Makeshift%20Stand.JPG


Here is the makeshift stand made of 2x4's.

Patio%20Table.JPG


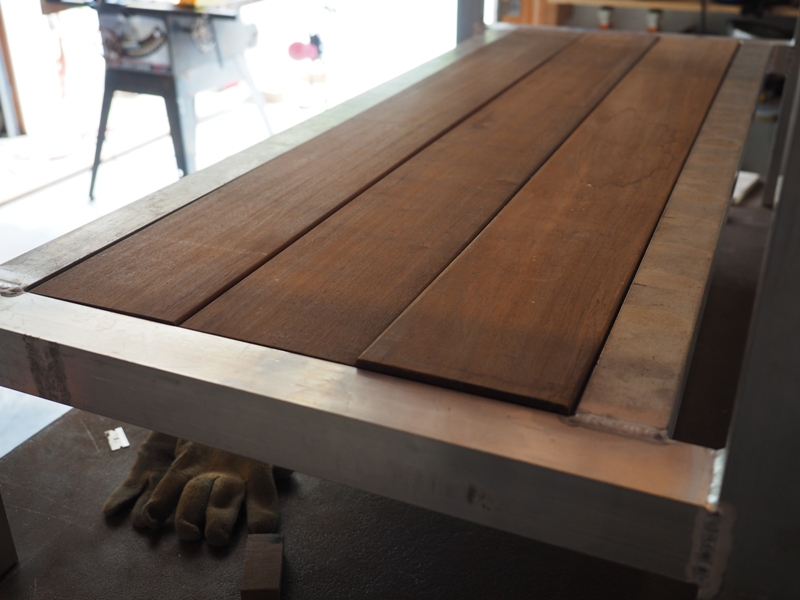
This is the table that I am going to match the BGE stand to. It is all made from 2" x 0.125 wall aluminum tube with a floating Ipe wood top on it. The wood has weathered, as expected, but otherwise is in perfect shape still after a year in the sun and weather.

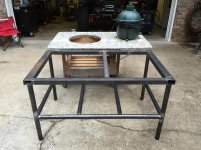
Just like the table, the stand will be made out of the same materials.

Here is a rendering of what I have in mind for the overall design.

BGE%20in%20Table.JPG


The top shelf will have enough room to place the cooking grate on as well as some extra room for food prep. I still may consider adding a pull out drawer to hold some of the grilling accessories, but this may be a second phase of the project.
 
To avoid these ads, REGISTER NOW!
OP
M

MBeaty

Well-known member
Joined
Feb 1, 2010
Messages
237
Location
Middle Tennessee
I'm going to slightly suggest a bit of modification in the front.
I am not so talented as to not bump my head on the edge of the table when adjusting the bottom vent, nor reach the bottom vent without considerable contortion.

I would consider making the egg proud of the front of the bench by a bit of the radius. It would be both for design and practicality to reach the bottom vent and to give a designed essence to the table.

(you need to add the center divider from the first table to this egg stand. Visually the tables are dissimilar.)

I actually considered the second of these options. The Ipe stock I bought is finished on all sides already as decking board. The overall width of the planks after settling is about 5.4 inches wide. Due to the Ipe being so hard and heavy to work with, not to mention expensive, I do not have much desire to try to rip each piece and put a new bevel on the edges. This binds me some with the overall design, which is why the top on the patio table is inset into the frame, but on the big green egg table is sitting on top. The lower shelf is inset and I think I will take your suggestion and make a middle divider on it in order to tie the two designs together.

After your suggestion I was toying around with a design to make the BGE sit proud, but it is tough with the overall dimensions that I want. The BGE itself takes up most of the bay, leaving little room for wood. I do agree though, if I could incorporate it, the design would be more visually appealing and would remove most of the wood endgrain from view.

Alternative%20Assembly.JPG
 

DonPowers

Well-known member
Joined
Dec 7, 2014
Messages
4,398
Location
On The Hair At The End Of The Dog's Tail
I have the JS Designs Long Cypress table with drop leaf, storage bin and granite insert. Check out their sight, they have several designs, you might find a few ideas for your build.


http://buy.jsdesignsshop.com/collections/all

Here are a couple not so good photos taken last winter of the egg and table.
 

Attachments

  • DSC01790G.jpg
    DSC01790G.jpg
    79.8 KB · Views: 153
  • DSC01791G.jpg
    DSC01791G.jpg
    71.2 KB · Views: 187

nutjob

Well-known member
Joined
May 8, 2008
Messages
807
Location
NE, PA
I made a table for my large BGE with a wood top. Big mistake. The wood is soiled from the dirt and grease. Setting the tongs down as you cook grease will drip off. I set the top cover on the table and grease drips off that. And I keep a cover over the whole thing. Even with a cover I get some water on the table top and it drips though into the top drawer.

If the budget allows go with a one piece type of solid surface material. And add a drawer for the extras and a large drawer for lump. Also add sides around the drawers to seal them up. Keeps chipmunk's out and dirt.

I'll add some pics later.

Kevin
 

elvee

Well-known member
Joined
Nov 1, 2006
Messages
309
Location
Atlanta, GA
A couple of suggestions I can offer. I was going to build my own table, but got a deal on a stainless table built locally for the eggs. The only drawback to the table is that they put no stiffeners into the shelves, so it is a little bouncy. That said, I have a lower shelf as well as a mid shelf on which the egg sits. This is great because I have three low profile tupperware tubs that store all my charcoal and wood chips/chunks. My table has a storage area in one end that is supposed to hold the charcoal, but I use that to store accessories, tools, etc.

Make sure you have an insulator between the egg and the shelf on which it sits. You also want to make sure you can get a pan under the egg for ash cleanout. I don't have quite enough clearance on mine, and it makes it a pain to get to. I need to raise it up with some split fire brick.

Don't forget wheels, or some way to make it slightly moveable. There will come a time when you need it somewhere else.

The table I have came from here - http://www.madhatteronlinestore.com/BigGreenEggTable-Long.aspx . I found it on CL for $275. The guy I bought it from didn't like the bouncy shelves, and instead shelled out for the deluxe BGE metal table system.
 
OP
M

MBeaty

Well-known member
Joined
Feb 1, 2010
Messages
237
Location
Middle Tennessee
Thanks for all the suggestions.

Here is my newest design with some changes incorporated. I am thinking about making one half of the top either out of a tile, or checking into getting a piece of granite cut for it. It would only work out to be 20" x 22" so I don't think the cost would be too terrible. Due to the dimensions of the BGE and the table, there is no way to make the center support of the top table in the actual middle. I like symmetry quite a bit in most designs, but I think this may actually look alright, especially with different materials on each side of the center bar. Any thoughts?

I was never completely happy with the raw wood edges of the original design, so this one would put aluminum around the entire perimeter of the wood, which I think looks much cleaner and much more like my patio table.

Assem2.JPG
 

tvguy

Member
Joined
May 13, 2009
Messages
9
I'm currently in the process of building a table for my BGE. I had a granite top made a while back while we were doing some kitchen remodeling and stuck it on the old table temporarily until I could fab up something new. This is just the basic table in the pic . . . I'm going to add casters, a few more supports and likely some wood decking material on the bottom. I'll post some more pics as the project progresses.
 

Attachments

  • IMG_1601.jpg
    IMG_1601.jpg
    148.2 KB · Views: 121
Last edited:

tvguy

Member
Joined
May 13, 2009
Messages
9
Here's the final version of the my table . . .
 

Attachments

  • IMG_1706.jpg
    IMG_1706.jpg
    146.2 KB · Views: 114
  • IMG_1707.jpg
    IMG_1707.jpg
    145 KB · Views: 125
OP
M

MBeaty

Well-known member
Joined
Feb 1, 2010
Messages
237
Location
Middle Tennessee
After a long delay, I finally got around to building this table.

Working in a batch process, I set up my mitering bandsaw and made quick work of 2 sticks of 2x2x0.125 aluminum square tube. One thing I have notices with welding aluminum, is that the end prep of the joints seems to be more critical than on steel. Weld penetration aside, it seems that a ragged edge or lots of burs on the aluminum will cause the arc to wander worse than on steel. On all of the joints I cut, I like to hand prep them with a small bevel with a file in order to make the welding smother and get better penetration.

Saw.JPG


Aluminum%20stock.jpg


After getting all the parts cut and prepped, I like to start building end planes first. This allows the entire end profile to be built flat on the table making it much easier to keep the legs plumb and square. It is times like these that there is no such thing as too many clamps.

Clamp%20Setup%20End%20Plane.JPG


Prior to making each weld, I clean the surface of the tube by heating it lightly with a propane torch then brushing it with a "clean" stainless wire brush.

Close%20up%20of%20Weld.JPG


It is a shame that one of the last steps is grinding down most of the welds to give the table a more finished appearance. Of course not all the welds looked this nice ;)

Once the end planes are built I attach the front faces. This is a trickier setup than the end planes due to having two dimensions to worry about. Between 321 blocks and a large square chunk of aluminum it is fairly easy to get the structure square.

Front%20to%20Side%20Plane.JPG


As I mentioned earlier, to give the final table a smoother more refined look, I grind most of the welds down smooth with the tube surface. After this, I go over the entire frame with an orbital sander with a 220 grit pad, followed by brushing it all with a black scotchbrite pad. While this is by no means a showroom quality finish, it works great for a piece of outdoor furniture like
this.

Smoothed%20Joint.JPG


This is prior to the scotchbrite finish.
 
To avoid these ads, REGISTER NOW!

bullnerd

Well-known member
Joined
Sep 17, 2012
Messages
5,690
Location
Jersey
That's a nice weld! I know it doesn't matter for this but since you mentioned it, when you wire brush aluminum, you have to go until the brush starts to drag pretty good. Just cleaning it isn't enough, you have to dig through that outer surface. It will make the weld puddle much easier and cleaner.

What brand is your miter saw and what's it plugged into? The blue box with the handle?
 
OP
M

MBeaty

Well-known member
Joined
Feb 1, 2010
Messages
237
Location
Middle Tennessee
That's a nice weld! I know it doesn't matter for this but since you mentioned it, when you wire brush aluminum, you have to go until the brush starts to drag pretty good. Just cleaning it isn't enough, you have to dig through that outer surface. It will make the weld puddle much easier and cleaner.

What brand is your miter saw and what's it plugged into? The blue box with the handle?

Thanks for the clarification on the prep portion. That is one of the best ways I have heard to describe it. One you get the feel down, it is easy to pick up on the drag of the brush once the oxide is removed.

The saw is a Femi 783. It is kind of an oddity in the US and I am not sure if it was ever even marketed for sale here. I found it on craigslist for quote cheap, because the previous owner did not think too highly of it. Since it is a European saw, it was designed for 240 volts and they had it running on 120, so it was quite sluggish and had next to no power, which makes sense why they did not like it. Once I figured this out, I found a small dry type transformer to power the saw. The blue box is the 120 to 240 volt transformer. On 240 volts the saw is great, especially considering the compact size.
 

bullnerd

Well-known member
Joined
Sep 17, 2012
Messages
5,690
Location
Jersey
Ahh, I thought it looked like a Femi, but the colors are different.

Congrats on the saw deal, I will own one someday...but the US version. LOL.
 
OP
M

MBeaty

Well-known member
Joined
Feb 1, 2010
Messages
237
Location
Middle Tennessee
Ahh, I thought it looked like a Femi, but the colors are different.

Congrats on the saw deal, I will own one someday...but the US version. LOL.

They are well worth the investment. If I had spacer for a bigger saw, I would have gone that route, but options for mitering saws get expensive quite quickly.
 
OP
M

MBeaty

Well-known member
Joined
Feb 1, 2010
Messages
237
Location
Middle Tennessee
After completing the frame, I started in on the wood work portion of the project. For the table I built last year, the Ipe wood was simply sitting on lips on each end of the table, with no means of fastening the boards. While this is nice and simple and quite effective, a few of the boards have twisted slightly. Ipe is extremely stable as far as woods go, but at the end of the day it is still a natural wood that shrinks and swells with humidity changes. After cutting a few boards for the bottom shelf of the table, I started to run into a few problems.

Warp%20of%20Ipe.JPG


Some of the wood had a little bit of twist to it, so over the 5 ft that the board spans, one end would not sit flush. I did not want to use any visible fasteners on this project, so I decided to make a board that spans the bottom of the slats to pull them all down consistently.

Woodworking is still a mystery to me compared to metalwork, but it is something that I have been striving to teach myself. Ultimately I would like to build a nice dining room table, so I got ambitious with this project and decided to make the board that spans the slats attach to the slats via a sliding dovetail rather than any screws.

A sliding dovetail is quite eloquent in its simplicity and functionality in an application like this, but unfortunately I had never tried to make a sliding dovetail before and I picked quite a difficult wood to try it on.

For the bottom shelf, I limped through cutting the dovetail with a nice carbide router bit, but it was not very great results. Due to the density of the Ipe, the cut was hard to make, even with a relief groove cut first. For the dovetail joint that holds the table top together, I chose to cut the joint much shallower to reduce the amount of material I would have to remove.

After rough cutting some pieces to length, I cut the dovetails into the top slats. I did it this way so that I would not have to locate the dovetails as accurately. Once all the pieces were together, I made one cut along the whole edge of the top to bring it to size. After this, I laid out a large circle and cut the top with a jigsaw.

Wood%20Top.JPG


Details of the dovetail.

Arrangement%20of%20Dovetail.JPG


Detail%20of%20Parts.JPG


Coming from a metalwork perspective, the Ipe is manageable to work with, but I can see why it is considered so tough from a woodworking viewpoint. Due to it being so hard, the most difficult part was keeping the ends from splintering as the router bit exited the material. Luckily I was ripping about 1/4 of and inch from the edge of each board which allowed me to cut off any splintering.

I think I have just as much time invested in these 12 parts that make up the top as I do the welding of the frame.

Top%20Halfway%20assembled..JPG


In addition to keeping the slats flat, the sliding dovetail will allow the top to be removed piece by piece in order to be assembled around the grill without having to take anything apart. A simple board with a hole in it would require the grill to be disassembled or the grill to be lowered down into the top, but due to the weight of a BGE, this was not something I wanted to attempt.

After some of the advice from here, I went to a local granite supplier and was able to get them to cut a remnant for a pretty fair price. The granite sits opposite of the wood, giving a good heat resistant and easy to clean surface to set the grate on.

Final%20Product.JPG


Here is a detail of the underside, showing the 1" aluminum angle that supports the top as well as the assembled dovetail joint that ties the slats together.

Detail%20of%20top%20supports%20and%20Sliding%20dovetail.JPG


Overall I am quite pleased with the way it turned out, but the woodwork portion was far more difficult than I had originally planned. Now I just hope I never have to move, because like everything I build, it always turns out to be way too heavy and overbuilt, but at least it will be a theft deterrent.
 
To avoid these ads, REGISTER NOW!
Top Bottom