To avoid these ads, REGISTER NOW!

major paint problems on car- need suggestions

vintage_Car

Well-known member
Joined
Aug 8, 2010
Messages
46
Location
greater Nashville, TN area
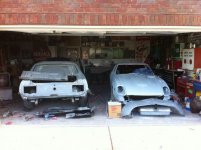
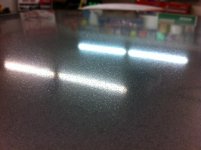
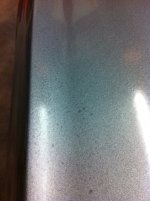
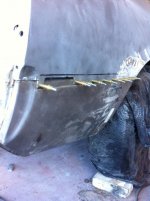
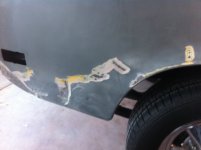
I just bought a car and it has paint issues with it. It is a titanium metallic silver Acrylic Enamel, and to be honest I believe it is a cheap paint the previous owner used, TCP Global (Restoration Shop). The metallic paint has dark spots, lighter spots, its dull and the entire top of the car has pitting in the paint. I have not seen the pitting before? what condition would cause that. I assume the darker and lighter spots are from improper paint technique with a metallic. I say assume, because I have never painted anything more than a few parts on a vintage pedal car with metallic paint. Any guidance/assistance on how to fix this would be very appreciated.

I have included a few pictures of what I described.
 

Attachments

  • photo 1.JPG
    photo 1.JPG
    107.1 KB · Views: 312
  • photo 3.JPG
    photo 3.JPG
    101.1 KB · Views: 316
  • photo 2.JPG
    photo 2.JPG
    89.9 KB · Views: 302
Last edited:
To avoid these ads, REGISTER NOW!

Boyd

Well-known member
Joined
Dec 16, 2009
Messages
866
Location
Forney, TX
The pitting looks like solvent pop. Basically, the thinner or reducer mixed with the paint becomes trapped in the paint film when the surface layer skins over too fast. He either unnecessarily used a fast reducer , sprayed too heavy of a coat, or had too much airflow going across the car.

You are correct with the light/dark spot issue. Any time I spray a metallic I "swirl" the cup every few passes to keep the metallic distributed evenly.

Unfortunately, the only way to fix your issues is by starting over.
 
Last edited:

Rodhotz

Well-known member
Joined
Nov 3, 2011
Messages
348
Location
Where the wind never stops! The high desert of CA.
In the first pic that looks like they put it on dry and tried to color sand it out. in the second pic those are fish eyes from poor prep and contamination, third pic is the same and also water under the paint along with poor painting. sand it down and do it over or live with it are pretty much the choices as none of it will come out.
 
OP
V

vintage_Car

Well-known member
Joined
Aug 8, 2010
Messages
46
Location
greater Nashville, TN area
thanks for the info guys. Can you color sand a single stage metallic?

couple questions on my process...
Can I scuff the paint that doesn't need bodywork for adhesion of the new paint job? what grit? I assume I will need to sand the paint entirely away, do bodywork, prime and feather it out for the reworked areas.

Last question- it has a single stage, can I go base/clear when I redo this, is there a benefit to it, or do I need to stay with the same single stage? I would be getting PPG either way.
 

retrobuilder

Well-known member
Joined
Oct 18, 2012
Messages
408
Location
Alpharetta GA
For metallic a clear coat will improve the top coat durability and appearance.

PPG- great paint

Yes you can sand with 600 wet dry/ sand wet using flat rubber and pad. watch corners as you can cut to metal.

The blush is just poor application of the metallic.
 

gahrajmahal

Well-known member
Joined
Dec 12, 2008
Messages
2,527
Location
Cincinnati, Ohio
Don't know if you caught what Retrobuilder wrote. Very critical, wet sand using a flat block made for that task. Your paint supplier will have what you need. Also before you start sanding wash the car completely, then after it is dry use a good quality wax and grease remover BEFORE YOU SAND.
The original painter may not have had a paint booth to spray in. Anything less makes the desired end result more challenging. Not impossible, just harder to achieve the perfect quality you would desire. Also, since you don't know the paint that is on the car I would use a sealer before putting down the color.
Good luck, we look forward to seeing progress pics.
 

Crusty Nut

Well-known member
Joined
Mar 16, 2008
Messages
475
I have used TCP paint with good results. I believe the first poster got it right. The first pic looks like solvent pop. The others just look like poor application of the paint. In my opinion, the main reason less expensive paints are less expensive has to do with the UV stabilizers so it just wont have the durability of a top line PPG or Dupont. You know, those companies have cheaper lines too.
 

lessersivad

Well-known member
Joined
Aug 28, 2011
Messages
282
Location
Morenci, MI
Kinda hard to tell in the 1st pic. Could be solvent pop or fish eyes.

2nd and 3rd pic I would say bad application. Also in 3rd pic looks to be water contamination AND the corner of the hood(?) has body filler that wasn't completely feather edged before primer/paint.

IMHO, this is one of the reasons I don't buy vehicles with a new paint job, when it's raining, or after dark. Unless I get one heck of a deal and figure I'm gonna have to do major work on it anyways or can possibly use it for parts.

As a guy once told me, "Paint can hide a multitude of sins".
 

Crisco

New member
Joined
Dec 24, 2008
Messages
2
Hey Vintage Car, I work at a restoration shop in Hendersonville. Why don't you bring it by one day and I will take a look at it for you.

Joe Towe Classic Cars
314 Rockland Rd
Hendersonville Tn
 
OP
V

vintage_Car

Well-known member
Joined
Aug 8, 2010
Messages
46
Location
greater Nashville, TN area
Well fella's thank you for the responses. here is where we stand currently.

600 grit wet gummed up, so did 400, 220 didn't and I achieved a good scuff on the entire car. I took a magnet across the car and anywhere it did not stick well I did a 'discovery sanding'. Basically sanding down where the magnet didn't stick and sanded out past the bondo till I hit nothing but just the paint and then bare metal. WOW! 1/4" of bondo in some places, sitting on top of galvanized metal that has been riveted on top of rusty holes. Some have caulking filling the holes, fiberglass bondo and then bondo on top of that. A real treat finding this out!

So, after all panels are fixed properly I think shooting a sealer over the entire car would be best. Then filler as necessary, high build and finally paint... I sure wasn't planning on this, but I could not live with the way the paint and body looked.
Any issues with this plan of attack?

Anyone in the Nashville have a paint booth for rent?
 

Kevin54

MEMBER EMERITUS
Joined
Jan 12, 2005
Messages
29,341
Location
Urbana, Ohio
Well fella's thank you for the responses. here is where we stand currently.

600 grit wet gummed up, so did 400, 220 didn't and I achieved a good scuff on the entire car. I took a magnet across the car and anywhere it did not stick well I did a 'discovery sanding'. Basically sanding down where the magnet didn't stick and sanded out past the bondo till I hit nothing but just the paint and then bare metal. WOW! 1/4" of bondo in some places, sitting on top of galvanized metal that has been riveted on top of rusty holes. Some have caulking filling the holes, fiberglass bondo and then bondo on top of that. A real treat finding this out!

So, after all panels are fixed properly I think shooting a sealer over the entire car would be best. Then filler as necessary, high build and finally paint... I sure wasn't planning on this, but I could not live with the way the paint and body looked.
Any issues with this plan of attack?

Anyone in the Nashville have a paint booth for rent?

What are you working on that you got into this mess? :wtf:
 

retrobuilder

Well-known member
Joined
Oct 18, 2012
Messages
408
Location
Alpharetta GA
600 grit wet gummed up, so did 400, 220 didn't and I achieved a good scuff on the entire car..........??

I have to ask, did you wet sand or dry sand? I cannot imagine prep sanding with 220 on any painted surface unless you intend to apply a primer or on bare steel. If you wet sand with 600/400 the water should remove most of the paint particles.

The paint must be old school enamel which is soft?

Why sand to metal if you found bondo if the surface was repaired and looked even and smooth? You just have to go back and repeat it or do a panel rework.

You will need a humidity controlled and ventilated paint booth and perhaps an experienced painter to spray your base coat/clear coat.

Good luck..
 
OP
V

vintage_Car

Well-known member
Joined
Aug 8, 2010
Messages
46
Location
greater Nashville, TN area
here is some of the mess
 

Attachments

  • mustang7025.jpg
    mustang7025.jpg
    74.6 KB · Views: 102
  • mustang7026.jpg
    mustang7026.jpg
    74 KB · Views: 104
  • mustang7027.jpg
    mustang7027.jpg
    50.4 KB · Views: 106
  • mustang7023.jpg
    mustang7023.jpg
    67.1 KB · Views: 105
  • mustang7019.jpg
    mustang7019.jpg
    45.8 KB · Views: 113
  • mustang7021.jpg
    mustang7021.jpg
    70.5 KB · Views: 118
  • mustang7003.jpg
    mustang7003.jpg
    128.5 KB · Views: 116
OP
V

vintage_Car

Well-known member
Joined
Aug 8, 2010
Messages
46
Location
greater Nashville, TN area
yes I tried wet 600 and 400...both gummed up the paper something awful. compile that with all the bondo that was cracking on the car and wavy when you looked down the side, I knew I would be sanding quite a bit. so the 220 was brought out, knowing I would be resealing with epoxy, high build...and changing the paint color since I'm repainting it I might as well put the color on it that I want.
 

e-tek

Well-known member
Joined
Dec 19, 2007
Messages
10,690
Location
Saskatoon, SK
Judging by the gaps, tiger stripes and solvent pops, that was a serious splash-and-dash. Sorry you had to be the new owner. Sound slike you're getitng it sorted out though.
 

retrobuilder

Well-known member
Joined
Oct 18, 2012
Messages
408
Location
Alpharetta GA
That's a lot of bad repair work by someone..bad prep equals bad paint and durability.

The earlier paint blush and orange peel is just to top of the iceberg.

BTW, you are better off **** welding the replacement panel, overlapping may have rust later between the overlap.

Using a high build primer looks like a good thing..GOOD LUCK

Good painting results is 90% prep..
 
To avoid these ads, REGISTER NOW!

e-tek

Well-known member
Joined
Dec 19, 2007
Messages
10,690
Location
Saskatoon, SK
thanks for the info guys. Can you color sand a single stage metallic?

couple questions on my process...
Can I scuff the paint that doesn't need bodywork for adhesion of the new paint job? what grit? I assume I will need to sand the paint entirely away, do bodywork, prime and feather it out for the reworked areas.

Last question- it has a single stage, can I go base/clear when I redo this, is there a benefit to it, or do I need to stay with the same single stage? I would be getting PPG either way.

Yes you can sand with 600 wet dry/ sand wet using flat rubber and pad. watch corners as you can cut to metal.

Ahh - no you can't. It'll mottle the metallic....but then it's a mute point here!

As for you other Q's - For any spots you aren't going to do bodywork, I would block it with 400 wet, then seal (https://buyat.ppg.com/refinishProdu...roductID=06b6c6e3-54e7-4d35-8c4a-a51d6ec39dea) it with the rest of the car just before paint. Then you can go base/clear - which I'd recommend so you CAN properly wet sand and polish the clear, to remove any orange peel/imperfections.
 
Last edited:
OP
V

vintage_Car

Well-known member
Joined
Aug 8, 2010
Messages
46
Location
greater Nashville, TN area
e-tek...just so I am clear...I have already sanded the entire car with 220. the areas that do not need bodywork, block it in with 400. once bodywork is finished and blocked in with 400, shoot entire car with epoxy sealer.
 
OP
V

vintage_Car

Well-known member
Joined
Aug 8, 2010
Messages
46
Location
greater Nashville, TN area
well all that junk is gone as of this weekend. I had never seen the riveted panels over rusty holes with 1/4" bondo on top...of course I have not been doing this very long either.
 

Kevin54

MEMBER EMERITUS
Joined
Jan 12, 2005
Messages
29,341
Location
Urbana, Ohio
I don't know what cars are like in Nashville, but I had a Mustang like that, same year, and looked about the same. I bet there was four gallon of bondo it it. Those Mustangs are known for rust. You may seriously just want to mud back over what is there, smooth it out, run it through your local Maaco, then unload it unless you are dedicated to doing a full blown restoration on it. If you do the latter, be prepared to go through a few wallets from opening them up all the time.

Oops....guess I was too late with my last comment. I see where you opened it up for surgery. Good luck and keep us posted. Maybe start a thread in the Fabrication forum.

Man I need some coffee. I guess we're in the Fabrication forum :spit:
 
Last edited:
OP
V

vintage_Car

Well-known member
Joined
Aug 8, 2010
Messages
46
Location
greater Nashville, TN area
Kevin54- yeah, I will probably start a new build thread, instead of the major paint problem thread growing into one.

As for your suggestion on unloading it with bondo and macco job- unfortunately I am nothing like the previous owner and can not rip off someone. The car has problems for sure on the body and floorpans, I believe I have a very good grasp at what has to be done to correct them. mechanically and electrically the car is very good as is the suspension (all new) and the chrome bits (all new). Of course suspension and chrome bits are all bolt on things and you just need to have the right wrench for that job. Its a shame I inherited the mess, but I can't close my eyes at night passing that mess onto the next guy. So...I will fix it to the best of my ability (which is above galvanized metal/rivets and gallons of bondo). Then disclose to the next guy what has been done, if it sells at a loss, hopefully it is not a large one and I count it as a lesson learned. These old cars always teach me something new in a restoration process, so I'm hoping that I will learn a few new tricks to apply to the next car that crosses my doorstep.
 

Kevin54

MEMBER EMERITUS
Joined
Jan 12, 2005
Messages
29,341
Location
Urbana, Ohio
Kevin54- yeah, I will probably start a new build thread, instead of the major paint problem thread growing into one.

As for your suggestion on unloading it with bondo and macco job- unfortunately I am nothing like the previous owner and can not rip off someone. The car has problems for sure on the body and floorpans, I believe I have a very good grasp at what has to be done to correct them. mechanically and electrically the car is very good as is the suspension (all new) and the chrome bits (all new). Of course suspension and chrome bits are all bolt on things and you just need to have the right wrench for that job. Its a shame I inherited the mess, but I can't close my eyes at night passing that mess onto the next guy. So...I will fix it to the best of my ability (which is above galvanized metal/rivets and gallons of bondo). Then disclose to the next guy what has been done, if it sells at a loss, hopefully it is not a large one and I count it as a lesson learned. These old cars always teach me something new in a restoration process, so I'm hoping that I will learn a few new tricks to apply to the next car that crosses my doorstep.

Vintage......are you doing this to "flip" the car, or doing it and plan on keeping it for quite a while? If you are planning on doing it and keeping it, there are a few places that carry the Mustang sheetmetal . Do you plan on blowing the car apart to restore it, or just plan on fixing the worse places while the car is still together? The reason I ask, is that the lower edge of the front fenders are going to be rusted. More than likel;y you are going to have rust in the back corners under the trim of the rear window. The lower door edges are going to be rusted, and as you found out, the rear quarters. Also the shock towers probably have rust. The floor pans, the trunk pan, and just about every nook that runs into a cranny :lol: You don't need to start a build thread, as I think this one will grow rather rapidly in itself.

I for one am very anxious to see what you run into. Oh, and BTW....pull the rear seat bottom out and see what the floor is like under there. I know that on mine, water ran down between the window and rear quarter, behind the side panel and the edge of the floor under the seat bottom was getting thin. And the tires kicking up water through the hole in the wheelwells didn't help either.
 
OP
V

vintage_Car

Well-known member
Joined
Aug 8, 2010
Messages
46
Location
greater Nashville, TN area
I do not know if it will be kept or turned yet. I am being very cautious about where I am spending the money on the car (which is all focused at body work right now) my original intent was to keep it and sell my 08 Mustang GT and drive this as a daily driver. Knowing I would be adding AC and Power steering to it...I had not planned on what is going on now. So it is a matter of if I can afford to keep it, I guess.

I am not blowing it any more apart that it already is for restoration. What I know about will be fixed and I will check those areas you mentioned. Right now...:willy_nil

The panels I have purchased were from CJPonyParts.
 

SM Racing

Well-known member
Joined
May 3, 2006
Messages
856
Location
Huntsville, AL
If there is rusty metal under bondo, under the paint, you absolutely have to sand it down to bare metal to fix the rust. It will eat the panels and then the bondo will crack and the rust will bleed through the paint and generally make a mess. I see no reason not to take this car down to bare metal and fix the metal problems with metal, then prime and paint up from there. In the interest of doing it right for a long term repair, metal needs to be cut and welded.
 

e-tek

Well-known member
Joined
Dec 19, 2007
Messages
10,690
Location
Saskatoon, SK
e-tek...just so I am clear...I have already sanded the entire car with 220. the areas that do not need bodywork, block it in with 400. once bodywork is finished and blocked in with 400, shoot entire car with epoxy sealer.

Well, yes, but you won't be worrying about primer for a while. Get all the metal work done, as you'll likely find more to do as you go along. Might be good to work on one panel at a time right now. Get the metal solid, then put your filler in and get it close to perfect, then move to next panel. If the front fenders are rough you may want t a new pair - new metal is the answer there.

Once the filler is all 80-90% done you know a lot more about what's under the rest of the paint, how well it sands and whether it feathers at all. If the paint that was just laid down sands out well, then you can spray 2K highbuid over it (and 200G is fine enough), but likely by the time you get all the repairs done you won't have much left to strip the entire car.

If that paint is that soft you might want to strip it as their is a good chance when you put the sealer on it it will lift.

Indeed. You'll find out when you're sanding it, but I'd expect to start stripping. You can use Aircraft Stripper at home, then wipe it down with Laquer Thinners, then run 180G -220G on the DA over it all to get the sealer to bite.

I see no reason not to take this car down to bare metal and fix the metal problems with metal, then prime and paint up from there. In the interest of doing it right for a long term repair, metal needs to be cut and welded.

Pretty much the only right way.
 
OP
V

vintage_Car

Well-known member
Joined
Aug 8, 2010
Messages
46
Location
greater Nashville, TN area
... More than likely you are going to have rust in the back corners under the trim of the rear window.

How do you fix this in the corners. currently it is full of caulking, but I removed some and there is about a 1/4" gap.

shock towers are okay

The floor pans- driver side *****- passenger side footwell *****

the trunk pan-its fine but the bottom of the trunk lid *****

I have a rat rod that is less rusty.

Passenger side rear quarter is done, as is passenger front fender. onto the driver side rear quarter.
 

Kevin54

MEMBER EMERITUS
Joined
Jan 12, 2005
Messages
29,341
Location
Urbana, Ohio
How do you fix this in the corners. currently it is full of caulking, but I removed some and there is about a 1/4" gap.

shock towers are okay

The floor pans- driver side *****- passenger side footwell *****

the trunk pan-its fine but the bottom of the trunk lid *****

I have a rat rod that is less rusty.

Passenger side rear quarter is done, as is passenger front fender. onto the driver side rear quarter.

The only way to fix it properly is to pull the glass, pull the upholstery, cut out the bad, and weld in some new. You will have to form the pieces to weld back in.

Check out MP&C's thread and you can see where he basically did the same exact repairs on a '55 Wagon he is working on.

It's going to be a pain in the caboose, but the ONLY way to properly fix it is to cut out and rust and replace it with good sheetmetal.

Now you know why project cars come up for sale all of the time :lol:
 

Kevin54

MEMBER EMERITUS
Joined
Jan 12, 2005
Messages
29,341
Location
Urbana, Ohio
the shops current view...

It won't be bad if you have the equipment to make the pieces you need. In my case, I didn't have the equipment, then 5 surgeries from a few years back force me to sell what I had ('62 Impala) I'm slowly buying some stuff here and there, so when I get another project car, I will have the stuff to make the parts and pieces, and not have to depend on someone else to work on my stuff.
 
OP
V

vintage_Car

Well-known member
Joined
Aug 8, 2010
Messages
46
Location
greater Nashville, TN area
I think a shrink/stretcher is a key tool for the fab work I need to do. I have some hammers and dolleys. Looking at MP&C project thread I have some ideas on how to make some as well.

I didn't see any pics in his thread on the 55 wagon on fabing a panel for the back corner of the window? maybe I over looked it... and that work he does is absolutely amazing! what a skill!
 

e-tek

Well-known member
Joined
Dec 19, 2007
Messages
10,690
Location
Saskatoon, SK
While a SS is nice - I've been doing this work for 30+ years without one. Also without a brake, bead roller or MIG! 18G metal is VERY easy to form. All you REALLY need are a an anvil - or piece of RR tie - few peices of pipe, hammers and dollys and some imagination!

You can make it all like that - witout specialized tools.
 

MP&C

Well-known member
Joined
Oct 21, 2009
Messages
4,401
Location
Leonardtown, MD
Post 19 on this link shows a rear window repair...

http://www.garagejournal.com/forum/showthread.php?t=86935

As far as fabricating replacements, the closer you can get your patch panel to match the original, the better off you'll be. As Ed mentioned, much can be done with simple hand tools and determination. But if your initial attempts don't turn out to fit well, do some research on metalshaping to insure your methods are correct. I'd suggest visiting the metalmeet or allmetalshaping websites. Also, check out David Gardiner's Youtube videos, and if that gives you any inspiration, go ahead and buy his DVD, it's well worth the money...


http://www.youtube.com/user/mindover3/videos
 
To avoid these ads, REGISTER NOW!
Top Bottom