To avoid these ads, REGISTER NOW!

Major shop rearrangement

Strouty

Well-known member
Joined
Mar 21, 2010
Messages
38,215
Location
Southern Maine
I am definitely gaining on it, slowly, but I can see the light now.

Trying to figure out how to buy a hook lift setup for one of my trucks without spending any money. I can find the hook lifts, but for some reason, everyone wants lots of money for them.

When you have some time, you should post a couple pictures of the new equipment, it is always neat to see what others are up to.

Have a good night Royce.
 
To avoid these ads, REGISTER NOW!
OP
R

royce

Well-known member
Joined
Jun 22, 2014
Messages
3,105
Location
fairbanks ak
Glad you are gaining on it Strouty,
Here is a few pics

Royce
 

Attachments

  • IMG_3337.jpg
    IMG_3337.jpg
    149.4 KB · Views: 150
  • IMG_3542.jpg
    IMG_3542.jpg
    152.3 KB · Views: 139
  • IMG_3537.jpg
    IMG_3537.jpg
    128.5 KB · Views: 148
OP
R

royce

Well-known member
Joined
Jun 22, 2014
Messages
3,105
Location
fairbanks ak
Very nice, I like the panel saw!

The panel saw is made by a italian company called GMC.
It was purchased by Conoco in 2013 and never put together or used.
There was no info with it and a puzzle to get put together.
It is precise and has great dust collection built in.
Now I need to figure out weather to keep it or peddle it.

Royce
 

Strouty

Well-known member
Joined
Mar 21, 2010
Messages
38,215
Location
Southern Maine
If you were closer, I would say sell it.

Yesterday I was set to scrap something, this morning I changed my mind again, my advice changes with the wind, so don’t rely on anything I suggest.
 
OP
R

royce

Well-known member
Joined
Jun 22, 2014
Messages
3,105
Location
fairbanks ak
Put a bit of work in the shop in the last couple days.
Decided to keep the panel saw for now and got it set where it goes, as well as landed the miter station and lathe.
It has been difficult to figure out the layout for the wood milling side of the shop.
Also got started on the table saw station, it consists of a 16" Oliver 270D, a 10" Powermatic 66 and a 10" Rockwell 10.
I'm tying the 3 saws together with a steel frame and will infill the voids with some 1/2" laminate I salvaged.
I set it up about the middle of the 11'-9"x 43'-6"area so I can get around all sides and able to rip as long as needed.

Royce
 

Attachments

  • IMG_3988.jpg
    IMG_3988.jpg
    76.9 KB · Views: 96
  • IMG_3982.jpg
    IMG_3982.jpg
    149.3 KB · Views: 96
  • IMG_3985.jpg
    IMG_3985.jpg
    146.2 KB · Views: 100
  • IMG_3989.jpg
    IMG_3989.jpg
    152.6 KB · Views: 96

zkling

Well-known member
Joined
Jan 23, 2007
Messages
16,939
Man you have good taste in equipment! How do you find so much of it up there? I hope to have a shop some day where I can refer to the bay(s) as cardinal directions. :spit:
 
OP
R

royce

Well-known member
Joined
Jun 22, 2014
Messages
3,105
Location
fairbanks ak
The frame is all cut out, drilled and bolted up, I'll get the filler panels fit up and then tack the frame together.
Got some laminate ripped today for the filler panels.
It was good to have a track saw being as the fences were off the table saws.
I'll get them fit to length tomorrow after I get a saw blade.
I got about 24' of cut and the combination blade is in need of a grind.
Maybe I can find one made for composites.

Royce
 

Attachments

  • IMG_4003.jpg
    IMG_4003.jpg
    137.4 KB · Views: 64
  • IMG_4002.jpg
    IMG_4002.jpg
    146.5 KB · Views: 55
  • IMG_3998.jpg
    IMG_3998.jpg
    146.8 KB · Views: 53
To avoid these ads, REGISTER NOW!
OP
R

royce

Well-known member
Joined
Jun 22, 2014
Messages
3,105
Location
fairbanks ak
Thanks Kevin,
Got the filler panels fit up today, now need to flip them over and glue some doublers on with mounting bolts.
After the doublers, I'll cut some miter slots in them.
Also thinking I'll mount a router along side the Oliver.

Royce
 

Attachments

  • IMG_4005.jpg
    IMG_4005.jpg
    146.5 KB · Views: 53
OP
R

royce

Well-known member
Joined
Jun 22, 2014
Messages
3,105
Location
fairbanks ak
Made a small bit of headway today, doublers glued up with mounting bolts and brackets.

Royce
 

Attachments

  • IMG_4010.jpg
    IMG_4010.jpg
    140.7 KB · Views: 38

turbowoodworker

Well-known member
Joined
Mar 18, 2012
Messages
3,537
Location
Apex NC
Hi Royce,

I have a few thoughts about your TS factory. Very cool that you have three old iron saws in your island. Since you asked...

1. Based on your setup, do you have specific tasks for each individual saw? I set mine up with the plan that the 5HP saw would be best at ripping (think 2" maple) and I would use the smaller contractor saw for sled crosscuts. (I also have the RAS setup for 23/32" dados and keep it that way as it is my least favorite and scariest too but is very accurate for crosscut dados). (Dewalt miter saw for small crosscuts).

2. How does the fence system for each saw interact with your structure to hold them together? I recall the 66PM has the Biesemeyer type fence but what about the Oliver?

3. I think I see levelers on your "doublers". Smart. You will want to make sure there is adjustment as handling long pieces or sheet goods will get caught on a "lip".

4. Dumb and unnecessary point as I am well aware of your attention to detail, but you do plan on derusting those table tops before all goes together right?

5. Dust collection plans for all those saws? We talked about overhead DC by PM but you will definitely want good 4" ports underneath. How are the old saws setup for DC? I have seen homemade shrouds for contractor saw open bases.


Great progress. How's the fire weed blooming? As I typed this I remembered some good times on the deck at Pike's Landing with a cold Alaska Pale Ale.

:beer:
 
OP
R

royce

Well-known member
Joined
Jun 22, 2014
Messages
3,105
Location
fairbanks ak
Good morning Turbo,
I appreciate your thoughts and welcome the input.

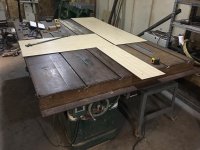
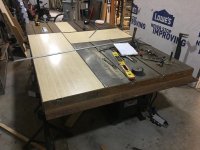
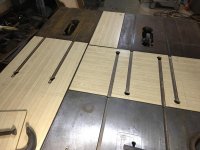
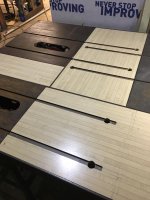
1 We are thinking alike, PM 66 for cross cuts and sled work, Rockwell for dados and the Oliver for ripping,as it is the only one that can be rigged with a riving knife.

2 The Oliver has a Beismeyer fence and I will be adding a longer rail tube to it to encompass the extension.
The 66 and the Rockwell both came with round rail fences and I will replace them with a single Beismeyer style fence that will serve both saws.
While the 66 has a great fence, I like the Beismeyer style better for fine adjustments.

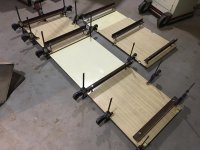
3 It was bit of a chore to take 3 pieces of cast iron that each had their own weaknesses, [crown, cup, twist, out of square and parallel] and make them one. I made sure to build in all the adjustment I could, including jack legs on each machine, oversize holes on the frame rails and leveling screws on the infill panels. It really paid off in the end and I'm tickled with how fair and square it turned out.

4 You bet

5 I'm working on a plan for dust collection and need to put more thought into it.
I'm thinking about skirting the whole thing and adding some drawers to make good use of the space under it for storage.
The Oliver and the 66 both have 4" ports and the Rockwell has a open cabinet.

Do you have any thought about mounting a router to this station?
Lift? Brand?
Location? From front edge? From left edge?
Miter slot? Distance from router plate?

The fireweed has not blossomed yet.
The fireweed going to seed is the indicator to get ready to go catch a moose and summer is done, bittersweet and double edged.

Sorry for being long winded and thanks for the help

Royce
 

turbowoodworker

Well-known member
Joined
Mar 18, 2012
Messages
3,537
Location
Apex NC
Royce,

I would add a router since you clearly have lots of room. Depending on location you could use one of the TS fences for the router.

Brand??? I do not have a router lift. While I think they are very nice, they are so expensive. I would love a lift but I use so many routers (and they are relatively inexpensive), I would spend a fortune on lifts. I have about 8 or 9 routers of varying size. Years ago I bought a Rockler double router table with two bases. I incorporated this into a salvaged kitchen cabinet and placed it on casters. The table top, which is 2" thick composite, was attached to the cabinet with a piano hinge. I use simple supports to hold the top open (like a rod on an import car hood). I placed a 4 inch DC collector. It works well and I can leave the bits set up when doing coping etc.

The rest of my routers are set up for dovetails, plunging, etc. and specialty nontable tasks and don't need frequent adjustment.

My two HD routers in the cabinet are Hitachi 1/2". Someone sells a simple threaded nut on a tube with a knob that replaces the height adjusting screws so moving up and down is a breeze and is way less expensive than a lift. But it must be accessed from inside. These could be easily fabricated by someone with your talent. I can supply pics if needed but will be OOT for a week.

I use my various routers so much that I keep them separate from the TS but in your case, you have lots of room.

Rick
 

turbowoodworker

Well-known member
Joined
Mar 18, 2012
Messages
3,537
Location
Apex NC
Oh, if you are thinking miter slot, I would actually plan it to use the TS fence but move it far right or left of the blade and set in an aftermarket miter slot near the router base. Rockler and others sell these as they sell the individual route bases.
 
OP
R

royce

Well-known member
Joined
Jun 22, 2014
Messages
3,105
Location
fairbanks ak
Thanks Rick,
I'll put some more thought into the router set up.
Got the miter slots cut in the filler panels today.
Now to start on some fence design.

Royce
 

Attachments

  • IMG_4014.jpg
    IMG_4014.jpg
    146.9 KB · Views: 33
  • IMG_4019.jpg
    IMG_4019.jpg
    93.5 KB · Views: 20
OP
R

royce

Well-known member
Joined
Jun 22, 2014
Messages
3,105
Location
fairbanks ak
Been ****** hot here for a few days, so to tolerate it, we've been spending time on the water.
But did get the fence rails made and bolted on.
I got started on the tee part of the fence, used some of the 1/2" laminate for the bearing surfaces, it runs very smooth and should wear well.

Royce
 

Attachments

  • IMG_3039.jpg
    IMG_3039.jpg
    86.5 KB · Views: 43
  • IMG_4024.jpg
    IMG_4024.jpg
    112.9 KB · Views: 42
  • IMG_4025.jpg
    IMG_4025.jpg
    89 KB · Views: 41
  • IMG_4026.jpg
    IMG_4026.jpg
    118.2 KB · Views: 38
  • IMG_4023.jpg
    IMG_4023.jpg
    122.7 KB · Views: 39
OP
R

royce

Well-known member
Joined
Jun 22, 2014
Messages
3,105
Location
fairbanks ak
Thanks Rick
Got a little more done on one of the fences.
I used the cast iron fence off the powermatic and also one of the cams.

Royce
 

Attachments

  • image.jpg
    image.jpg
    109.3 KB · Views: 38

turbowoodworker

Well-known member
Joined
Mar 18, 2012
Messages
3,537
Location
Apex NC
Looking good,
You may want to check out the latest issue of Fine Woodworking. There is a good comprehensive article on router table basics. Not sales pitches for the latest greatest, but rather a review of basic techniques. I just got my issue in the mail so yours should reach the AK newsstand in, say, October?
 
To avoid these ads, REGISTER NOW!
Top Bottom