To avoid these ads, REGISTER NOW!

"Make your own luck" garage

jimmy p

Well-known member
Joined
Nov 14, 2009
Messages
118
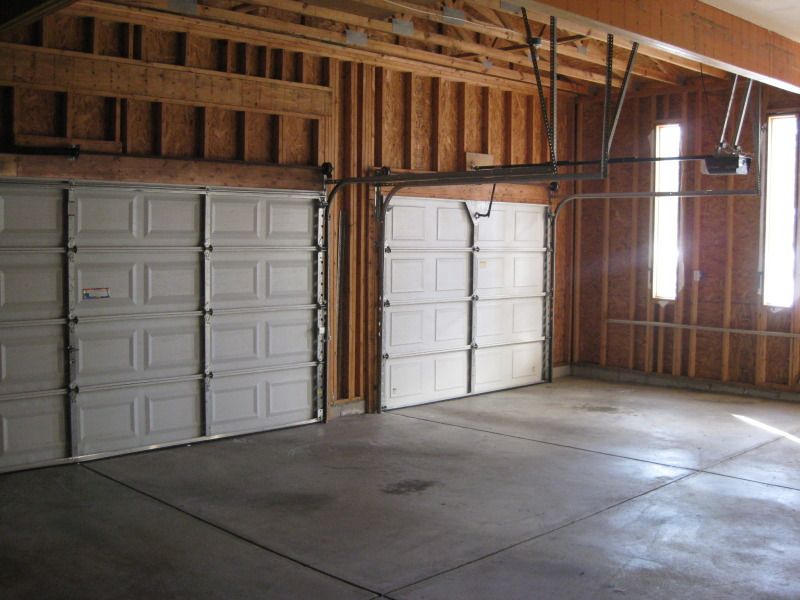
In the spring of 2010 I purchased my first home which included an attached 3 car garage. Here is what it looked like when I moved in:

IMG_2901.jpg

IMG_2902.jpg


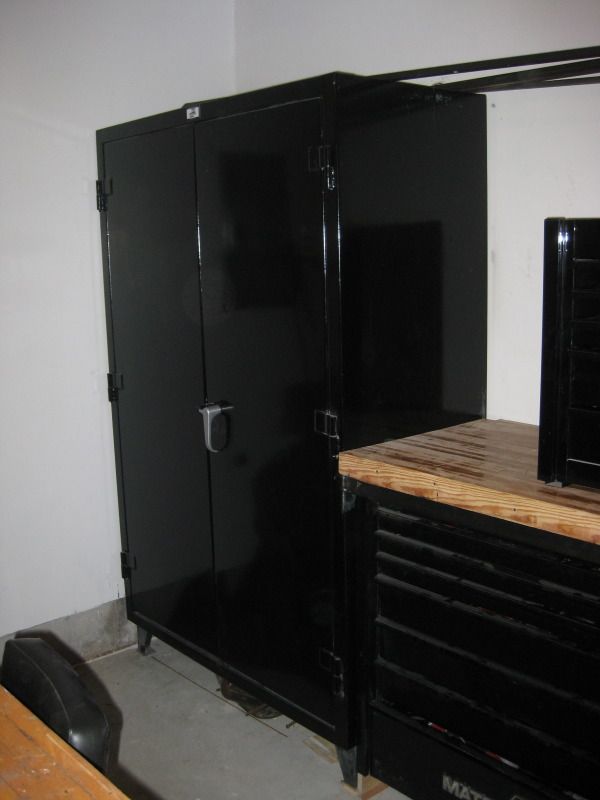
One of the first purchases was two strong hold cabinets found on craigslist, after a long time search. Unloading these things by myself was fun, luckily no damage other than a few chips in the pavement.

IMG_3072-1.jpg

IMG_3073-1.jpg


Electrical was next, I hired most of it out. I had 8 110 outlets added, 2 220 outlets for the plasma cutter and TIG, 8 outlets for fluorescent lights and another 220 outlet for the future compressor in the basement. I also ran 3/4"black pipe in the walls for the compressed air distribution. I also added 2 metal ceiling fans for some air movement in the summer.

IMG_0007.jpg

IMG_0014.jpg

Insulation was next.
IMG_0008.jpg

IMG_0017.jpg
 
Last edited:
To avoid these ads, REGISTER NOW!
OP
J

jimmy p

Well-known member
Joined
Nov 14, 2009
Messages
118
Drywall delivered from lowes. 4' x 12' x 5/8" inch.
IMG_0023.jpg

Picked up a drywall lift on craigslist for $200. Cheaper than renting!
IMG_0024.jpg

IMG_0027.jpg

IMG_0031.jpg

Also insulated the garage doors with 1" styrofoam, planning for another 1/2" in the future. Used expandable foam in a can to seal the edges and secure the foam sheets
IMG_0033.jpg

Spotlight for a future shop logo

IMG_0163.jpg

Future Big Maxx heater location

IMG_0162.jpg

High lift garage door tracks, new hardware in preparation for Liftmaster 3800s

IMG_0323.jpg


in progress
garage_under_construction.jpg
 
Last edited:
OP
J

jimmy p

Well-known member
Joined
Nov 14, 2009
Messages
118
Drywall done, prepped for mudding/sanding which I hired out most of. $500 was well worth it. Had to clean everything out and move my non running truck into and out of the garage every day to keep it out of their way.
IMG_0158.jpg


Picture of my first bench, built from a bowling alley.
IMG_0322.jpg


Heater up, gas lines in. Also painted the cabinets rustoleum gloss black.
IMG_0855.jpg


Welding bench and vice. Bench is awaiting warmer weather for paint.
IMG_1086.jpg


More bowling lane sections. Just cant get enough of these, picked them up from a alley that burned down for $40 each.
IMG_0857.jpg

Sanded and cut to size
IMG_0859.jpg

Bases for the matco boxes
IMG_0862.jpg

IMG_0854.jpg


IMG_0864.jpg

IMG_0870.jpg

Liftmasters installed
IMG_1093.jpg

IMG_1092.jpg

Picked up these stools for $40 each brand new from sears. Not bad for the price.
IMG_1080.jpg
 
Last edited:

regguy1

Well-known member
Joined
Dec 15, 2009
Messages
4,053
Location
On Mount Olympus with Zeus
You have a nice space with good square footage and are off to a good start. Keep posting as you progress.

I built my garage in 1984 but didn't finish the inside until recently
Take the inside tour:
 

Attachments

  • Before Int Finish.jpg
    Before Int Finish.jpg
    141.5 KB · Views: 106
OP
J

jimmy p

Well-known member
Joined
Nov 14, 2009
Messages
118
Recently added some can holders to the door of the strong hold. Really opens up some space in the cabinets and makes the paint cans easier to locate. I used some basic 1" angle iron and welded it right to the doors.
IMG_1098.jpg

IMG_1099.jpg
 
OP
J

jimmy p

Well-known member
Joined
Nov 14, 2009
Messages
118
Picked up a nice craftsman drill press tonight from CL. 17", 16spd, 5/8" chuck and the 1.5hp motor in pretty much NOS shape. It's dated 1990 and I was surprised to see it was made in Taiwan. It wasn't the old industrial look I wanted but for $150 I couldnt pass it up. Even came with the manual. I do need to order a new crank handle, its the only plastic piece on the press and of course its broken. I may try to find a replacement in metal.
2012-02-16_17-19-49_898.jpg

2012-02-16_17-32-08_134.jpg

2012-02-16_17-32-28_1881.jpg
 

Tripp P.

Well-known member
Joined
Jan 6, 2011
Messages
117
Location
G.R. Michigan
Was just learning at that show. I was volunteered to help out so I got 3 days to practice with some really awesome stripers.

The garage is looking good:thumbup:
 
To avoid these ads, REGISTER NOW!
OP
J

jimmy p

Well-known member
Joined
Nov 14, 2009
Messages
118
Couple new additions to the garage.

Craftsman wood/metal bandsaw. I added a new blade and it still needs a new belt. Whats the best way to clean the light rust off the table? I used some pb blaster which helped but I would like to clean it up a little more.
IMG_1133.jpg

IMG_1136.jpg

IMG_1135.jpg


Also my brand new quincy compressor, one of the few brand new things I have purchased for the garage. Its going in the basement so I dont have to listen to it in the garage. I will need to do some soundproofing down there yet. Picture was taken just before I disassembled it and slid it down the stairs.
IMG_1130.jpg
 

Kevin54

MEMBER EMERITUS
Joined
Jan 12, 2005
Messages
29,341
Location
Urbana, Ohio
Couple new additions to the garage.

Craftsman wood/metal bandsaw. I added a new blade and it still needs a new belt. Whats the best way to clean the light rust off the table? I used some pb blaster which helped but I would like to clean it up a little more.
IMG_1133.jpg


WD40 and a red ScotchBrite pad. Then wax it after you get done cleaning it.
 

flybefree

Well-known member
Joined
May 18, 2008
Messages
1,111
Location
Ohio/Kentucky
+1 Scotch Brite Pad...will come right off. I use boeshield to keep rust off, works for me but is sort of a machine tool thing.

Shaun
 

Shoottx

Well-known member
Joined
Jan 30, 2011
Messages
314
Location
Plano Tx
For rusty tables, I use a Scotch Brite Pad and CorrosionX, then 400 grit Wet dry paper Corrosionx with a flat a block (a piece of plywood) then wipe and spray with corrosionX or use a non silicon wax for the surface. Some car waxes or polishes contain silicon and wood will absorb the silicon.

Not related to CorrosionX folks just a very satisfied user.

Mike
 
OP
J

jimmy p

Well-known member
Joined
Nov 14, 2009
Messages
118
OP
J

jimmy p

Well-known member
Joined
Nov 14, 2009
Messages
118
Craigslist has been good to me lately, picked up a nice snap on blasting cabinet today. It was a long drive but well worth it, he even tossed in a new filter, extra nozzle and 2 brand new guns worth well over what I paid for the whole package. I almost broke down and bought a harbor freight unit but now I am glad I waited for something used. Now I really need to get the Quincy hooked up!
IMG_1143.jpg

IMG_1141.jpg
 

Red Leader

Well-known member
Joined
May 15, 2011
Messages
2,689
Location
Denver, CO
You have a very nice garage and a very nice build thread.

I like your pacing and description - it is very easy to follow along, know what is going on, and track with the changes. Great job with that.

My favorite part so far is probably the smallest part thus far: the spot and spotlight for your future logo. That is very forward thinking and not something that everyone has. I will be looking forward to seeing what you do with it.

Great job:thumbup:
 
OP
J

jimmy p

Well-known member
Joined
Nov 14, 2009
Messages
118
You have a very nice garage and a very nice build thread.
I like your pacing and description - it is very easy to follow along, know what is going on, and track with the changes. Great job with that.
My favorite part so far is probably the smallest part thus far: the spot and spotlight for your future logo. That is very forward thinking and not something that everyone has. I will be looking forward to seeing what you do with it.
Great job:thumbup:
Very nice, and well done work too!
Jim

Thank you both! I am just trying to give back to the board after all the info I have found here. Hopefully this thread can help someone else out someday.
I cant wait until I can start on the details like the shop logo.
 
OP
J

jimmy p

Well-known member
Joined
Nov 14, 2009
Messages
118
After a couple buffs with the red scotchbrite and wd40 the bandsaw table really cleaned up. Ill probably go over it once more and touch up some of the rust on the frame and call it good.
IMG_1147.jpg


Regulator/filter showed up. It was hard to find a good deal on a 3/4" npt in/out regulator but I came across this on ebay. It has a plastic housing but it's made by a company based just a few miles from here so I figured I would give it a try. (Note this is a temp setup just to test the compressor out)
IMG_1155.jpg

I ran all my air lines in the wall/ceiling in 3/4" iron pipe. The problem is that the fitting coming out of the tank is only 1/2". Any idea where I could find a replacement fitting with a 3/4" outlet?
IMG_1150.jpg
 
To avoid these ads, REGISTER NOW!
Top Bottom