To avoid these ads, REGISTER NOW!

Making a Blacksmiths Cone Anvil

Oregon rock crusher

Well-known member
Joined
Jun 28, 2016
Messages
1,944
Location
West of Salem
I've missed out on a few large cast iron cone anvils over the years but have always wanted one. Too late or too much money. The last one I saw was priced at $1700 but included a mid size bellows. Price was pretty firm at the time but I went back week later for another try but it had sold. I decided to just try to fab one up out of some of the junk,,, I mean surplus materials I have on hand.

First piece of the puzzle is the conical section from an old hydro-cylone used on wash plants for fine material recovery. They are rubber lined but eventually they wear through and need replaced. This one had a small hole at the discharge end flange that I could cut off. From there I needed to find a pipe around the diameter of the small end to finish the cone shape. An old oxygen bottle was perfect so after removing the valve I cut a piece out of the middle long enough to finish the cone taper. Probably use the ends as gongs.

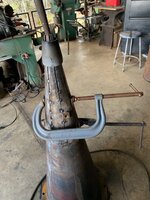
I layed out taper cuts on the cylinder to make 8 pie pieces which should fit together to match the old cyclone taper. I went with the plasma cutter for the cuts using a piece of copper for the straight edge. The copper bar twists easily which is necessary to match the contour of cylinder when your making pie cuts that have a progressively increasing angle at the tips. Anyway here are a few pics of the start of this project and progress so far...more to come. Ed.
 

Attachments

  • IMG_6140.jpg
    IMG_6140.jpg
    1.1 MB · Views: 68
  • IMG_6186.jpg
    IMG_6186.jpg
    609.6 KB · Views: 65
  • IMG_6185.jpg
    IMG_6185.jpg
    350.3 KB · Views: 62
  • IMG_6183.jpg
    IMG_6183.jpg
    478.9 KB · Views: 54
  • IMG_6181.jpg
    IMG_6181.jpg
    864.3 KB · Views: 54
  • IMG_6178.jpg
    IMG_6178.jpg
    575.9 KB · Views: 55
  • IMG_6146.jpg
    IMG_6146.jpg
    1 MB · Views: 54
  • IMG_6143.jpg
    IMG_6143.jpg
    888.2 KB · Views: 61
Last edited:
To avoid these ads, REGISTER NOW!
OP
O

Oregon rock crusher

Well-known member
Joined
Jun 28, 2016
Messages
1,944
Location
West of Salem
Made a little more progress this morning. Fighting that cylinder with its eight octopus type legs into shape took a few sizes of rings as well as some big C clamps and some hard hammering. I also welded some angle to the base to help locate the point fingers in plane. I felt like a monkey being entertained with a greased football at the start. Anyway it finally yielded and came into shape. It's just tacked up so far so I need to finish welding it up and give it a final shaping.

I had planned on a few other features. One cone anvil I saw was on a turntable so the smith could leave it in a corner where it was out of the way and still use it. I also considered adding more weight to it by adding an inner cone and pouring in a grout mix. After seeing how well it took hammer blows and how easy it is to move around I'll probably just leave it lighter and easier to store when not needed. I welded it to one of the steel beams in my floor for forming and can easily do that again if I need it to be stationary for heavy bending use. I will add a threaded socket for a lifting eye to screw into at the point. It will be useful to be able to weld things to it for shaping and then clean it up with a grinder after.
 

Attachments

  • IMG_6224.jpg
    IMG_6224.jpg
    636.1 KB · Views: 47
  • IMG_6221.jpg
    IMG_6221.jpg
    544.7 KB · Views: 44
  • IMG_6220.jpg
    IMG_6220.jpg
    528.3 KB · Views: 43
  • IMG_6202.jpg
    IMG_6202.jpg
    591.8 KB · Views: 48
  • IMG_6200.jpg
    IMG_6200.jpg
    556.6 KB · Views: 54
OP
O

Oregon rock crusher

Well-known member
Joined
Jun 28, 2016
Messages
1,944
Location
West of Salem
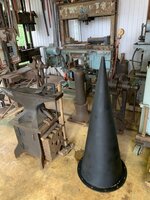
True enough retDAC, when you can make what you need with what you have laying around you usually come out ahead. I went out after lunch and finished this project off. I put solid welds on all the joints and smoothed them out with a grinder, belt sander, and flap wheel. Good enough. I put a coat of black primer on it so it doesn't rust up right away. I think I ended up with around 12 hours in this. I still have the pie shaped cut offs from the oxygen bottle in case I forget how much fun I had and decide to make a smaller cone for use with the anvil hardy hole...Could happen. Ed.
 

Attachments

  • IMG_6225.jpg
    IMG_6225.jpg
    566.3 KB · Views: 43
  • IMG_6227.jpg
    IMG_6227.jpg
    810.5 KB · Views: 40
  • IMG_6230.jpg
    IMG_6230.jpg
    568 KB · Views: 43
To avoid these ads, REGISTER NOW!
OP
O

Oregon rock crusher

Well-known member
Joined
Jun 28, 2016
Messages
1,944
Location
West of Salem
Thanks Jayman, I'm sure it will work out fine for the uses I might have. A steel cone should even have a few practical advantages over a cast iron one. Still would like to find a vintage cast cone though. Ed.
 

MongoTA

Well-known member
Joined
Mar 10, 2018
Messages
1,051
Location
CT
Nice work! Those heavier forming tools are indeed pricey and hard to come by; cone anvils, swage blocks, and your heavy leg vise, etc, ever since resellers got into the game.
Mongo
 
OP
O

Oregon rock crusher

Well-known member
Joined
Jun 28, 2016
Messages
1,944
Location
West of Salem
Thanks Mongo, it does seem like prices have been steadily going up the last 10 years or more. I used to think anvils were worth around $3/lb but now $6-$8/lb are being asked. Heavy 6"-7" post vises seem to be bringing a premium and 8" post vises are hard to find at any price. I still have a few 6" diameter rock breaking bits for making post anvils. Ed.
 
To avoid these ads, REGISTER NOW!
Top Bottom