altersaddle
Well-known member
Last week I managed to get a bunch of nice Williams Superrench combinations, from 1/4" up to 11/16". I'd already bought a single 7/8" Superrench so there's close to a useable set now.
Some Internet research exposed this vintage catalog, which has this nifty display board:

Continued internet research determined that there's no way I could easily buy a vintage Williams board. Also, I don't have any of the flare nut wrenches, nor would I use any of them beyond the 7/16" and 1/2" ones.
There's also no spot for the 1/4" wrench, and I wouldn't bother getting the fractional 32nds sizes.
So, I've decided to make my own!
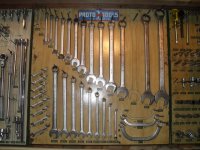
My tablesaw sled is conveniently 24x30", so I laid out my metric set and the SAE Williams set to see how things might fit:


With and without the flare nut wrenches I do own / need on the side.
This leaves me with a few questions:
1. How big do I go? I was planning on only going up to 1". My biggest metric combo is 22mm.
2. Is there a pressing need for anything metric under 8mm? My normal projects are bicycles and a Triumph sports car.
3. Is it okay to put the Williams Tools of Industry logo on a home-made board, or will the garage gods curse my very soul for such a heathen travesty?
Has anyone got designs to share, or links to existing threads of interest? I tried to search but it turns out "wrench" and "board" are pretty common words.
Some Internet research exposed this vintage catalog, which has this nifty display board:
Continued internet research determined that there's no way I could easily buy a vintage Williams board. Also, I don't have any of the flare nut wrenches, nor would I use any of them beyond the 7/16" and 1/2" ones.
There's also no spot for the 1/4" wrench, and I wouldn't bother getting the fractional 32nds sizes.
So, I've decided to make my own!
My tablesaw sled is conveniently 24x30", so I laid out my metric set and the SAE Williams set to see how things might fit:
With and without the flare nut wrenches I do own / need on the side.
This leaves me with a few questions:
1. How big do I go? I was planning on only going up to 1". My biggest metric combo is 22mm.
2. Is there a pressing need for anything metric under 8mm? My normal projects are bicycles and a Triumph sports car.
3. Is it okay to put the Williams Tools of Industry logo on a home-made board, or will the garage gods curse my very soul for such a heathen travesty?
Has anyone got designs to share, or links to existing threads of interest? I tried to search but it turns out "wrench" and "board" are pretty common words.


 Do you think using a vinyl decal would have been easier/better? Also, are you planning on putting "outlines" like the pic I've attached?