To avoid these ads, REGISTER NOW!

Making Boat Portlights-Metal Help Needed

Skiff Builder

Well-known member
Joined
Jun 7, 2016
Messages
1,783
Location
Southern NJ Coast
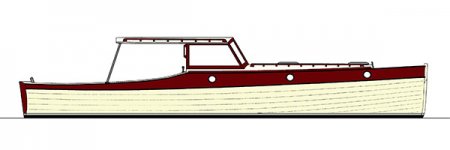
Need to make 6 Portlights for a boat. These will be non opening
(ie Deadlights), placed 3 each ,in near vertical planks in the cabin sides.

Going to use 3/8" Acrylic or Polycarb, 6" diam circle, let in to the planking so they lie flush with the outer surface.

Question is on making trim rings for the outside of these. Need a doughnut shape. Thinking to use 6061 Al plate stock.
Any advice on cutting/shaping these doughnuts.
Also finishing the Aluminum-prime/paint, powdercoat, etc.

I have most of the typical woodworking tools. Limited metal fab exp.
Thks, Skiffs


Link to my current boat build
https://www.garagejournal.com/forum/showthread.php?t=435884
 

Attachments

  • Deadlight dwg.JPG
    Deadlight dwg.JPG
    30.3 KB · Views: 22
Last edited:
To avoid these ads, REGISTER NOW!

readhead

Well-known member
Joined
Dec 8, 2012
Messages
6,187
Location
Durango, Co.
You can use all your woodworking tools on aluminum. I don't think you need 6061 for what you are doing. I would stay away from powder coat for this. When PC fails it will be a mess and hard to refinish.
 

warbird

Active member
Joined
Nov 16, 2013
Messages
35
buy the cheapest aluminum you can find (but make sure it is T3 or better...no O condition-too gummy).... cut rough shape outside with jigsaw. drill a hole in the center and make an arm for your hand router that attaches to a bolt running through said hole.... make arm long enough to bring your router bit to the outside of trim ring.... cut outer rim (use cutting oil so the aluminum does not gum up your router bit) now rough cut center with jigsaw.... set up your router table fence to start trimming rough cuts. keep moving the fence on router table untill final dimension is achieved....or take to a machinist and he can knock all 6 out in an hour or two
 

kd3pc

Well-known member
Joined
Aug 10, 2013
Messages
3,630
Location
Northern Neck
I would nix the AL altogether and use King Starboard as it is easy to work, lives a long time in the marine environment and epoxy/adhesives are decent. no corrosion, no sharp edges and so on.

Dow 795 to lay in the portlights and you should be set for decades.
 
OP
S

Skiff Builder

Well-known member
Joined
Jun 7, 2016
Messages
1,783
Location
Southern NJ Coast
Thanks for the advice gents. I like working in Starboard, but colors may be the issue (wish they had a bronze color). Also this a 1920's design I'm building so most likely metal or wood for the trim
 

Attachments

  • IMG_0082.JPG
    IMG_0082.JPG
    43.4 KB · Views: 28

matt_i

Well-known member
Joined
Mar 14, 2008
Messages
10,741
Location
SE Michigan
What's the intended thickness?

One could always lay them out by hand, bandsaw, scroll-saw, jigsaw, file and sand to scribe marks laid out with a compass.

One could setup a jig(s) to hold the parts and use a router on a radius-arm to cut the ID and OD. If you made the hole pattern first it could be used with plastic washers to hold the part down but some incorporation of double-sided tape would make it less chattery in my opinion.

A waterjet shop might be able to make these up fairly inexpensively depending on their workload. The design is pretty simple and if you can deal with large-scale materials they already have on-hand for other projects it will also save time in custom-ordering materials.
 

californiaHank

Well-known member
Joined
Nov 20, 2015
Messages
487
Anything but bronze/glass would look odd to me on a 1920's design.
Lots of stock designs are available that would be better than anything you could DIY, but they're not inexpensive. Since it's a wood boat, I'd consider making at least the forward ones opening, for ventilation/mold control.

If it's a budget project, (painted) aluminum portlights with acrylic windows from somebody like Beckson are cheap and decent looking if you find black or white acceptable.
 
Last edited:
To avoid these ads, REGISTER NOW!

Bigblue&Goldie

Well-known member
Joined
Mar 12, 2009
Messages
10,702
Location
AZ
I'd have the rings laser cut since you already have a drawing. Then use a router to shape them.
 

theoldwizard1

Well-known member
Joined
Feb 22, 2011
Messages
43,236
Location
SE MI
Consider Starboard or other similar plastic. Easy to cut with standard wood working tools. Watch this video.

Experience sailors use butyl tape for sealing. It works well and is easy to replace if required.
 
OP
S

Skiff Builder

Well-known member
Joined
Jun 7, 2016
Messages
1,783
Location
Southern NJ Coast
Trim ring thickness probably 3/8- 1/2". Want them low profile as they are fairly exposed on the hull.
I found Brass/Glass fixed ports for $200 ea (need 6) but don't know quality yet.

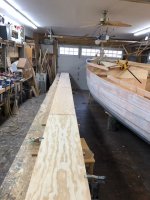
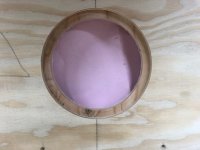
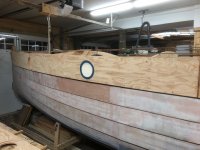
I did scarf up the last two planks of the hull,got them cut to shape and roughed in openings of the ports. I'll have some time to go before installing them.

It's a 1920's design. built in a composite of marine plywood/epoxy resin/Xynole Polyester fabric.

All great suggestions,again thanks.
 

Attachments

  • IMG_0614.jpg
    IMG_0614.jpg
    113.1 KB · Views: 37
  • IMG_0616.jpg
    IMG_0616.jpg
    63.7 KB · Views: 41
  • IMG_0617.jpg
    IMG_0617.jpg
    90.9 KB · Views: 41
  • IMG_0619.jpg
    IMG_0619.jpg
    110 KB · Views: 35
  • IMG_0620.jpg
    IMG_0620.jpg
    84.1 KB · Views: 35
OP
S

Skiff Builder

Well-known member
Joined
Jun 7, 2016
Messages
1,783
Location
Southern NJ Coast
Hank,
Your link are the ones I chose to fall back to if, I don't make my own.

I will also have to make up the opening windshield and side windows for the salon-either solid mahogany or glassed and painted other wood.
 

californiaHank

Well-known member
Joined
Nov 20, 2015
Messages
487
Hank,
Your link are the ones I chose to fall back to if, I don't make my own.

I will also have to make up the opening windshield and side windows for the salon-either solid mahogany or glassed and painted other wood.

You earned the respect of all of us from your thread on the 'simple' task of flipping the hull. I admire your skills and ingenuity, and hope you'll keep us updated on your progress with a few future threads.
 
To avoid these ads, REGISTER NOW!
Top Bottom