Bob, you are such as wise man. Your knowledge is certainly something to be proud of. Well, I do plan on addressing the areas you described. I really didn't know what I was getting myself into when I decided this. To make matters worse I am installing a Coyote engine with a 10 speed automatic. Also new A/C so this project has turned into a monster.Mark, I'm sure you already know this but one of the common leaks on those cars is the power steering pump. It mounts directly to the crankshaft on the front of the engine and puts out 1,500psi hydraulic power to the steering gear. Ford's better idea was to also use that hydraulic power to run the windshield wipers. That means there's a little extra plumbing involved. While you're at it, maybe switch to hydroboost for the brakes to eliminate that big vacuum canister.

You are using an out of date browser. It may not display this or other websites correctly.
You should upgrade or use an alternative browser.
You should upgrade or use an alternative browser.
Mark's Monster Garage....3800 sq ft
- Thread starter IGO2XS
- Start date
jbmatth
Well-known member
Oh now that does sound like a fun little project, if it isn't too late I'd like to throw out the idea of swapping in the new 7.3L gas engine out of the super duty trucks. No particular reason.  I may know a guy you can get advise from even.
JB
I may know a guy you can get advise from even.JB
casmurbax
Well-known member
Uncle Mark, I would gladly take a ride in any of your vehicles, but I want to drive that tractor!
Seats and the van are looking great!
Seats and the van are looking great!
Too late Bob.......LOL.......the motor is out as I couldnt wait. This past week we got the motor out of the lincoln. It wasnt too bad of a job but I did have help. I would definitely not want to be putting it back in. The GEN3 Coyote I am using is a pretty wide motor and along with some of the other obstacles should make this an interesting project. The frame must be notched and we will have to modify the transmission tunnel because of the 10r80 transmission. Some of the other issues is converting the wipers from hydraulic to electric and converting the steering column so it will work with our new power steerng pump.Mark, I'm sure you already know this but one of the common leaks on those cars is the power steering pump. It mounts directly to the crankshaft on the front of the engine and puts out 1,500psi hydraulic power to the steering gear. Ford's better idea was to also use that hydraulic power to run the windshield wipers. That means there's a little extra plumbing involved. While you're at it, maybe switch to hydroboost for the brakes to eliminate that big vacuum canister.
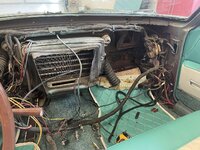
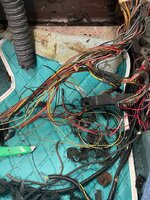
Over the weekend I decided I wanted to take the dash out. The previous upholstery shop did a terrible job on the dashboard and I wanted to take it out anyway. Wow what a job and quite frankly on Friday I almost gave up. I worked on it again on Saturday and I was successful in getting it out of the car. The other reason to remove the dash is I am installing Vintage Air. The factory A/C system takes up along of space in the engine compart and under the dash. Its amazing how much space I gained by removing it. I decided I was going to try to remove the unneeded wiring from the factory wiring harness to clean things up even more. Once I am done with the wiring I will install new wire loom and make it look new again. I am thinking of replacing the factory glass fuse panel with a new panel. I am trying to be cautious as there is so much wire in this car because of the power top, windows, and mirrors.
I have an electric wiper motor coming for it and 13" disc brakes all the way around with a proper booster.


Last edited:
I just recieved my new hood trays for the 63 Corvette. I had them done on a CNC and used an eggcrate pattern for a more modern look. I really like them. I am hoping later in the build we can come up with a grill using the same pattern. I dont know if it will be made out of aluminum or 3D print them.


Last edited:
jbmatth
Well-known member
That is pretty sweet, very well done it appears too.
JB
JB
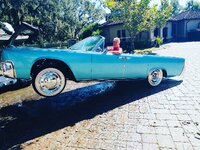
Got a little crazy yesterday and popped some wheelies in the Lincoln! Not really but I wanted to pressure clean the undercarriage with a rotating zero tip. This seemed to be the common sense redneck thing to do. My Bobcat comes in handy for all kinds of projects. Have a good day guys!!!
plain2car
Well-known member
Mark, that's funny.. .but the crazy thing is not that the lincoln looks like it is "poppin' a wheelie" it is the fact that the bobcat can actually lift the front of that lincoln in the air!!..now that is crazy!! (not to mention with you sittin' in it!!) hhaaa!!!
It's a bad *** Bobcat. With the motor out it's nothing for the bobcat to pick up. I believe the lifting capacity is around 2500 lbs.Mark, that's funny.. .but the crazy thing is not that the lincoln looks like it is "poppin' a wheelie" it is the fact that the bobcat can actually lift the front of that lincoln in the air!!..now that is crazy!! (not to mention with you sittin' in it!!) hhaaa!!!
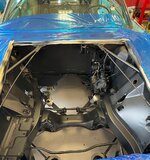
I think I have finally made it to the end of he dismantling the Lincoln as there isnt much else I can take off of the car. I removed everything from the engine bay and had a guy come by with his mobile sand blaster to strip the paint (and grease) off. I covered all the car except the engine bay and he took it all down to metal. I followed up with my PPG primer and sprayed all the bare metal. I have a small notch to do in the frame and once we have a quick fit on the engine I will follow up with a black satin enamel. I just couldnt see pulling the motor and not refreshing the engine area. I really love the way it turned out.
I have been working with Kris Horton on the rendering for my Corvette. He just sent me a few high resolution images to look at. He pretty much nailed the car and the modifications we have planned. Its really amazing what these guys can create with their computer. I wish I could say its all downhill from here on but its not going to work out that easy with this car. I have created some obstacles buy moving the motor back that will require a lot of thought but I feel confident we will overcome. The van will be going to the interior shop soon and hoping to be able to start spending more time on the Corvette.

I brought tires in so I could mock them up and get the measurements so I can order wheels. I am doing 19's in the front and 22's in the rear. I dont think I have seen a c2 with 22" rears but I am going for it. I happen to like big wheels and low profile tires.

I have been working with Kris Horton on the rendering for my Corvette. He just sent me a few high resolution images to look at. He pretty much nailed the car and the modifications we have planned. Its really amazing what these guys can create with their computer. I wish I could say its all downhill from here on but its not going to work out that easy with this car. I have created some obstacles buy moving the motor back that will require a lot of thought but I feel confident we will overcome. The van will be going to the interior shop soon and hoping to be able to start spending more time on the Corvette.
I brought tires in so I could mock them up and get the measurements so I can order wheels. I am doing 19's in the front and 22's in the rear. I dont think I have seen a c2 with 22" rears but I am going for it. I happen to like big wheels and low profile tires.
jbmatth
Well-known member
That is one killer rendering, what tire size are you going with on the C2?
JB
JB
Bob Heine
ALLIANCE MEMBER
Mark, that monster tire you are putting on the rear of the C2 Corvette is only 1.5-inches taller than the tires that came stock on the car in 1963.335/25-22 on the rear and 235/25-19 on the front.
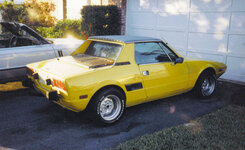
Your front tires are the same width tire I put on the rear of my Fiat X1/9 back in the 1980s. Of course a 235/50-13 is a whole lot shorter. Back then I thought even the 215/50-13s on the front were wide.

pwschuh
Well-known member
Mark, hope you and your family are well and that you have a Merry Christmas. Looking forward to seeing what happens in your garage in the New Year!
Terrick down Under
Well-known member
I know what you mean...they are the best helping hand a fella could have.Got a little crazy yesterday and popped some wheelies in the Lincoln! Not really but I wanted to pressure clean the undercarriage with a rotating zero tip. This seemed to be the common sense redneck thing to do. My Bobcat comes in handy for all kinds of projects. Have a good day guys!!!
Attachments

I have some pictures to post and will get them posted in the next few days. The van is in final stages of mechanical and I am about to get real serious on the Lincoln. I have a big pile of parts to install on the Lincoln.Merry Christmas to you and your family Mark! I’m starving for updates regarding all of the exciting news from Marks Hot Rod Garage! That’s really all I want for Christmas!!!
I have been working on the 63 Lincolns wiring for weeks. trying to organize and remove useless circuits. I also re-routed some wiring in the engine bay to try to keep it as clean as possible. I am happy to say the power windows, front and rear lights, and the convertable top are all still in working order. I left the battery in the car so I could test this areas every few days to make sure I didnt screw something up!! Although I do plan on installing a few fuse panel I was able to close the book on the wiring to move onto the air suspension and the brakes. Tomorrow I am going to flatbed the Lincoln to a friend of mines shop for this next phase. Although I would love to do this part of the build I just dont have time. My friend is a master fabricator and builder so I am confident its in the right hands. Here is a picture of the car with some of the parts.......I guess Christmas came early for the Lincoln but the looks of all these boxes.

Last week I took the Chevy van back over to Dienerbilt over West Palm Beach Florida so we could get the 4L80 transmission tuned and get the paddle shifter programed in. This was suppose to be a 2 day job and things didnt work out so well. Thankfully Doug is a master at tuning and programming so I left the van there for the week. I hope to get it back next week and then it will be time for the interior!!!!
What I am really excited about is that both the Lincoln and van are at shops and I can finally narrow my focus and spend more time on the vette. I have been messing around with the vette on and off though. I purchased this wheel/tire devise allowing me to mock up the tires and to help figure out the offset. I removed the coilovers so I could put the vette at ride height. With the average wheel $1500 to $1800 a piece you want to try to not make a mistake. I always seem to make things difficult with my decisions buy pushing the envelope. I want the corvette body to sit down over the tires so I have to tuck the wheels a little more under the fenderwells so I have travel. Even at this my back wheel is a 22 x 13 so I only have 1/2" or so of room between the tire and the body.

Last week I took the Chevy van back over to Dienerbilt over West Palm Beach Florida so we could get the 4L80 transmission tuned and get the paddle shifter programed in. This was suppose to be a 2 day job and things didnt work out so well. Thankfully Doug is a master at tuning and programming so I left the van there for the week. I hope to get it back next week and then it will be time for the interior!!!!
What I am really excited about is that both the Lincoln and van are at shops and I can finally narrow my focus and spend more time on the vette. I have been messing around with the vette on and off though. I purchased this wheel/tire devise allowing me to mock up the tires and to help figure out the offset. I removed the coilovers so I could put the vette at ride height. With the average wheel $1500 to $1800 a piece you want to try to not make a mistake. I always seem to make things difficult with my decisions buy pushing the envelope. I want the corvette body to sit down over the tires so I have to tuck the wheels a little more under the fenderwells so I have travel. Even at this my back wheel is a 22 x 13 so I only have 1/2" or so of room between the tire and the body.
Swanny1953
ALLIANCE MEMBER
Cool tool, Mark. Those will be "steamroller" tires under the back of that C2. And I thought mine were wide at 295's. Looking forward to seeing the progress on all 3 projects!
jbmatth
Well-known member
You sir are insane and we all love it, keep at it and keep us posted.
JB
JB
bowtiguy
Well-known member
What brand of wheel tool are you using there? I need to pick one up for my 3 piece wheel project on the callaway & a couple of “future” projects
Boosted1
Well-known member
Handy looking tire tool.
Looking forward to seeing the van update and drive
Looking forward to seeing the van update and drive
Trapps
ALLIANCE MEMBER
Wow on the Fiat!
jbmatth
Well-known member
@bowtiguy I don't want to stand on Mark's toes, but wanted to help ya too. It looks like Verified Fabrications kit, I have a similar one but it only has 2 contact points with the tire and in my experience that allows the tire to move a little causing it to not be centered, I'd go for this one rather than the one I have. It really makes tire setup much easier when measuring for rims.What brand of wheel tool are you using there? I need to pick one up for my 3 piece wheel project on the callaway & a couple of “future” projects
JB
pwschuh
Well-known member
You are a brave man to dive into the wiring on a Connie Convertible.
You are correct JB. I got mine from Verified too. When I had my shop I bought one that was close to $1000. Boy it was nice but I looked them up and they are no longer in business. This tool has been very helpful.@bowtiguy I don't want to stand on Mark's toes, but wanted to help ya too. It looks like Verified Fabrications kit, I have a similar one but it only has 2 contact points with the tire and in my experience that allows the tire to move a little causing it to not be centered, I'd go for this one rather than the one I have. It really makes tire setup much easier when measuring for rims.
JB
You dont know how scared I was!! Thank God I could hook up the battery every now and then and make sure I didnt mess something up. I am going to put a modern fuse panel in once I get it back. Wish me luck on that!!You are a brave man to dive into the wiring on a Connie Convertible.
I want to share a picture of the garage in its current state................the cupboard is bare so to speak as there are only two cars here. LOL I do park the dually in the garage and night and the 54 Ford is in the RV bay. Its kind of nice having room to walk around with the open space. I do have the 66 Mustang back as the fabricator installed all of the suspension brackets, sub frame connectors, and anything that would bolt on the car. Just a reminder we are using the Heidts 4 wheel independent suspension and big 13" Wilwood brakes. Anyway as you all know when your building a car you really build it in 3 steps............1. Put new parts on 2. take new parts off paint and then step 3 put all the parts back on Just to refresh you guys I am building this car for someone else. By the time we ordered all the Heidts suspension and brakes we had a $25,000 invoice...........wow. So I get the mustang back from the fabricator and he didnt want to cut the firewall because he wanted a body guy to do it. I am not a body guy but I got an itch to do it myself. There are 3 different levels of the firewall which made it a little scary but heck I figured anything I screw up I can fix. Ha ha I used a magic marker and marked around the area and with a cordless dewalt 4.5" cordless grinder cut it out. I got lucky as I dang near with much luck cut it out perfect. I used the piece I cut out as a pattern and transferred it to cardboard. I will pick up some metal this week and fit it. I cant weld so I will get someone over to help in that part of the project.
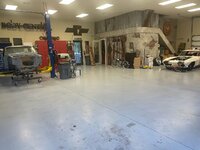


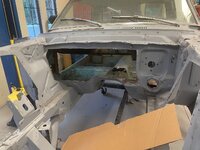

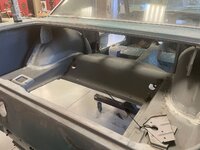
Just to refresh you guys I am building this car for someone else. By the time we ordered all the Heidts suspension and brakes we had a $25,000 invoice...........wow. So I get the mustang back from the fabricator and he didnt want to cut the firewall because he wanted a body guy to do it. I am not a body guy but I got an itch to do it myself. There are 3 different levels of the firewall which made it a little scary but heck I figured anything I screw up I can fix. Ha ha I used a magic marker and marked around the area and with a cordless dewalt 4.5" cordless grinder cut it out. I got lucky as I dang near with much luck cut it out perfect. I used the piece I cut out as a pattern and transferred it to cardboard. I will pick up some metal this week and fit it. I cant weld so I will get someone over to help in that part of the project.casmurbax
Well-known member
Hi Mark any updates?
Hope all is well.
The mustang doesn't look to bad in your last post.
Hope all is well.
The mustang doesn't look to bad in your last post.
Hi Mark any updates?
Hope all is well.
The mustang doesn't look to bad in your last post.
Thank you for rattling my chains I need to post more.
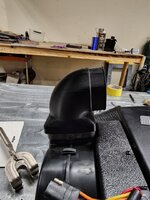
I have been hard at it with all the projects and sorry I havnt posted more detail. Right now the 63 Corvette is on the east coast at Cars of Dreams at Dienerbilt's shop. Doug is my go to guy when I need something special. Because of many factors involved and the decision I made to install the LT-4 the middle of firewall had to be moved back about 8". This caused 3 major obstacles..........1. no room for the A/C evaporator in the cockpit, 2. the mounting location for the master cylinder was eliminated 3. no room for a gas pedal, and 4. wiper motor location was modified. i ended up buying an evap unit from Old Air as they make a unit that is basically shaped like a box. It is mounted to the firewall on the passenger side of the Corvette. We removed the defrost and A/C air supply valves inside the car which is pretty cool because it all takes up very little space. Using his 3D scanner he printed a bracket to attach the evap unit to the firewall and and custom 90 degree adapter fitting............4" square to 3" round. I know it doesnt seem like much but it is so satisfying to make something custom. The first picture is the computer model, second picture shows the piece being printed and last picture is the fitting installed on the evaporator. 


The master cylinder had to be relocated and we tucked it behind the drivers side inner fender so it is hidden as well. I have a 8 speed automatic so we were able to do this. I purchased a universal brake pedal bracket and Doug fabricated a brake pedal arm that relocated the brake pedal in the proper location with a grazeable pivot pin . I only have a picture of the brake arm and will have better pictures next week when I pick up the car.


I have 5 projects going right now so in the next 5 days I will make a post about each vehicle.
Boosted1
Well-known member
I understand the satisfaction of solving the problem with that custom part. Nicely done!
Vette looks good.
Vette looks good.
I had a brake pedal arm for Doug to work with. Its 1/4" steel and he was able to make a 45 degree angle on it. That is all I wanted but Doug went ahead and drilled the holes in it to make it look custom. Its a small thing but this is the kind of go to the next level modification he does. He always goes the next step and thats why I like him.I understand the satisfaction of solving the problem with that custom part. Nicely done!
Vette looks good.
Homebody
Well-known member
That's the beauty of your projects - EVERY obstacle is overcome! Most would throw in the towel and not make the change. 
I am driving over to West Palm Beach tomorrow to pick up te 63 Corvette and bring it back home. I will shoot a few pictures of what we have done. It looks really good from the pictures I have received.
We have been working on the van and are working on blocking it. There were a few small dents they missed at the body shop and we have the repairs from damage done here in my garage. LOL Here is the van in its current state. I know it appears I am going backwards but the paint work really wasnt up to par so this time it will be done right. I have to have the van completed as I want to show it at the Goodguys Show in Columbus in July. The Lincoln in the background is a buddy of mines. He wants me to do the same thing to his Lincoln as I did to mine so here we go again. We have the motor out now and I am ordering parts for it. I pretty much know everything to buy now after my project. Also a picture of the Gen 3 Coyote going in my Lincoln.

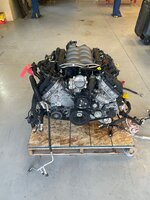

We have been working on the van and are working on blocking it. There were a few small dents they missed at the body shop and we have the repairs from damage done here in my garage. LOL Here is the van in its current state. I know it appears I am going backwards but the paint work really wasnt up to par so this time it will be done right. I have to have the van completed as I want to show it at the Goodguys Show in Columbus in July. The Lincoln in the background is a buddy of mines. He wants me to do the same thing to his Lincoln as I did to mine so here we go again. We have the motor out now and I am ordering parts for it. I pretty much know everything to buy now after my project. Also a picture of the Gen 3 Coyote going in my Lincoln.
jbmatth
Well-known member
I'm sure it stinks to have to re-paint the van, but at least this way you know it'll have the best looking paint on it you can give it. Thanks for posting progress and keeping us entertained.
JB
JB
SamYoung
Well-known member
I hope it gets done on time and I can see it in person. We visit Columbus frequently and I've always wanted to make it to Goodguys, but I've never actually been. Might even take the 74' Fiat 124 Spider down, but not to show.I have to have the van completed as I want to show it at the Goodguys Show in Columbus in July.
it does stink!! LOL Early on the van was on my lift and Doug was welding and a spark caught some insulation on the inside of the van on fire. I had removed most of the insulation and there was just a little bit of fuze on the wall and a spark ignited it and before he could put it out it bubbled the paint. The only way to fix it right was to paint the entire drivers side of the van because there is no way to blend this paint in. Then, I didnt like the way the hood fit so I figured since we had to paint the side we might as well fix the hood and paint it since it would be in the paint booth..........then I figured since we were painting 1/2 the van we might as well paint the other half......LOL This is a prime example how projects grow. Like you said it will be right. It gets painted the first week in April.I'm sure it stinks to have to re-paint the van, but at least this way you know it'll have the best looking paint on it you can give it. Thanks for posting progress and keeping us entertained.
JB
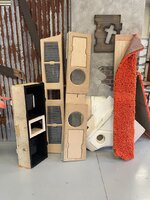
I might as well come clean and say I am tossing out some of the interior fabrication I had built. This picture shows some of the pieces that didnt make the cut. . They were some of the first pieces I made and for some reason I just thought they were too busy and had poor design.............sometimes less is more. So, I will get some shots of the interior tomorrow so you can see what is happening.
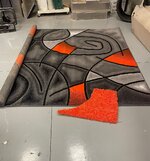
I did finally find the carpet I want to use in the van. It has all the colors of the interior.......orange, black, charcoal, and grey. i call it "modern psychedelic". The orange **** I am using is enough of a 70's theme without going overboard. My wife keeps telling me not to make it too busy and I completely agree. i hope you guys like it.
The Columbus Goodguys show is one of the top shows in the U.S. Its a huge show and is well attended. My interior guys are the wild card. They used to work for me and although talented they have a habit of making promises they cant keep. Hoping I dont have to pull out a needle and thread.I hope it gets done on time and I can see it in person. We visit Columbus frequently and I've always wanted to make it to Goodguys, but I've never actually been. Might even take the 74' Fiat 124 Spider down, but not to show.