To avoid these ads, REGISTER NOW!

MaxJax Install

cdaiscool

Well-known member
Joined
Jan 20, 2015
Messages
126
Location
Ann Arbor, MI
Put up my MaxJax tonight. Wondering if I should work to get it more perfect, or if it's okay as-is.

Also, I can't really change where the posts are. If I put them close enough to not be on the cut, the car won't likely fit, and even my 90-lb friends won't be able to shimmy out of the car. Further apart, and I can't get a 2nd car in the 2nd car spot, plus the posts will be very far apart and possibly not able to reach the car. It's not an expansion slot, and the wall side is approximately 7" from the end of the slab.

The concrete is approximately 4.5-5" near the wall, and 5.5-6" in the middle of the garage.

Hopefully this is good, otherwise I'm spending tomorrow fixing it. Need these up and running soon! The post in the middle of the garage is shimmed currently; 2 larger ones on bolt holes nearest garage door, 1 thick 1 thin on bolt 'A' and a big one on bolt 'B'.

Excuse the mess, I've been too busy with a bunch of auto projects.

https://scontent-ord.**.fbcdn.net/hphotos-xfa1/v/t1.0-9/1908454_10102944698552412_417774107972000025_n.jpg?oh=383accfaa677afececaac98f64df2eee&oe=55750916

11073570_10102944698477562_6262407991290403236_n.jpg


10425029_10102944698427662_7029586126326808808_n.jpg


64764_10102944698362792_8596272813452622463_n.jpg


11009342_10102944698258002_4837014661263235549_n.jpg


This is measured to be exactly in the middle of the string:
https://scontent-ord.**.fbcdn.net/hphotos-xfa1/v/t1.0-9/10384727_10102944698183152_1587234404038590804_n.jpg?oh=7f28693d02e05c9398974605c6d6447a&oe=558803A0

11059870_10102944698113292_5418930456642860882_n.jpg


Back of the post (this part's against the wall):
https://scontent-ord.**.fbcdn.net/hphotos-xpf1/v/t1.0-9/10394778_10102944698073372_1205898138292347758_n.jpg?oh=c34b8031c42e3bae36a2fe42bd0e4239&oe=55723CD0

10603411_10102944698018482_1211889236794936545_n.jpg


10313948_10102944697978562_5394809146176008505_n.jpg


Height of the arms currently (they're up right now, testing to see if hydraulics leak overnight/during the day.):
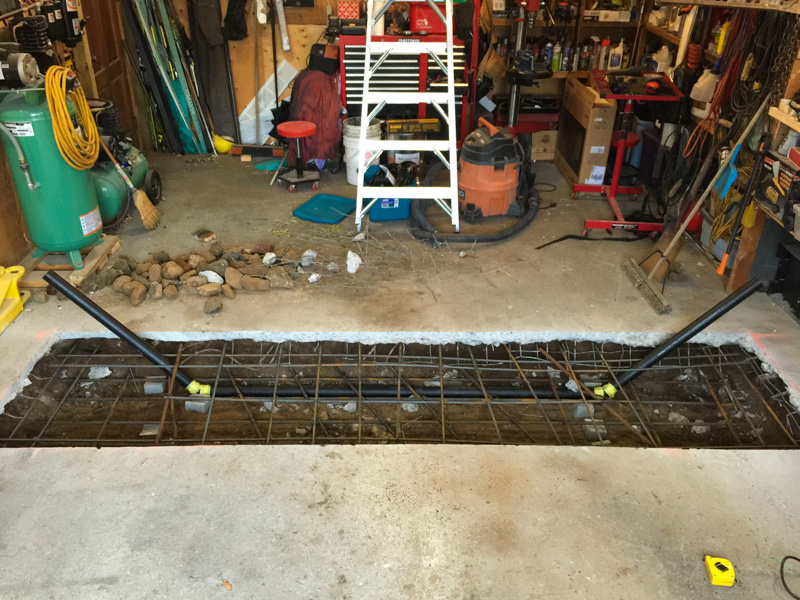
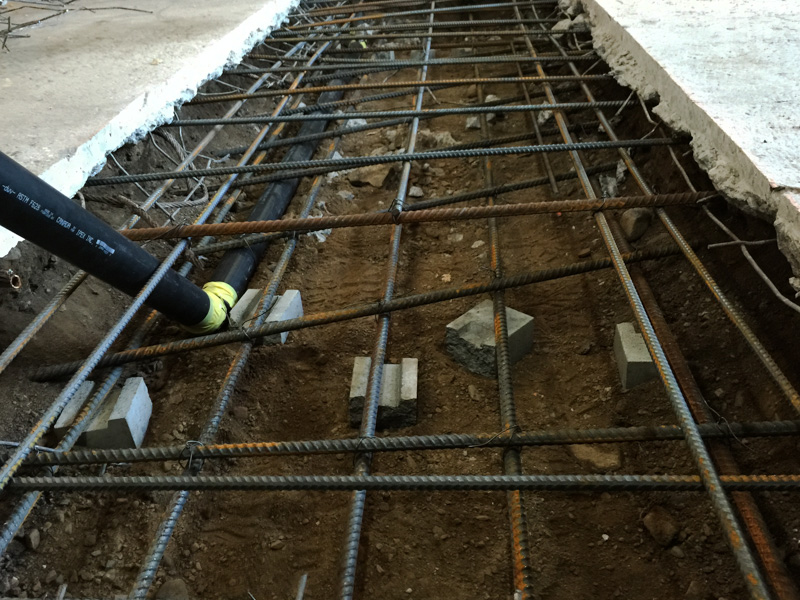
10959095_10102944697903712_7589644503585230947_n.jpg
 
To avoid these ads, REGISTER NOW!

ADSR

Well-known member
Joined
Jan 12, 2013
Messages
10,713
I would put a long level on it and shim it as plumb as you can.
 

kingchevy

Well-known member
Joined
Nov 9, 2007
Messages
247
Those line levels can be unbelievably inaccurate, I would not trust that at all.
 

Denwood

Well-known member
Joined
Sep 22, 2014
Messages
4,184
Location
Thunder Bay, Ontario, Canada
Suggest a 4ft level used on the side, and back of each post. If your posts are as far out as they look, I would fix them up. The danger of a leaning post is that your lift points will want to slide/displace on the car as you lift. This would not be cool.
 

Beemer533

Well-known member
Joined
May 9, 2014
Messages
2,057
Location
Syracuse, NY
For the line level use some mason's line stretched taught. I don't think the stuff you are using now is going to give you a good reading.

Much better would be a long level or 4' level with a straight edge though.

A water level would also work I think

This post edited by the NSA
 

Wizzard

Well-known member
Joined
Jan 28, 2011
Messages
350
I'd use a 4ft magnetic level...the magnetic levels are very handy and available at Lowes (Bostitch).
 
OP
C

cdaiscool

Well-known member
Joined
Jan 20, 2015
Messages
126
Location
Ann Arbor, MI
Hmm, I'm not finding a 4' level that's magnetic on their site. And I only saw 1 that was maybe 12" last night when I looked.

I'll at least pick up a regular one that's 4 foot and go with that. I'll do this:

-Get perfectly level with shims
-tighten down with impact (not to 90 ft lbs)
-verify straight
-repeat on post #2
-once both posts are level, use twine or mason's line for a better line level
-increase one side so are even
-tighten both to 90 lbs
-hope I'm not too high on shims

How is that for a game plan?
 
OP
C

cdaiscool

Well-known member
Joined
Jan 20, 2015
Messages
126
Location
Ann Arbor, MI
Well, the game plan changed. Long story short, the concrete cracked in a few places. Plus 4 anchors pulled up. So now I am moving the posts further away, and redoing all the holes. Thank goodness I ordered epoxy anchors so I can do it all tonight.
 

Cobra96

Well-known member
Joined
Jul 29, 2014
Messages
88
Well, the game plan changed. Long story short, the concrete cracked in a few places. Plus 4 anchors pulled up. So now I am moving the posts further away, and redoing all the holes. Thank goodness I ordered epoxy anchors so I can do it all tonight.

Sounds like the compressive strength of your concrete is inadequate. Had the same problem when installing in my garage. The pd 58's cracked the 6" concrete floor of my garage. I had to have two 4x4 12 inch footings poured and then used the epoxy. SOLID LIKE A ROCK!
 
OP
C

cdaiscool

Well-known member
Joined
Jan 20, 2015
Messages
126
Location
Ann Arbor, MI
Sounds like the compressive strength of your concrete is inadequate. Had the same problem when installing in my garage. The pd 58's cracked the 6" concrete floor of my garage. I had to have two 4x4 12 inch footings poured and then used the epoxy. SOLID LIKE A ROCK!

Yeah, definitely possible. I'm going to give it a try in the new location, away from the cracks further. If that doesn't work, then after my car's got its new engine and I can get access to the area again I'll end up pouring new footings and doing these right where I want them.

Just want to avoid that if possible.

Picture of the cracking:
https://scontent.**.fbcdn.net/hphotos-xpa1/v/t1.0-9/10957141_10102947792043032_2512984710541391230_n.jpg?oh=d9d0b5c0ceeba924db304a51f4749e64&oe=558273C9

Drilled out holes last night for the new anchors, cleaning and epoxy'ing them tonight and going to shimmy and test them for issues tomorrow. If no problems, then car hopefully up on Friday!
 

Denwood

Well-known member
Joined
Sep 22, 2014
Messages
4,184
Location
Thunder Bay, Ontario, Canada
Given the cracks on the left and the expansion cut, I would not lift a vehicle. With a balance offset during lift, there is a real danger the post could tilt over. If you do lift (and I would not), raise your heaviest vehicle a few inches and bounce your weight off front/rear bumper. Remember side torque loads will be highest at full rise height. Read this ( my 3' x 12' retrofit pour)

http://www.garagejournal.com/forum/showthread.php?t=265806

A few pics from that thread:

rebar2.jpg


The cement brick you see under the 5/8" rebar is there to make sure it stands off the ground 2 1/2 inches. The yellow tape around the ABS joints is just there as extra insurance against leaks as I did not wet test after bonding them with ABS cement. The pipe is 3", so plenty large enough to pass the hydraulic hose through.

rebar1.jpg
 
Last edited:
OP
C

cdaiscool

Well-known member
Joined
Jan 20, 2015
Messages
126
Location
Ann Arbor, MI
The holes you see are my previous ones. I'm not using these to lift a vehicle at all. I'm going to put in the epoxy anchors in holes that I drilled last night (not shown, I didn't get pictures) and those are around 6" from the cuts in the concrete, versus 3" on these ones. They're further back. I plan to get the lift plumb, tighten the lift down, probably jump on the lift while it's in the air a bit, then take it down and check for cracks. If none, then I'll move the car in, put that up a few inches, bounce it for center of gravity, then let it sit overnight at a low height. If that works, then Saturday I'll check once more for cracks, and no cracks consider it happy to go.

If I find any issues whatsoever, then I'll stop using the MaxJax, do the upgrades to the car I'm working on (turbo, baby) and after that's done THEN I'll cut the concrete and repour for a more optimum placement and a certain placement of the lift.
 

Trey T

Well-known member
Joined
Aug 3, 2011
Messages
3,749
Location
Houston, TX
Dennis:

Your rebar setup seems to be missing steel reinforcement at the critical areas, the base of the MaxJax. How did you justified the design?

Also, the steel reinforcement in the slab seems to be excessive. A foot of concrete w/ that amount of steel (5/8" bar with 10 bars) is about 8%, which is more than what I'm familiar with for slab, or even beams. Excessive steel bar is BAD!
 
OP
C

cdaiscool

Well-known member
Joined
Jan 20, 2015
Messages
126
Location
Ann Arbor, MI
Anchors were installed around 11:30 tonight. Its getting down to 30s at night, though furnace is keeping it 70 out there.

When should I be okay with truing up the posts and tightening them down to stress test the concrete?
 

ADSR

Well-known member
Joined
Jan 12, 2013
Messages
10,713
Dennis:

Your rebar setup seems to be missing steel reinforcement at the critical areas, the base of the MaxJax. How did you justified the design?

Also, the steel reinforcement in the slab seems to be excessive. A foot of concrete w/ that amount of steel (5/8" bar with 10 bars) is about 8%, which is more than what I'm familiar with for slab, or even beams. Excessive steel bar is BAD!

I completely disagree. I build houses and commercial buildings for a living. The engineers want more steel in the concrete than ever before. More steel = more better.
 

Denwood

Well-known member
Joined
Sep 22, 2014
Messages
4,184
Location
Thunder Bay, Ontario, Canada
Trey, the rebar setup was as specified by the engineer at Harris rebar...14" slab with 6" undercut. Just went with his spec... If, you look at the Mohawk rebar spec, it only specifies a 12" slab. With 14", the rebar standards call for 2 layers of reinforcement.

The epoxy anchors require 7" or so of clear concrete..hence the rebar pattern. We've lifted several vehicles now, about 5 months now, zero cracks...and the slab has seen many freeze cycles well below 0C.

Cd, thanks for clarifying, had me worried a bit :). Btw, the slab spec I did is overkill. MaxJax calls for 3'x3' , 12" thick. I went with a slab with a very high safety margin.
 
Last edited:

Trey T

Well-known member
Joined
Aug 3, 2011
Messages
3,749
Location
Houston, TX
I completely disagree. I build houses and commercial buildings for a living. The engineers want more steel in the concrete than ever before. More steel = more better.
I'm a number guy so when you say more steel, what do you mean?

Are you talking about a general slab or a beam, bc those are just different animal.
Trey, the rebar setup was as specified by the engineer at Harris rebar...14" slab with 6" undercut. Just went with his spec... If, you look at the Mohawk rebar spec, it only specifies a 12" slab. With 14", the rebar standards call for 2 layers of reinforcement.

The epoxy anchors require 7" or so of clear concrete..hence the rebar pattern. We've lifted several vehicles now, about 5 months now, zero cracks...and the slab has seen many freeze cycles well below 0C.

Cd, thanks for clarifying, had me worried a bit :). Btw, the slab spec I did is overkill. MaxJax calls for 3'x3' , 12" thick. I went with a slab with a very high safety margin.
You used 5/8" (#5) rebar, right? because that's the number I saw. Mohawk's specs are about 1% steel (cross-sectional area of steel to concrete slab excluding "cover") , very typical for rebar slabs.

the Mohawk (7000lbs capacity) A7 lift:

-existing spec of 1% rebar (#6, 12" spacing, 5bars)
-new spec (#4, 6" spacing, 8 bars) of 0.7% of steel.

These specs complies with the concrete bible, ACI code. If the engineer you used believes it will work, then go with it, but it's just a reminder for everyone else to be mindful of when it comes to build a slab for a critical machine, a lift.
 
To avoid these ads, REGISTER NOW!

Denwood

Well-known member
Joined
Sep 22, 2014
Messages
4,184
Location
Thunder Bay, Ontario, Canada
Actually we used a larger spacing than 12" grid, and used heavier steel. The extra layer (hard to see separation) was added as my slab was in the 14"-16" range. The existing (old) slab was in the 2" range, so even with a 6" undercut, I calculated a safety margin based on mass of the concrete (about 6500lbs). It would take ~800lbs assuming a lever distance of 7' (half a car) to tilt my retrofit slab, assuming complete failure of the undercut. Some more math in my thread, including soil load estimates provided by my pal Bob Klaas. Bob does most of the bridge QA engineering oversight in this area. It is very much overkill as Danmar only calls for 3'x3' @12" thick retro. Also used epoxy anchors from the get go.

It doesn't cost much more to build in a lot more safety.

Harris Rebar (local) engineers and custom cuts reinforcement for most of the local heavy construction locally. I went with their engineer's calcs on this one. Apparently he did alright as the slab has seen repeated shifts from -10C to +15C (was a brutal winter). Zero cracks.
 
Last edited:

Trey T

Well-known member
Joined
Aug 3, 2011
Messages
3,749
Location
Houston, TX
Dennis: Your slab should be revisited in another thread, but I'll give some food for thoughts.

Designing concrete slab is a very critical formulation of size of rebar, placement of rebar, thickness of conrete and cover. All of those things has to be spec'ed properly or else down the road, the owner will run into issues. Failure in civil engineer projects are TYPICALLY very slow, or they say high-resilence failure. I don't practice so much of concrete side of civil engineering but on a recent project, I had to write a general specs for concrete slab.

One of the important criteria for a concrete slab is calculating the steel % in the cross-sectional area of the slab (steel:concrete) that's perdendicular to the bending axis. It's a very simple calculation of AREA OF STEEL divided by AREA OF SLAB.

Believe or not, a slab could be stronger w/o the rebar vs a slab w/ way too much rebar. In another word (an extreme example), if you have a "continuous rebar" (like a steel plate) running between your slab, that's a weak slab (should I say two slabs?). The basic strenght of concrete slab is JUST THE CONCRETE, not the reinforcing steel bars. So don't think that if you place a bunch of "heavy" steel bars in there, it will be "strong". Again, just some food for thought.
 
OP
C

cdaiscool

Well-known member
Joined
Jan 20, 2015
Messages
126
Location
Ann Arbor, MI
I waited 24 hours for my epoxy anchors. I've done 3 installations.

I was done around 11:30 last night, won't get to 'em until around 9 pm tonight. Per Wejit, I think I'll be fine. Just found this document:

http://www.toggler.com/pdf/TOGGLER_catalog.pdf

I was under the impression that you're not supposed to mount two post lifts within 12" of a crack control cut?

Only thing I've been able to find is 10" from crack, edge of slab, or expansion joint. While I'm not a builder or laborer (except when grabbing a beer) I think this should be okay. Though there must be a minimum distance, since it did crack and either ran to or from the control cut.

If this one cracks as well under stress, I'll set the lift aside, do the work needed with the car on jack stands, and after the car's running only then cut the anchors out, pour new concrete, and probably do a jig that gets melded into the concrete as it dries like the guy with the Porsche did.
 

Attachments

  • wejit cure.jpg
    wejit cure.jpg
    72.6 KB · Views: 77
OP
C

cdaiscool

Well-known member
Joined
Jan 20, 2015
Messages
126
Location
Ann Arbor, MI
Well, I got it good and level after an hour. Went to tighten the epoxy anchor and the very 1st one lifted. Time for new concrete and paying someone to do it.

I throw in the towel. Would have been cheaper, faster, easier to have it installed professionally initially.
 
OP
C

cdaiscool

Well-known member
Joined
Jan 20, 2015
Messages
126
Location
Ann Arbor, MI
Apparently even though I followed the instructions to the letter, no epoxy got on the anchor. Curious how this happened.
 

Attachments

  • 14268180258521646744162.jpg
    14268180258521646744162.jpg
    142.7 KB · Views: 178

WVBrady

Well-known member
Joined
May 5, 2005
Messages
1,679
Location
WV
Apparently even though I followed the instructions to the letter, no epoxy got on the anchor. Curious how this happened.
If the hole went all the way through the concrete, the epoxy probably just pushed out the bottom. I used way too much epoxy in the first two holes because of that, so I ordered more and used some sort of padding at the bottom of the holes and filled up the hole before inserting the anchors. A little epoxy squished out the top when I pounded them down.
 
OP
C

cdaiscool

Well-known member
Joined
Jan 20, 2015
Messages
126
Location
Ann Arbor, MI
If the hole went all the way through the concrete, the epoxy probably just pushed out the bottom. I used way too much epoxy in the first two holes because of that, so I ordered more and used some sort of padding at the bottom of the holes and filled up the hole before inserting the anchors. A little epoxy squished out the top when I pounded them down.

What did you use for padding? I'll probably end up doing that.
 

Mr onetwo

Well-known member
Joined
Apr 6, 2011
Messages
2,006
Location
Coastal Maine
I would see if you can pull out all the other anchors. Then get a piece of steel rod 7/8" in diameter about 12" long or longer. Make a mark on it that equals the length of the epoxy anchor and test all your holes. Get a bag of fast setting grout and fill any holes with a void underneath. Mix up a small amount at a time and use the steel rod "tell-tale" to tamp down the grout and make sure you have holes of the proper depth that are filled up in the bottom. After you have properly prepared all the holes so the epoxy won't run out the bottom, make sure to wire brush out the holes and then vacuum thoroughly. Ream out with your drill as necessary (epoxy is not as sensitive to an out-of-round condition as mechanical anchors)then overfill your holes a bit with adhesive to make sure that some epoxy squeezes out when you drive the anchors in and you should be golden. The grout is only to seal up bottom of the holes in order to retain the epoxy. I would only use grout. A non-cement based product could react with the epoxy and cause a potential failure. It is a simple fix IMHO.Good luck!:thumbup:
 
OP
C

cdaiscool

Well-known member
Joined
Jan 20, 2015
Messages
126
Location
Ann Arbor, MI
How do I mix the quikrete in small enough batches? Just use a paper bowl and trowel it into the hole?

Figure you mean this stuff:
http://www.lowes.com/pd_10437-286-100450_0__?productId=3006121

Also, found out from a co-worker that Menards sells Wejit stuff, so I'm going to stop over there after my flying lesson tonight to see if I can get epoxy.

Who knows, maybe I'll have a lift this weekend yet... already have the car in the garage, so that's no longer the rush.
 

Mr onetwo

Well-known member
Joined
Apr 6, 2011
Messages
2,006
Location
Coastal Maine
How do I mix the quikrete in small enough batches? Just use a paper bowl and trowel it into the hole?

Figure you mean this stuff:
http://www.lowes.com/pd_10437-286-100450_0__?productId=3006121

Also, found out from a co-worker that Menards sells Wejit stuff, so I'm going to stop over there after my flying lesson tonight to see if I can get epoxy.

Who knows, maybe I'll have a lift this weekend yet... already have the car in the garage, so that's no longer the rush.

No...use this stuff http://www.homedepot.com/p/Quikrete-20-lb-FastSet-Non-Shrink-Grout-158520/100318454 mix it up in a foam or paper cup to a pourable consistency, but not too thin. Use the dowel to force it down the hole if necessary. You don't have to use Wej-it brand epoxy...just make sure you don't mix brands and have plenty of mixing nozzles. Simpson Strong-tie makes good structural epoxy and its readily available.3 tubes total will be plenty. Prep all your holes ahead of time and then do 5 anchors at a time. Make sure you get the correct size hole brush (VERY important).:beer:
 

Denwood

Well-known member
Joined
Sep 22, 2014
Messages
4,184
Location
Thunder Bay, Ontario, Canada
Cd, I'm thinking a home depot concrete cutter rental, demolition hammer and 30 minutes later you'll have two 3x3 holes cut. Do the two pads at 12" thick.

One of the issues I had with using the existing pad, is that the epoxy anchors really do need 6-7" of concrete . I have another 10 anchors with epoxy(ordered extra), so pm if you want them. If not, do the grout thing as Mr onetwo has described.

If you use the grout, pack it in until your hole is partly filled, then re-drill a few hours later to depth. That will contain the epoxy, and you'll have a "correct" depth hole as well. I would take his point on making sure the existing anchors can take at least 100ft/lbs of torque with no pull out. If your anchors are not recessed, then space the bolt up with washers that clear the anchor...in other words, make sure the anchor can be pulled out if it fails the torque test. Don't use an impact gun at all to tighten them.

A torque of 100ft/lbs should test each anchor to about 9300 lbs clamp load which is a safety factor of about 3x.. plenty for this application. Reference here: http://www.spaenaur.com/pdf/sectionD/D48.pdf

If that torque scares you, then just reference these numbers from MaxJax themselves:

Results:
Tension stress per bolt = 2,838 lb tension, loaded per ALI B-1 diagram.
Tension stress per bolt = 3,238 lb tension, loaded per Arms Fully Extended.
Safety Factor = 443% (based on ALI B-1 arm extension)
Safety Factor = 389% (based on fully extended arms perpendicular to the lift)

All that basically says that your bolts need to resist at least 3238lbs, assuming a fully loaded hoist. 100ft/lbs torque on a 5/8 11 bolt will put about 9300lbs of force on it. The epoxy anchors should be good to 26000lbs before pull out...and I suspect a chunk of concrete would be in your hands before that happened.

If anyone finds an error in my math there, please pipe in.
 
Last edited:
OP
C

cdaiscool

Well-known member
Joined
Jan 20, 2015
Messages
126
Location
Ann Arbor, MI
Holy cow, thanks to the both of you!

I ended up going the epoxy route one more time. Home Depot doesn't carry the Simpson Strong-Tie around here, so I picked up some Sika AnchorFix-1 stuff. There were 2 types of them, a pro and a fast setting, though they were both within minutes of each other for gel times.

Forgot to pick up a 7/8 rod so I'll pick one up tomorrow.

Here's to hoping tomorrow goes better than yesterday!
 

Mr onetwo

Well-known member
Joined
Apr 6, 2011
Messages
2,006
Location
Coastal Maine
Holy cow, thanks to the both of you!

I ended up going the epoxy route one more time. Home Depot doesn't carry the Simpson Strong-Tie around here, so I picked up some Sika AnchorFix-1 stuff. There were 2 types of them, a pro and a fast setting, though they were both within minutes of each other for gel times.

Forgot to pick up a 7/8 rod so I'll pick one up tomorrow.

Here's to hoping tomorrow goes better than yesterday!

I hope you see this post before you start.Anchorfix-1 is not epoxy!:shocking: It is a polyester based adhesive. It's shear specs are super low compared to the wej-it. You can get the proper adhesive from Stanley Supply http://fasteners.stanleysupplyonlin...hors-inject-tite-awf-all-weather-formula/eca8 Keep temps in the garage as low as you can 'til you are done. Good luck!:thumbup:
 

harricanfloyd

Member
Joined
Nov 24, 2009
Messages
20
Good luck man! I didn't have that much trouble with my install...is your concrete at least 5 inches thick?? Your not reaming out the holes are u? .I used the shims to keep the post level.....not under each of the bolt holes. I believe most garages have a slight tilt so water drains back out towards the doors. I didn't measure anything either because I was afraid of installing the jack too close to the back wall so the car would not fit. I brought the car in where I wanted it, and adjusted the fully assembled jack under it.....matched it exactly to the other side....marked and blasted holes.
 
OP
C

cdaiscool

Well-known member
Joined
Jan 20, 2015
Messages
126
Location
Ann Arbor, MI
I hope you see this post before you start.Anchorfix-1 is not epoxy!:shocking: It is a polyester based adhesive. It's shear specs are super low compared to the wej-it. You can get the proper adhesive from Stanley Supply http://fasteners.stanleysupplyonlin...hors-inject-tite-awf-all-weather-formula/eca8 Keep temps in the garage as low as you can 'til you are done. Good luck!:thumbup:

No worries, I haven't yet started! It said it was for anchors so thought it would be okay.

Well, time to see if it can be obtained locally. Otherwise time to put an order in online.
 
OP
C

cdaiscool

Well-known member
Joined
Jan 20, 2015
Messages
126
Location
Ann Arbor, MI
Good luck man! I didn't have that much trouble with my install...is your concrete at least 5 inches thick?? Your not reaming out the holes are u? .I used the shims to keep the post level.....not under each of the bolt holes. I believe most garages have a slight tilt so water drains back out towards the doors. I didn't measure anything either because I was afraid of installing the jack too close to the back wall so the car would not fit. I brought the car in where I wanted it, and adjusted the fully assembled jack under it.....matched it exactly to the other side....marked and blasted holes.

5.5 and 4.5, though possibly more - measuring using a brush and the end is a point so not including it in the measurement.

That's what I did as well, brought the car in the garage and measured them from there. Not reaming the holes out whatsoever.

This is my general luck. Oh well. Now I apparently need to wait for more epoxy. Simply isn't available even in the Detroit area.
 
OP
C

cdaiscool

Well-known member
Joined
Jan 20, 2015
Messages
126
Location
Ann Arbor, MI
Got a shipped notice on my order from Stanley on my Wejit AWF Inject-TITE. Tonight I'll likely do the grouting in the holes. :thumbup:

Also, so how tight should I be anchoring the lift to the anchors? If I should be doing a test of 100 lbs, should I be doing like 60 when used? Or 90? I know MaxJax calls for 90...
 

harricanfloyd

Member
Joined
Nov 24, 2009
Messages
20
Dont' wanna be a pain mang, but just want you to enjoy the lift.....cause once it's in, you'll love that stupidly expensive thing lol. I did not use a torque wrench on my anchor bolts/nuts. I tightened till they where snug and then 1 and a half turn till tight. When I mount the jack to the floor, I tighten the bolts with a Dewalt cordless.....set on 17. If anything, do exactly what max jax call for no more no less!
 
Last edited:
To avoid these ads, REGISTER NOW!
Top Bottom