To avoid these ads, REGISTER NOW!

MaxJax M6K lift anchors…regular or epoxy?

sticknrudder

Active member
Joined
Oct 25, 2023
Messages
35
Location
Southwest Michigan
I bought a used M6K that I am looking to install in my garage. Since it’s used it does‘t come with any anchors. Should I get the regular ones or the epoxy? Floor is probably 40+ years old but was never really used so its flat and in great condition. Heard people recommend the epoxy type but they’re more expensive and look harder to install maybe? Thanks for any recommendations.
 
To avoid these ads, REGISTER NOW!

mepstein

Well-known member
Joined
Sep 17, 2010
Messages
1,290
After reading a ton of maxjax threads I felt that the failure rate of the wedge style anchors was just to high and easily justified the epoxy anchors. I have no regrets using the epoxy. Rock solid for three years now.
 
OP
S

sticknrudder

Active member
Joined
Oct 25, 2023
Messages
35
Location
Southwest Michigan
mepstein and Rusted Nut, thank you! When you installed yours did you have enough epoxy? I’ve read reviews saying the kits don’t come with enough. What type of epoxy is used? Is it something that can be purchased outside of maxjax?
 

mepstein

Well-known member
Joined
Sep 17, 2010
Messages
1,290
I bought aftermarket epoxy anchors and a high strength epoxy made for the anchor install. Also bought the expensive dual tube applicator. I’m not made of money but felt it would be a good investment over time and for piece of mind.
Important tips - rent one of the Bosch sds plus hammer drills and buy a good quality bit. It makes the install very easy. Use the base of the maxjax as a template. Buy some round metal bristle brushes, cut off the loop end, chuck it in a drill and use it to clean out the hole. Then lots of vacuuming. Stuff a coffee filter in the bottom of the hole to keep epoxy from draining into the dirt. Place painters tape around the holes so any drips or epoxy overflow when you put the anchors in the hole is easy to clean up.
 

mm08822

Well-known member
Joined
Jan 13, 2012
Messages
6,029
Location
NJ
Using epoxy requires clean, dust-free holes otherwise it is compromised from the start. True even for wedge-only anchors.
Blowing them out and using bottle brushes is the trick. If the holes go through the slab, then water also can help in dust removal. Obviously, the holes must be dry before mixing/placing epoxy.

If your slab is thin, there is concern about drilling all the way through the slab as the bottom of the slab can blow out reducing the anchor grip length. (Similar to drilling all the way through a concrete wall from one side and the bit blows out a large area once close the the other side.
Changing from hammer mode to rotary-only mode towards the end of the depth can help reduce this.
 

olytdi

Well-known member
Joined
Dec 3, 2011
Messages
2,202
Location
Olympia, Washington
I feel like I reply to this question bi-yearly. I use the stock provided wedge anchors on now two different shop floors. I've never had one fail since, like 2009 when I bought mine on a group buy.

I just lifted my Silverado 1500 last night to change the oil...

I check the torque periodically. Never a problem.
 

Rusted Nut

Well-known member
Joined
Dec 11, 2022
Messages
1,823
Location
Northern Arizona
You can buy epoxy @ Home Depot and similar stores. Read instructions. Squirt it out until fully mixed. Brush and blow holes clean. Try not to drill all the way through slab; but if you do, just stuff in the bottom of the hole to prevent epoxy from running out the bottom.
 
OP
S

sticknrudder

Active member
Joined
Oct 25, 2023
Messages
35
Location
Southwest Michigan
Sounds like I can’t go wrong with epoxy and being that my lift came with no anchors, epoxy won’t be that much more expensive for me. So it’s best if I don’t drill through but if it’s only the minimum thickness and I have to drill through, is the epoxy still the way to go in that case? If it’s the best way to go regardless I’ll go ahead and order those. Also does the epoxy that comes with the kit require a special caulk gun? So just buy the kit and buy extra epoxy from Home Depot? Is it pretty much guaranteed I will need extra? Thanks for all the help so far.
 
OP
S

sticknrudder

Active member
Joined
Oct 25, 2023
Messages
35
Location
Southwest Michigan
I bought aftermarket epoxy anchors and a high strength epoxy made for the anchor install. Also bought the expensive dual tube applicator. I’m not made of money but felt it would be a good investment over time and for piece of mind.
Important tips - rent one of the Bosch sds plus hammer drills and buy a good quality bit. It makes the install very easy. Use the base of the maxjax as a template. Buy some round metal bristle brushes, cut off the loop end, chuck it in a drill and use it to clean out the hole. Then lots of vacuuming. Stuff a coffee filter in the bottom of the hole to keep epoxy from draining into the dirt. Place painters tape around the holes so any drips or epoxy overflow when you put the anchors in the hole is easy to clean up.
Which dual tube applicator did you buy? I own a Harbor Freight Bauer SDS rotary hammer drill, is that adequate or is there something special about the Bosch? Did you do the method where you complete and anchor, put the lift back and mark each hole after finishing the previous to make sure each is lined up or did you just mark them all at once? Also, do you drill a pilot hole or go straight for 7/8? Thanks for the great instructions, that is a good write up.
 

mepstein

Well-known member
Joined
Sep 17, 2010
Messages
1,290
Which dual tube applicator did you buy? I own a Harbor Freight Bauer SDS rotary hammer drill, is that adequate or is there something special about the Bosch? Did you do the method where you complete and anchor, put the lift back and mark each hole after finishing the previous to make sure each is lined up or did you just mark them all at once? Also, do you drill a pilot hole or go straight for 7/8? Thanks for the great instructions, that is a good write up.
No pilot hole per instructions. I don't remember where it was specified but it worked perfectly just using the 7/8 bit. Nothing special about the Bosch, it just worked really well. I did drill a test hole in a different location, just to get the feel of the drill and then filled it in with some excess epoxy. If I remember correctly, I started each hole using the base of the lift as the template. I drilled all 5 holes without moving the post. I can't remember if I just drilled the first inch that way or drilled the whole depth. Either way, I remember it was super easy and I let the weight of the drill do the work. I went really easy near the bottom to try not to blow out the back. Took maybe 45-60 seconds per hole. Maybe less. If my friend hadn't told me how easy it would be with the right drill and bit, I would have thought my concrete was defective. It really was that easy. I did make sure the temperature was appropriate per instructions. I let the epoxy set for a couple days before I touched it. The painters tape around the holes made cleanup super easy.
After talking to an engineer at Simpson strong-tie, I chose this epoxy. Not only high strength but actually reinforces the concrete. I felt better about using it rather than the no name Chinese epoxy tube that comes with the kit. I used the entire twin tube and I've often read that the single tube of epoxy that comes with the kit isn't nearly enough to do the job. Not everyone will agree with me going off the reservation but I'm the only one under the lift.
I only put some lightweight Porsche's on my lift. Early 911's and 914-6's. Max weight of the cars is ~ 2250lbs. So with the lift arms, each post has about 1200lbs leaning on it. That's about 240lbs per anchor. Really not much. But that's what I bought it for and with a ceiling height of 102", this is the perfect lift for my garage.
 

Attachments

  • epoxy.jpeg
    epoxy.jpeg
    25.3 KB · Views: 20
Last edited:
OP
S

sticknrudder

Active member
Joined
Oct 25, 2023
Messages
35
Location
Southwest Michigan
No pilot hole per instructions. I don't remember where it was specified but it worked perfectly just using the 7/8 bit. Nothing special about the Bosch, it just worked really well. I did drill a test hole in a different location, just to get the feel of the drill and then filled it in with some excess epoxy. If I remember correctly, I started each hole using the base of the lift as the template. I drilled all 5 holes without moving the post. I can't remember if I just drilled the first inch that way or drilled the whole depth. Either way, I remember it was super easy and I let the weight of the drill do the work. I went really easy near the bottom to try not to blow out the back. Took maybe 45-60 seconds per hole. Maybe less. If my friend hadn't told me how easy it would be with the right drill and bit, I would have thought my concrete was defective. It really was that easy. I did make sure the temperature was appropriate per instructions. I let the epoxy set for a couple days before I touched it. The painters tape around the holes made cleanup super easy.
After talking to an engineer at Simpson strong-tie, I chose this epoxy. Not only high strength but actually reinforces the concrete. I felt better about using it rather than the no name Chinese epoxy tube that comes with the kit. I used the entire twin tube and I've often read that the single tube of epoxy that comes with the kit isn't nearly enough to do the job. Not everyone will agree with me going off the reservation but I'm the only one under the lift.
I only put some lightweight Porsche's on my lift. Early 911's and 914-6's. Max weight of the cars is ~ 2250lbs. So with the lift arms, each post has about 1200lbs leaning on it. That's about 240lbs per anchor. Really not much. But that's what I bought it for and with a ceiling height of 102", this is the perfect lift for my garage.
Thanks mepstein.

I just spoke to MaxJax and they have a set of the epoxy anchors they can sell me. But they’re $360! Seems ridiculous. Where did you get your aftermarket anchors? I’m just wondering if I can save a little bit before dropping that much money on hardware. Thanks

By the way, I love your car collection. I have always dreamed of owning an early 911. A 944 is what mostly will be on my lift, although a Camry and Ram pickup will also be on it occasionally.
 

mepstein

Well-known member
Joined
Sep 17, 2010
Messages
1,290
It looks like the epoxy anchor kit has gotten silly expensive. I would still do it all over again at the current price. It’s not a one time use. Think of it as a 10 year investment. You will go through the concrete on a normal 4” garage floor.
If you have to buy anchors anyway, you are spending a couple hundred more for lasting piece of mind. At least that’s how I look at it. Reading through dozens and dozens of threads, not one mentions a lift pulling out the epoxy anchors.
 
To avoid these ads, REGISTER NOW!
OP
S

sticknrudder

Active member
Joined
Oct 25, 2023
Messages
35
Location
Southwest Michigan
Ok thanks. That’s the conclusion I’ve come to as well, but it’s good to hear it validated from someone else who has experience. I went ahead and ordered the epoxy anchors from MaxJax. Now I just need to source a good concrete bit and plan where exactly to install it on the floor.
 
OP
S

sticknrudder

Active member
Joined
Oct 25, 2023
Messages
35
Location
Southwest Michigan
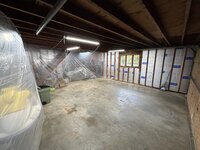
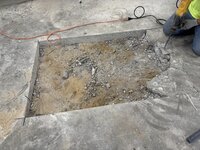
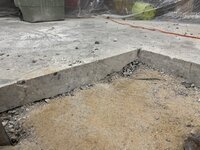
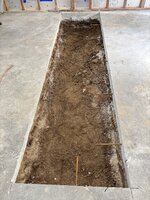
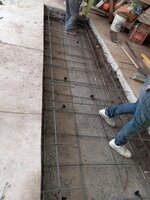
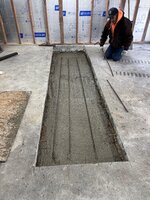
Just wanted to update you guys on my lift install. After drilling through the concrete I was pretty sure I had about 3” so I found a concrete company to come out and reinforce it. They’ve got it ready for some more rebar then pour 4,000 PSI concrete tomorrow with fiber reinforcement. It’s 3x12’ 15” deep, pinned into the old floor which looks like was between 3-4” thick. They said it was one of the best bases they’ve ever come across, very compact. One thing I’d do differently so far, is either remove everything from the garage and cover it (dust blows far and wide) or at least cover everything. I put up wall to ceiling plastic and it did almost nothing. A lot of clean up ahead of me but well worth it.

One thing I’m wondering if you guys can help me decide: I bought 2” PVC to make conduit to go from one end to the other to route hydraulic line under the floor. I’m kind of unsure whether to stick with that plan or not. I find it very difficult to get the quick connect by the bends even though I’m using large sweeps. I guess one option is take the quick connects off to route it. Probably will need more hose too as my is 15’ and a little short. My biggest hesitation though is adding things to the floor that could introduce cracks later. The concrete guys say that’s not going to be a problem, but still makes me nervous having an 2” hole within a foot of the anchors… Other options would be run it through the ceiling or just on the floor. Any thoughts?

IMG_0604.jpegIMG_0610.jpegIMG_0621.jpegIMG_0624.jpegIMG_0641.jpeg
 

mike93lx

ALLIANCE MEMBER
Joined
Dec 9, 2013
Messages
37,829
Location
Richmond, VA
They did the cuts dry? Wow

I'd likely put the pipe in, but heating and bending instead of using sweeps. Eliminating the joint and making the bend more gentle would help
 
OP
S

sticknrudder

Active member
Joined
Oct 25, 2023
Messages
35
Location
Southwest Michigan
They did the cuts dry? Wow

I'd likely put the pipe in, but heating and bending instead of using sweeps. Eliminating the joint and making the bend more gentle would help

That’s interesting…I was originally going to use a single piece of water pipe I had laying around and bend it that way. Maybe I’ll go back to that. So no concern with introducing more opportunities for cracks?
 

mike93lx

ALLIANCE MEMBER
Joined
Dec 9, 2013
Messages
37,829
Location
Richmond, VA
That’s interesting…I was originally going to use a single piece of water pipe I had laying around and bend it that way. Maybe I’ll go back to that. So no concern with introducing more opportunities for cracks?
The guy you are trusting to do the work that will hold your lift up is saying it's OK...
 

kngelv

Well-known member
Joined
May 25, 2011
Messages
2,230
Location
Detroit, MI
If you’re going to run it under the floor, I would try and dry fit everything before they pour any concrete. And make sure everything is going to work the way you want. If this is a permanent install, and you’re always gonna have the pillars there I would just maybe do the overhead lines paralleling the ceiling joists. if you come down straight at the pillars, I don’t think there will be any issues with anything being in the way and it’ll be a lot easier to deal with quick connects.

James
 

Dig Doug

Well-known member
Joined
Apr 16, 2018
Messages
1,122
One thing that can be done for the Chase Pipe -

is to dig a deeper trench To accommodate a larger radius sweep for the pipe chase

don’t use the short sweeps make your own sweep w/ a much wider radius - heat up a straight pipe and make a 2 ft or 30 inch radius - what ever works to accommodate the fittings
 

Dig Doug

Well-known member
Joined
Apr 16, 2018
Messages
1,122
I plan to to do the Same thing for my Max Jax

sawcut, remove concrete. Add new rebar / dowel into old concrete and a Chase side to side for the hydraulic lines and possible an electrical outlet / power cord
 

AC-WC

Well-known member
Joined
Jan 22, 2023
Messages
779
Location
NE, Indiana
That's the 1 thing I regret- not remembering to add a pipe/chase for the hydraulic lines.
Once I retire I'll be doing something to get the lines off the floor and still keep my Triumph C7000 portable.
Still using 2X's to keep from damaging the lines when I drive over them. You can see them in picture 2. Pushing 4 yrs now.
 

Attachments

  • 20220525_174403.jpg
    20220525_174403.jpg
    714 KB · Views: 13
  • 20220302_134909.jpg
    20220302_134909.jpg
    814.4 KB · Views: 14

olytdi

Well-known member
Joined
Dec 3, 2011
Messages
2,202
Location
Olympia, Washington
With regard to running hydraulic lines under the concrete -- I wall-mounted my pump and simply ran the lines straight up the wall and over to a two-by that runs across the bay, dropping each line from above directly to each respective coupling. Lines are entirely out of the way, hugging the posts and unaffected by the vehicle when lifted full height. Nothing on the floor, nothing hanging where it's in the way. I think its 12 years now like that without an issue.

I just measured the lines I needed and ordered them with couplings attached.
 
OP
S

sticknrudder

Active member
Joined
Oct 25, 2023
Messages
35
Location
Southwest Michigan
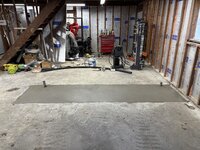
It’s done! I ended up putting in 2” PVC. It’s kind of iffy getting the hydraulic hose through with the quick connect on the end so I’ll likely remove it, then fish it through and add it back on the other end. Very happy with how this turned out. The guys did a great job, one had 40 years of concrete experience. Very glad I paid them for it instead of doing it myself. $1,500 in 2025 money is very reasonable. I have the heater cranked up and the garage is sitting at 62F 60% humidity. Should be perfect conditions for curing.

@AC-WC, I love your shop! Very cool looking ceiling, nice overhead space too.

IMG_0688.jpegIMG_0694.jpegIMG_0697.jpegIMG_0699.jpegIMG_0705.jpegIMG_0709.jpegIMG_0711.jpeg
 

AC-WC

Well-known member
Joined
Jan 22, 2023
Messages
779
Location
NE, Indiana
Wow-you got a bargain for the concrete work! You'll have tons of confidence with that pour.
 
To avoid these ads, REGISTER NOW!
Top Bottom