To avoid these ads, REGISTER NOW!

ME87's Simple 3 Car

ME87

Well-known member
Joined
Jan 19, 2012
Messages
65
Location
Tucson
My wife and I purchased our first garage in May, and moved into the house attached to it. :bounce:

It was a finished 3 car but pretty plain without a single shelf or spot of paint other than white

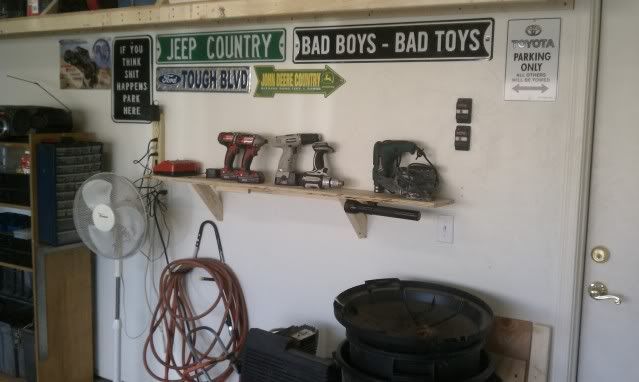
I quickly added the shelf along the back wall for storage
IMAG0482.jpg


Put up some pegboard
IMAG0481.jpg


and hung a few signs
IMAG0455.jpg


That sufficed for a bit, while I could make some improvements to the house

4 Weeks ago I decided to epoxy the floor and start on the paint scheme as well as put down molding to to seal the bottom of the wall and floor.

2011-12-30_14-46-48_580.jpg

2011-12-31_12-43-38_957.jpg

2012-01-03_21-31-17_904.jpg

2012-01-19_20-43-58_996.jpg


This is how it sits now with the addition of my signs again
2012-01-21_17-20-37_133.jpg


Next plan is get 220 in the garage (I'm going to run it all in well placed external conduit and boxes) as well as plumb permanent air into the garage and move the air compressor out back.

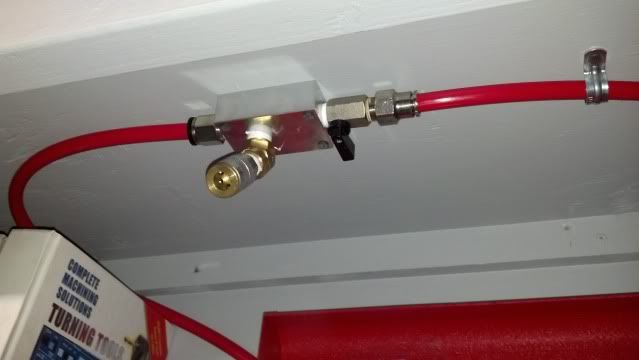
For the air I'm going to use a system similar to the "Rapid Air" kits out on the market but I'm piecing mine together from McMaster Carr as well as making some modifications to their manifold design. This system will be run externally as well, but will also be placed well enough that it doesn't look tacky. I will have a few manifolds placed at various points in the garage with quick connects.

ManifoldFitting1.jpg


Please feel free to make suggestions and criticisms
 
To avoid these ads, REGISTER NOW!

SiGmA_X

Well-known member
Joined
Aug 13, 2005
Messages
1,111
Location
Portland, OR
You appear to be off to a great start! Nice work! What floor coating did you use? I highly support moving the compressor out of the garage. I have mine in a ducted, insulated room and it really makes running for a long time a non-issue!
 

rmckee

Well-known member
Joined
Jan 2, 2012
Messages
457
Location
Wake Forest, NC
It's amazing what even a red stripe and some floor epoxy can do to change things up! You're off to a great start.
 
OP
M

ME87

Well-known member
Joined
Jan 19, 2012
Messages
65
Location
Tucson
First set of parts from McMaster for the air system. Manifolds are currently being manufactured and then I'll anodize them red to match the theme with the red line.

2012-01-20_20-29-29_880.jpg
 

glsmaverick

Well-known member
Joined
Dec 22, 2009
Messages
141
Location
Mid Michigan
Definitely watching this to see how you do the airline set up. I am thinking about moving my compressor to the basement.
 
OP
M

ME87

Well-known member
Joined
Jan 19, 2012
Messages
65
Location
Tucson
Acquired a new toy for the shop today

2012-01-28_18-33-24_953.jpg


and also started preliminary design on my welding table. it will be 2' X 3' and have multiple places for a vice as seen on other benches on the forum.

GarageWeldingTableMRK2.jpg


As it sits right now It's about 240 Lbs with a 3/8" top and 1/4' middle tray. I'll add a back splash to keep sparks off of the wall as well as adjustable feet to level it. The slots are so I can implement some clamps similar to the Miller X clamp tables which I can't afford, nor would I pay 4 figures for if I could, lol. A few more details to add such as ground clamp location, gun holder, and maybe a chip tray below the main the top.
 
OP
M

ME87

Well-known member
Joined
Jan 19, 2012
Messages
65
Location
Tucson
Had to try out the new saw today. Put together a book shelf specifically for reference manuals and books. While not large enough to hold my library, it can cold the most frequently used ones.

2012-01-29_16-28-18_929.jpg
 
OP
M

ME87

Well-known member
Joined
Jan 19, 2012
Messages
65
Location
Tucson
One more piece to my air system. Should have the manifolds from the machine shop in a few days and I can start piecing it together after anodizing.

2012-02-01_21-33-16_819.jpg
 
OP
M

ME87

Well-known member
Joined
Jan 19, 2012
Messages
65
Location
Tucson
A few updates.

Built a work Bench, just need to finish it
2012-02-12_12-09-12_819.jpg

2012-02-12_12-09-26_680.jpg

2012-02-19_18-23-39_450.jpg


Designed some custom handles for the doors on the work bench.
Handle.jpg


Finished the manifolds for the air system
2012-02-12_21-53-53_856.jpg

I still might anodize them red

Got the reel up
2012-02-04_17-42-19_193.jpg
 

Red Leader

Well-known member
Joined
May 15, 2011
Messages
2,688
Location
Denver, CO
That floor looks great! I am going to be doing the epoxy floor out in my garage, but it may not look nearly as nice...it kind of reminds me of the ocean surface if you were to instantly freeze it:D
 
To avoid these ads, REGISTER NOW!
OP
M

ME87

Well-known member
Joined
Jan 19, 2012
Messages
65
Location
Tucson
Been a while since any updates.

Put up some shelving in between garage doors
2012-03-25_16-13-16_759.jpg


Put my parts washer on a rolling cart that I fabbed up
2012-05-07_20-07-57_646.jpg


"installed" a fridge lol
2012-05-27_16-28-11_178.jpg


Put up some racks to store raw materials as well as a fan
2012-05-27_16-28-26_462.jpg


Put a nice metal top and vice on the work bench
2012-02-27_19-17-28_758.jpg


and last but not least, started my 1923 speedster build
2012-04-22_19-11-18_232.jpg
 
OP
M

ME87

Well-known member
Joined
Jan 19, 2012
Messages
65
Location
Tucson
Got around to building and mounting the TV mount

2012-06-07_20-42-26_357.jpg

2012-05-30_21-16-53_853.jpg


&

bought H.F. benchtop sand blaster and built a stand for it
2012-06-24_14-10-09_711.jpg


&

and making some slow progress on the '23 build

2012-06-24_15-21-21_912.jpg
 

NewShockerGuy

Well-known member
Joined
Oct 12, 2010
Messages
2,481
Location
Northern Virginia / DC
Been a while since any updates.

Put up some shelving in between garage doors
2012-03-25_16-13-16_759.jpg

How are those little shelves attached? I see that you have two pieces of wood under them but how is the top piece of wood attached to them?

And how do you have those two pieces of wood anchored in the walls?

Thanks,
-Nigel
 

Thruxton

Well-known member
Joined
Dec 30, 2010
Messages
767
Location
Virginia
I had moved my sandblaster, smaller than yours but with legs, out to the attached shed my dust collector is in, but when i finally got the dust collector installed, there was no longer room for the sandblaster. I was just scratching my head about adding casters to it, and your approach is just right. Will copy!
 
OP
M

ME87

Well-known member
Joined
Jan 19, 2012
Messages
65
Location
Tucson
How are those little shelves attached? I see that you have two pieces of wood under them but how is the top piece of wood attached to them?

And how do you have those two pieces of wood anchored in the walls?

Thanks,
-Nigel

The pieces underneath the shelf are screwed to the wall. There are 2 screws in each "leg". One screw is in a stud as they were conveniently placed, the other is in using a good quality drywall anchor. I then glued and screwed the shelves to these legs. They are perfectly strong for the surface area they provide unless you plan on storing lead ingots on them. One note of caution is to make sure your corner is square before you cut all of your shelves. If it's not, tailor your shelves to fit the non-square corner.

I had moved my sandblaster, smaller than yours but with legs, out to the attached shed my dust collector is in, but when i finally got the dust collector installed, there was no longer room for the sandblaster. I was just scratching my head about adding casters to it, and your approach is just right. Will copy!

Feel free.

Looking good...how do you like the HF cabinet? Work O.K. for the hobby guy? Like the 23 too.

Shaun

It works great for the hobby guy. I've done some small powder coating projects at home using my Eastwood gun and a BBQ. A small blaster like this provides perfect surface prep. for powder coating.

Looking Great, I see a turning manual but no lathe or is that hidden else where.
Nice work on the air manifolds.

No turning machines at home yet, but I do have a couple big ones at the shop.
 
OP
M

ME87

Well-known member
Joined
Jan 19, 2012
Messages
65
Location
Tucson
Added some Gladiator cabinets a while back.

2012-07-07_19-20-15_220.jpg


A view of 2/3's of the place

2012-08-12_13-10-40_65.jpg
 

55cadillacking

Well-known member
Joined
Apr 26, 2012
Messages
1,959
Location
Calgary
It's deceiving how much equipment you have in there because things are so clean and orderly. I love clean and orderly! Any pics of the entire garage?
 
OP
M

ME87

Well-known member
Joined
Jan 19, 2012
Messages
65
Location
Tucson
No pictures of the entire setup. I'll take a few this weekend. With a small garage (3 car) you have to keep it organized if there is going to be any hope of putting 3 cars in it still.
 
To avoid these ads, REGISTER NOW!
Top Bottom