Messing with my Unisaw

MongoTA

Well-known member
Joined
Mar 10, 2018
Messages
1,017
Location
CT
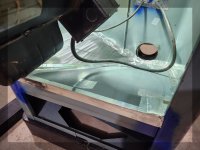
Picked up a Unisaw at auction for a couple hundred, the goal was to replace my 30 year old Delta Constractor's saw with something with a bit more bite. Loading it up at the auction site: Stripped it down, transported it upside-down.

20240909_145022.jpg

Came with the long Unifence which I like. I had the short Unifence on my contractor's saw and it served me well. Miter gauges are beat up, and it came with an assortment of slightly suspicious as well as pretty decent saw blades with a few stacked dado sets thrown in for good measure.

20240909_182955.jpg

My issue is I want to put three side-by-side Kennedy tool boxes back-to-back with the Unisaw, the Kennedy boxes will go underneath the table saw table which will be a cut down 4x8 sheet of melamine, roughly configured like this:
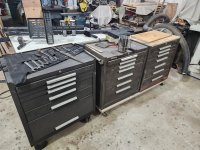
20251108_123723_resized.jpg
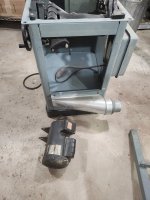
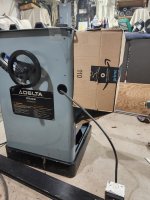
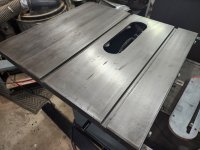
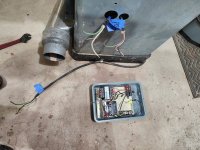
Problem is intereference from the Unisaw's sawdust collection exhaust, the Unisaw's electrical box on the back wall of the cabinet, and the three black brackets on the back edge of the table that hold the over blade dust collection. They all prevent me from snugging the Kennedy boxes tight to the back of the table saw, the sawdust port being the worst. It's only a few inches interference, but it's enough to keep a 48" deep piece of melamine from covering al that needs to be covered:

20251108_123647_resized.jpg

So it's time to do some cosmetic surgery on the Unisaw...
 
To avoid these ads, REGISTER NOW!
OP
M

MongoTA

Well-known member
Joined
Mar 10, 2018
Messages
1,017
Location
CT
Dust collection...I don't thave a great setup, just a 1-1/2hp system that I got about 30 years ago. It pulls well but not fabulously well, so I'm going to mess with the Unisaw cabinet a bit.

As is, the Unisaw flows sawdust out the right side of the cabinet. I'm going to move it to the left side, which is where my dust collector is. The pan on the bottom interior of the Unisaw cabinet is also sloped to the right, so I'll reverse the slope too.

Here's a photo from when I put the saw back together in my basement shop. A decent view of the dust port and pan that slopes towards the collection port.

20251031_214652_resized.jpg


I had already reinstalled the motor, with the motor in there was no way for me to simply flip the pan to reverse the slope. Whichever way I tried there was interference. It was easier and much faster to simply pop the tack welds that held this cross bar in place.

20251228_133939_resized.jpg

With the crossbar removed, I flipped the pan to reverse the slope, then tack welded the crossbar back in place. Then used some stunningly beautiful blue paint (ayup, years old leftover) to coat any bare steel.

20251229_192547_resized.jpg
 

Attachments

  • 20251228_133939_resized.jpg
    20251228_133939_resized.jpg
    612.4 KB · Views: 28
Last edited:
OP
M

MongoTA

Well-known member
Joined
Mar 10, 2018
Messages
1,017
Location
CT
I scratched my head over this. How to fabricate the new sawdust port. I wanted it to exit the cabinet wall at a 90 degree angle. Should I open up the entire bottom wall of the cabinet's left side and use the original sheet metal shroud, modifying it to my needs? The kicker there in the photo below is the the left wall has a seam running down the middle. Not a big deal, but I didn't feel like cutting into it or messing with the seam. Should I just get a 4" port and be done with it? Or a 4x10" rectangulal that would fit on one side of the seam.

I took the easy way out. The logical way out? The 4" round port.

20260102_162631_resized.jpg


20260102_162943_resized.jpg

It's tidy. But more importantly? It's a decision made and a decision done. Sometimes I think too much.

20260102_180029_resized.jpg
 

BTL-A4

Well-known member
Joined
Feb 28, 2018
Messages
1,256
Location
Santa Clarita
Do you find that sealing every crack helps with dust collection? Do you really get more suction where it's needed? I have a Craftsman saw and it looks like swiss cheese with all the holes in various places.
 
OP
M

MongoTA

Well-known member
Joined
Mar 10, 2018
Messages
1,017
Location
CT
Haven't fired it up yet with these modifications, it's still a work in progress.

The one "hole" that will remain open is the opening for blade height adjustment wheel axle, the opening that the axle rotates through as the blade is tilted. I can play with that a little afterwards if needed.
 
OP
M

MongoTA

Well-known member
Joined
Mar 10, 2018
Messages
1,017
Location
CT
One detail I thankfully I remembered to check before welding the cross bar back in place, I tested the motor's clearance from the resloped pan through the full motion of the motor. Has a little less than 2", good enough!

20251229_151650_resized.jpg

The Unisaw came without a motor enclosure. Using an Azamon box for a mock up to make the enclosure big enough, but not too big. I sloped the bottom of the box to match the slope of the floor pan inside the cabinet. Took some measurements and transferred them to a piece of 22ga sheet that's been patiently been waiting to be used in a project. It's time has come.

Tomorrow? Sheet metal work. Gotta get the box of band-aids ready. 🚑

20260104_152125_resized.jpg
 
Last edited:

turbowoodworker

Well-known member
Joined
Mar 18, 2012
Messages
3,548
Location
Apex NC
Good find and nice project.
Jumping to the next topic…saw blade stash.
Looks like there are some nice blades and some junk. Hard to tell on some. Sort through those and find one decent rip, crosscut and a couple of combo blades. Maybe get them professionally sharpened and you will have plenty of great cuts ahead of you.
Isee a couple of high toothe count crosscut blades that appear have a negative rake, suggesting they are more appropriate for a miter saw.
The Amana dado set is a keeper. The craftsman wobble dado is not.
 
OP
M

MongoTA

Well-known member
Joined
Mar 10, 2018
Messages
1,017
Location
CT
3hp motor, 220v, 12.4amps on the motor plate. Motor seems to be in good shape. Bearings, etc. Opened it up, inside was clean so I buttoned it back up.

Cast iron main and wing tables both look good too. One small ding on the main table, maybe 1/4" square. Nothing nasty.
 

RoninB4

Well-known member
Joined
Jul 22, 2020
Messages
3,620
Location
Under My House
-Work mods look good enough to my eye. I had always wanted a Unsaw to further my furniture/cabinetry explorations.
 

jar944

Well-known member
Joined
Jul 26, 2010
Messages
5,960
Location
Northern VA
One detail I thankfully I remembered to check before welding the cross bar back in place, I tested the motor's clearance from the resloped pan through the full motion of the motor. Has a little less than 2", good enough!

20251229_151650_resized.jpg

The Unisaw came without a motor enclosure. Using an Azamon box for a mock up to make the enclosure big enough, but not too big. I sloped the bottom of the box to match the slope of the floor pan inside the cabinet. Took some measurements and transferred them to a piece of 22ga sheet that's been patiently been waiting to be used in a project. It's time has come.

Tomorrow? Sheet metal work. Gotta get the box of band-aids ready. 🚑

20260104_152125_resized.jpg
I used a cardboard motor cover for years on my unisaw clone. It was always good enough to leave it alone...lol
 

jar944

Well-known member
Joined
Jul 26, 2010
Messages
5,960
Location
Northern VA
The best dust collection I've seen has been a complete shroud coving the blade area, either a small shroud just around the blade to a flex hose or a duct that encompasses the blade area and separates it from the rest of the cabinet. You really need a overhead/ blade shroud with separate port to get all the dust though.

That said what you have should be a large improvement.
 
OP
M

MongoTA

Well-known member
Joined
Mar 10, 2018
Messages
1,017
Location
CT
The best dust collection I've seen has been a complete shroud coving the blade area, either a small shroud just around the blade to a flex hose or a duct that encompasses the blade area and separates it from the rest of the cabinet. You really need a overhead/ blade shroud with separate port to get all the dust though.

That said what you have should be a large improvement.
You are correct, I thought long and hard about dust collection at the blade with this setup. The Unisaw came with the support pipe bracket for the over-blade shroud, but no blade guard/sawdust collection shroud. I was actually excited about the possibility of using that. Looked like this when I picked it up:

20240909_133244.jpg

I often use my tablesaw table as an assembly or work table, assembling cabinets, drawers, pieces of furniture, etc, and for my use, that bracket "as is" would have been more of a hindrance than an asset. What I figured is that in the future if I want to add blade shroud dust extraction, I could rig up something that came directly down from the ceiling and that can be folded up against the ceiling when not in use.

This will evolve over time. It's actually evolved in the day or two that I've been working on it!
 
OP
M

MongoTA

Well-known member
Joined
Mar 10, 2018
Messages
1,017
Location
CT
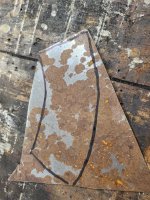
The more I looked into the cabinet, the more I thought, "yeah, this might help." So I mocked this up. The triangular piece of cardboard adds a secondary slope to the pan, with the "V" where the two slopes meet pointing downslope towards the dust extraction port.

If it doesn't help? Meh. I'm trying. Even with my old contractor's saw, some sawdust got extracted, some didn't. The sawdust that didn't would eventually be formed into a sloped "sawdust cone" leading to the extraction port. From then on out, most of the sawdust was extracted. It sort of created it's own thing. I'm not expecting this pan to remain pristine forever, just looking for "better."

20260102_195339_resized.jpg
 
To avoid these ads, REGISTER NOW!
OP
M

MongoTA

Well-known member
Joined
Mar 10, 2018
Messages
1,017
Location
CT
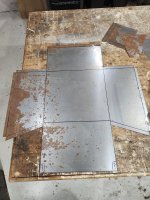
Took the measurements for the motor enclosure and the secondary slope pan and transferred them to a piece of steel sheet, I'd say 22ga, that has been sitting off to the side for a few years. Marked with a sharpie, cut with shears. Acetone as my sharpie eraser. Yup, I had to erase and redraw a few lines.

20260105_165515_resized.jpg

Cut them out:

20260105_171747_resized.jpg

Test fit, I'll trim off a nib at the point and it'll slide that last bit to the wall. Good enough.

20260105_170814_resized.jpg
 
OP
M

MongoTA

Well-known member
Joined
Mar 10, 2018
Messages
1,017
Location
CT
Put a cutoff disc in the angle grinder and scored all the fold lines.
Then swapped out the cutoff wheel for a flap disk and quickly went back and forth with horizontal passes, cleaning up to get shiny metal.

The box folded nicely with a bit of hand pressure. A few whacks with a mallet helped square up the corners as needed. I used the seamers to fold the 3/4" flange around the perimeter of the opening.

20260105_174329_resized.jpg

Motor enclosure box and secondary slope plate:

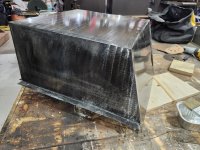
20260105_180620_resized.jpg

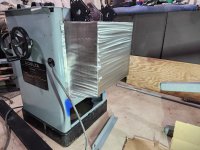
Test fit, held in place with a few welding magnets attached to the top. Pretty pleased with the fit, while I could clean up the return flange a bit, it sits pretty tight to the Unisaw cabinet on all sides as is:

20260105_175810_resized.jpg
 
OP
M

MongoTA

Well-known member
Joined
Mar 10, 2018
Messages
1,017
Location
CT
Installed the secondary slope piece of metal, sealing the edges with aluminum tape. I'll see how it holds up. Then waxed and buffed the interior cabinet surfaces as well as the carriage for the motor and blade. I installed a set of three matched pulley belts, there were two on the saw when I picked it up and they were heavily split and frayed.

20260107_115836_resized.jpg

For the motor enclosure, I opened the folded seams up just enough to seal with a bead of silicon caulk, then reset the seams and tack welded the corners to snug the box square. I waxed the interior of the box. The exterior, the bright metal was a bit too bright for my liking, so I mixed up some black oxide, sprayed it, then wiped it dry and then gave it a thin coat of Penetrol (had an open can on hand) as a protective coating. It'll take a day maybe two for the Penetrol to cure. Sort of the same as boiled linseed oil if anyone uses that on metal. So patience for me while the Penetrol cures.

20260107_112715_resized.jpg
20260107_112811_resized.jpg
 
OP
M

MongoTA

Well-known member
Joined
Mar 10, 2018
Messages
1,017
Location
CT
(Sort of) Buttoned things up today.

Yesterday I drilled three screw holes through each of the two side flanges of the motor cover to match up wth the factory holes on the cabinet.

My wife has a couple of large pieces of felt we use as a topper for a game board/puzzle. She had some scrap, I cut a few 3/4" wide strips to be used as a weatherstrip. Didn't think I had any proper adhesive on hand, so yesterday I took some Penetrol, painted it a little heavy on the metal flanges, then set the felt strips onto the Penetrol. Let it sit that way overnight. Came down this morning and they were glued tight. Gummy boiled linseed oil to the rescue!

Heated an awl and used that to melt through the felt at the screw holes. I didn't want to take a chance of just driving the screws through the felt and having the thread catch on the felt and rip the felt off the flange. The heated awl resulted in nice clean holes through the felt.

20260110_120820_resized.jpg

Mounted the motor box pn the cabinet and it fits nice and tight. When I originally dry fit it, there was a slight gap at the middle of the top flange. I put a straight edge on the unisaw cabinet and the top crosspiece was bowed in. I used a pipe wrench to straighten it, so the top now has a nice fit.

20260110_121524_resized.jpg

Sides are tight too.

20260110_121558_resized.jpg

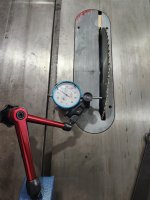
Placed the cast iron top back on the cabinet, started the four attachment bolts, and installed a saw blade. Then I used this spare dial indicator and stand to set the miter slot parallel to the blade. Once good, I snugged the bolts tight and rechecked.

20260110_124549_resized.jpg

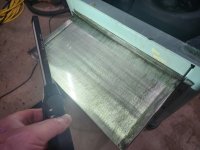
Gave the cast iron a good lookover. There are a few blemishes, but nothing nasty. The right hand miter slot had a small metal burr, I filed that off. Took a ~120grit 3M pad and gave the top a decent but not overly extensive dry scrubbing, then a wet acetone scrubbing, then a wipedown with a microfiber.

20260110_125955_resized.jpg

There are a couple of shallow scratches, I scrubbed one of them individually with the scotchbrite, it improved a bit but I never got to shiny metal. Don't know if they warrant any further attention, speak up if any of you have ideas. For now, it is what it is. I waxed the top and that's it.

20260110_130152_resized.jpg

Next up, I need to figure out the Kennedy boxes. Not certain which boxes I'll use as the base for the outfeed table. I'll build a 2-by base as needed to elevate them as needed, then get a sheet of melamine to cover it all.

I've been fairly lakadaisical getting this done, but...it's done. (Almost. lol)
 
OP
M

MongoTA

Well-known member
Joined
Mar 10, 2018
Messages
1,017
Location
CT
From the "I Just Can't Leave Well Enough Alone" department, this just in:

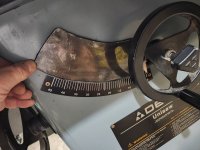
This is the only big hole left in the cabinet.

20260112_175032_resized.jpg

I've seen a few things by others to try to cover that slot; brushes, sliding panels, etc. I figure over its life my contractor's saw probably spent 98% of the time with the blade at 90 degrees to the table. So here's my 98% solution. Traced this out on a 22ga cutoff from the motor enclosure:

20260112_172518_resized.jpg

Same treatment, hit it with a flap disc to clean, black oxide to decorate, then Penetrol to seal. Then stuck a piece of felt on the back side of it.

20260112_174632_resized.jpg

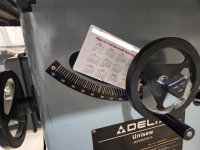
Fits really well. The right side of it tucks in tightly behind the bevel angle pointer mechanism. It rides on top of the bevel angle scale. I'll use a rare earth magnet (or something else?) to hold the left edge against the cabinet. Attach a handle of some sort.

20260112_174811_resized.jpg

While it only took maybe 25-30 minutes from start to finish, when done, I walked out to the mailbox to pick up the daily delivery. What was in today's mail? A 2026 calendar magnet from our heating oil company. Oh well.

20260112_231906_resized.jpg
 

Lumpy102

Well-known member
Joined
Aug 26, 2012
Messages
207
Location
Ontario Canada
Nice job on the motor enclosure box, you might want to leave a vent hole somewhere for the dust collector to draw a bit of air from, you'll need some air volume to keep the sawdust moving, humorously, you might create enough negative pressure to draw your board down tight to the saw table.
 

rlitman

Well-known member
Joined
Oct 18, 2010
Messages
24,678
Location
Long Island
Nice job on the motor enclosure box, you might want to leave a vent hole somewhere for the dust collector to draw a bit of air from, you'll need some air volume to keep the sawdust moving, humorously, you might create enough negative pressure to draw your board down tight to the saw table.
A TEFC motor should be moving around air in there on it's own, and the sloped bottom should be directing the bulk of the dust that settles down to the floor collection. That works relatively well in my Powermatic with pretty much the same design (though mine is left tilt).

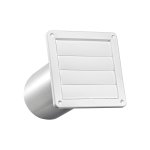
That ODP motor will be pulling a lot of dust through itself, so yeah, having some fresh air streaming at it is probably a good idea. Maybe install something like a bath fan louvre vent backwards to allow air to be pulled in?

361WTP-01.jpg

...There are a couple of shallow scratches, I scrubbed one of them individually with the scotchbrite, it improved a bit but I never got to shiny metal. Don't know if they warrant any further attention, speak up if any of you have ideas. For now, it is what it is. I waxed the top and that's it.

20260110_130152_resized.jpg
...
I'd say if there aren't any raised burrs, those scratches aren't worth bothering with. Nice work! Also, I really like the touch of burning holes in the felt.
 

Lumpy102

Well-known member
Joined
Aug 26, 2012
Messages
207
Location
Ontario Canada
A TEFC motor should be moving around air in there on it's own, and the sloped bottom should be directing the bulk of the dust that settles down to the floor collection. That works relatively well in my Powermatic with pretty much the same design (though mine is left tilt).

That ODP motor will be pulling a lot of dust through itself, so yeah, having some fresh air streaming at it is probably a good idea. Maybe install something like a bath fan louvre vent backwards to allow air to be pulled in?
My point was, If the dust collector is pulling say 400 cfm of air/sawdust out of the box that is your tablesaw base, and you restrict the airflow into the box to near 0 cfm, your dust collector becomes terribly inefficient. Dust collectors move air, coincidentally sawdust moves along with the air, the more air moving the better. And that seems to work relatively well with my General cabinet saw.
Just my opinion/observation
 
OP
M

MongoTA

Well-known member
Joined
Mar 10, 2018
Messages
1,017
Location
CT
Some good points have been brought up. There are still plenty of gaps for air to enter the cabinet. For the photo below I removed the blade tilt cover plate for photo recognition/orientation. I removed the zero clearance insert and shone a flashlight inside the cabinet. It shows there are gaps between the underside of the cast iron top and the top flange of the cabinet base.

20260202_150705_resized.jpg

I also left open the 1-1/2" diameter hole in the front of the cabinet that the switch/motor wire passes through to get to the motor. That hole is to the right of the blade height wheel and directly in front of the motor. My goal was to encourage air flow across the motor and top-down flow within the cabinet.

It's doing well so far. I've run a fair amount of poplar, cabinet grade plywood, and some sapele and cumaru through the saw and there seems to be good turbulent flow inside the cabinet with virtually no sawdust build up in the base.

So far. lol

I appreciate all the comments.
 

rslaback

Well-known member
Joined
Jul 24, 2010
Messages
4,083
Location
Westcentral Wisconsin
I'm somewhat late to the party but I do know a thing or two about dust collection. A common misconception is that you need stronger and stronger vacuum for dust collection but what you really need is air flow.

You can have a material in a perfect vacuum and it doesn't move. Add an air leak and the air rushes over to equalize pressure taking the material with. This is easily observed when you notice collections of dirt along the edges or in corners of a dust collection system. No air gets behind it so it stays in the corner. If you think of vacuuming a carpet, the agitator brush us designed to throw the dirt up out of the carpet so that the particles are between the pressure loss and the incoming air trying to fill that loss. A good system has both good vacuum pressure and good air flow.

The best dust collection for a table saw is actually going to have an intentional air leak opposite the dust port. Older unisaws actually had a louvered front panel for the purpose.
 

rlitman

Well-known member
Joined
Oct 18, 2010
Messages
24,678
Location
Long Island
I'm somewhat late to the party but I do know a thing or two about dust collection. A common misconception is that you need stronger and stronger vacuum for dust collection but what you really need is air flow.

You can have a material in a perfect vacuum and it doesn't move. Add an air leak and the air rushes over to equalize pressure taking the material with. This is easily observed when you notice collections of dirt along the edges or in corners of a dust collection system. No air gets behind it so it stays in the corner. If you think of vacuuming a carpet, the agitator brush us designed to throw the dirt up out of the carpet so that the particles are between the pressure loss and the incoming air trying to fill that loss. A good system has both good vacuum pressure and good air flow.

The best dust collection for a table saw is actually going to have an intentional air leak opposite the dust port. Older unisaws actually had a louvered front panel for the purpose.
Without going too deeply into pump curves, the dust collector you're using determines how much open area you need to get good airflow. Typical 120V woodshop dust collectors with 4" ports have a lot of space around the impeller in the volute. That's good for getting high flow numbers without restriction, but gives a terrible static lift pressure. With such a dust collector, if you restrict the openings too much, you can reduce the airflow to just about nothing.

OTOH, with a shop vac, the static lift is very good (they may have multi-stage turbines to get this), though the flow is pretty poor. With these, you really do need to reduce every gap that wastes suction, to get the most out of your system.

Neither is really sufficient to collect all of the dangerous particles from a cabinet tablesaw during use. Bill Pentz has a good discussion of the velocity of particles exiting the blade, and how much air velocity you need to counter that to keep the particles from escaping, and it takes a whole lot of power to do that.
 
To avoid these ads, REGISTER NOW!
Top Bottom