To avoid these ads, REGISTER NOW!

Metal roofing install help

brass89

Well-known member
Joined
Sep 15, 2014
Messages
240
Ok folks, I've tried contacting the manufacturer of the metal roofing and am having no luck getting a clear cut answer. Hopefully someone with more experience can help me out.

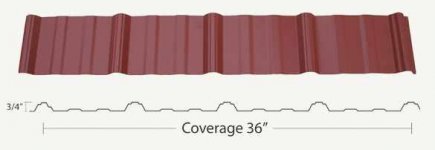
I'm looking to install imperial rib exposed fastener metal roofing. I went to ABC's website and they have detailed diagrams and videos showing 'proper' installation but some of it doesn't make sense to me.

First question, seam tape. I know seam tape is used at the overlapping edges (where ribs overlap, not overlapping 2 panels end to end). I'm assuming 1/2" wide tape here? 3/8" seems too narrow. The install diagrams also show using seam tape at the closure strips both eave and ridge (inside and outside closures). Usually I've seen the foam closure strip laid down, the panels lined up over top of it and screwed down. This calls for a layer of seal tape, then the closure strip, then another layer of seal tape, then the metal panel. The closure strip already has some 'bulk' to it so it will slightly compress making a snug fit. Does using 2 layers of seal tape at both closure points sound right? If so, this will require 4 rolls of seam tape instead of 1. Which I'm fine with, just sounds to me like adding 2-3 gaskets to something which rarely works out well.

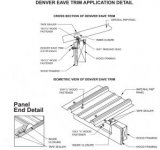
Second question, ABC offers install videos which I watched out of curiosity. In their demo, they show installing the metal roof to solid decking which I'm planning to do. They had their decking down, then roofing felt layered bottom to top like for shingles - so if moisture leaks through, it will run down a layered effect and run off the roof. Then they added the eave trim/drip edge OVER the top of the roofing felt. Sounds to me like if any moisture does reach the felt, it will run off properly until reaching the eave trim/drip edge then get hung up by the lip and may try to seep under it. Similar to covering decking with roofing felt starting at the top with the layered effect backwards trapping rather than shedding moisture. Should the eave trim with drip edge be put onto the bare decking first, then the roofing felt layered from eave to ridge to ensure proper moisture shedding? Or does it matter?

Usually everyone's advice is when in doubt, follow the manufacturer's directions. Just seems to defy common sense to me. I attempted several ABC offices to ask and clear up these questions, none were helpful including the headquarters where the sales rep they passed me off to seemed to know less about metal roofing than I do. So I'm reaching out to fellow GJ'ers. Thanks.

Included is a pic straight from their user manual showing the designation of double seam tape at closure strips. Not arguing that it's correct, rather noting it seems odd (and a bit excessive, potentially causing more problems). I included to show why I'm confused.
 

Attachments

  • Denver trim.jpg
    Denver trim.jpg
    13.9 KB · Views: 79
To avoid these ads, REGISTER NOW!

joe_padavano

Well-known member
Joined
Feb 26, 2011
Messages
1,788
Location
Northern VA
I've installed several metal roofs on various structures on my property. The double strip of mastic appears to be pretty common in the manufacturer's instructions. Keep in mind that these procedures are geared towards commercial applications and the double row is better safe than sorry to avoid call-backs. Also keep in mind that the manufacturer is trying to cover all worst-case weather environments like hard blowing rain and ice dams. I can't say that I can see how the double row could potentially cause problems.

I would be lying if I said that I used this procedure on the roofs I've personally installed on my own property. I typically use concealed fastener metal roofing (mainly Advantage-Lok, which mimics standing seam).
 

readhead

Well-known member
Joined
Dec 8, 2012
Messages
6,181
Location
Durango, Co.
Yep that is how we install it. If you don't use the tape, the closure can work its way out over time. 3/8" is what we use for seams. Two rows of 1" on end laps. I have always installed the felt over the eave trim on screw down roofs. If it is a standing seam roof where the panel hooks the trim the felt goes under the trim so water doesn't collect in the hook. There is a school of thought that if the felt is run past the edge of the sheeting and then covered with the eave trim that any water that makes its way to the bottom will come out behind the trim and exit without damaging anything.
 
OP
B

brass89

Well-known member
Joined
Sep 15, 2014
Messages
240
Ok - well if there's no potential issues and it's better safe than sorry, I have no issue using the extra tape seal. 3/8" is enough for seams?

readhead, I'm not clear on two rows of 1" for end laps, are you talking about a larger roof where it requires multiple panels to reach from eave to ridge? Or the overlap of panels on the side where one rib of the new sheet lays over the rib of the previous sheet? My roof will only be 6' from eave to ridge, so I'll be using 12' panels cut in half and be able to cover the roof with one panel vertically. (it's a small shed/workshop).
 

readhead

Well-known member
Joined
Dec 8, 2012
Messages
6,181
Location
Durango, Co.
I just mentioned it for the people that may have a longer run that would require multiple sheets. You don't need it.
 
OP
B

brass89

Well-known member
Joined
Sep 15, 2014
Messages
240
Oh ok, no worries. Just wanted to clarify. Still trying to learn all the proper terms since I don't deal with this stuff much and wanted to make sure I didn't misunderstand.
 

volleyball

Well-known member
Joined
Aug 29, 2011
Messages
4,127
Location
NY, not NYC
What model panels are you talking about? Mine isn't ABC but like their imperial and I used no tape or gaskets either in ribs or overlap.
 
OP
B

brass89

Well-known member
Joined
Sep 15, 2014
Messages
240
It's called imperial rib, it's a 5 rib 36" wide panel with 9" spacing between ribs. Apparently 'imperial' is the name ABC gives them. Here's a pic of one.
 

Attachments

  • masterrib_drawings.jpg
    masterrib_drawings.jpg
    6.7 KB · Views: 28
  • MMR-PAN-IMP-29GA-3.gif
    MMR-PAN-IMP-29GA-3.gif
    5.4 KB · Views: 21
To avoid these ads, REGISTER NOW!
OP
B

brass89

Well-known member
Joined
Sep 15, 2014
Messages
240
Here is the link to the install for ABC. It's kind of lengthy since it lists part numbers etc and installation for various types including the imperial rib.

http://abcmetal.com/pdf/2014-29-Gauge_8-14-14_WEB.pdf

page 29ga-50 shows the denver eave trim install. page 29ga-43 shows the ridge cap install. page 29ga-40 shows the screw patterns (at the bottom of that page is the imperial).

This page lists trim details including the denver gable/rake - there are text links with popup windows with illustrations for the various trims. http://abcmetal.com/rc_commontrimdetails.html#

This link has various instruction vids for installs including the exposed fastener as well as hidden fastener standing seam. http://abcmetal.com/videotutorials.html
 

volleyball

Well-known member
Joined
Aug 29, 2011
Messages
4,127
Location
NY, not NYC
I see the difference. The stuff I use has a stepped profile on the ridges. They state that those ridges, help with eliminating siphoning which would draw water up the panel.
The tape is for the foam sealer panels. I don't use those. It may stop driven water from going up but it also would prevent water from draining.
Mine also has you screwing in the high points all the way down, not just like the ridges for ABC. This keeps the panel from lifting which I could see the ABC way of fastening will allow. It seems they either wanted to be different or were too cheap to buy better rollers for their panel machine. With the screws in the ridges, it goes through both panels locking them together, no tape needed.
For my shed the foam board is the barrier for all things that those foam strips will provide.
Hope this helps. Their instructions make sense to me, just that I would not do it that way.
 

readhead

Well-known member
Joined
Dec 8, 2012
Messages
6,181
Location
Durango, Co.
Volleyball, I didn't mention the stitch screws in the seams because the op was asking about attaching the panels to the roof. I suggested he find the install guide for whatever panel material he is buying. Not sealing the ridge so water can get out is foolish. If water needs to get out, the ridge was not installed correctly.
I install this stuff for a living and have to provide a warranty. If I half assed an installation like you are suggesting I would be out of business in no time.
 
OP
B

brass89

Well-known member
Joined
Sep 15, 2014
Messages
240
I opted for 1 1/2" screws and rather than put the purlins on top of the felt covered decking, they'll be running flush with the tops of the rafters. Solid purlins though, actually stretching across the rafters not just blocking in between rafters. This way I can run the metal flat to the felt covered decking, and when I screw into the flats beside the ribs it'll go through the 7/16" osb and bite into the 2x4 purlin beneath a good inch. That should prevent any lifting of the panels.

I've read a ton or tried to and there's all different ways. So long as no one see's an issue using the seam tape in conjunction with the closure strips I'll give it a whirl. In addition to the seam tape where the ridges overlap, screw on either side of the overlapped ridges and stitch through the rib as well.

The prevailing winds will for the most part be hitting the rear gabled end of the roof. Using the denver gable/rake trim, since it overlaps the edges of the panels along the gable should prevent the wind from grabbing anything.

Hopefully condensation isn't too big of an issue, it'll be an uninsulated roof (no interior osb, wallboard or anything) and not like the attic of a house (above a sealed insulated flat ceiling). Since it's thinner 29ga vs the thicker 26ga stuff, I'm a bit worried about being on it and causing ripples between raised purlins. Hoping a solid deck beneath will prevent that. So long as I use eave vents and gable vents I should be ok right?
 

readhead

Well-known member
Joined
Dec 8, 2012
Messages
6,181
Location
Durango, Co.
Sounds like you have devised a good plan. I would use 26 ga. It is very easy to strip stitch screws in the 29 ga.
 
OP
B

brass89

Well-known member
Joined
Sep 15, 2014
Messages
240
Yea, unfortunately I'm on a budget. As it is, been trying to go 'economical' while still attempting to do things right. If this shed lasts more than 10yrs, fantastic. Definitely hope to have a bigger space by then. If this was a really nice shop like a 20x30 or a permanent garage then I could justify the higher priced stuff. As it is I'm well over budget for what I consider a small/simple 8x12. At this point I'm just happy to have pieces that match and go together lol. Beats a white roof, galvanized mish mash drip edges, reddish ridge cap - can't complain too hard, a shed/workspace at this point beats what I have which is nada.
 

volleyball

Well-known member
Joined
Aug 29, 2011
Messages
4,127
Location
NY, not NYC
Volleyball, I didn't mention the stitch screws in the seams because the op was asking about attaching the panels to the roof. I suggested he find the install guide for whatever panel material he is buying. Not sealing the ridge so water can get out is foolish. If water needs to get out, the ridge was not installed correctly.
I install this stuff for a living and have to provide a warranty. If I half assed an installation like you are suggesting I would be out of business in no time.
I am not sure the OP is still going with a ridge. A lot of work for appearance.
A shed roof with the low side in the back is a great idea in snow country. The snow just slides off the back and you don't have to shovel.
Did not say no ridge cap. Just no to the foam filler. Filler between the cap and panel is advised.
My shed is lower and the screws are spread out. My house is 2-3 stories up in an open area. Subject to high winds. My purlins are 18" OC because of my insistence. You double the number of supports and tie down. This give the roof triple the strength. I don't have the wavy look I see on many buildings with the same metal.
 
OP
B

brass89

Well-known member
Joined
Sep 15, 2014
Messages
240
volleyball, Yes I'm going with a ridge. Just a classic 8x12 with gabled roof. It's not just for appearance, it's a fairly strong design and where I have the gravel pad base located there's a walkway (path) between it and a utility trailer. The rear of the shed will be facing into the prevailing wind (rather than the 12ft side) and behind the shed's 8ft rear wall is a garden area. If I had a single planed roof, all water would run off the back and wash right into the garden area. This way it sort of breaks it up. I opted to put doors on the short wall only so I'd have two uninterrupted 12ft walls inside and since I'm not using gutters (at the moment) a door under the eaves would be like walking through a waterfall to enter/exit if it's raining.

To either side of where the shed's going, are nothing but foot paths to a garden area that won't be used in winter so no shoveling.
 
To avoid these ads, REGISTER NOW!
Top Bottom