To avoid these ads, REGISTER NOW!

MF corner brace

Half-fast eddie

Well-known member
Joined
Jul 10, 2021
Messages
1,479
Location
Virginia
Found this Millers Falls 502 corner branch at an antique store. Paid too much, but I didn't have one and it was calling my name. Catalog says it's nickel plated, and as such it's in excellent condition. Only problem is that the gearbox seemed to be gummed up a little, so it doesn't turn easily. I want to fix that.

Question: how do I get the cover off the gear box? The domed sheetmetal covers are pinned in place on both sides, no apparent way to easily remove them. I don;t want to deform the covers. Ok ... looked a little closer ... looks like a set screw in the boss at the end of the shaft, i can handle that.
 

Attachments

  • corner brace.JPG
    corner brace.JPG
    317.9 KB · Views: 118
  • corner brace 3.JPG
    corner brace 3.JPG
    263.3 KB · Views: 107
  • corner brace 2.JPG
    corner brace 2.JPG
    250.6 KB · Views: 75
  • corner brace 4.JPG
    corner brace 4.JPG
    232.8 KB · Views: 80
To avoid these ads, REGISTER NOW!
OP
H

Half-fast eddie

Well-known member
Joined
Jul 10, 2021
Messages
1,479
Location
Virginia
Bumping this back up ... looking for suggestions on how to remove the domed covers on the gear box ...
 

Attachments

  • corner brace 2.JPG
    corner brace 2.JPG
    250.6 KB · Views: 80

RTM

Well-known member
Joined
May 13, 2019
Messages
13,053
Location
SF Bay Area
yup, what darkzero said, drive screws would be my guess too. I think you can get them out with a sharp edged knife or chisel (preferably one you consider disposable, or don't mind resharpening) to get an edge to pry them out, or possibly with a needle nose pliers if you can get replacements.

Missed this on Sunday, and usually anything MF gets my attention (ah, we aren't on the vintage side of the house. It moved away too fast for me.)
 

RTM

Well-known member
Joined
May 13, 2019
Messages
13,053
Location
SF Bay Area
Arrrrghhh. The thought of using a chisel to loosen the rivet raises the hair on the back of my neck.
What, you don’t have beater, loan to the neighbor chisels? Bought at a garage sale for $1? My good ones don’t get used for that, and you’d foul up a perfectly good pry bar, I mean flat bladed screwdriver, trying to get under the rivet without dinging it up. Just wiggle it under, don’t whack it with. 32oz ball peen.
 

metaldad

Well-known member
Joined
Aug 2, 2011
Messages
7,732
Location
nw indiana
you're going to have to drill out the blind rivet.
or grind down the heads, and either drill out the rivet, or, drill new holes to relocate cover............ looked at pic, cant reposition cover
trying to wedge anything under the cover will distort / scratch the cover
 

DadsTools

Well-known member
Joined
Jul 27, 2017
Messages
1,852
I'm surprised that no one has yet proposed the universal GJ cure-all for any gummed up mechanism--soak it in ATF. I've had a few vintage ratchets in my time (the permanently sealed type) that that were so gummed up as to be non-functional, that a soaking in lubricant fixed them right up. Judging from its overall condition, it's unlikely that the gearbox is shot--even if it were, where would you get the replacement gears? I had a North Bros brace where the ratchet was just about frozen that loosened right up with lubricant.

My recommendation is the dissemble what you can from the chuck back to the gearbox, then soak the gearbox in ATF or similar, propping the tool up so that only the gearbox is submerged. Bet it frees up for you after a couple-day soak. That's what I would do instead of trying to pry those rivets out, especially since the idea of them being drive screws is just an educated guess. I wouldn't try to drill them out either. If the soaking doesn't fix it, then it's inclear what kind of repair it might need anyway. Still a great collector piece. .
 

zendriver

Well-known member
Joined
Dec 10, 2014
Messages
29,685
Location
Indiana
^^^^That's what I was thinking also, to soak something in from somewhere. Has to help.

Busting it open will ruin how it looks IMO.
 

toolmiser

Well-known member
Joined
Sep 1, 2009
Messages
1,653
Location
La Crosse, WI
I think you can saw or grind a small "kerf" in the rivet and then back it out with a screw driver. Of course you will have to get new rivets.
 
OP
H

Half-fast eddie

Well-known member
Joined
Jul 10, 2021
Messages
1,479
Location
Virginia
Saw this posted in the harbor freight tool thread. Wonder if it would work to pull the pins.
 

Attachments

  • 72696F5D-354F-4AC6-8DB5-7C83A077E77C.jpeg
    72696F5D-354F-4AC6-8DB5-7C83A077E77C.jpeg
    83.1 KB · Views: 33

rharman

Well-known member
Joined
Apr 22, 2012
Messages
8,730
Location
SoCal
I just want to echo the sentiment that that brace is the coolest thing I've seen in tools in a long time.
(y) (y)
 
To avoid these ads, REGISTER NOW!

darkzero

Well-known member
Joined
Oct 20, 2011
Messages
3,315
Location
SoCal
Saw this posted in the harbor freight tool thread. Wonder if it would work to pull the pins.
Maybe but they might scratch the cover a bit if you care about that. I have the Craftsman ones like those, I use em for plastic push pin rivets on cars.

If they are drive screws, most have sprial flutes so you need to grab em & pull with an unscrewing motion to take em out. Those push pin pliers might not grab the drive screws well to turn but they might pull them up enough so you can then grab em with pliers. You could lay some tape down to try & help prevent scratches, that's what I do sometimes

If you couldn't tell from my pic, I use stripped screw removal pliers, specifically the Engineer PZ-60. They work great for drive screws for me. I think I've seen you in the Japan Tools thread so not sure if you have any Engineers. PZ-57 might work too. The popular PZ-58 might be too big but I've never tried.

zange-323295.jpg
 
OP
H

Half-fast eddie

Well-known member
Joined
Jul 10, 2021
Messages
1,479
Location
Virginia
I don’t have any stripped screw pliers, and i have been amazed at the tools that are abailable in that thread.

The brace i first asked about is in excellent condition, except a little gummy. It’s currently soaking in atf. I ordered a second one off eBay, due to arrive any day. In the pictures it looks complete, but in rough shape, lots of rust. Actually it looks like it was buried. So i’m going to experiment on it. Got it for a good price, only way to go is up.

Getting both of these for less than i paid for the first one.
 

Attachments

  • FDC19A3E-D04E-40DD-9185-7E7EB22E8A73.jpeg
    FDC19A3E-D04E-40DD-9185-7E7EB22E8A73.jpeg
    1.1 MB · Views: 26

DadsTools

Well-known member
Joined
Jul 27, 2017
Messages
1,852
I don’t have any stripped screw pliers, and i have been amazed at the tools that are abailable in that thread.

The brace i first asked about is in excellent condition, except a little gummy. It’s currently soaking in atf. I ordered a second one off eBay, due to arrive any day. In the pictures it looks complete, but in rough shape, lots of rust. Actually it looks like it was buried. So i’m going to experiment on it. Got it for a good price, only way to go is up.

Getting both of these for less than i paid for the first one.
Let us know the results of the soaking.

I found an interesting video where the host was showing two of these corner braces. On one of them, the cover dome had apparently been replaced by a home-made cover and the rivets replaced with screws. The owner may have destroyed the original cover trying to remove it. The gears were re-greased with what looks like the old vintage yellow Lubriplate (I have a nearly full can of that stuff from the 1950s--they don't make libricants like they used to, and with some products like this, that's a good thing). I also saw a photo of a really old one that was made with no cover at all. The point is that these two gears are substantial, and so it's difficult to imagine how they might be damaged from normal use. There's an excellent chance that yours is probably gummed up inside. ATF or ATF/acetone mix is the GJ universal cure-all. WD40, which also acts as a grease solvent, should work too.


If by some chance there is damage to the gears, how would one fix that anyway? I found a video of someone repairing a Bergman, but the gearbox was already open, the housing had already been broken and brazed, and the mechanism was like a u-joint, not gears. It's an interesting video nonetheless, although the fellow was something of a brutish hack.
. The job resulted in a usable tool, but having little or no collector value.

As is typical of youtube videos, finding one showing an extremely difficult task is next to impossible, or they'll skip over showing the difficult part because they don't want you to see what a struggle it was for them (it's an ego thing, I think; "see how easy I did that?"). I couldn't find any video showing the removal of one of these gearbox covers. Even if you were to get inside, it's unclear how you might replace a damaged gear. Of course, if it's a collectible, replacing gears is not as critical. If it's intended to be a user, there's still enough of these corner braces out there to find one in good working condition. In any event, I think that enough soaking in the right lubricant/solvent is going to get the job done.
 
OP
H

Half-fast eddie

Well-known member
Joined
Jul 10, 2021
Messages
1,479
Location
Virginia
Thanks, i’ll check that video. My good brace is just stiff to rotate, i don’t think anything is broken, just gummy. Hopefully a good soak will be enough.
 
OP
H

Half-fast eddie

Well-known member
Joined
Jul 10, 2021
Messages
1,479
Location
Virginia
Ironic that his site name is “hand tool rescue” … he butchered that brace. Sad part is … he will sell it on ebay as rebuilt. At one point he had a wire wheel spinning in the drill press, and held his fingers against it … dumb.
 
OP
H

Half-fast eddie

Well-known member
Joined
Jul 10, 2021
Messages
1,479
Location
Virginia
Ok, copying a discussion from another thread. The gist of it is ... I’m trying to get this corner brace back into operating condition.
 
OP
H

Half-fast eddie

Well-known member
Joined
Jul 10, 2021
Messages
1,479
Location
Virginia
So … while the squirrel tail is baking ... can’t be idle. Thought i would start on the corner brace. It’s in very good condition, except it’s really sluggish to turn. I filled a cheap pitcher with auto trans fluid and soaked the gearbox for 2 weeks. No change. I know the atf got into the gearbox, cuz when i started disassembly the pink fluid poured out.
.
So I started on the gearbox covers. As someone pointed out, they are held in place with spiral twist drive pins. I sacrificed a cheap wood chisel and work it under the metal cap, and followed up with a 5-in-1 putty knife. Got the pins up just a tad, then was able to barely get under the head with very sharp dykes. Ended up removing both sides.
1659293891832.jpeg


1659293986067.jpeg
 
OP
H

Half-fast eddie

Well-known member
Joined
Jul 10, 2021
Messages
1,479
Location
Virginia
Here's the little dykes i used to grip the pins once i got a little bit of room.
1659296579340.jpeg


After i got the covers off i found that the grease was … stiff.
1659297089392.jpeg


.
I removed a set screw from the boss near the chuck, and drove put a pin there as well. Then i drove out a pin from the driven gear. In hindsight i don’t think i needed to remove the pin from behind the chuck, have not figured out yet what it does. After removing the pin from the gear, i could gripnthe knurled ring and unscrew the chuck drive shaft. (I marked up a previous picture taken before starting work).
1659297475005.jpeg


1659297702443.jpeg


Once the chuck and shaft came out, i discovered ball bearings. Managed to capture all of them 😀
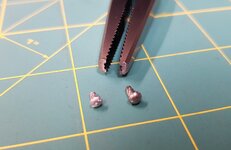
. You can see where that have been bearing near the small end of the conical face, just above the loose bearing on the right.
.
1659297858610.jpeg
 
OP
H

Half-fast eddie

Well-known member
Joined
Jul 10, 2021
Messages
1,479
Location
Virginia
I am making good progress, but not good enough. I have been working PB Blaster into the joints and rotating the handle, it’s getting much better, to the point that it’s useable now. But as you can see, it’s still stiff enough that the handle won’t flop over by itself.

1659361978363.jpeg
I took off the top knob, it was fixed with 3 small phillips screws and the knob was threaded onto the end of the shaft. Looking closer, the red arrow points to the gap where the cap pivots on the shaft. The yellow ring is fixed to the peened over end of the shaft, the threads are fixed to the knob plate. I have been squirting PB into the red gap, and also from the underside.

1659362165693.jpeg

I drove out the pin from the collar just above the gear box on the angled shaft, that didn't accomplish anything. I’m thinking that's a thrust collar to keep from driving the crank handle and gear too hard against the driven gear. I have been squirting PB into that joint as well, and cranking til the cows come home.
I would like to remove the crank handle completely, but that means taking apart the connecting strap under the knob, and i’m not sure i want to do that. Looks like it would be fairly easy to grind off the small end, but then i need to find a replacememt.

.1659362387240.jpeg

1659363020542.jpeg
.
1659363070295.jpeg
 

Rabid Badger

Well-known member
Joined
Apr 2, 2018
Messages
1,338
You guys should hold off on your pearl-clutching long enough to watch a few more of Hand Tool Rescue's videos. You'll be hard pressed to find a better resource when it comes to learning how to return old, damaged tools to a usable state.
 
OP
H

Half-fast eddie

Well-known member
Joined
Jul 10, 2021
Messages
1,479
Location
Virginia
You guys should hold off on your pearl-clutching long enough to watch a few more of Hand Tool Rescue's videos. You'll be hard pressed to find a better resource when it comes to learning how to return old, damaged tools to a usable state.
I don’t understand “pearl clutching”.
I have watched several of his videos, he is talented for sure, but in my opinion he is heavy handed with his work. Interesting videos, but i would not use them for a resource.
 
OP
H

Half-fast eddie

Well-known member
Joined
Jul 10, 2021
Messages
1,479
Location
Virginia
A little more progress. Despite all my lube work and turning the crank, there was still enough resistance somewhere that the crank handle would not fall down by itself.
.1659636309725.jpeg

So i ground off the pin that hold the rods together and took it further apart. Bingo … the top knob spins freely, and i don’t see much in the gearbox socket. The shaft was a little fouled so i cleaned that up with a nylon brush, and i cleaned out the socket with a brass brush from a shotgun cleaning kit. The brush for a 20 ga works very well.
.
1659636490622.jpeg
Then i tried to check the alignment of the crank rod to see if it has been bent. It’s not easy to do with the collar in the way, but the best i can tell it’s straight. (The chisel is there to support the straightedge).
1659636650239.jpeg


So now i will start putting it back together and lubing the bearing surfaces.
Here’s a closeup of the gears, interesting to note that the teeth don’t seem to be completely radial. One side looks off a little.
1659636794284.jpeg
 
To avoid these ads, REGISTER NOW!
Top Bottom