To avoid these ads, REGISTER NOW!

mhadden's 24x30 garage build

mhadden

Active member
Joined
Aug 2, 2011
Messages
26
Location
NW Indiana
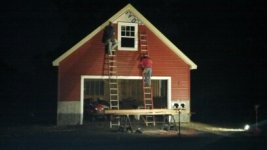
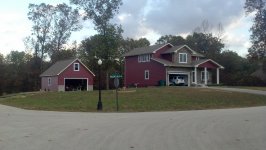
When the wife and I moved to our current house over a year ago, I immediately put "building a barn" on the to-do list. Our house is of decent size but only has a 2 car garage. With two cars, a motorcycle, riding tractor and garden cart, along with my detailing and shop supplies, it was a tight fit.

After doing some research here and other places, I put together a rough list of what things would cost. I knew that the cost could rise to over 30 grand in a hurry, so I have tried to be as realistic as I could (being a working man). Here was my list of desires:

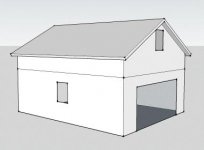
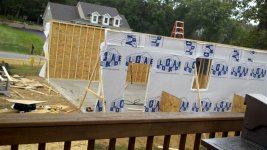
1. 24x30 (20 sq ft over what our covenants say we can build, but got permission from the developer)

2. Heat!

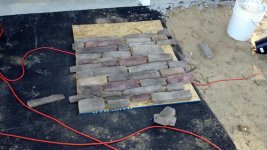
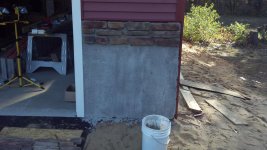
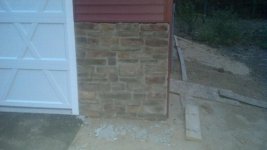
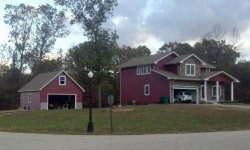
3. Matching facade with house (siding and stone, lights, and garage door)

4. 100 amp service to be able to run anything I would need to run

5. Ample outlets

6. Internet/tel/cable run to barn

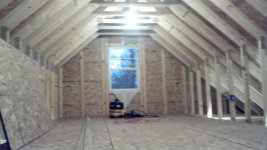
7. insulated and drywalled

Our initial quotes we had sent out came in at a low of $28k and a high of $35k. These quotes didn't include drywall, insulation, heat, or any other "luxuries. Even though my time at home is limited because of my job and other traveling, I thought to myself that I could build it myself and save some money. Now that it's most of the way done, I can say that I'm very glad I decided to go that route. Even though it was a headache more than once, the work got done to my standards and with my input, not to mention some of my sweat (and blood) went into building it!
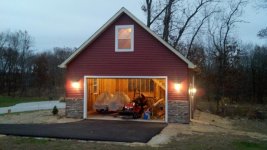
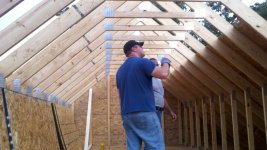
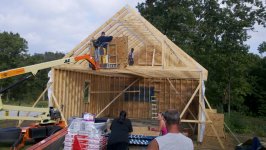
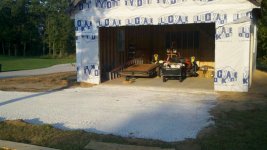
 
To avoid these ads, REGISTER NOW!

Hangtowncruzr

New member
Joined
Nov 21, 2007
Messages
4
Location
Placerville, CA
Can we send you a camara? As you know we live for these new builds and info on Workbench's, Organization tips, and foremost..projects you are working on! Thanks in advance for a dozen photo's.....
 

stangman39

Well-known member
Joined
Jun 26, 2005
Messages
65
Location
GA
Did you buy a kit or did you build it all yourself?
How did you do the roof? Trusses premade?

Thanks for the additional info
 
OP
M

mhadden

Active member
Joined
Aug 2, 2011
Messages
26
Location
NW Indiana
Concrete

While we waited for some of the quotes to build the garage to come back, we went ahead and sent out for quotes for concrete work. The highest came back at 6.25 a square foot and the lowest at $5.30. We did end up going with the lowest bid. Yes this was because of budget reasons, but we also had a chance to see the contractors previous work (which was excellent) and his demeanor was also pleasant. Since we have a lot (that is an understatement) of sand around, we gave them permission to dig back behind where the barn was to be built to bring it up the hill and level off where the garage was going to be built. To my amazement, they found pristine sand back behind there (when I got home, I thought they trucked some in) and leveled off the site. Unlike some of you here, I just went with a monolithic slab rather than a block foundation. The integrated footers are 18" deep and 12" wide with a 5" thick floor for those who are interested. Concrete work was done the last week in August and took 2 days (day one: prep, excavate, level, day two: set forms, rebar, pour, trowel, and finish).
 

Attachments

  • 2011-08-26_18-58-31_710.jpg
    2011-08-26_18-58-31_710.jpg
    149.8 KB · Views: 303
  • 2011-08-29_13-10-13_202.jpg
    2011-08-29_13-10-13_202.jpg
    150.1 KB · Views: 344
Last edited:
OP
M

mhadden

Active member
Joined
Aug 2, 2011
Messages
26
Location
NW Indiana
I have a camera, but was busy building! ;) I assigned my wife the task of helping with photos, but she was a little sidetracked keeping everyone fed and hydrated!

As far as the garage, it is what I like to call a "quasi kit" :D I initially saw the general design from a Menards flier and was going to order it as-is with the exception of changing siding, roofing, etc. to match the house. At the time I was going to order it (the vast majority of the stuff was on sale), I found a local lumber yard that would price match and give an additional 10% off. So I had the Menards print outs and went and ordered the "kit". They were able to order the trusses locally (in West Lafayette, IN) so the turn around time was much quicker than it would have been if I would have order from Menards. They were also cheaper (by $300) and had the gable ends custom made to be ready to slap plywood on (and precut for the window in the loft). I only ended up ordering the roofing, soffiting and fascia materials from Menards. Everything else was through my local lumberyard and another local supplier.

I will say word of caution to anyone that doesn't already know so: be careful on ordering based off of Menards' pick list. They provided me with too much soffit, #30 felt, and some general small dimensional lumber but not enough shingles (was shy by a bundle), fascia (shy by 8' [and this stuff was special order so I had to wait another 3 weeks to get it]), and 2 pieces of plywood (and we made as little scrap, where possible). The good thing is that the oversupplied materials were returned for a refund (and totalled nearly $500).
 
Last edited:

stangman39

Well-known member
Joined
Jun 26, 2005
Messages
65
Location
GA
Thanks for posting. I've had one concrete guy out so far and I think this is the type of slab/foundation he said he would build for me. I had wanted to have small concrete walls built to build the framed walls on but he said that would be more expensive.

Do you know how much concrete you were charged for? Since the back of my land slopes down about 2 feet he is going to have to build it up with dirt, pack it down and let concrete fall around the sides to make the walls and said he thinks it will take 18 cu. yards.

How are you doing to attach your frame walls studs to the concrete? Don't you need to put "L" brackets in before the concrete sets?

Thanks for the info. This site really rocks!
 
OP
M

mhadden

Active member
Joined
Aug 2, 2011
Messages
26
Location
NW Indiana
I'm unsure of exactly how much concrete was used. It did take two truck loads, though. I initially planned on having concrete reveals as you want because of some planned water usage (detailing) but ended up not going that route because of expense (it was another grand to add them). The concrete guys asked me where I would have my doors (overheard and entry) and placed J-bolts accordingly just after everything was troweled (but while it was still wet).
 

stangman39

Well-known member
Joined
Jun 26, 2005
Messages
65
Location
GA
That's the hardest decision I'm having....trying to get the best bang for the buck but not spending a crazy amount of $$ ordering a kit!
I'm having a guy at Home Depot up a whole materials list for me....looking fwd to that so I can always take it to the local lumber place and have them price it all out. The 84 Lumber kit with basic trusses was $4700 (wood siding...not Hardie) and the Home Depot kit w/o garage door with Hardie and basic trusses is around $7K!
 

stangman39

Well-known member
Joined
Jun 26, 2005
Messages
65
Location
GA
I'm unsure of exactly how much concrete was used. It did take two truck loads, though. I initially planned on having concrete reveals as you want because of some planned water usage (detailing) but ended up not going that route because of expense (it was another grand to add them). The concrete guys asked me where I would have my doors (overheard and entry) and placed J-bolts accordingly just after everything was troweled (but while it was still wet).

All this is so new to me...so I'm learning a lot in gathering info in pre build estimate gathering phase!

I've always thought if we do a slab like yours and put the framing right on the slab...when it rains...the water will run up or site against the wood framing. I guess many others in the past have built on top of a slab w/o concrete walls so there must be a step that I'm not hearing about yet!
 
OP
M

mhadden

Active member
Joined
Aug 2, 2011
Messages
26
Location
NW Indiana
All this is so new to me...so I'm learning a lot in gathering info in pre build estimate gathering phase!

I've always thought if we do a slab like yours and put the framing right on the slab...when it rains...the water will run up or site against the wood framing. I guess many others in the past have built on top of a slab w/o concrete walls so there must be a step that I'm not hearing about yet!
If you have proper drainage and a sill sealer, you should have no problems. You'll just have to make sure that the grade is 2" below the top of the slab.
 
OP
M

mhadden

Active member
Joined
Aug 2, 2011
Messages
26
Location
NW Indiana
After my materials arrived, it was still going to be two weeks before my parents, uncle, and two of their friends came down to help build. I started the framing myself and banged out the first 30' wall in a hour and a half. I laid my lumber down to start the second 30' wall and my air compressor took a dump. Rather than spending the time to troubleshoot, I went to town and purchased a Bostitch pancake and brought 'er back home. In the process of unboxing it, I ran into some zip ties that were a PITA to remove. I grabbed my handy-dandy box cutter, extended the blade fully and removed 2 of them. There was one in front of me that I omitted, so rather than cutting away from me (DUH!) I cut towards me. The new blade I just put on went through the zip tie like a hot knife through butter and it did the same when I couldn't stop it in time from stabbing me in the hand! It bled like crazy (I seriously thought I was going to pass out!) After 7 hours in the ER and one stitch (pathetic), I got back to work the next morning and finished the wall :D
 

Attachments

  • 290779_10100727979734708_13708005_62097030_5328336_o.jpg
    290779_10100727979734708_13708005_62097030_5328336_o.jpg
    43.4 KB · Views: 104
  • 2011-09-06_12-32-41_586.jpg
    2011-09-06_12-32-41_586.jpg
    149.6 KB · Views: 156
OP
M

mhadden

Active member
Joined
Aug 2, 2011
Messages
26
Location
NW Indiana
Many hands on deck

My family and friends of family arrived on September 7 so we could start work on the 8th. The morning of the 8th proved to be a crappy, on-again-off-again rainy day. Regardless, we got the 30' walls sheathed and wrapped with housewrap and built, sheathed, and wrapped the back 24' wall. Then we carried up the trusses from the road (the truck driver couldn't get them up by the barn because of our sloping lawn apparently) to be ready for the 9th.

On the 9th we still had rain, but it was more of a battle since it would downpour and then mist. It was a slippery as all get out! We grabbed the back wall truss and used notched 2x4's to support it while it was sheathed. We then attempted to raise it in place (again with notched 2x4's) which proved to be one hell of a chore. This is the way I was taught 10 years ago. This is the way I did it when helping friends build their barns. This was just a total PITA! We nearly dumped the thing over the back wall (even with a 2x8 "T" brace nailed in to the back wall to prevent this)! Then after getting a hold of it (and ourselves) we had problems securing and toenailing the truss into place (the 2x8 on the truss was warped). After sledging and the use of some clamps, we nailed it in.

After the back truss fiasco, we decided that it would be best to get a crane to life the trusses into place. However, I didn't want to pay $300/hr for a crane nor could I find one readily available in the area. We then went to our local rental place and found a JLG lift that would serve triple duty (raise trusses, bring shingles and other roofing supplies to the top, and allow us to systematically cut down a tree on the other side of our house). By the time we got the lift, the rain lifted and we literally zoomed through the trusses in 2 hours. We started laying the floor in the loft while some of the other guys started nailing osb for the roof.

The next day we sheathed the front truss and set it into place. Roof sheathing continued and the shingling started. The roof only got about 40% done before our help had to leave :(
 

Attachments

  • 2011-09-08_12-56-55_538.jpg
    2011-09-08_12-56-55_538.jpg
    153 KB · Views: 372
  • 337927_533158874724_154301444_30861467_2085904483_o.jpg
    337927_533158874724_154301444_30861467_2085904483_o.jpg
    83.9 KB · Views: 398
  • 2011-09-09_15-44-31_359.jpg
    2011-09-09_15-44-31_359.jpg
    154.1 KB · Views: 428
  • 340436_533158779914_154301444_30861463_1255237914_o.jpg
    340436_533158779914_154301444_30861463_1255237914_o.jpg
    92.7 KB · Views: 454
  • 333002_533158829814_154301444_30861465_525082164_o.jpg
    333002_533158829814_154301444_30861465_525082164_o.jpg
    95 KB · Views: 357
  • 341263_533158909654_154301444_30861469_2011742501_o.jpg
    341263_533158909654_154301444_30861469_2011742501_o.jpg
    95.5 KB · Views: 352
  • 336556_533175681044_154301444_30861664_1174339411_o.jpg
    336556_533175681044_154301444_30861664_1174339411_o.jpg
    95 KB · Views: 392
OP
M

mhadden

Active member
Joined
Aug 2, 2011
Messages
26
Location
NW Indiana
After our crew took off back to Michigan, the wife and I got up and started to finish shingling. My wife sat on top of the ridge and slid me down shingles while I nailed away. We were able to get through a bundle in an hour (not bad for a person who hasn't roofed since high school)! But then I grew tired of the wife making fun of me about me whining about the board starting to crack (I weigh 260lbs...a 2x6 10 foot long on roof jacks and fat man standing in middle is just waiting for a big boom)! So we employed our neighbor, who is coincidentally the one who helped the contractor do the concrete work to finish off the roof.

I was able to catch the asphalters who were paving the subdivision back behind us to pave our drive to the garage for a discount (since they were already there). The same day, the garage door I ordered for the barn that matches the house arrived and was installed! :thumbup:
 

Attachments

  • 2011-09-17_17-41-41_3.jpg
    2011-09-17_17-41-41_3.jpg
    151 KB · Views: 238
  • 306779_533376388824_154301444_30863649_1001769161_n.jpg
    306779_533376388824_154301444_30863649_1001769161_n.jpg
    94.7 KB · Views: 227
  • 315053_533376478644_154301444_30863652_2124108933_n.jpg
    315053_533376478644_154301444_30863652_2124108933_n.jpg
    87.1 KB · Views: 261
  • 319481_533506667744_154301444_30864687_1632671970_n.jpg
    319481_533506667744_154301444_30864687_1632671970_n.jpg
    46.1 KB · Views: 302
Last edited:
OP
M

mhadden

Active member
Joined
Aug 2, 2011
Messages
26
Location
NW Indiana
After we had the roof on, I felt a lot better. I could actually put stuff in the barn without it getting soaked from rain (for a while, I felt like I lived in Seattle :eyecrazy: 
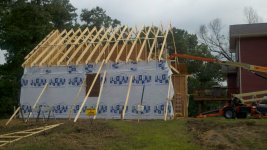
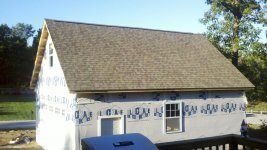
)! I again employed the neighbor to bang out the soffits and fasica. Money well spent!

I then started working on the siding after I would get home from work. I only have about an hour of daylight when I get home, so it was slow going. My best man came in from KCMO this weekend and with his help, we managed to get the north side of the garage done! For the last two nights, my neighbor has been helping me put the rest of it up. He was here until 9:30 last night finishing up the work!

So this is where my story meets up with current events. I'll keep everyone posted as the barn progresses. As long as the weather is decent Saturday, I plan on applying the stone to the scratch coat and getting the boxes for the lights done! Pics to follow!
 

Attachments

  • 1318471661395.jpg
    1318471661395.jpg
    15.1 KB · Views: 306
  • 1318464490851.jpg
    1318464490851.jpg
    14.2 KB · Views: 237
  • 1318201278747.jpg
    1318201278747.jpg
    28.6 KB · Views: 329

hockey88fan

Well-known member
Joined
May 25, 2011
Messages
428
Looks great. Now though I'm wondering why mine is taking so long, you guys work fast!
 
OP
M

mhadden

Active member
Joined
Aug 2, 2011
Messages
26
Location
NW Indiana
Now that the siding was done and I had a scratch coat up for the stone, I applied the stone veneer this weekend (since it was beautiful and the wife was gone). I first laid out the stone to the approximate area that I needed on a piece of cut plywood. I carefully selected stone so I wouldn't have to make any cuts (and I succeeded!) Getting the mortar to the right consistency was challenging: the sun, along with the dry weather and 20mph winds were drying it out quickly, so I had to keep adding small amounts of water to keep it pliable. After I finished with the right side, I started to mix the mortar for the left side when my drill chuck froze up. :mad: After a short run into town to get a new electric drill (I'll mess replace the chuck later), I mixed and threw up the stone. I also managed to get the 18" trench dug for the 1 1/2" conduit for the 3 3awg and 1 8awg feeders from the house to the barn. I also threw in 1/2" conduit to run Cat5 and coax for phone and tv. I backfilled with the snow plow (yeah, that's right - because I don't have a garden blade on my tractor) rather than spending another hour or so backfilling with a shovel and rake! :D Outside electrical boxes were also placed in the J-block and wires ran to the respective boxes. I just have to finish wiring to light boxes inside and I'll be ready for rough electrical inspection!:rocker:
 

Attachments

  • 2011-10-15_08-52-26_132.jpg
    2011-10-15_08-52-26_132.jpg
    151.7 KB · Views: 266
  • 2011-10-15_08-52-06_154.jpg
    2011-10-15_08-52-06_154.jpg
    149.8 KB · Views: 244
  • 2011-10-15_09-56-33_617.jpg
    2011-10-15_09-56-33_617.jpg
    151.5 KB · Views: 256
  • 2011-10-17_18-07-37_139.jpg
    2011-10-17_18-07-37_139.jpg
    148.4 KB · Views: 257
  • 2011-10-14_17-20-39_894.jpg
    2011-10-14_17-20-39_894.jpg
    148 KB · Views: 574

Rich H.

Well-known member
Joined
Nov 30, 2010
Messages
285
Location
SE Michigan
Great job matching the house, should be a real nice space for ya.

Nice sneak preview on the white door there too....you showed just enough to make people want to come back and check it out later..."Here's a piece of the door with the siding.....and here's the whole door, but no siding.....and come on back to see the whole thing done" :)
 
Last edited:
OP
M

mhadden

Active member
Joined
Aug 2, 2011
Messages
26
Location
NW Indiana
Framing and rough electrical inspection was completed on Friday. The wife and I finished up the grout on the stone last night. Pics to follow soon!
 
To avoid these ads, REGISTER NOW!

wolflrv

Well-known member
Joined
Jun 7, 2011
Messages
304
Location
Savannah, TN
Very, very nice!!! Looks really balanced on the property and matches the house really well!! When we bought our place, it had nasty half-rotted western cedar siding. We had our detached shop built fairly quickly and liked the siding and trim so well, we redid the whole house to match the shop..LOL! Pics are in my sig line.

Looking forward to seeing it finished out!!
 
OP
M

mhadden

Active member
Joined
Aug 2, 2011
Messages
26
Location
NW Indiana
Sorry, work has been extremely busy and all my work on the barn has been in the dark and at night (but very little has been done since the inspections). Lights inside and out are operational but I have yet to finish wiring my outlets.

Nice garage! Very similar to what I just started, although yours is a bit bigger. What are you doing for heat?
I plan on running a PE NG line from the house and running a 75k BTU ventless natural gas heater. I only plan on heating the garage to around 60° with the ability to run it up to 70° when I'm working out there. I need to work on getting the black pipe roughed from the wall where the line would come in to where I plan on hanging the heater as well as insulating (R13 on walls, R19 w/vents for the trusses).
 
OP
M

mhadden

Active member
Joined
Aug 2, 2011
Messages
26
Location
NW Indiana
Here is where I'm at now:

20111030110453600.jpg


I was able to get the outside lights and lower level inside lights installed, but as mentioned, still need to get the outlets (and the upstairs lights) finished. I also need to scrub the stone with a wire brush to get the grout staining off (from using a rough bristle brush w/ water to smooth the joints).
 

westray

Well-known member
Joined
Sep 8, 2011
Messages
87
Very nice build. The color choice is great. What are the plans for the upstairs?
 
OP
M

mhadden

Active member
Joined
Aug 2, 2011
Messages
26
Location
NW Indiana
Haven't decided yet. The wife was initially going to use it as a photography studio until she saw how dusty it was going to be and saw that it was smaller than she imagined. I will probably put a futon up there (for the nights I have to sleep in the "dog house'! But we already started to think that some storage racks would be nice (since we will start finishing off the basement this winter).
 
OP
M

mhadden

Active member
Joined
Aug 2, 2011
Messages
26
Location
NW Indiana
I was able to get another 3 hours of work in yesterday. Upstairs and north wall outlets are prepped (just need to put the outlets in) and the south side as well as the upstairs lights are completely done. I'll attempt to finish up the upstairs and north outlets tonight, then Friday (I have a day off!) I'll run and wire for my workbench and for the 240 outlets (welder and air compressor) on the east side (back of garage). I still need to scrub the stone work but included a better, close-up pic of the current work.

I'm still mulling over my options about gas heat (vs. electric)...

(sorry for the crappy, low-light camera phone pics...)
 

Attachments

  • 2011-11-06_16-35-55_589.jpg
    2011-11-06_16-35-55_589.jpg
    147.2 KB · Views: 275
  • 2011-11-06_16-36-53_187.jpg
    2011-11-06_16-36-53_187.jpg
    148.4 KB · Views: 194
  • 2011-11-06_16-36-35_45.jpg
    2011-11-06_16-36-35_45.jpg
    147.1 KB · Views: 204
  • 2011-11-06_16-37-07_378.jpg
    2011-11-06_16-37-07_378.jpg
    145.3 KB · Views: 249
  • 2011-11-06_16-37-24_400.jpg
    2011-11-06_16-37-24_400.jpg
    145.2 KB · Views: 261
  • 2011-11-06_16-37-40_439.jpg
    2011-11-06_16-37-40_439.jpg
    141.2 KB · Views: 210

xravenx

Well-known member
Joined
Nov 4, 2010
Messages
147
Location
Baltimore, MD
The steps in the corner look very similar to mine. My garage is 24' x 32' and the upstairs looks just like yours, we use for storage only, tons of room up there, you will like it.

DSC04401.jpg


DSC04417.jpg
 
Last edited:
OP
M

mhadden

Active member
Joined
Aug 2, 2011
Messages
26
Location
NW Indiana
I finally managed to finish up my electrical and got the stair railings in. Received my passing final inspection last week!

I hope to start insulating the garage soon, but the wife wants me to finish the basement before our first kid is born in June. :( We'll see how quickly I can get both done!
 

stangman39

Well-known member
Joined
Jun 26, 2005
Messages
65
Location
GA
Garage looks great.
I've thinking of going 24x24 all along but after seeing yours I may try to squeeze out a few more feet!

For the stone work you did on the front...did you have to do anything different or special in the planning process? I have stone on the front of my house like you have on yours (just different stone) and if the additional cost isn't too much more...I'd like to do stone on mine exactly like yours to match the house.

Still unsure what to do about wall height and trusses to get the 12' minimum interior ceiling height I need. Some say just do 12' walls and standard roof trusses...others say do 8 or 10' walls and do scissor trusses, however, all the truss companies I speak to say unless I do a really steep pitch...I'm only gonna get to 12' ceiling height at the peak of the roof. Decisions decisions...budget budget!!
 
OP
M

mhadden

Active member
Joined
Aug 2, 2011
Messages
26
Location
NW Indiana
The stone is a veneer, so no additional architectural items were added. Just #30 felt and metal lathe screwed into the studs. Then butter the back of the stone with mortar and plop them on there. I then filled the "cracks" with mortar using a mortar bag and a small towel. There really is no additional planning needed, only the need to know you are going to do it and puting your J-channel for siding accordingly. I couldn't chose to use corner stones, but just ended up putting them on the front-only and putting my perpendicular J-channel an inch forward (towards the front of the stone). And for me, the cost of the stone wasn't too much more. In the end, I paid right around $250 for the stone and mortar (and still have some of each left over).

In regards to your ceiling height, I agree with just making your walls 12' tall. Just make sure you have some equipment to move your trusses into place! But I can tell you, if you plan on doing it yourself for the most part, get a 6 or 8/12 pitch if possible. My 10/12 nearly killed me when I was trying to shingle it!
 

stangman39

Well-known member
Joined
Jun 26, 2005
Messages
65
Location
GA
Thanks for the info.

10/12 pitch...yep...that sure must have been tough! We'll prob do a 6/12 or maybe even a 4/12. If the walls are 12' high and since I'm in the south, there really won't be much need for a steep pitch.
 

sparky67

Well-known member
Joined
Jan 13, 2012
Messages
58
Location
Northern NJ
Looks like a really sweet garage. I am looking to do something very similar with the attic trusses. There are two things I dont understand yet about trusses since they are not very common around here. First is how the stairs get built. Do you need special trusses for where the stairs come through the attic floor or do you just space them farther apart there with some other framing? Second how does the overhang get attached to the gable end? I assume notching a truss like you would if you were building with rafters is a bad idea.
 
OP
M

mhadden

Active member
Joined
Aug 2, 2011
Messages
26
Location
NW Indiana
Thanks for the info.

10/12 pitch...yep...that sure must have been tough! We'll prob do a 6/12 or maybe even a 4/12. If the walls are 12' high and since I'm in the south, there really won't be much need for a steep pitch.

I, personally would still do a 6/12. You still get rain down there, right? :p

Looks like a really sweet garage. I am looking to do something very similar with the attic trusses. There are two things I dont understand yet about trusses since they are not very common around here. First is how the stairs get built. Do you need special trusses for where the stairs come through the attic floor or do you just space them farther apart there with some other framing? Second how does the overhang get attached to the gable end? I assume notching a truss like you would if you were building with rafters is a bad idea.
There is one of two ways to factor in where stairs will be built in correlation with your trusses. One is prefered, the other is not, unless the truss manufacturer approves. The first, and widely accepted method is to double up, meaning sandwich two truss next to each other on the inside section of the garage. Then use joist hangers and joists perpendicular to the trusses 16-24" on center between the doubled-up trusses and the outer truss where your stairs and associated opening won't be. This will include the roof area. A good example to see what I'm talking about is to look at ohiosiouxfan's garage build pics.

img1646l.jpg


img2422jz.jpg


See the perpendicular joists (and the doubled-up truss?)

The second way, which is the route I went, is to place the trusses 24"OC and then cut out a portion of the truss. Again, this is not recommended and should only be done if your truss manufacturer says it can safely be done. Proper bracing will also be required.

As far as the gable end overhang is concerned, you just make a "ladder" with 2x6's (or whatever the thickness of your rafter ends are). Then simply nail onto the truss ends. (this is over simplified, but should give you the general idea).
 

stangman39

Well-known member
Joined
Jun 26, 2005
Messages
65
Location
GA
I, personally would still do a 6/12. You still get rain down there, right? :p

I'll probably go with the 6/12 truss pitch...and still probably do a scissor truss with 12' walls (if the cost for the truss isn't that much more over a standard) so I can still get some extra clearance on the inside ceiling height.

Figured out over the weekend my current garage attached to the house has a 12/12 pitch!
 

rsa

Well-known member
Joined
Mar 3, 2011
Messages
300
Location
Between Raleigh and Fayetteville, NC, USA
It looks great and I'm envious! You lucked out on the catching the asphalters.
But I can tell you, if you plan on doing it yourself for the most part, get a 6 or 8/12 pitch if possible. My 10/12 nearly killed me when I was trying to shingle it!
I hesitate to ask, but did you consider trying to echoing the house's style and more modest roof pitch? Your choice of materials makes for such a pleasing tie-in to the house that I thought I'd risk it. :) I was thinking trusses like hockeyfan88 used might have worked. And it would have been an easier roofing job.

I'm wrestling with the matching-look game myself. Do I go with a matching a hip roof or go for the rural accessory building look (see my avatar) that I see all around our local farms?

Stewart
 

Attachments

  • pic3.jpg
    pic3.jpg
    11.3 KB · Views: 39
  • pic2.jpg
    pic2.jpg
    9.2 KB · Views: 30
  • pic1.jpg
    pic1.jpg
    101.5 KB · Views: 58
OP
M

mhadden

Active member
Joined
Aug 2, 2011
Messages
26
Location
NW Indiana
I hesitate to ask, but did you consider trying to echoing the house's style and more modest roof pitch?
I did, but I was worried about all-around proportions. Believe it or not, the pitch on the house is 8/12 with 6/12 over the porch. And 8/12 would've been nice but then I would've wanted to decrease the height of my wall (10') and that wouldn't work for the matching garage door. Not to mention, the cost! At $230 a piece, I would've almost tripled the cost of trusses to go with that design!! (I paid $110/piece)
 

rsa

Well-known member
Joined
Mar 3, 2011
Messages
300
Location
Between Raleigh and Fayetteville, NC, USA
I did, but I was worried about all-around proportions. Believe it or not, the pitch on the house is 8/12 with 6/12 over the porch. And 8/12 would've been nice but then I would've wanted to decrease the height of my wall (10') and that wouldn't work for the matching garage door. Not to mention, the cost! At $230 a piece, I would've almost tripled the cost of trusses to go with that design!! (I paid $110/piece)
Cool. I guessed 6.5/12. I've decided designing a garage is like a squeezing a water filled balloon. :)
 
OP
M

mhadden

Active member
Joined
Aug 2, 2011
Messages
26
Location
NW Indiana
Nothing right now :( I've had a bit of bad luck when it comes to health and haven't been able to work on it. I'll definitely post pics and post an update when I get crackin' again!
 
To avoid these ads, REGISTER NOW!
Top Bottom