To avoid these ads, REGISTER NOW!

Between 705 & 1200 SQ/FT Mick's Thunderbird Garage

Workspaces between 705 and 1200 squarefeet.
OP
T

Toothaker

Well-known member
Joined
Nov 25, 2016
Messages
1,367
Location
Wichita, Kansas
Then there are those of us who will say, "Bird poop?" Then sheepishly admit we've ground off more than our fair share of welds. But only under sworn testimony.

Thanks, Kirk.

I learned stick welding many years ago in school. My shop teacher was the typical good shop teacher: terrible work got you constructive criticism. Good work got insulted, excellent work you were told to grind it off and try again. He was a great teacher. I got to the point I thought I knew what I was doing. He made a point to tell us that none of us were welders. "Fill a pickup bed with rod, then use them all up. Then you can start to call yourselves welders."
 
To avoid these ads, REGISTER NOW!

Bob Heine

ALLIANCE MEMBER
Joined
Oct 24, 2009
Messages
10,705
Location
Boca Raton, Florida
Bob, I was actually thinking of you as I carefully reached in with my left arm to set the jackstands; I'm right handed so I was risking my non-dominant hand/arm.
Mick, that's how I lost it -- trying to set a jack stand under a moving train. At least that's how I remember it.
 

bj383ss

Well-known member
Joined
Sep 29, 2011
Messages
3,166
Location
TX
Bret, I do believe you are being modest. I am wading my way through your 75 page thread - I'm up in the 60's now - and I can assure you there isn't anything you need to make excuses for on that beautiful truck.

Edit: Actually, I can either give you the credit or the blame for the new rotors. I was reading your thread and got to the part about the new door. You'd worked on the original door for hours, welding, hammering, sanding and filling, and then it didn't fit right. You ordered a new door, and it was perfect. I had my new rotors on order within 10 minutes of reading that post. And the funny thing is, my concerns about 'do I reuse or replace' went away immediately.

I appreciate the time you have spent wading through my unorganized thread. I am sure a competent body man could have fixed that door. But when the new skin didn't go on right it was beyond my skill set. My wife actually being supportive came out to the garage when she heard loud expletives and said just order a new door! She is definitely a keeper!

Glad I could help in your decision making. Patiently waiting for the new rotors to arrive now.

Bret
 

Stas26

Well-known member
Joined
May 19, 2017
Messages
444
Location
Zheleznogorsk, Siberia
Another flashback, this one from about 6 days ago.

I decide to get the front wheels off and start the brake system work.

I have a nice Craftsman 3 ton floor jack, which I got a year ago from a neighbor who was moving away. "Mick, you can have this. It doesn't work. It goes up, then goes down by itself. I've added oil, but still does it. It's not safe, but if you want to try to fix it, you can have it." So I took it, and thought I'd fixed it, but randomly unscrewing things until air and oil came bubbling out. When I was done, it worked, but had the "air in the hydraulic lines" sound to it. But I could stand on it, and it didn't go down. That's a good test, right?

attachment.php


Ignoring the tiny voice in my head, I started jacking up the front of the TBird. Now, this car weighs 4400 lbs, and a lot of that weight is in the front. Nah, I know what I'm doing. I get it up to about halfway, high enough most of the weight is off the wheels, but enough I can pull the lugnuts without the wheel/tire moving. I get the wheels off, barely, and resume jacking. Nope, the car isn't going up. In fact, it may be going down slowly. I quickly got jackstands under things, and took the weight off the jack. Whew. Ok, what time does HF close? I need a new jack. Umm. Maybe I can fix this one.

Now, a key point to this story. I didn't have the manual, and I hadn't searched for the manual.

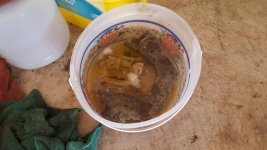
I get some oil. I take the checkvalve out. Oil and air come out, making a mess. Ah! I raise the jack all the way, and open the check valve. Oil comes out, making a great imitation of Hawaiian lava flows - inexorably flowing all over. Hmmm. I know you fill this with it raised. Then I look around and find the actual oil fill spot. Ok, got it. Raise it up, fill the oil to the brim, replace the plug, and them lower it quickly. Now, I'm tall - 6'7" (200 cm) and I'm looking down at the jack as I lower it. My face is maybe six feet from it. When it comes down, it goes off, not like a Hawaiian volcano. Nope, it does a great imitation of Mt. St. Helens. Blam, whoosh gurble. All over the garage. And my face. My shirt. The car. Anything in a 12 foot radius.

attachment.php


All those light tan spots, freckles if you will, on the floor are the oil stains from the stupid jack owner.

I read the manual, came back the next day and fixed the jack and finished raising the car.

Edit: do NOT follow any "instructions" you read in this post! Don't do it. It's wrong. To follow any of my steps will cause death, destruction of the vehicle you are lifting, raise your insurance rates and make your wife a widow and your friends will console her in ways you might not approve. If you don't die, people will laugh at you for all time.
Hi Mick!
Hydraulic rolling jack is my sore subject. The instructions for him did not indicate how to fill it oil properly if necessary, but all because he was made in CHINA and they do not care about you as the buyer of their products.
I have a problem, Katya's father dropped the jack on its side and oil leaked out of it. Now he does not rise at all.
How to fill it with oil and pump the hydraulic system?
If you have a good instruction from your jack, maybe you put it here so I can read it?
 
Last edited:

xtremek

Well-known member
Joined
Apr 13, 2012
Messages
11,603
Location
St. Johns, Mi
Mick, I will grudgingly admit this is becoming one of my favorite threads. I'm really glad you started this.
 
OP
T

Toothaker

Well-known member
Joined
Nov 25, 2016
Messages
1,367
Location
Wichita, Kansas
Hi Mick!
Hydraulic rolling jack is my sore subject. The instructions for him did not indicate how to fill it oil properly if necessary, but all because he was made in CHINA and they do not care about you as the buyer of their products.
I have a problem, Katya's father dropped the jack on its side and oil leaked out of it. Now he does not rise at all.
How to fill it with oil and pump the hydraulic system?
If you have a good instruction from your jack, maybe you put it here so I can read it?

Stas, I like to share what I'm learning and doing. But a lot of my posts are for entertainment and a laugh here and there, mostly at my expense. I take safety seriously.

I hesitated to answer you, because I don't want to be the source of bad advice to you, or to anyone else. But I want to be helpful, and assist another GJ member. I used Google to search, using the brand name (Craftsman) and model number and the word 'manual'. I compared the pictures of the jack in the manual to ensure it was the same one, or very much like it. That manual shows that there are two separate tasks that I needed to do. The manual for my floor jack is too big to upload here, and that's ok, because it probably does not apply to your floor jack. You need the manual for your jack.

1. Bleed the system. Raise the jack all the way up, and then lower it all the way down. Then open the checkvalve, enough so you hear the air escape, a "pfffft" and oil will come out also. The hardest part is identifying the checkvalve, because there are two fittings I can loosen on my jack, and only one is the right one.

This is what I did when I first received the jack from my neighbor, but I didn't do the second step, which is to fill the oil. That's why my floor jack only went up so far and then stopped.

2. From the manual for my jack:
To Add Oil:
• Position the jack on level ground and
lower the saddle. Remove the oil plug (See
Fig.1).
• Fill the oil case till it is level with the oil
filler plug hole.

That part was difficult for me, because the fill hole is small and it is located down in the jack mechanism. I made a funnel from a bottle, which made the job easier.

I did this several times. Fill the oil, bleed the system, fill, bleed, until there was no audible air in the system and it behaved normally.
 
Last edited:

Stas26

Well-known member
Joined
May 19, 2017
Messages
444
Location
Zheleznogorsk, Siberia
Stas, I like to share what I'm learning and doing. But a lot of my posts are for entertainment and a laugh here and there, mostly at my expense. I take safety seriously.

I hesitated to answer you, because I don't want to be the source of bad advice to you, or to anyone else. But I want to be helpful, and assist another GJ member. I used Google to search, using the brand name (Craftsman) and model number and the word 'manual'. I compared the pictures of the jack in the manual to ensure it was the same one, or very much like it. That manual shows that there are two separate tasks that I needed to do. The manual for my floor jack is too big to upload here, and that's ok, because it probably does not apply to your floor jack. You need the manual for your jack.

1. Bleed the system. Raise the jack all the way up, and then lower it all the way down. Then open the checkvalve, enough so you hear the air escape, a "pfffft" and oil will come out also. The hardest part is identifying the checkvalve, because there are two fittings I can loosen on my jack, and only one is the right one.

This is what I did when I first received the jack from my neighbor, but I didn't do the second step, which is to fill the oil. That's why my floor jack only went up so far and then stopped.

2. From the manual for my jack:
To Add Oil:
• Position the jack on level ground and
lower the saddle. Remove the oil plug (See
Fig.1).
• Fill the oil case till it is level with the oil
filler plug hole.

That part was difficult for me, because the fill hole is small and it is located down in the jack mechanism. I made a funnel from a bottle, which made the job easier.

I did this several times. Fill the oil, bleed the system, fill, bleed, until there was no audible air in the system and it behaved normally.
Don't worry, it's for my responsibility!
Can you give a link for it? :beer:
I think I'll see a pictures too and for my mind it will be a more light to understand :lol_hitti
 

jbmatth

Well-known member
Joined
Jun 3, 2013
Messages
5,681
Location
Northern Ok.
Mick,
Glad I was able to get into your thread early so I can more easily keep up. I like the T-bird, and it looks like one I helped to jump start last winter but I don't think it was yours then. The guy I helped mentioned he was headed to Wichita so I thought for a bit it might have been.

I'm only about an hour from you just inside of Oklahoma. If you are coming through this way feel free to get in touch, I'm most likely on your way to Kaw lake depending on how you head there.

JB
 
OP
T

Toothaker

Well-known member
Joined
Nov 25, 2016
Messages
1,367
Location
Wichita, Kansas
Mick,
Glad I was able to get into your thread early so I can more easily keep up. I like the T-bird, and it looks like one I helped to jump start last winter but I don't think it was yours then. The guy I helped mentioned he was headed to Wichita so I thought for a bit it might have been.

I'm only about an hour from you just inside of Oklahoma. If you are coming through this way feel free to get in touch, I'm most likely on your way to Kaw lake depending on how you head there.

JB

JB, anything is possible; I know very little about this car.

I know I bought it in August, 2017 from Copart from their Peoria, IL lot. It had spent most of its life in Illinois. The Marti report shows it was manufactured in Wixom in August 1969, and shipped to the Indianapolis District Sales Office, and sold by Jack Thrasher Ford in Terre Haute. Papers left in the car show it was registered in IL as late as 1997.

Thanks for the invitation! Just be careful what you offer - we might take you up on it! :)
 
Last edited:
OP
T

Toothaker

Well-known member
Joined
Nov 25, 2016
Messages
1,367
Location
Wichita, Kansas
I'm not hurrying :pimpflash
I wish you a great holiday!

https://c.shld.net/assets/own/00950139e.pdf

Stas, I hope that helps you with your floor jack.

Here we are heading out.
attachment.php

attachment.php


About the vacation: we have a saying: "a bad day of fishing is still better than a good day at work." I think it applies to camping too. We had parts of 4 days to camp, and of course it rained one day. We didn't care. We sat under the canopy and watched it rain. And the other three days were beautiful - blue skies 65° (18° C) during the day, and 34° (1° C) at night.

Camp fire in the evening to warm up. And the girls did some shopping.

attachment.php
 

Attachments

  • 20181018_121621.jpg
    20181018_121621.jpg
    149.5 KB · Views: 457
  • 20181019_103418.jpg
    20181019_103418.jpg
    150.9 KB · Views: 456
  • 20181020_180637.jpg
    20181020_180637.jpg
    148 KB · Views: 459
Last edited:
OP
T

Toothaker

Well-known member
Joined
Nov 25, 2016
Messages
1,367
Location
Wichita, Kansas
Didn't get any time in the garage today; my wife had some errands to run and needed me and the truck.

I did get this from Rockauto.
attachment.php


So I started thinking about torque values - I like to have my research done ahead of time. I remembered something I bought right after getting the car.
attachment.php

attachment.php


So if anyone needs to know something about a 1970 Ford automobile, just let me know. I have the books.:bounce:
 

Attachments

  • 20181022_222744.jpg
    20181022_222744.jpg
    127.4 KB · Views: 447
  • 20181022_211102.jpg
    20181022_211102.jpg
    147.2 KB · Views: 667
  • 20181022_212325.jpg
    20181022_212325.jpg
    146.5 KB · Views: 668

bj383ss

Well-known member
Joined
Sep 29, 2011
Messages
3,166
Location
TX
Nice shop manuals. Pretty sure you need to get one of each car that the manual covers now. It only makes since.

Bret
 

jbmatth

Well-known member
Joined
Jun 3, 2013
Messages
5,681
Location
Northern Ok.
Thanks for the invitation! Just be careful what you offer - we might take you up on it! :)

Not a problem, you are welcome anytime I'm around. :thumbup: Looking forward to more progress on the Thunderbird. Any plans for more power in the near future?

JB
 
To avoid these ads, REGISTER NOW!
OP
T

Toothaker

Well-known member
Joined
Nov 25, 2016
Messages
1,367
Location
Wichita, Kansas
Not a problem, you are welcome anytime I'm around. :thumbup: Looking forward to more progress on the Thunderbird. Any plans for more power in the near future?

JB

JB, the plan is to get the car roadworthy, then rebuild the engine. That may come sooner than later, as I have a real noisy lifter (tappet) or two. I haven't done a leakdown test yet, so I don't know how bad it is.

So in this order:
  1. Get brakes and shocks installed.
  2. Fix the transmission cooling lines.
  3. Get some minor bodywork* done on the right side.
  4. Fix a rotten spot in the frame.
  5. Install replacement window and fix armrest.
  6. Trace out and resolve numerous electrical gremlins.
  7. Get the car registered**.
  8. Replace the exhaust system.
  9. Get the transmission rebuilt.

*So here's the rest of the story. The car has a salvage title, bought from Copart. That is an auction site where insurance companies sell cars that are considered a total loss. So a $500 car with $600 dollars of damage is a total loss using the insurance company's relentless logic. There is damage that I've not shown in pictures - the passenger door has a small ripple, the quarter panel has a larger dent, and the passenger window glass was broken. I actually started on the glass, but as I was working through it, I decided to get the door and quarter straightened first while the door was apart.

attachment.php


**Here's the rest of another story. The car was sold as a "1974 Ford Thunderbird". If someone was looking for a pre-smog Ford, and used the site's filters appropriately, they would have missed this car. In fact, I think that's why I got such a good deal; nobody else was bidding on it. So the paperwork came from the seller, and sure enough, it all says "1974". I called the seller, and they assert that's the information the insurance company gave them, and they can't 'fix' it. Knuckleheads. I think I know what happened, too. Say "1970 Ford Thunderbird" three times, fast. It sounds like 1974 Thunderbird, doesn't it? "Hey, Ralph! Make a salvage title for that 1970 Ford Thunderbird and get rid of it on Copart!" So Ralph duly made up a salvage title for that 1974 Thunderbird. :eyecrazy::badteeth::tard:

Ralph, you're just going through the motions.

According to the Kansas DMV, I can get it corrected with a sworn affidavit.

Then, after all that... if all goes to plan, I will rebuild the 429 myself. When done, the D0VE-A heads will have a mild port, the valve train will have new SS valves, roller rockers and a mildly better cam than factory. Compression will be lowered from factory 10.5:1 to 9.5:1 or so. Probably MSD ignition.
 

Attachments

  • 20171030_183322.jpg
    20171030_183322.jpg
    107.9 KB · Views: 556
Last edited:

Bob Heine

ALLIANCE MEMBER
Joined
Oct 24, 2009
Messages
10,705
Location
Boca Raton, Florida
So I started thinking about torque values - I like to have my research done ahead of time. I remembered something I bought right after getting the car.
attachment.php

attachment.php


So if anyone needs to know something about a 1970 Ford automobile, just let me know. I have the books.:bounce:
Mick, like you I always buy the manuals for my cars. They used to be pretty cheap and GM put an order form for them in the owners manual.
attachment.php


I paid several hundred dollars for the 2011 Cadillac CTS but it's pretty big (the yellow ones).
attachment.php


In recent years I've upgraded to CD versions. I knida had to for the 2004 PT Cruiser because the printed manual was outrageously expensive. The printed manuals are converted to PDF format so you can search them for information and magnify illustrations (and text for us older folks). I have an antique laptop in the garage for viewing the information (and even putting it up on the 32-inch flat screen). As the above picture shows, my '72 Corvette manuals are aging poorly so having a clean viewable copy is helpful.

Amazon, and I'm sure others sell the CD version of your manuals for fairly reasonable money:

https://www.amazon.com/dp/B00HDC3FI2/?tag=atomicindus08-20
 

Attachments

  • 72 Corvette Owners Manual Order Form.jpg
    72 Corvette Owners Manual Order Form.jpg
    57.6 KB · Views: 534
  • Shop Manuals.jpg
    Shop Manuals.jpg
    98.3 KB · Views: 540
OP
T

Toothaker

Well-known member
Joined
Nov 25, 2016
Messages
1,367
Location
Wichita, Kansas
Mick, like you I always buy the manuals for my cars. They used to be pretty cheap and GM put an order form for them in the owners manual.
attachment.php


I paid several hundred dollars for the 2011 Cadillac CTS but it's pretty big (the yellow ones).
attachment.php


In recent years I've upgraded to CD versions. I knida had to for the 2004 PT Cruiser because the printed manual was outrageously expensive. The printed manuals are converted to PDF format so you can search them for information and magnify illustrations (and text for us older folks). I have an antique laptop in the garage for viewing the information (and even putting it up on the 32-inch flat screen). As the above picture shows, my '72 Corvette manuals are aging poorly so having a clean viewable copy is helpful.

Amazon, and I'm sure others sell the CD version of your manuals for fairly reasonable money:

https://www.amazon.com/dp/B00HDC3FI2/?tag=atomicindus08-20
If I get the CD version, will they spell "Volume" correctly? 20181023_231344.jpeg
 
Last edited:

^&right

Well-known member
Joined
May 27, 2013
Messages
426
Location
Indiana
Got on the copart website. Neat site, a little something for everyone. I was tempted by a few!
 

BBChevro

Well-known member
Joined
Jan 24, 2014
Messages
2,235
Location
Brisbane, Qld., Australia
Each time that I've looked in on this thread, I've had to abort a half written comment due to various time restraints (I type slowly on a proper keyboard, and even slower on my phone [emoji12] ).

Anyway (I'll try to keep it brief so I can actually post it this time), I'm here following along - nice work space with a cool car as a bonus.

We don't see many Thunderbirds down under, and the ones that I have seen here have all been early '60s models.

Thanks for posting the link in Andy's thread. [emoji106]

Sent from my SM-G950F using The Garage Journal mobile app
 
OP
T

Toothaker

Well-known member
Joined
Nov 25, 2016
Messages
1,367
Location
Wichita, Kansas
Each time that I've looked in on this thread, I've had to abort a half written comment due to various time restraints (I type slowly on a proper keyboard, and even slower on my phone [emoji12] ).

Anyway (I'll try to keep it brief so I can actually post it this time), I'm here following along - nice work space with a cool car as a bonus.

We don't see many Thunderbirds down under, and the ones that I have seen here have all been early '60s models.

Thanks for posting the link in Andy's thread. [emoji106]

Sent from my SM-G950F using The Garage Journal mobile app

You're welcome Mark. Thanks for dropping by.
 
OP
T

Toothaker

Well-known member
Joined
Nov 25, 2016
Messages
1,367
Location
Wichita, Kansas
A little progress today.

I have the bad habit of thinking about too many steps. I should put up a sign in my garage that says "There's no 20 point play in football".

So today I took several tiny steps.

Decided that I'd replace the flexible brake lines, replace the front shock absorbers and build one of the calipers.

Started with this. The shock is inside the coil spring.
attachment.php


Put a socket on the top nut, and the cylinder rod just spun. Got out the die grinder and cutting wheel. Man, I love having the right tools for the job! And the compressor kept up as I took no prisoners on that rusty, krusty shock
attachment.php

attachment.php


Every once in a while something shiny shows up on the car.
attachment.php

attachment.php


Not being very knowledgeable about calipers, several days ago I took just one apart, soaked it in vinegar, and then painted the bracket that is reused. The paint has been curing for a few days. I don't have any pictures of that process, but I will have pictures of the second one. Got the first caliper assembled following the other original one. I'm sure glad I did it that way, because even with a sample to follow I ended up taking it apart and putting it back together more than once.
attachment.php

When I bought the caliper paint at the auto parts store, the eager young man assisting me told me the red paint was the same price. I told him the black is what I wanted. "But the red looks so much better!" The other two older guys behind the counter and I just stood and smiled as he tried to convince me that red is what I wanted. Finally I told him the red bling is not what I wanted, that I'm putting a 1970 Thunderbird back together, and black is what I want. He looked positively hurt that I called his red "bling". The older guys just smiled and shook their heads slowly at the young guy. I did reassure him that red looks just fine on the newer cars.

Disassembled the second caliper and set the parts to be reused into vinegar for cleaning. It's hard to see, but this is soaking in vinegar.
attachment.php


That's it for the day. Thanks for following along.
 

Attachments

  • 20181027_181056.jpg
    20181027_181056.jpg
    66.2 KB · Views: 411
  • 20181027_164235.jpg
    20181027_164235.jpg
    142.4 KB · Views: 411
  • 20181027_181109.jpg
    20181027_181109.jpg
    147.5 KB · Views: 412
  • 20181027_181719.jpg
    20181027_181719.jpg
    67.1 KB · Views: 410
  • 20181027_185243.jpg
    20181027_185243.jpg
    114.8 KB · Views: 417
  • 20181027_185305.jpg
    20181027_185305.jpg
    148.9 KB · Views: 416
  • 20181027_194600.jpg
    20181027_194600.jpg
    150 KB · Views: 417
Last edited:
OP
T

Toothaker

Well-known member
Joined
Nov 25, 2016
Messages
1,367
Location
Wichita, Kansas
It's fantastic and so **** :) Like NEW parts!

Thank you Stas!


That caliper does look like new Mick [emoji106]
I'm glad that you didn't go with the red. [emoji1]

Thanks, Mark. Some parts of the caliper have been professionally rebuilt (the gray piece), and other parts I cleaned and painted. Mainly, I wanted the brakes to work like new.

It's nice when things actually go smooth. The caliper look really good.

Thanks, Kirk! Later I'll be installing the replacement CuNi hard lines you recommended I get. But I have to remember, one step at a time, one step at a time.

Red was the same price and you went with black?:willy_nil:willy_nil:willy_nil

I'm dizzy now. Calipers look good:bowdown: 
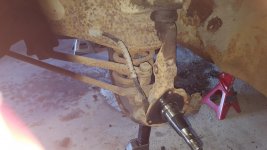
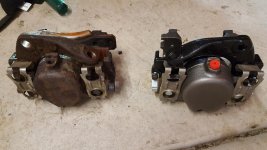
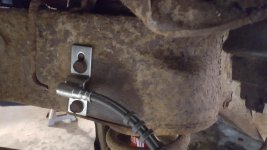
New brake lines are wise.

Thanks, Andy. The young man at O'Reilly's is really a car nut, which is nice to see in someone his age, which I figure is early 20's. He reminds me of a year old Laborador pup - friendly to the point of being a hazard. I've been helped by him before, and I think everyone at the store likes him, so we all - customers and co-workers alike - try to not discourage him from being a car nut. The store is near my work, so I often drop by over the lunch hour and pick things up. I think I'll take a picture of the cars the employees drive, because they have some nice ones.

The more I dig into this car, the more I find to do. Do you ever get into a project and start to second guess yourself? "What was I thinking? Why am I doing this?" I griped at my wife Saturday about all the things wrong with the car, and she was very supportive. She reminded me that I wanted a car to tinker with, and I've got it. After her pep talk I went out and got all the things done that I documented in the prior post. Did I mention that she's great?

Thank you, everyone, for following along.
 
Last edited:

Unruh

Well-known member
Joined
Aug 12, 2017
Messages
1,431
Location
Silverdale, Washington
A little progress today.

I have the bad habit of thinking about too many steps. I should put up a sign in my garage that says "There's no 20 point play in football".

So today I took several tiny steps.

I do this as well. I’m not a Raiders fan, but They help me keep on track. One of their motto’s is “Just win baby!”. I think of win as What’s Important Now, and will ask that several times to myself during the day. Sometimes it stops me from doing things out of order or getting sidetracked...sometimes.
 

xtremek

Well-known member
Joined
Apr 13, 2012
Messages
11,603
Location
St. Johns, Mi
In the end, all the tinkering will help you know all the little quirks it'll have, and you'll be able to work around them. I think the quote is, "If it's easy, it isn't good. If it's good, it isn't easy."
 

oldironfarmer

Well-known member
Joined
Jun 25, 2016
Messages
6,664
Location
Terlton, Oklahoma
The more I dig into this car, the more I find to do. Do you ever get into a project and start to second guess yourself? "What was I thinking? Why am I doing this?" I griped at my wife Saturday about all the things wrong with the car, and she was very supportive. She reminded me that I wanted a car to tinker with, and I've got it. After her pep talk I went out and got all the things done that I documented in the prior post. Did I mention that she's great?

You've got a gem of a wife there.

I do sometimes get into something and decide to shortcut what I had planned. Some stuff just does not have to be done. One thing to watch out for is getting tired of the project. When you start getting tired of it, get it to running and drive it a bit before tearing it back apart. Unless you see lots of pitting on the existing brake lines I would be inclined to delay that part of the project. It can take a long time. "Tinkering" with a running vehicle is often a lot more fun than watching your 401k disappear into a pile of rust in the shed.

But you're doing great! I'm enjoying the show tremendously and you have a great audience.:bowdown:
 
OP
T

Toothaker

Well-known member
Joined
Nov 25, 2016
Messages
1,367
Location
Wichita, Kansas
You've got a gem of a wife there.

Without a hint of sarcasm, you are right, Andy. She's a gem. :)

I do sometimes get into something and decide to shortcut what I had planned. Some stuff just does not have to be done. One thing to watch out for is getting tired of the project. When you start getting tired of it, get it to running and drive it a bit before tearing it back apart. Unless you see lots of pitting on the existing brake lines I would be inclined to delay that part of the project. It can take a long time. "Tinkering" with a running vehicle is often a lot more fun than watching your 401k disappear into a pile of rust in the shed.

I agree completely! I am going to be driving this thing, not working on it. Yes it's a project, but not a project for project's sake. But I'm not tired of it yet. Overwhelmed, yes.

Unfortunately, the brake lines have to go. One, yes there is pitting and flaking. Two, the fittings are rusted so badly there's no way to disconnect them and connect them to the new parts. Lastly:
attachment.php

Yes, that's a compression fitting someone used to repair the brake line to the rear axle.

But you're doing great! I'm enjoying the show tremendously and you have a great audience.:bowdown:

Wait. Now I'm confused. You are in the audience. You say "you have a great audience" - are you calling yourself 'great'?:headscrat

Didn't get anything done in the garage today. My daughter "A" had an upset tummy yesterday and today, and today I have it too. I did get the RMA on the old calipers, and got them boxed and shipping labels printed. I will take them to FedEx tomorrow.
attachment.php


I used the transfer punches on this yesterday.
attachment.php

Previously I'd have guessed, eyeballed the center. More often than not I was way off. I never got it right. With the transfer punch, this was easy peasy.

The parts continue to clean in the vinegar.
attachment.php


And more proof that my dear wife is a keeper: she is insisting I build a shed in the back yard for the lawn equipment. This is a 'shed' in the American sense - a storage building not another workspace. So I started designing an 8' by 12' shed, and staked it out in the yard. She thought it was too small, so it will be 10' by 12', approximately 3 by 3.5 meters. She wants me to have adequate workspace in the garage, and getting the tiller, mower, rakes and shovels, wheelbarrow, edger, etc. will make things a lot less cramped. I will be interleaving efforts on the car and building the shed.

She's been trying to get me to build this since we moved into this home, but I've thought all along that the garage was big enough for everything. But now with more things going on in the garage, some of the stuff needs to get out of the way.
 

Attachments

  • 20181028_205742.jpg
    20181028_205742.jpg
    97.7 KB · Views: 342
  • 20181028_091719.jpg
    20181028_091719.jpg
    147.4 KB · Views: 342
  • 20181028_205804.jpg
    20181028_205804.jpg
    109.5 KB · Views: 342
  • 20181028_121119.jpg
    20181028_121119.jpg
    149.8 KB · Views: 341
Last edited:

Bob Heine

ALLIANCE MEMBER
Joined
Oct 24, 2009
Messages
10,705
Location
Boca Raton, Florida
And more proof that my dear wife is a keeper: she is insisting I build a shed in the back yard for the lawn equipment. This is a 'shed' in the American sense - a storage building not another workspace. So I started designing an 8' by 12' shed, and staked it out in the yard. She thought it was too small, so it will be 10' by 12', approximately 3 by 3.5 meters. She wants me to have adequate workspace in the garage, and getting the tiller, mower, rakes and shovels, wheelbarrow, edger, etc. will make things a lot less cramped. I will be interleaving efforts on the car and building the shed.
Mick, you will love the shed. Mine is 18'x12' and I can still see some floor. It has been 22 years and I mentioned it might be time for a second shed to store the bikes we never ride, the emergency generator that sits under the workbench and a number of extremely useful tripping hazards. Try moving the stakes until your wife says "that looks awfully big" and then move the stakes in two feet.
 
To avoid these ads, REGISTER NOW!
Top Bottom