To avoid these ads, REGISTER NOW!

Between 485 & 705 SQ/FT Mid-Century Moto Mecca Makeover

Workspaces between 485 and 705 squarefeet.

RLK1400

New member
Joined
Dec 30, 2011
Messages
3
Location
The Netherlands
Hi Gregor,

your thread is an absolute joy to read and watch. Quite inspiring, and the quality of your pictures and documentation is outstanding.
Keep up the good work!

Best regards from the other side of the globe!
 
To avoid these ads, REGISTER NOW!

_CY_

Well-known member
Joined
Oct 12, 2010
Messages
61
Yes, if that R90S is clean and low mileage you really scored - they're getting to be very rare. Congrats. I wonder about the black engine...

Gregor

checking in on your project .. WOW .. what craftsmanship!
there's a term for someone that's highly skilled at a LOT of disciplines. polymathic is the term I use ...

polymath were folks like Benjamin Franklin, Leonardo da Vinci, Michelangelo, Galileo Galilei, etc.

here's a pic of R80G/S which went thru a frame off restoration. my R90S's original unrestored condition is within 90% of the restored R80G/S. here's the Adv thread on bringing R90S back to life after sitting 30 years.


R90S with 7,300 miles on the clock
DSC08689-1.jpg


Dec20201120003.jpg
 

onething

Well-known member
Joined
Jan 23, 2011
Messages
438
Location
TEXAS
I would have been done 6 months ago. I admire your tenacity and attention to detail. I know you are under a lot of pressure, but maybe a couple of days off might be in order. Even God rested.
 

Max Power

Well-known member
Joined
Aug 8, 2010
Messages
65
Location
Lakewood Colorado
I've been loving this project from the start. Stay focused on the finish line but never sacrifice anything to the deadline. I've been living with flaws for 12 years, no body else seems the details but I'm wanting to tear everything up.
 
OP
S

sakurama

Well-known member
Joined
Oct 10, 2010
Messages
1,458
Location
Portland - the cool one.
Thanks guys.

Today was epic and if it wasn't for Ben's help it would have been an epic disaster but because of his help it turned into an epic success. Sadly, there's no photos during what was the most stressful and difficult part of the day - the large sheet of 10' laminate going down because it was one calamity after another.

The trouble started with putting on the side strips first - like you're supposed to. Except that I'd put glue down on the whole top and sides. It was dry but the trimmer I used spewed chips everywhere. Then I switched bits but forgot that we'd been using a piece of laminate to ride the sole plate on and the bit gouged the edge. Only I didn't realize it until we'd placed the top. We then had to pull the top, pull the side, flip the side, retrim and then re roll the top. Then Ben noticed the other side had a mistake too. He's really got a knack for that.

Anyway, it was sort of one disaster after another and I was ready to throw in the towel but Ben convinced me we could save it and he was right.

So here's Ben rolling the underside of the counter on the seating side - post drama. I figured with two little kids the easier it was to clean under the counter the better so let's put laminate under the counter too.

i-TSsnX4L-X2.jpg


Sadly you don't get to see any shots of how the Karran sink is done. Basically you glue it up like normal but one inch back from the sink edge you run a bead of a special epoxy. Once that's had time to harden you cut out the laminate in the sink with a router.

i-KxQ5n8P-X2.jpg


The router was bumping all along the edge and it just didn't seem right but you couldn't see why until the whole thing was cleared and then it was obvious - epoxy had oozed out and onto the lip of the sink. As Ben said, "Hmm, I'll be it didn't look like that in their video." Umm, nope.

After about 20 minutes of gently prying the hardened epoxy off the edge (it broke off fairly easily and didn't stick to the stainless) we got a clean edge and progressively plunged the router .5mm deeper for successive passes using a tapered cutter with an oversize bearing.

i-DjSBfFf-X2.jpg


And arrived at what the goal was when I first saw this sink - a zero edge join between the laminate and the stainless that looks very cool.

i-PG59KF7-X2.jpg


Phew! I am tempted to plunge deeper to put a bit more taper on the edge but as Ben suggested I'll do that on the other sink first so as to not screw up the main one. In fact the idea was that I do all my testing on that sink but that sort of went out the window.

After everyone left I pulled out my box of plumbing parts and started fitting them together in a way that would give me the most room for drawers under the sink. I hate under sink spaces as they're always a big mess so I'm determined to use drawers, even if they have to be shallower, so as to better use the space.

i-ZS5qLMw-X2.jpg


Next I wanted to get the faucet in so I spent a lot of time measuring since I would only get one chance to do it right or I would ruin... well, everything, let's face it, just everything, if I were to screw it up.

i-4RqMTVk-X2.jpg


I didn't.

i-QXxLJN8-X2.jpg


I'm very happy with the plumbing so far. Because the sink is in a peninsula and not on a wall you have to use an AAV (air admittance valve) to let air in so the sink can drain. I'm allowed three by code and I'm using all three (main sink, bar sink and laundry). I have to say that I'm almost considering making this back panel of the counter removable so as to allow easy repairs if needed. It probably wouldn't be much trouble to screw it on and hide the screws under the top and a toe kick. I could go all racer and attach it with 1/4 turn Dzeus fasteners. Maybe even those cool pin and post fasteners on hot rod hoods. That might help bring it back around to the garage side.

I'll have to think about it.

Anyway, thanks to Ben I'm back on track and have a much better attitude. Thanks Ben!!

Gregor
 

Evan K.

Member
Joined
Sep 18, 2010
Messages
14
Location
North Bay Area
I like the idea of the removable back panel. If it's not hard to implement why not do it? I always tell my customers that there is one thing you can guarantee about anything man-made and that is that eventually it will fail.
 

smschriefer

Well-known member
Joined
May 28, 2009
Messages
842
Location
Yorktown, VA
Gregor, I know you were sweating bullets when you pulled the trigger on your drill! You did an awesome job and have a great item to show friends when they come over. I'm much like you in that I am a perfectionist. I bet you know where every minor flaw is and that bugs you, but trust me, nobody else will see them. Remember, you are a craftsman and that means you will make errors, but have the skills and determination to fix and/or hide them.

I think a false panel for the plumbing is a great idea. How about a false panel with a top mount piano hinge and a push in magnetic catch at the bottom. If it had small struts it could support itself in the open position. Maybe set the back as three panels over a black base frame leaving 1/2" reveal between panels. That way it would be aesthetic and functional. Whatever you do will look awesome! :thumbup:
 

rvieceli

Well-known member
Joined
Nov 3, 2013
Messages
779
Location
Illinois
good idea on the removable panel. I like the Dzus fasteners. Or at the very least, stainless button head screws.

since you have small kids, I wouldn't make it too easy to remove, like magnets or pop ons.

Everything is looking great.
 

akapero

Well-known member
Joined
Mar 3, 2009
Messages
96
Location
EPWV
Still one of my favorite threads on GJ, and one of the few I regularly check. I love watching all of your projects, from your garage, to your house, to your bike builds and your photography.

Keep up the great work. :thumbup:
 

polexican23

Banned
Joined
Jun 11, 2013
Messages
2,168
Location
burbs-Illinois
Get the magnetic key locks to secure the panel, incorporate a jewelry or gun storage. Come on you have to have some hidden passages or hidden secrets built in somewhere.
Who on this board doesnt wish they had some kind of hidden room or space?

BTW the since and counter look amazing, first time I have ever seen that. Better hurry up and close this thread before my warden wants one of them too.
 

JTH

Well-known member
Joined
May 4, 2012
Messages
167
Location
MO Ozarks
Thank you for documenting this build so well! Have the same issue with wanting things perfect because I know where to look and always see the mistakes I've made.
Isn't it wonderful to have a friend like Ben? Mine have saved me time and bailed me out more than once. I just try to return the favors.
Your home is outstanding because your hands are able to fashion the visions of your artistic mind! Thanks again for the enjoyable thread. JT
 

TiFJ

Well-known member
Joined
Sep 8, 2011
Messages
106
Location
Calgary, AB
Very cool thread, one of my favorites on the board. Threads like this, whether they are about building a car / truck / motorcycle, garage or house... whatever, are what keeps forums alive. There is always something exciting to see or look forward to, and of course, lots to learn.

I wish I had half the talent guys like Gregor have. I have many ideas and lots of things I'd like to do with my house, garage and vehicles but I know I lack the skill and patience to execute. Ambitious, but rubbish!

Again, great thread and project. Thank you for taking the time to document it and share with us!
 
OP
S

sakurama

Well-known member
Joined
Oct 10, 2010
Messages
1,458
Location
Portland - the cool one.
Thanks much guys.

I like the idea of a secret panel. I need a gun safe in the new home so you had me envisioning a sort of Blade Runner inspired hydraulic lift where I press a secret button and the panel swings up and my guns are held on the back side like some kind of James Bond display. I'll put some thought into it but since my boy Lucas is so dam clever about getting into things I'll need a real safe.

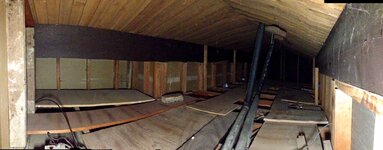
But as for the secret spaces - I'm already on top of that. There is an attic space that was empty with no access that I discovered when we knocked out the chimney.

i-hkkZ9kj.jpg

I'm putting in a secret door in the top of the closet in the kids room and I am going to fully wire, light and finish it but won't be telling them about it until it's done. When it's finished I'll remove the false panel and ask them, "Hey, guys, what's that at the top of the closet?" and they can "discover" a secret room that will be all theirs. It's about 6' wide, 4' tall and 12' long and once finished it will be an amazing secret fort. So, yeah, I'm all about the secret spaces in the house. Many will be incorporated as I go.

Gregor
 

jdp993

Member
Joined
Aug 30, 2006
Messages
21
Gregor, kitchen is coming out great! There is an artistic quality to your work, bikes and houses, that is really special.

Lamello, the folks who developed biscuit joinery has this other line of product called p-system. They look like really fat biscuits but I think there is a version that has a camlock style connector that might work well for a removable panel on your island.
 

jdp993

Member
Joined
Aug 30, 2006
Messages
21
I just looked and noticed Lamello is also still making the Invis-mx which is a completely hidden fastener where the tool magnetically rotates the connector inside the panel. I've never used one but they look really cool.
 

lucky.expert

Well-known member
Joined
Aug 23, 2012
Messages
61
Location
San Antonio, TX
Kitchen looks awesome! I'll have to admit, I was a bit surprised you went with laminate for the counter top, I was expecting granite or something along those lines to match the quality of that shiny viking range! The laminate does look very good though, I love the sleek look of the built in sink. We are going to be remodeling our kitchen soon and I was considering concrete counter tops because it is the next cheapest thing to laminate but I thought it would 'feel' higher quality. Your kitchen makes it look like laminate can look good after all though...
 
To avoid these ads, REGISTER NOW!

Ryan

Administrator
Staff member
Joined
Jan 26, 2006
Messages
5,731
Location
Texas/Hawaii
Kitchen looks awesome! I'll have to admit, I was a bit surprised you went with laminate for the counter top, I was expecting granite or something along those lines to match the quality of that shiny viking range! The laminate does look very good though, I love the sleek look of the built in sink. We are going to be remodeling our kitchen soon and I was considering concrete counter tops because it is the next cheapest thing to laminate but I thought it would 'feel' higher quality. Your kitchen makes it look like laminate can look good after all though...

Granite is way too "traditional" or maybe even cliche for such a space. The laminate is brilliant.
 

The J

Well-known member
Joined
Mar 4, 2010
Messages
152
The angle on the back of the peninsula is awesome. That's such a creative and effective use of the space. It's appealing to look at and functional.

I can't stop staring at that seamless sink transition. It looks like an optical illusion.

Great job as always.
 

paranoid56

Well-known member
Joined
Dec 18, 2008
Messages
1,596
Location
San Diego, Ca
Kitchen looks awesome! I'll have to admit, I was a bit surprised you went with laminate for the counter top, I was expecting granite or something along those lines to match the quality of that shiny viking range! The laminate does look very good though, I love the sleek look of the built in sink. We are going to be remodeling our kitchen soon and I was considering concrete counter tops because it is the next cheapest thing to laminate but I thought it would 'feel' higher quality. Your kitchen makes it look like laminate can look good after all though...

I was thinking of some quartz as that goes well with modern items. but man did that laminate turned out sweet.
 

ginslung

Member
Joined
Jun 20, 2012
Messages
5
Location
Denver
Great work Gregor.

Regarding the back panel on the sink island - I have a similar setup.

I knew I was going to have to get back there to screw around with the dishwasher, replace the air admittance device, etc. I countersunk some short 1/2 lag bolts into the top and bottoms of a few of the studs. Matched those with heavy duty, flat round magnets countersunk and glued into the back panel. I used construction adhesive, but in hindsight epoxy would work better I think.

Put an outlet or two on the back side of the panel and you have an easy way of lining things up and a small place for fingers to grab the panel when you need to remove it.
 
OP
S

sakurama

Well-known member
Joined
Oct 10, 2010
Messages
1,458
Location
Portland - the cool one.
Thanks for the compliments on the counter. It's funny because if I told people that I wanted to use laminate I tended to get the blank stare. I have a soft spot for the stuff and have used it in all my studios to make huge counters and work stations but it is also a much cheaper way to accomplish what I wanted which was the look of a monolithic counter that came down the wall, flowed across the counter and then did a "waterfall" off the end. It would have cost a silly amount of money to do that in Corian which would have been my first choice. When I came across the sink it solidified my decision was the way to go because I'd just never seen anything like that and I loved it. And now that it's in and I'm really happy and looking forward to finishing the other sections of the counter.

So not much progress today as I spent the time actually gluing up the plumbing for the sink and fitting the lines. It was worth the fuss to finally have water in the sink.

i-bKj5hFs-X2.jpg


I then spent the remainder of the day working on the smaller coffee bar sink - you know, the test one that I was supposed to do first. Well, since I "practiced" on the big one the smaller one went really well.

i-Gsmk4hX-X2.jpg


The coffee bar was supposed to have only a very small bar sink but then I decided that it would be much more helpful to have a full size sink since the kitchen was so small. This sort of gives us a kitchen and a half and a great prep area that is completely out of the way. Plus, of course, a dedicated station for my espresso machine. Yeah, coffee is another "hobby" that I've taken a little far. Anyway, the coffee bar has a second smaller Karran sink of the same style and then today I scored a second Hansgrohe faucet on ebay for an absolute steal - or should I say steel.

Lot's of things on ebay are not worth the trouble or actually go for more than you can find them elsewhere but if it's something really odd that doesn't make sense to buy on ebay the chances of a great deal are high. $900 German faucet for $275 - that's a deal. Another thing to buy on ebay? Metal. You can get great deals on small amounts of aluminum, stainless, titanium or what have you. Short of bulk steel I buy all my metals on ebay anymore.

Gregor
 

YoungMedic

Well-known member
Joined
Jul 10, 2012
Messages
170
Location
Florida
:lol: sink puns.. next thing you know the whole thread is down the drain :beer:

So do you just hobby in espresso or coffee as well? My awesome wife got me a Technivorm moccamaster for our 1st anniversary and I absolutely love it! Might have to look into a coffee station of my own :drool:
 

RKA

Well-known member
Joined
Jun 9, 2010
Messages
1,744
Location
NJ
I completely forgot about those lamello fasteners jdp993 mentioned. I read about then here on GJ. Great suggestion, but I remember them being expensive.

Gregor, you're making amazing process and the end result continues to leave me in awe. I wish I was closer so I could lend a hand (learn a thing or two!). :)

One thing that came to mind with that Harry potter room is fire safety. If the kids would spend any time in there, provide a second access point to minimize risk of trapping via a single access.
 

RKA

Well-known member
Joined
Jun 9, 2010
Messages
1,744
Location
NJ
As much as I absolutely love that sink and counter, what about the risk of chipping with this design?
 

dhubbard422

Well-known member
Joined
Jan 16, 2011
Messages
472
Location
Texas Hill Country
Again, great thread. Amazing house. I enjoy reading and learning from your sharing of this build/remodel.

The sink & laminate counter is a really nice idea. It looks great and it is in keeping with period. A removable panel on the back of the island counter sounds like a great idea. Dzus fasteners would be interesting, but even large (diameter) shallow head furniture screws would be simple, practical and mostly unobtrusive.

Your kids will love the "hidden fort". Almost 20 years ago we built a cottage on Bainbridge Island (near Seattle) and there was enough attic space under the 7.5/12 pitch roof that we finished it out for our (then) young girls. The entrance was via a ladder in the hall (linen) closet. Everyone loved this hidden space.

You may be getting tired of "eating the elephant", but you've taken lots of bites and it appears that you are making great progress!
 

tacostand

Well-known member
Joined
Jan 2, 2012
Messages
59
Location
New York City
One thing that came to mind with that Harry potter room is fire safety. If the kids would spend any time in there, provide a second access point to minimize risk of trapping via a single access.

+1

Which dovetails with my first thought when I saw the photo yesterday: roof hatch (skylight).
I love that your kids are getting a fort.
The bottom line is that- should the worst ever happen, flame spread is

FAST.

An operable skylight up there would at least give them an option, if it came down to it.

Dave
 

Zeke

Well-known member
Joined
Aug 13, 2009
Messages
17,176
Location
Long Beach CA, the sewer by the sea.
That would be like crawling up chimney during a fire. Low egress is what you want. Opening a skylight would ventilate the fire which is only good thing if the fire dept is already there and inside.
 

tacostand

Well-known member
Joined
Jan 2, 2012
Messages
59
Location
New York City
That would be like crawling up chimney during a fire. Low egress is what you want. Opening a skylight would ventilate the fire which is only good thing if the fire dept is already there and inside.

There are pluses and minuses to what you're saying and to what I'm saying.
The attic room is isolated enough (and kids may lack the situational awareness) such that your fire warning comes when the fire is in the room below.

Definitely a good discussion to have and I'm glad an earlier poster brought it up in the thread.
I'm sure when Gregor sees this it will be a topic of discussion with his friend Ben and that will sort it out.
 

OJ Bartley

Well-known member
Joined
May 18, 2009
Messages
605
Location
Toronto, ON
I'm all for the safety of the kids... But I'd have to think twice about giving in them access to the roof. Also, I'd hate to be away from home, see it start to rain, and ask "did you close the roof?" because you know the answer would be "ummmm, probably?"

Sent from my Nexus 7 using Tapatalk
 
OP
S

sakurama

Well-known member
Joined
Oct 10, 2010
Messages
1,458
Location
Portland - the cool one.
You all bring up a some very good points. I was planning on putting in two entrances as I'm going to allot a portion of it to our winter/summer/christmas storage AND I would like to put in a window at the end. The whole fire issue is certainly one that is very important and I'll make sure it's addressed.

So I wanted to get the counters done and just clean up as the mess was making me nuts. First up were the two counters on either side of the stove.

i-mSs7MjF-X2.jpg


Then the end of the counter. I spent a while measuring and trimming to get it as close to perfect as I could. The trick here was how to attach it without showing screws.

i-NvV2k3M-X3.jpg


My solution was to glue the edge on first then clamp the laminate in place on top and run the router around three sides, move the clamps one at a time to not disturb the laminate and then trim the last edge. Then I had a perfect fit but not glued on yet.

i-Vp9mwF9-X2.jpg


Then with the MDF screwed to the wall and the contact adhesive applied and dry I set the laminate to the bottom, registered the edge and then rolled it up. Obviously I did a few dry runs to make sure I wasn't going to hit a snag but it worked out well.

i-mVmFL5G-X2.jpg


Then I cleaned, and cleaned and cleaned.

i-vn2q4FH-X2.jpg


i-xZ2zh4J-X2.jpg


i-pCbNJhk-X2.jpg


With the whole place empty and clean it felt like like a completely different place - not my working area but my new home. It looks great and I'm really happy to finally see a transformation after all the work. Obviously there's still a lot to do but it's real progress.

Gregor
 

OHSCrifle

Well-known member
Joined
Mar 11, 2013
Messages
178
Location
Atlanta
As an architect whose pleasure comes from learning with skilled craftsmen (while many others wield flair pens and practice "talkitecture") I really appreciate your comments about Ben. There is no substitute for doing the work, to truly understand the work. I hope his abilities are appreciated by others.

The photo that shows the old wood spindle railing at the top of the stairs is a reminder of how bastardized this MCM home had been. These post-cleanup photos offer a glimpse of how great it will be when you are finished. There is no question all the effort is justified, it's looking great.

It is also a great case study why really good contractors are never cheap. There is SO MUCH work at every turn. Putting in the effort necessary to correct sags and "true up" things that are out of plumb/square - by fixing or carefully camouflaging - simply takes time. You may get a good initial price from somebody who thinks they can do this work quick and easy, but you will pay dearly (one way or another) as they learn the hard way.

So let's get back to the point of sharing your project with a crowd. Does the range have adjustability for height? Right now it looks lot be sitting about an inch low, which could let the ends of the side counters get burned. Of course it's also a test fit at the end of a long day...

Keep it coming. This is a great daily read.
 
To avoid these ads, REGISTER NOW!
Top Bottom