You are using an out of date browser. It may not display this or other websites correctly.
You should upgrade or use an alternative browser.
You should upgrade or use an alternative browser.
Between 485 & 705 SQ/FT Mid-Century Moto Mecca Makeover
- Thread starter sakurama
- Start date
Workspaces between 485 and 705 squarefeet.
Modern Jess
Well-known member
Can't wait to see what you do when you get to making knives. And just so we're clear and I can avoid the whole Kramer thing I want to get on the list now.
Done.
And did I mention my interest in making watches? I'm not going to attempt a movement any time soon (I can buy Swiss movements for a reasonable price) but watch cases and especially dials are really interesting to me. Currently trying to figure out how I can do guilloche on a CNC mill.

I'm really digging some of the RGM watches, mostly because of the guilloche they do with their vintage machinery: http://www.rgmwatches.com/about_rgm/engine_turning.php
Last edited:
OJ Bartley
Well-known member
Done.
And did I mention my interest in making watches? I'm not going to attempt a movement any time soon (I can buy Swiss movements for a reasonable price) but watch cases and especially dials are really interesting to me. Currently trying to figure out how I can do guilloche on a CNC mill.
I'm really digging some of the RGM watches, mostly because of the guilloche they do with their vintage machinery: http://www.rgmwatches.com/about_rgm/engine_turning.php
Noooooo, I don't need more projects to follow and give me (bad) ideas! RGM puts some stunning detail on their dials. I love the variety they come up with.
Sent from my HTC One using Tapatalk 4
polexican23
Banned
yes, it is official despite Odins amazing garage...more people hate both Modern and Sakurama for creating ridiciolous distractions from work.
if you start doing knives and watches, my boss is going to be sooooooooooooooooo mad at me.
if you start doing knives and watches, my boss is going to be sooooooooooooooooo mad at me.
I used to say I loved anything that spins or points but holy cow!
I just lost an hour watching guilloche videos. That is so amazingly cool. I love the complexity of those old machines - Spirograph for metal! I wonder if a CNC could do single point carving? I've never seen it but it must exist.
Yeah, I love watches as well but I like the other end of the spectrum - old Seiko automatics. There's something so simple and honest about them. The movements are cheap too. I've made a few parts for my Seikos - I like modding them. Sort of addictive.
I am busy as hell trying to finish my closet so updates will have to wait.
Koendd - thank you!
Polexican23 - ha! I do what I can.
Gregor
I just lost an hour watching guilloche videos. That is so amazingly cool. I love the complexity of those old machines - Spirograph for metal! I wonder if a CNC could do single point carving? I've never seen it but it must exist.
Yeah, I love watches as well but I like the other end of the spectrum - old Seiko automatics. There's something so simple and honest about them. The movements are cheap too. I've made a few parts for my Seikos - I like modding them. Sort of addictive.
I am busy as hell trying to finish my closet so updates will have to wait.
Koendd - thank you!
Polexican23 - ha! I do what I can.
Gregor
Modern Jess
Well-known member
I just lost an hour watching guilloche videos. That is so amazingly cool.
Hah! So glad that I sent you down the rabbit hole this time, instead of the other way around.
I love the complexity of those old machines - Spirograph for metal! I wonder if a CNC could do single point carving? I've never seen it but it must exist.
The machines are truly magnificent. And completely unobtanium, though there's a couple of guys making a modern version for wood.
I'm thinking that with a fourth axis (horizontal rotary table) and a fixed cutter mounted on the quill, I could carve patterns by moving X and Y, then rotating the fourth axis and repeating. The Z would have to be a gradual touchdown (so as not to just mash the cutter) while moving X and Y, but other than that, it should be relatively straightforward. Well, except for generating the G-Code.
Did I mention my occasional dabbling in software?

ScottsRX
Well-known member
I finally did it. I got through this entire thread. It took about 3-4 days and a lot of my employers time and internet quota (they've got plenty of both)
What a motivational and inspiring thread Gregor. I always thought that we all got one skill only, be it working with Wood or Steel. You can either weld or you could build timber things, but you've just proved me wrong. You can do both, and both extremely well.
Love the work on your place. I'm currently working on plans to build my wife and I a cottage for our property and you've given me some great ideas. And the bikes, don't get me started about the bikes and your photography. Love them both. Followed you on instagram as well
What a motivational and inspiring thread Gregor. I always thought that we all got one skill only, be it working with Wood or Steel. You can either weld or you could build timber things, but you've just proved me wrong. You can do both, and both extremely well.
Love the work on your place. I'm currently working on plans to build my wife and I a cottage for our property and you've given me some great ideas. And the bikes, don't get me started about the bikes and your photography. Love them both. Followed you on instagram as well
Did I mention my occasional dabbling in software?
Yeah and Valentino Rossi dabbles in motorcycles...

Wow, just read 69 pages, amazeballs dude.
I need to give out medals or something for people that make it through this thread. I know my wife only looked at it once or twice. She was curious why so many people were looking at it but perhaps it's like the way people slow down to look at an accident...
I finally did it. I got through this entire thread.
What a motivational and inspiring thread Gregor. I always thought that we all got one skill only, be it working with Wood or Steel. You can either weld or you could build timber things, but you've just proved me wrong. You can do both, and both extremely well.
Followed you on instagram as well
I used to think the same thing too. Not many of my friends do both but a few do and do it well. I respect anyone that wants to learn and better themselves. I'm a sponge for learning things and it feeds me. I'm lucky as my work has allowed a great deal of flexibility in my creative pursuits. I learned photojournalism then moved to still life, then environmental portrait. In a sense once I learn a discipline I'm almost bored with just repeating the motions so I need to learn something new; a new way of retouching, a new lighting method, a new style.
So the house is fun because it's allowing me to utilize a lot of the skills I picked up over the years. It's like my magnum opus. It's also why I like this blog - it's an opportunity to teach and inspire other people to learn something new.
I've said it before in this thread I'm sure but over the years in both motorcycles and photography I met a lot of very competitive and secretive people who guarded their knowledge fiercely. It drove me nuts and further steeled me to figure out what they knew (often very little). I was also lucky to have a few patient, generous teachers who shared their knowledge freely and it opened not just doors but whole worlds. They only asked that I pass the knowledge on and it's something I've taken to heart - and something I really enjoy.
So, there you go.
Gregor
Another newbie joined by conincidence after finding ADVRider, one of my daughters is sick at the moment, but hey this was a great excuse to stay up all night reading this thread or mind blowing insanity.
Quickly becoming a sakurama cross-forum thread stalker; I will try to rehabilitate.
Ps. The serious forks, I have some too if they came off a RSVR gen2 Ape, mine are going on a Falco.
Since you like 'stuff' and your garage is getting tight, have you seen this lift? I have one in my tiny mancave that I have to ride through the house to get to, but hey ho go with what you got!

Simultaneously have another bike on this while leaving something on the traditional bench? It can be pushed around (carefully!)
http://www.bike-lift.com
Hi from Wicklow, Ireland
Al
Quickly becoming a sakurama cross-forum thread stalker; I will try to rehabilitate.
Ps. The serious forks, I have some too if they came off a RSVR gen2 Ape, mine are going on a Falco.
Since you like 'stuff' and your garage is getting tight, have you seen this lift? I have one in my tiny mancave that I have to ride through the house to get to, but hey ho go with what you got!
Simultaneously have another bike on this while leaving something on the traditional bench? It can be pushed around (carefully!)
http://www.bike-lift.com
Hi from Wicklow, Ireland
Al
Glad to give you some diversion while your daughter is sick. Hope she's feeling better.
Cool lift. It's a space saver for sure. I love that you have to ride through your house to get to the shed. What we do for our passions. (I hate calling them toys - that seems to minimize their importance to us)
Gregor
Cool lift. It's a space saver for sure. I love that you have to ride through your house to get to the shed. What we do for our passions. (I hate calling them toys - that seems to minimize their importance to us)
Gregor
Re: Mid-Century Moto Mecca Makeover (Festool & Dust Deputy)
Gregor,
I know this is going way back to the beginning, but can you provide some more detail on how you setup the Dust Deputy with your Festool Dust Collector. I can't tell from the photo if it's sitting on a box on top of the vac or if it's a separate trash can behind it. I just bought a TS55 REQ and CT last weekend and it sounds like a great idea.
Did you notice a difference is suction, good or bad?
Are you using the larger diameter hose for this setup?

And that is all the dust that's left after 24 rips. The Dust Deputy on the vacuum also is a great invention as I no longer need to keep replacing bags.

From there I have two Festool tables (I am good at scoring deals on used stuff) and I bolted the tables together and then turned some brass "bench dogs" that I could use to make repeatable cross cuts using the CNC hole pattern.
Gregor
Gregor,
I know this is going way back to the beginning, but can you provide some more detail on how you setup the Dust Deputy with your Festool Dust Collector. I can't tell from the photo if it's sitting on a box on top of the vac or if it's a separate trash can behind it. I just bought a TS55 REQ and CT last weekend and it sounds like a great idea.
Did you notice a difference is suction, good or bad?
Are you using the larger diameter hose for this setup?
marylandBen
New member
- Joined
- Mar 20, 2015
- Messages
- 1
I too read the entire thread over the last week or so. I've always considered myself handy, and have looked up to guys who build or remodel their garages on this forum and others. Your work is far and away the best I've seen thus far, going far beyond handy.
WeldTightFab
Member
- Joined
- Mar 2, 2015
- Messages
- 22
Just read finished the entire thread, wow. Love the attention to detail, I may have to "accidently" end up in your neck of the woods sense we are both in Portland! Your garage/house is truly inspirational to a younger mind.
Re: Mid-Century Moto Mecca Makeover (Festool & Dust Deputy)
Its a special Dust Deputy that is designed to mount on the CT. Like this.
Gregor,
I know this is going way back to the beginning, but can you provide some more detail on how you setup the Dust Deputy with your Festool Dust Collector.
Its a special Dust Deputy that is designed to mount on the CT. Like this.
Re: Mid-Century Moto Mecca Makeover (Festool & Dust Deputy)
Yes, Ben got the link already. He turned me on to the dust deputy and I have to say I didn't like the idea of this large contraption on top of my "sleek vacuum" but I was buying and filling a lot of bags. Now that I have it I'm pretty amazed with how well it works.
I use the larger hose up into the ceiling and then that connects to a smaller one which drops down to the tool. The large hose is great for things that make a ton of dust like the router table or the miter saw. The TS55 can use the large hose but it makes the saw unwieldy as its stiffer. I have collected a few hoses so I keep a second small diameter hose just for the TS55 and I now keep the vacuum in the corner of the garage so it will reach outside to break down sheet goods.
It works great though. It seems like more suction but that could be because the bag is never filled or clogged. That's the great benefit - it just sits on top and it takes forever to fill. I only use it for wood so I can just dump all the sawdust onto our compost pile. Win win.
MarylandBen - thanks for the props. It's good to know I have the support of a second Ben. Ha.
Weldtight - stay tuned for a party this summer. Finished or not. And I think we all know it won't be finished.
Gregor
Gregor,
I know this is going way back to the beginning, but can you provide some more detail on how you setup the Dust Deputy with your Festool Dust Collector. .
Did you notice a difference is suction, good or bad?
Are you using the larger diameter hose for this setup?
Yes, Ben got the link already. He turned me on to the dust deputy and I have to say I didn't like the idea of this large contraption on top of my "sleek vacuum" but I was buying and filling a lot of bags. Now that I have it I'm pretty amazed with how well it works.
I use the larger hose up into the ceiling and then that connects to a smaller one which drops down to the tool. The large hose is great for things that make a ton of dust like the router table or the miter saw. The TS55 can use the large hose but it makes the saw unwieldy as its stiffer. I have collected a few hoses so I keep a second small diameter hose just for the TS55 and I now keep the vacuum in the corner of the garage so it will reach outside to break down sheet goods.
It works great though. It seems like more suction but that could be because the bag is never filled or clogged. That's the great benefit - it just sits on top and it takes forever to fill. I only use it for wood so I can just dump all the sawdust onto our compost pile. Win win.
MarylandBen - thanks for the props. It's good to know I have the support of a second Ben. Ha.
Weldtight - stay tuned for a party this summer. Finished or not. And I think we all know it won't be finished.
Gregor
I've said it before in this thread I'm sure but over the years in both motorcycles and photography I met a lot of very competitive and secretive people who guarded their knowledge fiercely. It drove me nuts and further steeled me to figure out what they knew (often very little). I was also lucky to have a few patient, generous teachers who shared their knowledge freely and it opened not just doors but whole worlds. They only asked that I pass the knowledge on and it's something I've taken to heart - and something I really enjoy.
So, there you go.
Gregor
Cheers, Gregor. Great analysis! The passion is most evident, and it makes this such an enjoyable read. Thanks for your continued effort.
FishTacoMan
New member
- Joined
- Apr 26, 2012
- Messages
- 3
You have certainly joined the ranks of that group of patient and generous teachers through this thread and your others on ADV. Thanks for the inspiration and insights.
Re: Mid-Century Moto Mecca Makeover (Festool & Dust Deputy)
I went with a Dust Deputy for my CT26 recently and love it. My local Woodcraft didn't have the Ultimate set up in stock though so I made a notches in a piece of 3/4" ply to fit Systainer clips on top of my CT and then put a DIY Dust Deputy deluxe on top of that. One bucket is secured to the ply, the second with the cyclone on it sit in that. To empty I just pop the top and lift the filled bucket out.
You could actually do it even cheaper if you have your own buckets and tops. with the $49 kit and a 2.5" hose.
Gregor,
I know this is going way back to the beginning, but can you provide some more detail on how you setup the Dust Deputy with your Festool Dust Collector. I can't tell from the photo if it's sitting on a box on top of the vac or if it's a separate trash can behind it. I just bought a TS55 REQ and CT last weekend and it sounds like a great idea.
Did you notice a difference is suction, good or bad?
Are you using the larger diameter hose for this setup?
I went with a Dust Deputy for my CT26 recently and love it. My local Woodcraft didn't have the Ultimate set up in stock though so I made a notches in a piece of 3/4" ply to fit Systainer clips on top of my CT and then put a DIY Dust Deputy deluxe on top of that. One bucket is secured to the ply, the second with the cyclone on it sit in that. To empty I just pop the top and lift the filled bucket out.
You could actually do it even cheaper if you have your own buckets and tops. with the $49 kit and a 2.5" hose.
Okay, it's been a very busy few weeks so I haven't had a spare second to catch up but I'm going to attempt to now.
Judiaann had a week long trip to NYC with her niece planned and my goal was to finish the bedroom by the time she came back. A very ambitious plan considering that I'd only have two of those days where the kids were in school and the rest of the time I'd be trying to finish while also managing the destructive force of a 4 and 5 year old by myself. There's also the fact that I haven't really "finished" a room yet. Yeah, there's that too.
The story starts with Sean wondering how I was going to keep my drawer pulls square. I was wondering the same thing but being called out in public added to the pressure! I decided that the more difficult part was not going to be the welding but the cutting of the two miters on the stainless. They would be essential.
I was considering ordering some 8020 to rig up a fence system for my cold saw when I discovered that I still have the wings to my Kapex and that they, remarkably, were about the same height as my saw - it must be because they're both German.

The first thing was to make a mount for the wings so I needed to determine the hole center distance. Here's one of my absolute favorite tricks of calipers. Measure the width of the hole you need to find the center between. In this case 8.87mm.

Press the "zero" button to zero the caliper at that distance.

Now measure from the outside edge of both bolt holes. That's your center-to-center distance. By zeroing the caliper we subtracted one hole's width so the other was divided in half. It's about all the math my head can get around so like a little kid amazed when you pull a quarter behind their ear this trick is endlessly fascinating to me. Wheee! I could do this for hours!!!

I measure the first hole, zero the DRO and then drill two holes with countersinks 120mm apart.

Perfect. Except that I need to add a "V" groove to hold the mount for the Kapex.

For that I grab some aluminum angle which I'd then attempt to weld to the 1" block.
Key word attempt.
It didn't go well. I'm only an aluminum welding novice and trying to weld thick to thin was not going well. I abandoned hope and decided to just buy a thicker piece of aluminum to avoid the trouble. When I got my block home I realized that I had no way to cut it small enough to fit in either the cold saw or the mill. Foiled! At this point I spent more time watching aluminum welding videos and getting frustrated that I may not be able to complete the project in time. Then it occurred to me that I still needed a bandsaw and while I wanted a bigger machine I should consider a smaller one to get me by. Something like a Rockwell/Delta 14" which are ubiquitous and reliable.

With great luck one had just been listed for $250 and I was the first person there, pointed out some issues like missing screws and a loose hinge and loaded into the truck for $200.
Then off to the lego store to buy myself some time with the kids. Lego is almost as good as an ipad for occupying children but it's far more developmentally worthy. And let's face it, more fun for me.
Back home lego was opened and I decide to try welding the aluminum one more time before I threw in the towel and as luck would have it I finally got a bead that was decent enough to do the job. And I got a bandsaw! Sneaky me.


Here's the Kapex wing on the cold saw.
So then I needed to start welding. I do this after the kids are asleep. I used a v-block to hold the round rod and then cut a length of stainless to 500mm - the same width as the closet doors. It's like miniature numerology. I make my first cuts long so that there's room for error.

I weld on one end with two very small tacks on opposite sides then longer welds. I don't add filler and I don't v-groove them - this is a pure fusion weld with low amps. It's a door pull, not a subframe.

From here I clamp the welded end at exactly 90° against a stop measured out to 500mm and then clamp it in the v-block.

This ensures the cut will be parallel to the first one. Or perpendicular. Or just straight. Whatever. I'm tired.

I clamp the one end down and then do my tacks and weld it up and... it's square. Perfectly. Nice!

Next up, to keep the missus happy, I scotchbrite the welds smooth. I'll be honest - it looks better and I give the whole pull a once over to make them look smooth.

I'm like a production facility! Okay, maybe not. But those are done and that's progress.
Gregor
Judiaann had a week long trip to NYC with her niece planned and my goal was to finish the bedroom by the time she came back. A very ambitious plan considering that I'd only have two of those days where the kids were in school and the rest of the time I'd be trying to finish while also managing the destructive force of a 4 and 5 year old by myself. There's also the fact that I haven't really "finished" a room yet. Yeah, there's that too.
The story starts with Sean wondering how I was going to keep my drawer pulls square. I was wondering the same thing but being called out in public added to the pressure! I decided that the more difficult part was not going to be the welding but the cutting of the two miters on the stainless. They would be essential.
I was considering ordering some 8020 to rig up a fence system for my cold saw when I discovered that I still have the wings to my Kapex and that they, remarkably, were about the same height as my saw - it must be because they're both German.
The first thing was to make a mount for the wings so I needed to determine the hole center distance. Here's one of my absolute favorite tricks of calipers. Measure the width of the hole you need to find the center between. In this case 8.87mm.
Press the "zero" button to zero the caliper at that distance.
Now measure from the outside edge of both bolt holes. That's your center-to-center distance. By zeroing the caliper we subtracted one hole's width so the other was divided in half. It's about all the math my head can get around so like a little kid amazed when you pull a quarter behind their ear this trick is endlessly fascinating to me. Wheee! I could do this for hours!!!
I measure the first hole, zero the DRO and then drill two holes with countersinks 120mm apart.
Perfect. Except that I need to add a "V" groove to hold the mount for the Kapex.
For that I grab some aluminum angle which I'd then attempt to weld to the 1" block.
Key word attempt.
It didn't go well. I'm only an aluminum welding novice and trying to weld thick to thin was not going well. I abandoned hope and decided to just buy a thicker piece of aluminum to avoid the trouble. When I got my block home I realized that I had no way to cut it small enough to fit in either the cold saw or the mill. Foiled! At this point I spent more time watching aluminum welding videos and getting frustrated that I may not be able to complete the project in time. Then it occurred to me that I still needed a bandsaw and while I wanted a bigger machine I should consider a smaller one to get me by. Something like a Rockwell/Delta 14" which are ubiquitous and reliable.
With great luck one had just been listed for $250 and I was the first person there, pointed out some issues like missing screws and a loose hinge and loaded into the truck for $200.
Then off to the lego store to buy myself some time with the kids. Lego is almost as good as an ipad for occupying children but it's far more developmentally worthy. And let's face it, more fun for me.
Back home lego was opened and I decide to try welding the aluminum one more time before I threw in the towel and as luck would have it I finally got a bead that was decent enough to do the job. And I got a bandsaw! Sneaky me.
Here's the Kapex wing on the cold saw.
So then I needed to start welding. I do this after the kids are asleep. I used a v-block to hold the round rod and then cut a length of stainless to 500mm - the same width as the closet doors. It's like miniature numerology. I make my first cuts long so that there's room for error.
I weld on one end with two very small tacks on opposite sides then longer welds. I don't add filler and I don't v-groove them - this is a pure fusion weld with low amps. It's a door pull, not a subframe.
From here I clamp the welded end at exactly 90° against a stop measured out to 500mm and then clamp it in the v-block.
This ensures the cut will be parallel to the first one. Or perpendicular. Or just straight. Whatever. I'm tired.
I clamp the one end down and then do my tacks and weld it up and... it's square. Perfectly. Nice!
Next up, to keep the missus happy, I scotchbrite the welds smooth. I'll be honest - it looks better and I give the whole pull a once over to make them look smooth.
I'm like a production facility! Okay, maybe not. But those are done and that's progress.
Gregor
Thanks. That welding table was a great score. At some point I'm going to get the top blanchard ground and make a base deserving of the top. I got it all drilled from an old machine shop that was closing up. The whole top is drilled and tapped at 6" intervals with 1/2-13 holes. It weighs almost 1000lbs.
Simultaneous to working on the pulls I was working on finishing the doors and building the closet in. Since I had the issue with the drawer slides interfering I came up with the idea of notching the doors via the miter saw with the depth stop. I tested it on my hinge testing board.


This was a little tight but it worked out fine. I was nervous to do this on the actual doors but since I tested it what's the worst that could happen?
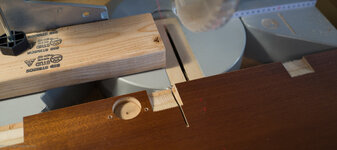
This. The saw slipped off the depth stop I know not how. I had to walk away for a few minutes when this happened.

I ended up cutting a sliver from a scrap and glued it in place. Once it was sanded and touched up with poly it was pretty invisible. Skill is as much covering your mistakes as not making them. I'd like to tip the balance to the not making them side however.
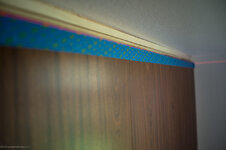
With the doors mounted I adjusted them as much as the hinges would allow but still there were inconsistencies. Hard to say if it was me or the cabinets or what but I haven't had this many issues with my own cabinets. I put up a laser level and then laid a strip of tape across the line to act as my cut guide and then took all the doors down and recut them.

Here's a tool you probably didn't expect from me. And probably one you won't see much more either. I don't like the iron on edge banding. I don't find it very quick, it slips as the heat melts the glue and it's not particularly easy. The world of glue and adhesive has some a long way since iron on edge banding...

I used a small roller to poly the facia around the closet after it was nailed into place.

All the drawers I made are mounted into place.

Next up I chose a random measurement of 30mm to inset the door pulls and then use the laser level again to set the placement of the top of the pulls.

The bottom was just referenced off the pull and inset 30mm incase there were any length irregularities.

Then I trimmed out the closet and the ceiling with the quarter round black.


And then I spent every other spare hour doing laundry, folding my clothes and cleaning. The base is just leaned in place as J has acquiesced to the idea of putting down new cork - something I've wanted since the beginning. Aside from the originality I just like the look.
So there you have it. I succeeded in finishing a room and just in time for J's arrival home. She was very impressed. So much so that she asked if we could do it with the other rooms since it feels like we didn't lose any size at all in the overall room but gained some massive storage space. I think that's because the full wall of wood recedes a bit compared to a white wall. Regardless it's great to have a closet, to finally be able to put my clothes away and to trim out a room. One box on a very long list can be checked "done" and that feels good.
Gregor
Simultaneous to working on the pulls I was working on finishing the doors and building the closet in. Since I had the issue with the drawer slides interfering I came up with the idea of notching the doors via the miter saw with the depth stop. I tested it on my hinge testing board.
This was a little tight but it worked out fine. I was nervous to do this on the actual doors but since I tested it what's the worst that could happen?
This. The saw slipped off the depth stop I know not how. I had to walk away for a few minutes when this happened.
I ended up cutting a sliver from a scrap and glued it in place. Once it was sanded and touched up with poly it was pretty invisible. Skill is as much covering your mistakes as not making them. I'd like to tip the balance to the not making them side however.
With the doors mounted I adjusted them as much as the hinges would allow but still there were inconsistencies. Hard to say if it was me or the cabinets or what but I haven't had this many issues with my own cabinets. I put up a laser level and then laid a strip of tape across the line to act as my cut guide and then took all the doors down and recut them.
Here's a tool you probably didn't expect from me. And probably one you won't see much more either. I don't like the iron on edge banding. I don't find it very quick, it slips as the heat melts the glue and it's not particularly easy. The world of glue and adhesive has some a long way since iron on edge banding...
I used a small roller to poly the facia around the closet after it was nailed into place.
All the drawers I made are mounted into place.
Next up I chose a random measurement of 30mm to inset the door pulls and then use the laser level again to set the placement of the top of the pulls.
The bottom was just referenced off the pull and inset 30mm incase there were any length irregularities.
Then I trimmed out the closet and the ceiling with the quarter round black.
And then I spent every other spare hour doing laundry, folding my clothes and cleaning. The base is just leaned in place as J has acquiesced to the idea of putting down new cork - something I've wanted since the beginning. Aside from the originality I just like the look.
So there you have it. I succeeded in finishing a room and just in time for J's arrival home. She was very impressed. So much so that she asked if we could do it with the other rooms since it feels like we didn't lose any size at all in the overall room but gained some massive storage space. I think that's because the full wall of wood recedes a bit compared to a white wall. Regardless it's great to have a closet, to finally be able to put my clothes away and to trim out a room. One box on a very long list can be checked "done" and that feels good.
Gregor
Hostyle
Well-known member
Must have been an awesome feeling to finally tick that box! And with a great result to boot.
Terranova
Well-known member
I used to work in a music store in the drum department. We'd occasionally host clinics by famous professional drummers. In hind sight I learned that clinics usually fell into 1 of 2 categories:
The first kind were inspiring: afterwards you wanted to go home and play drums and practice till all hours of the morning in an attempt to improve.
The second kind were depressing: the drummer was so good and made even the most difficult things seem effortless. They made you want to go home, snap your sticks in half, turn in your secret drummer decoder ring and burn your membership card.
Please take it as a compliment when I tell you, your garage thread is both. Some days you inspire me to go out to the garage. Other days your posts make me want to curb alert all my tools on Craigslist! Lol.
And for all that I thank you.
Please Continue.
The first kind were inspiring: afterwards you wanted to go home and play drums and practice till all hours of the morning in an attempt to improve.
The second kind were depressing: the drummer was so good and made even the most difficult things seem effortless. They made you want to go home, snap your sticks in half, turn in your secret drummer decoder ring and burn your membership card.
Please take it as a compliment when I tell you, your garage thread is both. Some days you inspire me to go out to the garage. Other days your posts make me want to curb alert all my tools on Craigslist! Lol.
And for all that I thank you.
Please Continue.
OJ Bartley
Well-known member
Very nicely done, Gregor. Looks like this project all came together to more than the sum of its (considerable) parts. I also love that you still have a plain bare bulb up there for now, because it makes me feel better about the rooms in our house that still have the awful builder's fixtures.
Edit: ^ Agreed, Terranova! Some posts make me think "That's a great idea, I might be able to do something like that", and then others are more "Pffft, this guy..."
Edit: ^ Agreed, Terranova! Some posts make me think "That's a great idea, I might be able to do something like that", and then others are more "Pffft, this guy..."
Last edited:
Aww, you guys...
Yeah, that bulb is ugly. I'm not a fan of track light but it's the right place and would serve to allow several multiple pools of light. I generally prefer table lamps but the pair I had broke.
Lighting is like the icing on a cake - yummy. And important. And last.
Gregor
Yeah, that bulb is ugly. I'm not a fan of track light but it's the right place and would serve to allow several multiple pools of light. I generally prefer table lamps but the pair I had broke.
Lighting is like the icing on a cake - yummy. And important. And last.
Gregor
Great work on the bedroom! I'm glad you're now closeted! Um, wait, well, anyway.
I was thinking back to the beginning of this thread where you had contacted Saul Zaik about perhaps doing some consulting on the house but he quoted you a ridiculous figure. Have you shared this thread with him? If I were him I'd feel both proud that someone was taking such great care with my design, and I'd feel silly I didn't offer my services at a reasonable price. Not that I think you need the help of an architect, but sometimes just a conversation about the house could bring out things/ideas that wouldn't present themselves without the historical perspective. Oh well, I suppose it is his loss not being involved in such a stunning project. Great job.
I was thinking back to the beginning of this thread where you had contacted Saul Zaik about perhaps doing some consulting on the house but he quoted you a ridiculous figure. Have you shared this thread with him? If I were him I'd feel both proud that someone was taking such great care with my design, and I'd feel silly I didn't offer my services at a reasonable price. Not that I think you need the help of an architect, but sometimes just a conversation about the house could bring out things/ideas that wouldn't present themselves without the historical perspective. Oh well, I suppose it is his loss not being involved in such a stunning project. Great job.
Modern Jess
Well-known member
That looks awesome, Gregor. I don't know that I would have had the presence of mind to fix that slip cut in the door. My first reaction would have probably been to set the thing on fire and then walk away. So kudos for that.
The closet really came out nice. Very impressive. And thanks for the tip about the calipers. It's funny, I've used tricks like that on DROs all the time, but never thought of doing the same with calipers.
The closet really came out nice. Very impressive. And thanks for the tip about the calipers. It's funny, I've used tricks like that on DROs all the time, but never thought of doing the same with calipers.
Great work on the bedroom! I'm glad you're now closeted! Um, wait, well, anyway.
I was thinking back to the beginning of this thread where you had contacted Saul Zaik about perhaps doing some consulting on the house but he quoted you a ridiculous figure. Have you shared this thread with him? If I were him I'd feel both proud that someone was taking such great care with my design, and I'd feel silly I didn't offer my services...
There was a person watching this thread that was working on a biography and they were impressed and mentioned that they'd like to have him come and visit the house at some point. Perhaps at some point I can "hire" him to show me some photos of the place from when it was built. He's in his 80's and restoring "his" house is costing me every cent that I have so it's a funny standoff of sorts. At this point I'd love to find the family that owned it but all my searches have turned up nothing so I'm just going forward and trusting my gut.
Gregor
E12-535iTurbo
Well-known member
I guess that's the nicest IKEA closet I've ever seen. Nice work.
However the entrance door to the room does look a bit weird now right next to those tall darker closet doors. Any plans for that?
However the entrance door to the room does look a bit weird now right next to those tall darker closet doors. Any plans for that?
TimRaleigh
Active member
- Joined
- Nov 27, 2013
- Messages
- 27
By zeroing the caliper we subtracted one hole's width so the other was divided in half.
Great tip, thanks.
With great luck one had just been listed for $250 and I was the first person there, pointed out some issues like missing screws and a loose hinge and loaded into the truck for $200.
Nice catch...Karma
Here's the Kapex wing on the cold saw.
Really creative solution.
Next up, to keep the missus happy, I scotchbrite the welds smooth. I'll be honest - it looks better and I give the whole pull a once over to make them look smooth.
Those handles look sweet.
Tim
GDPossehl
Well-known member
Lighting is like the icing on a cake - yummy. And important. And last.
The last part is only the actual hanging of fixtures. The best light fixtures are artfully placed, even before the drywall goes up.
I could see a ceiling light in that room go a number of ways. Easiest would be a swing arm sconce (or track lights--eww) from the existing bulb's location.
However, the ultimate ceiling light in that bedroom would be a mid-century chandelier centered in the ceiling or over the foot of the bed. (take your pick)
Last edited:
TimRaleigh
Active member
- Joined
- Nov 27, 2013
- Messages
- 27
Here's a tool you probably didn't expect from me. And probably one you won't see much more either. I don't like the iron on edge banding. I don't find it very quick, it slips as the heat melts the glue and it's not particularly easy.
It does get easier, but it's still a chore. The MFK 700 makes it easy and fun to trim though.
Then I trimmed out the closet and the ceiling with the quarter round black.
Looks really good.
transplant_wi
Well-known member
You can have my MFK 700 when you pry it from my cold, dead hands
The last part is only the actual hanging of fixtures. The best light fixtures are artfully placed, even before the drywall goes up.
I could see a ceiling light in that room go a number of ways. Easiest would be a swing arm sconce (or track lights--eww) from the existing bulb's location.
However, the ultimate ceiling light in that bedroom would be a mid-century chandelier centered in the ceiling or over the foot of the bed.
Ceiling mounted lights are a trick in this house with the exposed T&G roof deck & beams. If my SketchUp model is right the beam over the bed in that room that's about 8' above the floor, but there's no great way to get power to a light there without opening a hairy can of roof.
Overly ambitious bedroom lighting is in the list of things I think about for Gregor's house, but am too good a friend to suggest (until he finishes the house & dozen or so other projects.)
Let's knock out the second story motorcycle shrine addition on the garage first!

And then I spent every other spare hour doing laundry, folding my clothes and cleaning. The base is just leaned in place as J has acquiesced to the idea of putting down new cork - something I've wanted since the beginning. Aside from the originality I just like the look.
So there you have it. I succeeded in finishing a room and just in time for J's arrival home. She was very impressed. So much so that she asked if we could do it with the other rooms since it feels like we didn't lose any size at all in the overall room but gained some massive storage space. I think that's because the full wall of wood recedes a bit compared to a white wall. Regardless it's great to have a closet, to finally be able to put my clothes away and to trim out a room. One box on a very long list can be checked "done" and that feels good.
Gregor

Congrats, and a job well done on finishing a project. Always a great feeling.

I know my wife would wish I did this more often...
Yeah, I know that door needs to be addressed by the closet. All the door frames and trim are going to go black at some point. As for the light. Yup, I know that light ***** but as Ben mentions the ceiling is the roof so there's no way to get power anywhere near the center of the room.
Down the line we have plans to pull the roof and bump it up another 6" to add insulation beyond the whopping R3 that is there. At that time I could pull more power and put in drops wherever I wanted but for now I'm limited to to what's available. Since it's unlikely that I'll get any kind of useful light from that spot I sometimes look for midcentury light sculpture that could work.
Right now I'm thankful that Ben doesn't offer up any more (good) ideas that cost me more time or money. I want to finish the stuff on my plate now before getting too distracted with things I can't change easily or inexpensively.
Gregor
Down the line we have plans to pull the roof and bump it up another 6" to add insulation beyond the whopping R3 that is there. At that time I could pull more power and put in drops wherever I wanted but for now I'm limited to to what's available. Since it's unlikely that I'll get any kind of useful light from that spot I sometimes look for midcentury light sculpture that could work.
Right now I'm thankful that Ben doesn't offer up any more (good) ideas that cost me more time or money. I want to finish the stuff on my plate now before getting too distracted with things I can't change easily or inexpensively.
Gregor