To avoid these ads, REGISTER NOW!

Between 485 & 705 SQ/FT Mid-Century Moto Mecca Makeover

Workspaces between 485 and 705 squarefeet.
OP
S

sakurama

Well-known member
Joined
Oct 10, 2010
Messages
1,458
Location
Portland - the cool one.
Okay, I'm not done with the linen closet but perhaps an update will help me along.

i-CcJfkGN-L.jpg
i-MFXR9bq-L.jpg


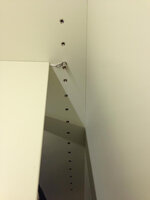
The space I'm working with is the little opening right behind the white on the right side. It used to be the chase for the chimney for the boiler. We took out the chimney and ran the intake and exhaust for the hot water heater in the space. I figured I'd finish it out so I sheet rocked it and then left it.

I started out thinking the best way to do finish it was to make a box that would slide in and that way I could drill the sides for adjustable shelves. I did that and, big surprise, it wouldn't slide in. Framing just isn't square and trying to make something fit inside something that isn't square is an exercise in futility.

That was week one. Down the drain.

Next up I decided to be smarter and make some measuring sticks and just build in the sides. I used some left over track and fittings in my "hold down/track/fixture" drawer.

i-jDQdXBc-XL.jpg


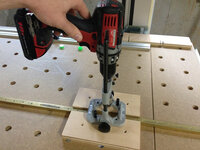
This got me two sides that were not square to match the sides that weren't square. I figured if I could get two sides that would fit I could reference them off the bottom and then drill the holes with the LR32 system for the shelves and then just fit a bottom and top.

i-bk7Rtjb-XL.jpg


I used the track and the LR32 cradle to route my dados for the back as well. Around this time I realized that the single light (a high hat in the ceiling) wouldn't light up the close save for the very top shelf. This was annoying and I've had closets like this before and it always strikes me as a sloppy "whatever" solution.

This is where the closet took a dark turn and became a two week affair. The solution was to not use the high hat but instead use lighting that put light into each shelf. I could use LED's on each shelf bottom but then they would never be adjustable... really. I needed light on both sides but that would also allow shelves to be slid in and out.

I researched the hell out of LED strip lights (and I'm still learning) and bought a reel (which in the LED world is 5m long) then decided to route out a dado for them. Of course the LED's aren't really attractive so I wanted to make them more slick. At this point I'm considering the closet a test bed for the LED's that I want to put elsewhere in the house so I'm trying to do a good job.

i-xxwVfbn-XL.jpg


I source a 10.3mm router bit and cut a channel to fit the LED and a slice of 1/8" milk white (translucent) plexi.

i-BMDPJdq-XL.jpg


I tested the idea with a piece of scrap and it seemed like the way to go.

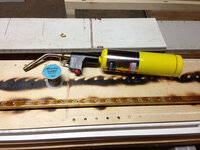
I soldered up one of the strips.

i-3ZJGJw9-XL.jpg


i-pKt2jrh-XL.jpg


One of the things I learned from my time the high end audio world was soldering. One of our tricks was to use 5minute epoxy to cover the leads after testing them and then, when the epoxy was still liquid, to slide over the jack barrel or cover so that the epoxy provided stress relief. In this case I used a little hot glue on the wires and while it was curing slid over some shrink wrap and heated it up. This will keep the wires from stress breaking.

Cut it to length (all LED's can be cut at every third LED - as you can tell from the picture).

i-v6QwgsL-XL.jpg


And then test fit the two strips into the dado's that I cut.

i-DbthgCK-XL.jpg


It's here I wished for a table saw. The router made a pretty decent channel but the track saw wasn't the best way to cut the plexi strips. There was enough variation between them (less than .5mm) that a perfect press fit wasn't happening so I set up the router table to skim them strips where needed.

i-DZTWLcL-XL.jpg


After a lot of fussing I finally got the plexi strips cut and fit as a press fit over the LED's. There's no clearance but the LED's aren't very hot but I guess this is my test of concept. I have the sides in but need to now conceal the power supply and fit a switch so they only turn on when the door is open. Rain this past week has prevented me for getting the parts finished.

i-Q2BVNnC-XL.jpg


So that's where I'm at.


________________________________________________________​


In other news I have found myself at the steel yards a lot this past week and bought myself a pizza "stone" as we have started back up our tradition of making homemade pizza. If you haven't tried making your own pizza I encourage you to do it. It's so easy to do that it's a crime to buy pizza. For the cost of one large pizza you can buy pretty much all you need. My research on "stones" led me here where I got the idea for scrap steel. For $10 I got a piece of 1/2" 12" square steel.

i-kXQNnpB-XL.jpg


The recipe that we use is from the pizza place Roberta's that's a few blocks from my studio in Brooklyn and a place we go to frequently. It's very easy, takes very little time and yields the best pizza I've ever had. Do it!

i-D68qDH5-XL.jpg


_________________________________________________________​


Lastly, it's been another year and my boy's birthday is tomorrow. I wanted to make it a tradition to make him a tool and last year I made him a very small hammer so this year he's getting a slightly larger one:

i-cNzbkDX-XL.jpg


i-fGTvJmV-XL.jpg


Each year I can see my machining improve with the things I make and this year the hammer is much nicer than the one last year. J suggested that I make him a tool box for the hand made tools and that's a great idea but it's for down the road.

Hopefully I'll finish the closet this week and post up some photos but at least I got this post out.

Gregor
 
To avoid these ads, REGISTER NOW!

Modern Jess

Well-known member
Joined
Jan 2, 2011
Messages
1,362
Location
Bay Area, California
The only thing that surprises me about this thread any more is that I really should have seen it coming, where "it" is whatever cool thing you're mastering. Generally, it's either something that I've been intently interested in at some point in the past, or something that I'm just getting around to being intently interested in. The LED strip lights are something I investigated at length while I was building my suspended shelf. I left some low-voltage in-wall wiring behind the underside drywall in case I ever actually get around to adding some supplemental light above my metal pegboard. I have a few sample strips and some really nice extruded housings, but haven't pulled the trigger yet.

And pizza, yeah. Love the metal slab idea, might have to try that. I use a Big Green Egg with enough lump charcoal to get it up around 800 degrees or so, which makes for a properly bubbled and ever-so-slightly charred pizza. Hmmm... getting hungry...

Nice work on the hammer, too!
 
OP
S

sakurama

Well-known member
Joined
Oct 10, 2010
Messages
1,458
Location
Portland - the cool one.
LED's are sort of a lighting promise made good. The guys at the place where I bought them were experimenting with electroluminescent paint which is what we'll be replacing our LED's with in 10-20 years. It's pretty amazing stuff. For now I'm comfortable enough with LED's that I know what I like and I'm ready to order more and start installing them. I will do channel for the garage cabinets so if you have a good source for 10mm channel let me know. Channel and the water resistant LED's should be a perfect combo.

I've wanted one of those Big Green Egg's for a long time and the pizza might be just the reason to get one. Our oven only goes to 500 and that's the limit for getting the proper bubbling crust. I've been considering the Weber so perhaps I'll try that for now.

Gregor
 

Rodney Schultz

Active member
Joined
Mar 20, 2014
Messages
28
Location
Leduc, Alberta, CANADA
First let me comment that your thread, and of course your work, is awesome. Not to mention your work ethic.

On the LED strips, I have seen an adjustable shelving unit that had light strips under each shelf and although I haven't looked real close, on first look it appears that the strips are powered by the metal adjustable shelf strips dadoed into the cabinet sides. I can not see any other wires leading to the shelves. Would make the shelves completely adjustable AND lit. Thought it was an excellent idea, and you just reminded me of it.

Again, thank you for an unbelievable thread.
Rodney
 

RKA

Well-known member
Joined
Jun 9, 2010
Messages
1,744
Location
NJ
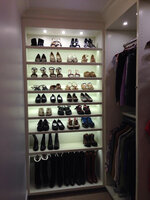
Let me give Gregor some more inspiration along the lines of what Rodney is suggesting. These are images from a fantastic walk in closet built by FOG member Cort for a client. He did some really really nice work and I saved it for my own inspiration if and when the time comes. But hopefully he won't mind me sharing his work here.

On to the pictures. Hopefully the pictures give you a pretty good idea.

i-qbW4jc5-M.jpg
i-cXpppBf-M.jpg
i-2sbFtMK-M.jpg
i-HSwq6xh-M.jpg
i-ZmbChgx-M.jpg
i-wSQx6fT-M.jpg
i-VftXTxb-M.jpg
i-w4HPJhq-M.jpg
i-DRx4gq8-M.jpg
i-ngvMWrL-M.jpg
i-42kKWJG-M.jpg
 
Last edited:

Modern Jess

Well-known member
Joined
Jan 2, 2011
Messages
1,362
Location
Bay Area, California
OP
S

sakurama

Well-known member
Joined
Oct 10, 2010
Messages
1,458
Location
Portland - the cool one.
Hot damn, somebody has out-Gregored Gregor!

Damn, that's cool. I like being "out Gregor'd". Raises the game.

I would think you could forgo the threaded post and eyelet and just make each shelf have a contact patch or plate. that way there'd be no problem to just remove the shelf and put it in another place.

Very slick idea and basically just what Rodney was saying. Man, makes me want to start over on the whole kitchen...

Gregor
 

blsuedeshu

New member
Joined
Nov 19, 2008
Messages
2
I love the look of the old school Sony deck with VU meters. That photo inspired me to look for my Walkman Pro. I know it here somewhere...........
 

Da Wad

Member
Joined
Jul 16, 2014
Messages
16
First let me comment that your thread, and of course your work, is awesome. Not to mention your work ethic.

On the LED strips, I have seen an adjustable shelving unit that had light strips under each shelf and although I haven't looked real close, on first look it appears that the strips are powered by the metal adjustable shelf strips dadoed into the cabinet sides. I can not see any other wires leading to the shelves. Would make the shelves completely adjustable AND lit. Thought it was an excellent idea, and you just reminded me of it.

Again, thank you for an unbelievable thread.
Rodney

Yeah they very much do exist. That is the style of shelving that we had in Canada in the Target stores (RIP) in the beauty section. I was part of the team that set up a number of the stores and it was really neat to see.
 

itb76

Active member
Joined
Dec 29, 2007
Messages
40
Location
Whitehall, MI
Gregor,

I am amazed and inspired! I'll admit it took me three weeks to read the thread thus far. I wish I had half your energy and a fraction of your talent, I love the way your home and garage are coming together. The style and craftsmanship are beautiful. When I catch up on all my automotive projects I hope to start working on cabinets. I have four road cars, a race car, a 1985 Honda Interceptor, and four kids so it may be a while.

Lenny
 

elvee

Well-known member
Joined
Nov 1, 2006
Messages
309
Location
Atlanta, GA
Ok, the idea of contacts for the shelves is awesome.

I found LED strip stuff at oznium.com a few years ago when I was redoing the inside lighting for the mobile farmers market truck I built / am partners in. Being in a hurry I bought prebuilt 5ft long strips that had quick plugs on each end. You can daisy chain them together, or run them as independants. As the truck is a former Mac dealers truck, I had plenty of lighting circuit wires to steal from. Two years, and a lot of bouncing down the road, and I have only lost a few diodes. I am pretty certain the loss is from the units getting hit by boxes, not from burnout. It is the same strip material that Gregor is using. I should have purchased the enclosed strips for more durability, but the budget wasn't quite big enough.

On the pizza, I second the BGE. We just had friends over yesterday, and I did a bunch of different pizzas for everyone. The only problem was that I somehow deformed the hinge assembly. Guessing that getting the Egg up to over 800 degrees was a little much. Lesson learned. There are some really cool kits you can buy for a Weber kettle to set it up as a pizza oven. The kit comes with a stainless band that is about 6 inches tall that creates the "oven" and gives you an access port to slide the pies in and out. It also includes a baking stone. Kits are about $200 I think.

Or you can just build a brick oven out in the backyard.

Gregor, as always, your work is incredible and gives me lots of bad ideas.
 
OP
S

sakurama

Well-known member
Joined
Oct 10, 2010
Messages
1,458
Location
Portland - the cool one.

Huxley

Well-known member
Joined
Mar 4, 2008
Messages
210
Location
Colorado
If she had a lathe & welder, I am sure she would have made some tooling for the project. I read about the one below a while back but I was unable to retrieve the build thread. The exterior was finished with colorful mosaic tile.

The rod in the middle is mounted to a pivoting base so it can support each brick / coarse as the hemisphere is built.
viewimage.php


viewimage.php


viewimage.php


viewimage.php
 

lilscorpion

Well-known member
Joined
Mar 15, 2010
Messages
3,600
Location
Colorado
Alright guys, help me catch up. The activity of building the oven would be cool. Seeing it sit in the backyard would be cool. Being able to brag about it would be super cool. Couple of questions to help me get one on my list -

I will likely not make much more than two pizzas at a time. Is it worth the time of heating up the oven to cook just two pizzas over using a conventional oven?

We make pizzas currently no more than every other week. Are you guys cooking pizza more often than not? Would use the oven for other things? I know you can make calzones (much like a pizza) or maybe bread or something. Trying to get an idea for how much I'd use it.

Would you guys seal it up when not in use? Seems like it's an amazing home for critters.

Matt
 

elvee

Well-known member
Joined
Nov 1, 2006
Messages
309
Location
Atlanta, GA
The big thing with a brick oven is the temps you can achieve - think 900 plus! The pizza cooks is 3 or 4 minutes. Little char on the bottom, super bubbly and blistered crust.

So, what else do you do with the heat? Bake bread. Do roasts for a long time with little effort. I think the Forno Bravo site talks about this a bit, but the usual production cycle would be:
Get oven up to temp (takes a few hours to really get it hot)
Bank fire and bake breads
Crank it up a little bit to do your pizzas for dinner
Knock the fire back down
Put a roast in for a long, slow cook (think overnight).

Most people have a door for the oven for both when it is baking (keeps heat in, damps down the fire) and also to keep stuff out. The door gets inset into the opening and sits between the baking chamber and the chimney. You also usually have an opening in the hearth, or at the back of the dome, as an ash dump / cleanout.

I've spent a lot of time over the last few years planning mine. Just can't come to an agreement with my wife about where to put it.

Also, as far as frequency - the most common thing I have heard from people is that once they have it they use it a lot more than they thought they would. You might turn into the neighborhood bakery, but there are worse things to do with your time.
 

Modern Jess

Well-known member
Joined
Jan 2, 2011
Messages
1,362
Location
Bay Area, California
Alright guys, help me catch up.

This is something that I've given a lot of thought to, as it happens. When we moved into our current house (fresh off an epic trip to Italy, riding scooters across Tuscany) I really, really, really wanted to build a pizza oven in the backyard. The wife was reluctant, and pointed out all the same points raised here -- it wouldn't get used often enough, it takes up space, where to put it, etc.

The BGE was my compromise solution. It's expensive, but it can cook a pizza, grill steaks, roast a turkey, and even smoke meat with some additional setup. And if you put it on the right base, it's mobile, too. So that answers pretty much all the potential criticisms of a stationary pizza oven. It's probably not quite as good as a dedicated pizza oven. But it's damn close, and it makes up for it by doing lots of other stuff.
 

itb76

Active member
Joined
Dec 29, 2007
Messages
40
Location
Whitehall, MI
Best pizza I ever had was on a Weber charcoal grill...


Main drawback is you can't make a gluten free crust this way (it doesn't hold together), and my wife and one of the kids found they are allergic to wheat. Was fun while it lasted though!
 

tiggi

Well-known member
Joined
Sep 12, 2014
Messages
253
Location
USA
Alright guys, help me catch up. The activity of building the oven would be cool. Seeing it sit in the backyard would be cool. Being able to brag about it would be super cool.
Matt

I take every chance I get to brag about my wood burning pizza oven. I finished mine couple of years ago and I use all the time. I have couple of pics in my thread. My usual routine is to cook pizza for dinner and then bake bread tomorrow morning. My oven will keep useable temps for most of the next day as long as I keep the door closed.
 
To avoid these ads, REGISTER NOW!

mr_magicfingers

Well-known member
Joined
Apr 22, 2013
Messages
70
Location
Devon, UK
Hi Gregor, I've just spent my spare time over the past week reading through the thread, having found my way here via Lilscorpion's thread. I've nothing to add to the comments here other than my appreciation for your work and effort. I have a house renovation looming over the next few years and hope to do a fair bit of the work myself. With some cabinet making in my past and a love of learning new things, your work has encouraged me to continue my plan to learn along the way as I renovate and build anew.

Thanks for the time and trouble you go to keeping everything documented, it's been a great learning opportunity. Mind you, as I have to replace my old woodworking equipment (table saw, jointer, planer etc) for the new workshop after having sold the ones I used to have during a period of life where I was broke, the festool kit is certainly looking appealing, but I think a cabinet saw is likely going to be my preference, at least for a while. I'll go and get a demo of some of the festool kit though, it does look very handy and there's always a reason to buy new tools :)

All the best,

Justin.
 

RKA

Well-known member
Joined
Jun 9, 2010
Messages
1,744
Location
NJ
Thanks Tim! I updated the post to give due credit. That image search feature is cool...just learned about it yesterday, but haven't used it yet.
 

mypov

Well-known member
Joined
Aug 1, 2011
Messages
557
Wow, I am absolutely amazed - and humbled. I love your attitude to learning, and passion for getting so involved and doing things right. There are a lot of contractors, and certified tradesmen who have the knowledge (and likely the ability) but don't do as nice as job as you have demonstrated. I am currently in school for heavy equipment mechanics, and am almost certified, but have passion for building, and really wish I went carpentry route - but you have shown that you can do what you love after work. Anyway, this confirms that I need to double my effort for things, lacking knowledge and time is no excuse for not doing a fantastic job and doing things right. I have gutted our basement and am looking forward to rebuilding when school is done and funds allow. I will also be starting a garage thread, and will be borrowing from your examples. Hope you are doing well, and just to reiterate, nice job!
 

boatmark

Active member
Joined
Aug 23, 2012
Messages
32
I haven't been around for a while, and it occurred to me this evening to make a quick stop to see what was up on the Gregor Project. I should know better . . once I start I cannot stop until I am completely up to date. Took three hours.

It is refreshing to see your attitude with regards to teaching others along the way. I too have encountered many whose secretive ways were actually ego covering up the fact that their skills were not what they were made out to be. I was very lucky to have two very talented craftsmen go out of their way to pass on their skills to me at a young age - one mechanical, and the other in wood. The wood being Formula-1 raceboat's - build it / crash it / fix it / crash it with more enthusiasm / build another / repeat! :D

Random thoughts in no particular order . . .

- Love the door handles, but I don't think I could muster the focus on that many. I am not worthy.

- Really surprised you have never gone to a table saw. I assume it is a space issue? In the race shop (man I miss that shop) we built a 9'x9' saw table, with a very precise 6' fence. A sanity saver for precisely making repetitive cuts - much like your cabinet / closet work.

- You know you are going to end up doing knives - go ahead and admit it. So I'll go ahead and get my order in now. Being as I'm in the boat / yacht biz, I'll take mine trimmed in teak. (tell us when deposits are necessary!)

- You have allowed us this glimpse into your life for so long that when I ran across the photo of your daughter painting the arbor press, my first thought was "wow, she's gotten big . . . "

As always, thanks for letting us follow along.
 
OP
S

sakurama

Well-known member
Joined
Oct 10, 2010
Messages
1,458
Location
Portland - the cool one.
Wow, I am absolutely amazed - and humbled. I love your attitude to learning, and passion for getting so involved and doing things right... I will also be starting a garage thread, and will be borrowing from your examples. Hope you are doing well, and just to reiterate, nice job!

Thanks and be sure send a note when you start your thread. I have a tough time keeping up with various threads I already subscribe to and not nearly enough time to keep up with all the cool new ones.

Random thoughts in no particular order . . .

- Love the door handles, but I don't think I could muster the focus on that many. I am not worthy.

- Really surprised you have never gone to a table saw. I assume it is a space issue? In the race shop (man I miss that shop) we built a 9'x9' saw table, with a very precise 6' fence. A sanity saver for precisely making repetitive cuts - much like your cabinet / closet work.

- You know you are going to end up doing knives - go ahead and admit it. So I'll go ahead and get my order in now. Being as I'm in the boat / yacht biz, I'll take mine trimmed in teak. (tell us when deposits are necessary!)

- You have allowed us this glimpse into your life for so long that when I ran across the photo of your daughter painting the arbor press, my first thought was "wow, she's gotten big . . . "

As always, thanks for letting us follow along.

Thanks, I'm losing my focus lately so I hope to re-find it at the end of the month. I was asked to lead a Moto trip to eastern Oregon for some journalists and I can't not do a good job. So I'm scouting, researching, planning and fixing my bike. It's an experiment to see if I can create the magic every good trip has to have. You'll see if I succeeded when the story comes out and I'll link to it.

Anyway, table saws scare me and I have not the space. Despite this I see their worth and wish I had one.

No! No more passions! My dream would be to build bikes and that is something I don't know I could do.

That was funny about my daughter - eventually I'll bequeath her this blog and she can write about finishing this house. Yikes! Yes, it's taking forever.

Gregor
 

Modern Jess

Well-known member
Joined
Jan 2, 2011
Messages
1,362
Location
Bay Area, California
No the wrecking ball was built by Chris Hodgson of San Jose BMW and while he's helped with some of the motor work this is a different bike.

Apropos of nothing in particular, I just thought I'd mention that I saw Chris this morning at SJ BMW, which is in fact my friendly neighborhood BMW dealer and the dealer from which I bought my R12R. They're also a Vespa dealer, so I'm in there pretty regularly.
 
OP
S

sakurama

Well-known member
Joined
Oct 10, 2010
Messages
1,458
Location
Portland - the cool one.
Apropos of nothing in particular, I just thought I'd mention that I saw Chris this morning at SJ BMW, which is in fact my friendly neighborhood BMW dealer and the dealer from which I bought my R12R. They're also a Vespa dealer, so I'm in there pretty regularly.

About 8 years ago I bought a full long rod conversion from Chris and never ended up getting the parts. I tend to forget it until I'm reminded and I think at this point he's certainly forgotten even though I remind him every few years. I'd still love to get them and build a better boxer engine...

But I have too many irons in the fire as it is. It will most likely remain in limbo until some future date allows us to reconcile.

No house work for the past few weeks. I've been preparing my KTM for the trip to lead the Gear Patrol guys through eastern Oregon and scouting the roads and trails of the area. I wish I was getting paid for the time but it's a great opportunity to get back on the bike for which I'm grateful. I've managed to pack in several thousand miles of dirt, mud, snow and twisty pavement and my bike is working very well.

And because posts without photos are boring here's some of the scouting shots I took on my last trip out with Ben.

i-SdzFJMH-X2.jpg


i-p3n3kxj-X2.jpg


i-PThxQD9-X2.jpg


i-jzrBcfh-X2.jpg


i-GDpH88Q-X2.jpg


Now Ben can add "model" to his list of accomplishments.

In a few weeks that will be done and I am hopeful to put some time into the house again. I want very much to take a break on it. I'm tired and want to get to a place that I can feel comfortable stopping for a while. Not quitting of course but resting and then coming back with renewed energy. There's a short list of things that I need to do to allow that and I hope to tackle them in the next month.

Gregor
 

Fast914

Well-known member
Joined
Jul 15, 2010
Messages
188
Location
Dartmouth, Nova Scotia Canada
Hi Gregor, I am sure I have posted re my thanks for all that you do on here and ADV Rider as well but, man your photos are just fantastic! We just finished a whole house Reno last year.... its great but gosh, it really does take a year or more to feel like you are truly back in. I got a new garage with the Reno and of course that is where my current projects (KTM 200 and my 74 914) are sleeping.

Again, much thanks, I just have to look at the work you do in the run of a day...and that is all it takes to get me back at the 914 in particular. If you ever get back to Nova Scotia again, our house is your house. Grant
 

Modern Jess

Well-known member
Joined
Jan 2, 2011
Messages
1,362
Location
Bay Area, California
that camp pic is epic. can you say the settings you were using when you took it? or is that some photoshop trickery? :D

I can't speak for Gregor, but I can take a wild *** guess about the technique: looks like a long exposure, with the guy in front of the fire holding relatively still, and the motorbike on the right "painted" with a flash or even a flashlight during the exposure.
 

bdking

Well-known member
Joined
May 16, 2013
Messages
94
Location
PDX
30 second exposure, I stood by the fire & Gregor walked around with a flashlight painting the tents, trees, and my bike. His tripod rattled apart on the trail, so the camera was resting on his bike.
 
OP
S

sakurama

Well-known member
Joined
Oct 10, 2010
Messages
1,458
Location
Portland - the cool one.
I can't speak for Gregor, but I can take a wild *** guess about the technique: looks like a long exposure, with the guy in front of the fire holding relatively still, and the motorbike on the right "painted" with a flash or even a flashlight during the exposure.

Yup, that's basically it.

My Gitzo tripod head vibrated apart and off and became trail booty somewhere long the way so without a tripod I rested the camera in my tank bag and just did a 30 second exposure. I'm using a Canon 1Ds Mkiii which doesn't have the same low light ability of the 5D's or the newer 1Dx so I was limited to 3200 ISO and that's about the limit for the 2.8 lens I was using. The shots you see with crazy bright stars in the sky are done with the newer camera's a faster lenses as 30 second exposures are enough to start to see the stars "tracking" or moving and leaving streaks as opposed to being dots.

After setting the camera off I used my headlight (Surefire Minimus - great for it's ability to go from 1-100 lumens) and walked around and "painted" the trees, tents and the bike. I didn't put much time into the shot since I didn't have a tripod but that's basically it. The only trick to light painting like that is to keep moving and use your body to block the light - basically hold it in front of you with your back to the camera. In a 30 second exposure you won't show up.

Gregor
 

smschriefer

Well-known member
Joined
May 28, 2009
Messages
842
Location
Yorktown, VA
I think you do show up as a ghost at the 10-11 o'clock position relative to the fire and maybe at 3 o'clock relative to the yellow tent. Then again, those could just be shadows. If it wasn't for the information you gave, it wouldn't be visible. Is the tripod in the lower left the one that broke?
 

DarkMonohue

Well-known member
Joined
Sep 21, 2009
Messages
261
Location
Pacific Northwet (OR)
Holy cats!

Gregor, I'm glad there are people like you who have the desire, passion, and ability to jump in with both feet and commit to just about everything you do - it's great entertainment for those of us who don't fit that mold to sit back and watch it all happen, waffling between feeling the warm wind of inspiration and the damp, discouraging chill of inadequacy. And blue-collar budget constraints. And lack of time in the day. And a thousand other reasons we ain't accomplishing a tenth of a tenth of what you're getting done.

Maybe too late, but welcome to the PNW. It's alright out here.
 

OJ Bartley

Well-known member
Joined
May 18, 2009
Messages
605
Location
Toronto, ON
Really nice shots, Gregor. Looks like the roads and scenery around your new home are... "acceptable" to put it mildly. My brother (pro wildlife photographer) was just down in Portland from Victoria on a little weekend trip and he raved about it. He wasn't shooting, just relaxing, but he loved it, and the city has been pushed farther up on our "to visit" list.

There's something about those outdoor night shots... stars bright in the sky, tents glowing warm and inviting, crackling fire... they always make me want to get out into the wilderness for a little while.
 

Fastowl

Member
Joined
Jul 20, 2014
Messages
13
Yes, but my first tests with the router were disappointing. I'll let you know when I get there.


Thanks!


Thanks. I feel like I've lost some of my momentum lately so I'm working to get that back. It's so easy to get sloppy when you just want it done.


Yes, I'm learning that. It's both good and bad however. Keeping the hifi at the low ceiling part of the living room and aiming it into the house has proven to be fantastic acoustically. There's no echo and the sound carries very well without being loud so there's the upside to it as well.

________________________ | | | _______________________


As I mentioned I lost a bit of momentum this week. After I got the first drawer built I wanted to put the others together but the shop was a disaster and there was just no room to build the other six drawers. The bandsaw might provide the solution for mitering the edge banding so I wanted to get that fixed and find a home for it and generally just start putting things away and cleaning. Cleaning is a good way to refocus and also to find your missing tools.

So I thought I'd take an hour or so and get the band saw running. When I bought it it was running but the owner kept the one pulley and belt so I needed to remedy that. Besides the planetary gearbox was going to necessitate remounting the motor. I almost took the time to do it right but I was able to control myself and left the motor on it's plywood base and just moved it over to align with the pulley and then mounted the linked belt because, again, I just wanted to get it running.

i-hw3SHtq-XL.jpg


She'd (yes, it was a women woodworker - there's a ton here in Portland which is very cool) put a fence on but it was a sloppy contraption so I went to Rockler to buy some track that I could mount flush to the table.

i-g4J2BkQ-XL.jpg


Then I went through my stock collection and found a giant piece of aluminum angle that I had always thought would come in handy for something and cut a piece off on the cold saw.

i-BD82SX9-XL.jpg


And with some T-bolts and quick release clamps I made a quick and easy fence for the bandsaw and then replaced the friction blocks and rehung the door. Then I just tidied the thing up and replaced the cheap hardware where I found it.

i-rFbZSPw-XL.jpg


At this point I swept out the wood side of the shop and came across the RapidAir system and decided that since the week was basically a wash on the drawers I might as well put my time into getting the shop in order. Besides, how long could installing the air take?

All day.

i-BqRTjvR-XL.jpg


These are the parts of the "drops" of the RapidAir MaxLine system. I think the difference with the Maxline is that the fittings are metal. The basic system is plastic fittings. For some reason the instructions specify to assemble the threaded portions without teflon tape but to use pipe dope. I'd never done that but decided to try it.

i-nLfMp3R-XL.jpg


I countersunk the mounting holes so I could use some star drive wood screws to hold them to the walls.

i-dS8cKWs-XL.jpg


This tool bevels the plastic tube. If you've never seen this stuff it's sort of like a very thin aluminum tube covered in thin Pex. I'd heard that it was very difficult to work with as far as getting it straight but that turned out to be nothing. The aluminum holds a bend and it's quite easy to straighten the tube as it comes off the roll. If you've ever used Pex tube this is about a dozen times easier.

i-pjvHQPF-XL.jpg


Most of what took time was getting the other fittings and having to run around to 3 or 4 places to get them. I also went to Harbor Fright with the intention of buying a shop press but I just couldn't do it. It was super cheap but then it was also super cheap. There's just something about a lot of (everything?) there that doesn't seem worth the time to remake in order to make it useable. I'll make a press down the road and do a nicer job but for now I just couldn't accept the sloppy build of it. Anyone have experience with hydraulics? I'm hoping to build a 20T press but with a hand pump instead of the ubiquitous bottle jack.

Oh, so how did the air system work? Horrible! Turns out that the pipe sealant I got (perhaps the wrong kind since I took the suggestion of someone at Home Despot) did not work at all. Nope. When I opened the valve it was like the sound of all the bicycle tires in Portland going flat at once (that's a LOT). Total fail. My friend Clipper happened to call about then to say that he wanted to be part of our upcoming degenerate Colorado to Portland motorcycle tour I'm planning and mentioned that he'd never had any luck sealing air systems without using teflon tape. Yeah - me too.

So last night after the kids went to sleep I solemnly pulled every block, cleaned them and reinstalled the fittings with teflon tape just like I would have done if I'd not read the stupid instructions. Stupid instructions. :mad:

While I haven't powered it up my fittings on the tank with tape have held fine so I'm guessing (hoping) that it will be okay now. Fingers crossed.

So for the rest of today and tomorrow I'm going to try to get the shop cleaned and put away. It's a mess that's been bugging me and it's time to stop treating it like a garage where things are dumped and like my shop. Wish me luck!

Gregor

Gregor, I know this about a year old post but I wanted to comment on the Maxair system leaks. I put in the Maxline RapidAir system a couple of months ago. No leaks whatsoever. However I believe my instructions said to use both Teflon tape plus pipe sealant. I used a Teflon based sealant that I use for hydraulic lines. Not any issues. If I remember part of the reason for both was to provide a barrier between disimimaler metals ( I could be just making that up).
 
To avoid these ads, REGISTER NOW!
Top Bottom