To avoid these ads, REGISTER NOW!

Between 485 & 705 SQ/FT Mid-Century Moto Mecca Makeover

Workspaces between 485 and 705 squarefeet.
OP
S

sakurama

Well-known member
Joined
Oct 10, 2010
Messages
1,458
Location
Portland - the cool one.
Okay, the so the goal was to finish today and we sort of did. We got it done save for the lights which showed up later when we weren't really sharp enough to deal with that. Besides, I started putting up trim that had been painted.

i-tPJ7w7W-X2.jpg


The boards at the start or ends of the closets are hard because they have to be notched out. Nervous to over cut with the track saw I started marking the ends with tape - it also helps with tear out.

i-vv787Zf-X2.jpg


The lasers let me know the saw kerf and for the last cut it was the end of the door so both parts had to be saved.

i-sFZpVWM-X2.jpg


I was cutting the final notch on the board that I'd already notched for the cabinet when...

i-MX4gMH8-X2.jpg


I managed to accidentally drop the blade in early. I was tired and not paying attention. I started to layout a new board when I realized that not only did I screw up the cut but the off cut was already glued at the end of the last door meaning that this board was matched in already.

Screwed.

I'm a good retoucher so I figured I needed to make like photoshop and clone some matching wood in there. I found the off cut from the upper part and sliced a very thin strip off.

i-sc282zS-X2.jpg


I used a small plane to shave it thin enough to fit.

i-VFRQQbW-X2.jpg


Cut it at a diagonal with some snips and then planed the wedge down smooth.

i-S4wV6kZ-X2.jpg


And then glued it in. Luckily it's up high so not really in an obvious place.

i-4F3tvPL-X2.jpg


The last two boards go in together and one needs to be sliced to fit. I pick two boards that match pretty well to be the sliced pair so they'd look good. The cut fix is just above my hand there on top of the black trimmed corner.

i-M5hDrx8-X2.jpg


I just need to touch up that little bit of light colored wood.

i-TV6QkWP-X2.jpg


And they get nailed in. And cabinet is done. Almost. Needs trim.

i-prCbSNP-X2.jpg


Which Lara is painting. We're slowly emptying the room of all the tools one load at a time while waiting for trim to dry or touching up the edges of any bare wood.

i-GPnHZkC-X2.jpg


We don't have any handles, catches for the doors or the lights in but no matter - we start to load up the shelves. It's such a relief to finally have a place to put the KitchenAid, the coffee roaster, the rice cooker (here's a little tip to all my non asian friends - buy a rice cooker! Every asian has one and being married to one it was the first gift I got - best thing ever.) The doors don't quite lay perfectly flat but they're not far off. I think putting catches on top and bottom should do the trick.

Tomorrow is the final clean up and the installing of the small LED's. I'm a bit nervous to screw something up but I don't think it will be too hard. Famous last words.

Gregor
 
Last edited:
To avoid these ads, REGISTER NOW!

BoilermakerFan

Well-known member
Joined
Apr 17, 2006
Messages
2,188
Location
Indianapolis, Indiana
<snip>

i-prCbSNP-X2.jpg


<snip>

We don't have any handles, catches for the doors or the lights in but no matter - we start to load up the shelves. It's such a relief to finally have a place to put the KitchenAid, the coffee roaster, the rice cooker (here's a little tip to all my non asian friends - buy a rice cooker! Every asian has one and being married to one it was the first gift I got - best thing ever.)

<snip>

Gregor

It looks great Gregor. With a little finish touch up you won't see the patch...

Is that a vintage Vornado floor fan in the back ground?

An InstaPot does a great job on rice too, but it has a little more flexibility; of course, we use ours to almost exclusively cook rice and hard "boil" eggs... I did notice that it took a couple of batches to dial in the water/rice ratios on the pressure pot for each type of rice. Basmati, Jasmine, and sushi rice all took a little different ratio that was different from traditional stove top ratios.
 

custombuild

Member
Joined
Jun 30, 2017
Messages
19
I'm strictly using the Domino guide pins to set the locations but on the center I set a fence up and clamped it down to act as the stop for the fence.

i-SBDMNBp-X2.jpg


The moment of truth was to assemble the cabinet frames and remarkably they were all correct but a super tight fit.

i-Xh69WhP-X2.jpg


I'm not using any glue here. The domino's make for a very strong construction so I'm only using three screws a side to hold them together. They can't go anywhere so I think they'll be fine.


i-SG6XwKd-X2.jpg


In addition to this I haven't figured out how I'm going to do the lights yet. I need to solve that tonight and run wire now before it's too late.

i-9JVwXBp-X2.jpg


Gregor

Gregor,

As usual fantastic work. Not only do I enjoy watching your progress, I appreciate the amount of time it takes to document and track it - so thanks for sharing.

How wide are those cabinets? I notice there is a fixed vertical partition in the middle, but each floating shelf must be ~36 inches wide or so?

Do you worry about deflection on the shelves with 18 mm ply?

Also, that middle partition supports shelves on both the left and the right side, right? How deep did you drill the 5 mm shelf supports (any worry about thru-holes for the shelf pin holes?)

I ask because I'm making a similar cabinet box now for a pantry. It's ~36 inches wide and debating on a vertical middle partition and fixed horizontal partition to give it more strength, or just to make "stronger" floating full width shelves and only 1 fixed horizontal partition.

Thanks again for sharing your work!
Chris
 
Last edited:

donnie

Well-known member
Joined
Jan 24, 2007
Messages
953
Location
North Carliona
That is a lot of wood, it looks great.
It is Good that you have your younger sister helping you. She seems very handy.

How much more do you have to do to finish the house?
 

TMaulick88

Member
Joined
Dec 12, 2015
Messages
6
6 lunch breaks and 121 pages later I finally made it to the present day. Gregor you are a legend, your craftsmanship is absolutely top notch and the care and precision you put into everything you work on is lacking in today's world. I'm definitely hanging around to see where all of this goes! Cheers :drink:
 
OP
S

sakurama

Well-known member
Joined
Oct 10, 2010
Messages
1,458
Location
Portland - the cool one.
Gregor,

As usual fantastic work. Not only do I enjoy watching your progress, I appreciate the amount of time it takes to document and track it - so thanks for sharing.

How wide are those cabinets? I notice there is a fixed vertical partition in the middle, but each floating shelf must be ~36 inches wide or so?

Do you worry about deflection on the shelves with 18 mm ply?

Thanks again for sharing your work!
Chris

I didn’t use this but here’s a handy link for you: http://www.woodbin.com/calcs/sagulator/

Each cabinet is 1500mm wide or about 5 feet across. The center panel is drilled through so the pins just bump into each other. At just about 28” per shelf I’m not worried really but that’s why I did the center and divided the cabinet. I’m using a pretty good shop grade prefinished plywood and haven’t had any issues yet in the garage cabinets despite the stupid amount of weight they hold.

Hope that helps.

Gregor
 
OP
S

sakurama

Well-known member
Joined
Oct 10, 2010
Messages
1,458
Location
Portland - the cool one.
That is a lot of wood, it looks great.
How much more do you have to do to finish the house?

You're joking right? :eyecrazy: Oh, man, so much. The stairs need to go, the floors upstairs need to be replaced, we need a new roof. It makes my head hurt. But hey, the living room is done.

6 lunch breaks and 121 pages later I finally made it to the present day. Gregor you are a legend, your craftsmanship is absolutely top notch and the care and precision you put into everything you work on is lacking in today's world. I'm definitely hanging around to see where all of this goes! Cheers :drink:

Ha! Thanks so much. I like doing a good job but I also tend to underestimate projects.

_______________________________________________​


We've seen the light!

I considered doing LED strips but decided that puck lights, and the small pools that they create, were the better solution. I got them from SuperbrightLED and I have no affiliation but they seem to have what I need usually.

i-WpxvvhS-X2.jpg

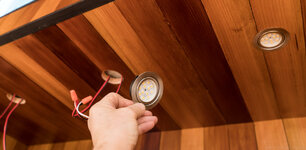
We hot wired one of the lights and also put small circles of tape up to judge placement. You'd think you should just center them up but straight top light is not very flattering so we tried 7" from the front since the depth is 21" but that felt too far forward. We pushed it back to 8" because it felt right. We also pulled the side lights in a bit towards the middle - only an 1-1/2" from the middle but again, it felt right.

i-WMHtF9f-X2.jpg

I was a bit nervous to drill the holes but after triple checking my measurements and taping the spot to reduce tearout I just went for it.

i-HXtmnc9-X2.jpg

Since Lara has worked as a marine biologist and with the non-profit fishing organization Fish Florida she was obviously tasked with the job of fishing the wires out of the holes. She proved her worth.

i-zV45GdF-X2.jpg

The nice part of wiring up LED's is that they're low voltage and you don't have to take any special precautions like you would with 120v household current. Still, we use the right size wire nuts.

i-KWM5Ldg-X2.jpg

There's no "i" in team work. No "z" or "q" for that matter. Just sayin.

i-rr9XrMq-X2.jpg

I used a transformer that plays nice with triac dimmers which are probably the ones you have in your house. Triac dimmers are for normal lights. LED's have a hard time dimming so they tend to flicker. A power supply that's designed for a Triac dimmer let's the light go low without the flicker.

i-wWRb4fZ-X2.jpg

Plug it in and test it out before we stuff them all up there and... it works! Yup, still amazed when electricity works first time. It's like I'm a hundred years old or something.

i-BVGj6TC-X2.jpg

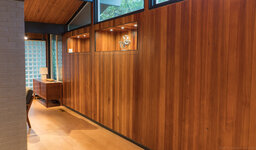
Then, for the full effect, we kill the other lights and admire our handiwork. It's pretty cool and feels like a neat period detail. I'll have to start shipping back my nicest fans to put on display now.

i-shN8W59-X2.jpg

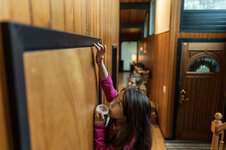
But before we break it all down we finish trimming out some left over doors and make some adjustments. I got my little helper to fill in the nail holes and she did a great job - very detail oriented and thorough. Not sure where she gets that. :headscrat

i-vr74GLM-X2.jpg

Then we cleaned up and put the Kapex away.

Done. I'm DONE *******!

I mean not done with the house but with this project. Tons more to do. Lara has committed to building the bookcases for the back room. That should be really easy after all this. But right now I'm going to drink a gallon of eggnog. Or tequila.

Gregor
 

Zippercat

Well-known member
Joined
Jul 13, 2013
Messages
828
Location
TN
Also, that middle partition supports shelves on both the left and the right side, right? How deep did you drill the 5 mm shelf supports (any worry about thru-holes for the shelf pin holes?)

Chris, I drilled 5mm shelf pin holes in a similar cabinet a couple weeks ago. I just drilled the holes on one side of the middle support a 1/2 inch deeper in the cabinet than the other side. I had a face frame that helped hide the holes. It’s unnoticeable to anyone.
 

Fast914

Well-known member
Joined
Jul 15, 2010
Messages
188
Location
Dartmouth, Nova Scotia Canada
Gregor, Beautiful Work....WOW!!! I can't let my wife see any of this as it would cost me a fortune....LOL.....I look for your thread everyday....we never know what you are going to be up to.

Hope you and your family have a wonderful Christmas,

Grant
 

GDPossehl

Well-known member
Joined
Sep 23, 2014
Messages
450
Location
Atlanta, GA
Gregor,
As many have noted here, we appreciate all the effort you make to share your projects and life events with us. Your content is really enjoyable and I've been a "follower" for a few years now. Have you considered starting a blog? I would imagine with your personal touches it could be a lucrative move and you'd practically be assembling a host of past work to get it off the ground immediately. Your updates to this thread are essentially blog posts in themselves. You could literally copy and paste what you're already doing here. Just a thought. :)

http://www.budgetinginthefunstuff.com/how-to-start-a-blog-on-bluehost/
 

Binrat

Well-known member
Joined
Nov 30, 2011
Messages
186
Location
Hurst, TX
Great Job, great sister too. Hard to find good help these days, is she working for room and board?

mike
 
To avoid these ads, REGISTER NOW!

leongsoon

New member
Joined
Jul 20, 2017
Messages
1
Location
Malaysia
Hi Gregor, hi all!

I'm another one of those guys who discovered you thru BuildThreads, then went to the house thread, to the KTM thread, to the Ducati thread, to the Maltese road trip thread, to the... gawd how many threads were there anyway? Then I finally went to the van build and back to this thread. Man I don't know how many times I have to bow to express my awe haha. Your work, detailing and documenting is way beyond awesome.

"Done. I'm DONE *******!"

Couldn't help laughing when I read this.
 

custombuild

Member
Joined
Jun 30, 2017
Messages
19
Chris, I drilled 5mm shelf pin holes in a similar cabinet a couple weeks ago. I just drilled the holes on one side of the middle support a 1/2 inch deeper in the cabinet than the other side. I had a face frame that helped hide the holes. It’s unnoticeable to anyone.

I didn’t use this but here’s a handy link for you: http://www.woodbin.com/calcs/sagulator/

Each cabinet is 1500mm wide or about 5 feet across. The center panel is drilled through so the pins just bump into each other. At just about 28” per shelf I’m not worried really but that’s why I did the center and divided the cabinet. I’m using a pretty good shop grade prefinished plywood and haven’t had any issues yet in the garage cabinets despite the stupid amount of weight they hold.

Hope that helps.

Gregor

Zippercat.. good call, thanks!

Gregor, thanks for the reply. Cabs look great! Mine are 882 mm wide, so I'm throwing in a center panel... but have been using b grade columbia purebond plywood from the homeless despot.


House looks great. Going back in the thread you can really see how far it's come. 95% done, 95% to go! :)
 

OJ Bartley

Well-known member
Joined
May 18, 2009
Messages
605
Location
Toronto, ON
That final pic is incredibly satisfying... and I'm in the cheap seats just watching. Well done!:beer:

I was just thinking the same. It's easy to get drawn in to Gregor's projects, the photography really makes it feel like being there. Beautiful work, and congrats on another item off the list. I'm inspired to get back to planning some basement build work!
 

Bob Heine

ALLIANCE MEMBER
Joined
Oct 24, 2009
Messages
10,708
Location
Boca Raton, Florida
Gregor, thank you for all the presents you deliver throughout the year. I hope you and your entire family have a wonderful Christmas and a great New Year.
 

fergus

Well-known member
Joined
Oct 4, 2009
Messages
1,620
Location
Yolo County CA
Really nice work as usual Gregor. Btw, whatever happened to the Ducati project? I mean, its not like you've had any other projects between now and then... ;).
 

cortina64

Well-known member
Joined
Dec 31, 2013
Messages
111
Location
Brisbane, Australia
Gregor your attention to detail is amazing, your thread is the first one I search for each day for any new updates.
Have a great relaxing Christmas!
Warren
 

dchance

Well-known member
Joined
Oct 3, 2016
Messages
614
Location
OKC
Great work on the cabinets.

Now you can enjoy the holidays with family. Have a Merry Christmas.

Dwight
 

Zippercat

Well-known member
Joined
Jul 13, 2013
Messages
828
Location
TN
Those FastCap magnetic catches are incredible! We have a roll out cabinet in our bar that holds large (handle size) bottles. Cabinet door is attached to the rollout and it wanted to roll a few inches open all the time.

Being too busy/lazy to unload everything and start down the rabbit hole of adjusting drawer tracks, I ordered a couple of those Fastcap magnetic latches. I ordered two thinking this rollout holds a lot of weight so one wouldn’t have enough holding power. Wrong! Took about 3 minutes to install-because I actually read the instructions, for a change, and then immediately put my tools away.

With one magnetic latch installed it now stays shut and is easy to pull open. My wife at least pretended that I was a genius on this occasion. (I think she realized that if I had unloaded all the bottles they would have been left out on the bar counter for days unless she put them away.)
 
Last edited:

H1Pete

Active member
Joined
Dec 19, 2014
Messages
26
Gregor - this thread is epic. Beyond epic. Been following for a while but decided to post now because I just bought my first Festool saw. Thanks....I think.
 

neilc

Well-known member
Joined
Jan 17, 2014
Messages
94
Location
Chicagoland
Gregor, those are fantastic built-ins. Truly captures the design and delivers on the functionality of hidden storage. Love the LED lights. The craftsmanship as usual, is spectacular!

Happy holidays!

neil
 

RibsBrisket4me

Active member
Joined
Jan 10, 2014
Messages
35
Location
BBQ Country
This thread is incredible. The depth and breath of information is staggering as is the volume and quality of the work. The topper is the amazing photographic documentation.
Wow...just wow...
 

GRS DESIGN

Well-known member
Joined
Aug 9, 2013
Messages
46
Hey Gregor .....I know you are busy but have you made any progress on the Rickman?
Cheers
Glenn
 

sean Buick 76

Well-known member
Joined
May 7, 2013
Messages
3,221
Location
Edmonton Alberta
Greggor, I do not post on here often but WOW you and your family are doing fantastic job and it is really well documented and photographed... All the best to you guys in 2018!
 
OP
S

sakurama

Well-known member
Joined
Oct 10, 2010
Messages
1,458
Location
Portland - the cool one.
While it may come as no surprise that I'm a person who likes resolutions as they're a challenge to improve myself. I also feel that it's extremely important to look back on your accomplishments and give yourself credit for things you managed to do.

This year I stumbled on a TV show that I found extremely profound and I've become a bit of an evangelist for: Alone. If you've seen it you probably enjoy it but if you haven't I'll give you the 30 second synopsis. 10 people are dropped in the woods of Vancouver Island with 10 items of their choosing and case of video cameras. They film themselves without a crew and try to stay as long as possible. It's a very simple premise and the sort of reality show fodder you might expect but there's no fictitious drama inserted by the producers. It's very simple and that's the beauty. After watching a couple of seasons what struck me wasn't the skills or the determination of the winners, although they can be impressive, but their attitude. Without fail the people that did the best had a sense of humor and did not dwell on their mistakes but took pride in small successes. As the weeks turn to months they simply break down and you see how attitude becomes the single most important attribute to survival.

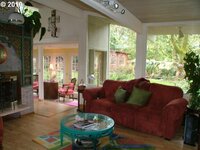
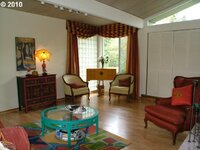
So, with that in mind, I was looking through the thousands of images I've compiled for this thread and found the original images I'd come across in a real estate ad for the house before we'd bought it. Not my images but the house best presented by the previous owners years before we saw it. I was dumbfounded by the contrast. More than my images of process I was struck by the transformation that I have made to this house. It's not done and I've made mistakes and I'm often frustrated with the process but nonetheless I can look at these images and see something profound.

So let's take a look at where we've come so far in this epic journey.

From the kitchen looking towards the living room:

i-6q6mnDv.jpg

i-PKsKL8H-X2.jpg

And from the other side looking out to the yard:

i-L239SFs.jpg

i-gP2nWzP-X2.jpg

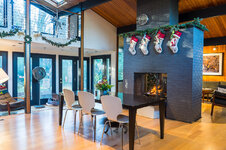
In the living room looking out:

i-H5qnsbS.jpg

i-Js3bVLQ-X2.jpg

And maybe my favorite - looking back to the corner I just finished:

i-st9Z4nr.jpg

i-qZs9nqq-X2.jpg

Someday I'll try to shoot these photos when it's not Christmas but when I found them I loved the contrast. The previous owners tried so hard to fight what the house was and it looks so horrible. I take a huge amount of satisfaction from these images. It's been an epic struggle and one that has caused no shortage of domestic stress but slowly we are rounding a corner. More is done than needs doing - on the inside. There's still the stairs which will be an epic project but for now I'm going to take some satisfaction in what has been done. When I saw this house I imagined it like this. Dozens of people walked through it before us as judged by the number of real estate broker cards that were left on the kitchen counter and no one made an offer.

I wouldn't do it again. No way. But then if you knew the struggle in front of you every time would you dive in? Probably not. It takes a certain amount of stubborn optimistic delusion to believe you can do something beyond your ability. And it's important to see what you've done along the way and say, "Nice job" and give yourself a pat on the back. Without that you'd quit.

Thanks for following along for the past five years. The comments and support here have been instrumental in helping to move this project forward. I've threatened to have a party here when the house was done and clearly the house will never be done but the party must happen. This summer I'm going to do a big scouting trip for an upcoming Rev'It! shoot and my best friend Gino will be coming out for the first time. I can't think of a better time for a party, so once we figure out that date I'll plan a day to open the house and invite all those who've followed along to come out.

Again, thanks for following along.

Gregor
 

SW50th

Active member
Joined
Oct 30, 2007
Messages
30
Location
Portland, OR
Stunning transformation Gregor, and what a tremendous journey! Thanks for taking us along.
Wishing you and family a very Happy New Year-
 

kwyjibo

Well-known member
Joined
Apr 8, 2008
Messages
743
As a fellow mid-century house owner, I know the horror of seeing some of the "updates" that these houses have often picked up over the years. At the same time, like vintage cars, some modernization can significantly add to their comfort and practicality. I think you've done an excellent job of balancing the (re-)preservation of the mid-century look while making it more livable. Keep of the great work.
Happy New Year to you and your family!
 
To avoid these ads, REGISTER NOW!
Top Bottom